Wheel Bearing DIY
 06-22-2007, 01:11 AM
#1
COTM Coordinator
Thread Starter
Wheel Bearing DIY
Well, since I was asked to do a DIY on this, Ive decided to help those who need it and make an official DIY. So here it is.
I was going to take a pic of all the tools and all of the points that need to be taken apart, but since my camera is broken, i will use diagrams from a parts website.
These will be refered to as image 1 and image 2.
Image 1:
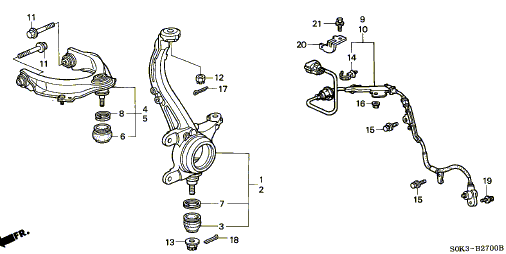
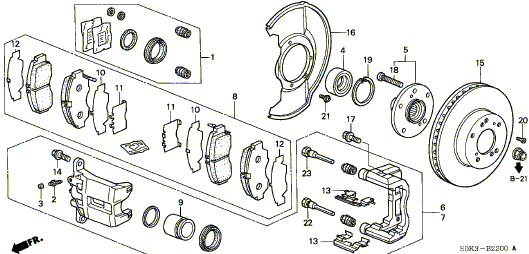
Image 2:
So lets start with a list of tools:
17mm wrench
17mm Socket and Ratchet
10mm Socket and Ratchet
Pneumatic Impact Gun
36mm Axle Nut Socket (Autozone)
24mm socket or equivelant
Impact Screwdriver Tool (check rotor change DIY for pic)
Needle Nose Pliers (for cotterpins)
Tie Rod end Puller/seperator
12 ton or higher Hydraulic press (Harbor Freight $120)
possiblya dremel tool with cutting wheel or equivelant
There, now that we have that out of the way we can get started.
1. Obviously your going to have to jack up the car, but before you do that loosen the lug nuts, otherwise you will lower it again and feel like a tool, because you know better then to try to loosen the lugs with the tire off the ground,
2. Remove Wheel
3. Remove Caliper from knuckle ( knuckle is image 1 number 1, yes I know I called it a spindle in the last quick DIY, forgive me please for I was wrong) you will remove the caliper by removing bolts 17 in image 2. You may have to give it a little tug, but it will slide off the disc.
4. Next you must remove the rotor from the knuckle. You will do this by removing screw 20 in image 2 from the hub. This will alow you to seperate the disc from the hub. If you cant pull it off, try hitting the backside with a deadblow hammer, or rubber mallet, where the caliper was because there is no dust shield there.
5. Once the rotor is removed, your going to have to remove the axle nut which is number 21 in image 2. You will definitely need the impact gun for this. I tried using a freaking breaker bar that was longer then I am tall, and it didn't work.
6. Now you have to remove the cotter pin (#17 image 1) from the upper control arm, the cotter pin (#18 image1) for the lower control arm, and for some reason it isnt pictured, but youll have to remove the cotterpin for the tie rod end. You should mark the tie rod end where the threads are, in case it decides to rotate which would mess up your alignment.
Image 1:
Image 2:
7. Now remove the Nuts from the same locations you removed the cotter pins from, using a 17mm socket or wrench.
8. Before you remove the knuckle from the control arms and tie rod end, now would be a good time to disconnect the ABS sensor line (#9 image 1) You will do this by removing bolts (#15 and 19 image 1) from the knuckle using the 10mm socket and ratchet. When removing the sensor from the knuckle be careful not to break or damage it, it may cause problems with your ABS, just pull it straight out and set the wire and sensor on top of the upper control arm.
9. now you will remove the upper control arm, lower control arm, and tie rod end from the knuckle using the tie rod end puller/seperator. This will be easily accomplished for the tie rod end, and for the upper control arm, but for some reason the lower control arm like to get stuck. If this occurs, beat the shit out of the lower control arm where it attatches to the knuckle with a hammer. This will help loosen it and with the aid of the tie rod end puller/seperator it will come out.
10. Now that this is done, you can pull the knuckle out, by lifting the ball joint out of the lower control arm then pull towards you to remove it from the axle. Hard part complete.
11. So you have the knuckle and the hub and are probably wondering where the hell this bearing is that is giving your car an unluxurious ride..... well your almost there. The next step is to press the hub out of the bearing. Now you have two choices:
1. you can choose to take this part to your local machine shop or automotive shop that has a press (call around cause not all of them do) and askt hem to do it, which they will but of course they will make their money off of you or..
2. You can choose to continue doing it yourself, which means that you have a press or just went and bought one, because you wanna learn.
If you chose step one then once you recieve your knuckle back with a beautiful new bearing pressed in for you, then reverse the first 10 steps and your car will be back to normal, take it for a drive and fall in love again, and ask for forgiveness for talking so much shit about your car.
If you choose step 2 then please continue reading....
Image 1:
Image 2:
12. The bearing is #4 in image 2 and the hub is #5 in image 2. The bearing and hub need to come out, but unfortunatley you can only do one at a time. So the hub needs to come out first.
13. Take your knuckle and put it hub side down on the press, make sure that the hub and studs are not touching the press, but that the knuckle is being supported and the hub had room to come out. take your a 24mm socket or equivelant and place it on the back side of the hub, the side facing up, and begin to press out the hub. It may take a little force then all of a sudden pop or it may come out smooth, I had both. Now you also might have the inner race of the bearing stuck on the hub..... this is ok, but will require the use of a dremel with cutting wheel. To remove that race, you need to cut one or 2 solid cuts into the race as far as you can without cutting the hub. Then take a chisel and hammer and crack that son of a bitch open. There will be a hairline fracture, but that is enough for you to pry the race off.
14. Ok that part sucked, now you remove the reatining ring(#19 in image 2) from the knuckle so you can press out the bearing. At this point you can choose to remove that dust shield like I did, because all it does is help trap in heat for your breaks and that is the last thing that we want. It will also make it easier to press out the bearing.
15. now you will press out the bearing by placing ther knuckle face down, and this time using your 36mm axle nut ontop of the bearing and press down on that with the press, once again you may get a loud pop after applying what you may think way too much pressure, or it may come out smoothly, and like the hub, I had both.
16. Thats pretty much it, make sure you note which way the bearing was in there, there are two different sides to the bearing. there is a side with a rubber seal, and a side that is all metal. The all metal side goes outboard. Press the new bearing in, install the retaining ring, press the hub back into place then follow all the steps in reverse to get your car back to normal.
Now this just saved you a couple hundred bucks, yeah it gave you a little headache, maybe you lost some sleep, had a couple of arguements witht he wife/girlfriend/boyfriend/mom/dad or whomever, but dont you feel that much better about yourself, that you were able to accomplish something that didnt think you could do. i know thats how I felt. Oh and the first side is going to be the hardest. Its going to be your learning one, but once you start the second one it will feel like you have been doing it for years. I put mine all back together in less then 10 minutes.
I hope this DIY will help and inspire some of you to do it yourself, and save the money that some company would have loved to get their hands on.
I was going to take a pic of all the tools and all of the points that need to be taken apart, but since my camera is broken, i will use diagrams from a parts website.
These will be refered to as image 1 and image 2.
Image 1:
Image 2:
So lets start with a list of tools:
17mm wrench
17mm Socket and Ratchet
10mm Socket and Ratchet
Pneumatic Impact Gun
36mm Axle Nut Socket (Autozone)
24mm socket or equivelant
Impact Screwdriver Tool (check rotor change DIY for pic)
Needle Nose Pliers (for cotterpins)
Tie Rod end Puller/seperator
12 ton or higher Hydraulic press (Harbor Freight $120)
possiblya dremel tool with cutting wheel or equivelant
There, now that we have that out of the way we can get started.
1. Obviously your going to have to jack up the car, but before you do that loosen the lug nuts, otherwise you will lower it again and feel like a tool, because you know better then to try to loosen the lugs with the tire off the ground,
2. Remove Wheel
3. Remove Caliper from knuckle ( knuckle is image 1 number 1, yes I know I called it a spindle in the last quick DIY, forgive me please for I was wrong) you will remove the caliper by removing bolts 17 in image 2. You may have to give it a little tug, but it will slide off the disc.
4. Next you must remove the rotor from the knuckle. You will do this by removing screw 20 in image 2 from the hub. This will alow you to seperate the disc from the hub. If you cant pull it off, try hitting the backside with a deadblow hammer, or rubber mallet, where the caliper was because there is no dust shield there.
5. Once the rotor is removed, your going to have to remove the axle nut which is number 21 in image 2. You will definitely need the impact gun for this. I tried using a freaking breaker bar that was longer then I am tall, and it didn't work.
6. Now you have to remove the cotter pin (#17 image 1) from the upper control arm, the cotter pin (#18 image1) for the lower control arm, and for some reason it isnt pictured, but youll have to remove the cotterpin for the tie rod end. You should mark the tie rod end where the threads are, in case it decides to rotate which would mess up your alignment.
Image 1:
Image 2:
7. Now remove the Nuts from the same locations you removed the cotter pins from, using a 17mm socket or wrench.
8. Before you remove the knuckle from the control arms and tie rod end, now would be a good time to disconnect the ABS sensor line (#9 image 1) You will do this by removing bolts (#15 and 19 image 1) from the knuckle using the 10mm socket and ratchet. When removing the sensor from the knuckle be careful not to break or damage it, it may cause problems with your ABS, just pull it straight out and set the wire and sensor on top of the upper control arm.
9. now you will remove the upper control arm, lower control arm, and tie rod end from the knuckle using the tie rod end puller/seperator. This will be easily accomplished for the tie rod end, and for the upper control arm, but for some reason the lower control arm like to get stuck. If this occurs, beat the shit out of the lower control arm where it attatches to the knuckle with a hammer. This will help loosen it and with the aid of the tie rod end puller/seperator it will come out.
10. Now that this is done, you can pull the knuckle out, by lifting the ball joint out of the lower control arm then pull towards you to remove it from the axle. Hard part complete.
11. So you have the knuckle and the hub and are probably wondering where the hell this bearing is that is giving your car an unluxurious ride..... well your almost there. The next step is to press the hub out of the bearing. Now you have two choices:
1. you can choose to take this part to your local machine shop or automotive shop that has a press (call around cause not all of them do) and askt hem to do it, which they will but of course they will make their money off of you or..
2. You can choose to continue doing it yourself, which means that you have a press or just went and bought one, because you wanna learn.
If you chose step one then once you recieve your knuckle back with a beautiful new bearing pressed in for you, then reverse the first 10 steps and your car will be back to normal, take it for a drive and fall in love again, and ask for forgiveness for talking so much shit about your car.
If you choose step 2 then please continue reading....
Image 1:
Image 2:
12. The bearing is #4 in image 2 and the hub is #5 in image 2. The bearing and hub need to come out, but unfortunatley you can only do one at a time. So the hub needs to come out first.
13. Take your knuckle and put it hub side down on the press, make sure that the hub and studs are not touching the press, but that the knuckle is being supported and the hub had room to come out. take your a 24mm socket or equivelant and place it on the back side of the hub, the side facing up, and begin to press out the hub. It may take a little force then all of a sudden pop or it may come out smooth, I had both. Now you also might have the inner race of the bearing stuck on the hub..... this is ok, but will require the use of a dremel with cutting wheel. To remove that race, you need to cut one or 2 solid cuts into the race as far as you can without cutting the hub. Then take a chisel and hammer and crack that son of a bitch open. There will be a hairline fracture, but that is enough for you to pry the race off.
14. Ok that part sucked, now you remove the reatining ring(#19 in image 2) from the knuckle so you can press out the bearing. At this point you can choose to remove that dust shield like I did, because all it does is help trap in heat for your breaks and that is the last thing that we want. It will also make it easier to press out the bearing.
15. now you will press out the bearing by placing ther knuckle face down, and this time using your 36mm axle nut ontop of the bearing and press down on that with the press, once again you may get a loud pop after applying what you may think way too much pressure, or it may come out smoothly, and like the hub, I had both.
16. Thats pretty much it, make sure you note which way the bearing was in there, there are two different sides to the bearing. there is a side with a rubber seal, and a side that is all metal. The all metal side goes outboard. Press the new bearing in, install the retaining ring, press the hub back into place then follow all the steps in reverse to get your car back to normal.
Now this just saved you a couple hundred bucks, yeah it gave you a little headache, maybe you lost some sleep, had a couple of arguements witht he wife/girlfriend/boyfriend/mom/dad or whomever, but dont you feel that much better about yourself, that you were able to accomplish something that didnt think you could do. i know thats how I felt. Oh and the first side is going to be the hardest. Its going to be your learning one, but once you start the second one it will feel like you have been doing it for years. I put mine all back together in less then 10 minutes.
I hope this DIY will help and inspire some of you to do it yourself, and save the money that some company would have loved to get their hands on.

The following 5 users liked this post by MurkyRiversTL:
03_CLS_6sp (07-17-2011),
moy_tls08 (11-28-2013),
Professor_Raiden (02-02-2024),
RONE (11-14-2012),
webmastir (04-21-2012)
 06-23-2007, 01:38 AM
#4
thanks.... i'm changing my axles and i only had a 32mm... that's what i've used for civic/integra's... you posted this at the right time... i was just gonna start buying the sockets and see which one fit... you saved me the trouble...
09-07-2007, 04:16 AM
#5
Intermediate

Join Date: Dec 2006
Posts: 36
Likes: 0
Received 0 Likes
on
0 Posts
can u get the hub with the baring in it and change both as one unit without removing the knuckle form the car?
http://shop.acurapartstore.com/buy.p...n&make_code=AC
http://shop.acurapartstore.com/buy.p...n&make_code=AC

Trending Topics
12-14-2007, 05:59 PM
#8
1st Gear

Join Date: Dec 2007
Age: 44
Posts: 1
Likes: 0
Received 0 Likes
on
0 Posts
What about the ball joints on the KNuckle. My dealer told me that this needs to be replaced and that I need to replace the whole knucke to do so.. Is this true? if so wouldn't it make sense to replace teh knuckle and bearing all at once?
Thanks.
Thanks.
01-05-2008, 05:20 PM
#9
Intermediate

Join Date: Dec 2007
Age: 41
Posts: 44
Likes: 0
Received 0 Likes
on
0 Posts
great DIY, just replaced my rear passenger side bearing. dremmel trick worked perfectly, just saw in a little bit and give it a tap wit a chizzle and hammer and it should crack right off.
04-08-2008, 04:12 PM
#10
Awesome Memeber
iTrader: (1)
Join Date: Aug 2007
Location: Mississauga, Ontario, Canada
Age: 41
Posts: 463
Likes: 0
Received 1 Like
on
1 Post
Hey I was interested in changing my wheel bearings myself, but seems like the tools are gonna cost quite a bit. Anyone know of a good place to buy the Pneumatic Impact Gun, is the price on this website a good deal?
http://qualitytoolsforless.com/Produ...x?ProductID=18
Thanks,
SS
http://qualitytoolsforless.com/Produ...x?ProductID=18
Thanks,
SS
04-08-2008, 06:00 PM
#11
COTM Coordinator
Thread Starter
Impact gun for the axle may not be needed. If you remove the wheel, pop out the center cap, put wheel back on, lower car, then use axle nut socket and breaker bar to break axle nut loose. I did that because my impact gun broke.
04-08-2008, 06:03 PM
#12
Senior Moderator
Originally Posted by SSTL
Hey I was interested in changing my wheel bearings myself, but seems like the tools are gonna cost quite a bit. Anyone know of a good place to buy the Pneumatic Impact Gun, is the price on this website a good deal?
http://qualitytoolsforless.com/Produ...x?ProductID=18
Thanks,
SS
http://qualitytoolsforless.com/Produ...x?ProductID=18
Thanks,
SS
04-14-2008, 04:15 PM
#14
Awesome Memeber
iTrader: (1)
Join Date: Aug 2007
Location: Mississauga, Ontario, Canada
Age: 41
Posts: 463
Likes: 0
Received 1 Like
on
1 Post
Well guys I havent done the bearings yet....still kind of anxious about it...
Main reason is I dont want to mess things up since it involves the wheels, so still reading up on it to get as much info as possible.
As my car is a 99 I think that some bolts maybe rusted and then I would have to heat it up. What kind of torch would you recommend I use?
I ask this cuz for my 95 integ, my friend and I were changing the rotors etc and the bolts were rusted so we tried using one of those small torches you can get at Canadian Tire and it wouldnt heat the metal up enough for us to get it loose and had to take it to a garage. Would like to avoid that again....
Has anyone run into rusted bolts what did you do to get around it, aside from heating ?
Now I checked this website for bearings, please let me know if this is good.
http://www.autopartsonlinecanada.com/basket.php
Wheel Bearing OEM
Acura 1999 NSK
TL 3.2 (exc. Type-S)
NSK
Part: K8000-87878
$73.90 (includes shipping)
Just for the hell of it I called acura just to see what they would charge....
$ 160 - Labour
$ 104.62 - Wheel Bearing
and thats not including taxes or the diagnostics.
Thanks for the help appreciate it.
04-14-2008, 04:34 PM
#15
COTM Coordinator
Thread Starter
I got mine from autozone. They worked just fine.
As for rusted bolts, I didnt have any, but any time I do I use PB Blaster which is a penetrating oil that will help loosen the bolt. And a huge breaker bar and lots of muscle.
I did however run into a problem with the ball joints. so I would suggest getting a ball joint puller..... it helps in removing the knuckle...
Other then that you shouldnt have too much trouble... mine is a 99 too.
04-14-2008, 04:50 PM
#16
Senior Moderator
The only thing you will have trouble with is the axle bolt. Thats where the big breaker bar and a 4 foot pipe extension for leverage helps out. If you can find it like murky said, get a ball joint tool.
 04-20-2008, 01:36 AM
#19
Awesome Memeber
iTrader: (1)
Join Date: Aug 2007
Location: Mississauga, Ontario, Canada
Age: 41
Posts: 463
Likes: 0
Received 1 Like
on
1 Post
I tried....
Well guys...after a long day of going store to store and getting the proper tools for this DIY...in the end....2 screws screwed me over.
My friend and I were only able to get the calipers bolts off after using almost half a can of WD-40 and 1.5 hours of waiting! We were overjoyed for this little step forward, next we sprayed the 2 screws holding the rotor and while we waited for the WD-40 to do its job; we took off the 36mm bolt which came off very easily.
Our hopes were high now, all we had left standing between us and the bearing were 2 screws. These weren't just any ordinary screws...they were the screws from hell!...not only were they already worn out and we could barely get the philips to turn without wearing out the head even further....they didnt even budget a bit....
We tried everything.....WD-40(rest of the can) waited 30-40 mins
....and tried to loosen the screws but still nothing. Next we tried PB Buster, no results there either....
we even took the philips and hit the end with a hammer to possibly loosen the bolts...no avail....

even heating up the screws didnt help!!!
In the end all we were left with was 4 hours of battling against the almighty screws. The little screws that just wouldnt budge....so I'll be taking it to my buddies garage in the morning and hopefully he will teach those screws a lesson!
My friend and I were only able to get the calipers bolts off after using almost half a can of WD-40 and 1.5 hours of waiting! We were overjoyed for this little step forward, next we sprayed the 2 screws holding the rotor and while we waited for the WD-40 to do its job; we took off the 36mm bolt which came off very easily.
Our hopes were high now, all we had left standing between us and the bearing were 2 screws. These weren't just any ordinary screws...they were the screws from hell!...not only were they already worn out and we could barely get the philips to turn without wearing out the head even further....they didnt even budget a bit....
We tried everything.....WD-40(rest of the can) waited 30-40 mins
....and tried to loosen the screws but still nothing. Next we tried PB Buster, no results there either....
we even took the philips and hit the end with a hammer to possibly loosen the bolts...no avail....
even heating up the screws didnt help!!!
In the end all we were left with was 4 hours of battling against the almighty screws. The little screws that just wouldnt budge....so I'll be taking it to my buddies garage in the morning and hopefully he will teach those screws a lesson!
04-20-2008, 04:19 PM
#20
COTM Coordinator
Thread Starter
you could drill the heads of the screws off, then take vice grips to the shank once the rotor is removed. Or you can drill into the screw and get an easy out to remove it...
04-20-2008, 04:23 PM
#21
Senior Moderator
They make a impact screw driver (you hit it with a hammer) and they come right out. Ither wise a chisel works well too. Just hit it in the direction of loosen. If all else fails just drill the head off. They arent important to have. They just hold the rotor on during assembly of the brake pads.
 04-21-2008, 12:22 AM
#23
Awesome Memeber
iTrader: (1)
Join Date: Aug 2007
Location: Mississauga, Ontario, Canada
Age: 41
Posts: 463
Likes: 0
Received 1 Like
on
1 Post
Well finally got the new bearing installed, did it at my friends garage. He basically melted the heads off the screws and then got the rotor off, but most of the bolts were so rusted that they either broke or the thread were messed. Luckily he had the more bolts and we justed used those, thanks for all the help guys.
04-21-2008, 11:01 AM
#25
Senior Moderator
Originally Posted by Montaigne
I had to drill mine out. Not a big deal. Just make sure you're oiling the drillbit as you go in.
05-02-2008, 08:21 AM
#26

just did an oil change and noticed the rubber boot from a lower ball joint is ripped. Do they sell just the rubber boots or do I need to replace the entire ball joint? It just happened cuz I always check boots for cv and ball joints.
05-29-2008, 11:53 AM
#28
Awesome Memeber
iTrader: (1)
Join Date: Aug 2007
Location: Mississauga, Ontario, Canada
Age: 41
Posts: 463
Likes: 0
Received 1 Like
on
1 Post
I've become the bearing dude at my friends garage
After the right front was fixed...a week later the the left front started making sounds. So I had them installed new front rotors and brakes for both wheels since mine were messed up anyways. Then this weekend, went in for an oil change...and the left back was screwed, so I had them fix that as well...sigh. Only one left is the right back...hope it doesnt need to be changed *knock on wood*...After all that Im down $620  for the 3 bearings, 2 front rotors and front brakes. But atleast the car runs smoothly and quietly now
After the right front was fixed...a week later the the left front started making sounds. So I had them installed new front rotors and brakes for both wheels since mine were messed up anyways. Then this weekend, went in for an oil change...and the left back was screwed
, so I had them fix that as well...sigh. Only one left is the right back...hope it doesnt need to be changed *knock on wood*...After all that Im down $620 for the 3 bearings, 2 front rotors and front brakes. But atleast the car runs smoothly and quietly now
07-23-2009, 07:25 PM
#29

This is an old thread, but popping the lower ball joint can be done by removing the shock fork bolt, then jacking the lower control arm high enough to put a 1/2" craftsman ratchet (or something with a rectangular end) into the gap between the lower control arm and the knuckle. Then kick, or in my case, jump on the knuckle and the knuckle comes loose from the lower control arm. Its an old trick for hondas.
04-26-2010, 12:19 PM
#30
1st Gear

Join Date: Apr 2010
Posts: 1
Likes: 0
Received 0 Likes
on
0 Posts
The is a great post for the wheel bearing. I just got it replaced on my TL-S 2003 front driver side at a shop in my neighborhood. It definitely cost much less than what the dealers were saying. Frist of all every dealer had their own price for the bearing and they could/would not tell me the manufacturer of the bearing. How ridiculous. Also they would quote 3 hours of labor, when it is only one hour job. Dealers, as we all know, are crazy.
06-07-2011, 07:14 PM
#31
7th Gear

Join Date: Jun 2005
Age: 39
Posts: 7
Likes: 0
Received 0 Likes
on
0 Posts
All, I either got the wrong bearings or I thought it would be nice to update a small portion of the DIY.
I got my new bearings and, unlike the OEM bearings, both sides are metal, as opposed to the OEM which has one rubber side. Since the DIY originally said to be sure to install with the correct rubber side as original, do the newest bearings (I got Moog) not direction specific and work both ways?
I got my new bearings and, unlike the OEM bearings, both sides are metal, as opposed to the OEM which has one rubber side. Since the DIY originally said to be sure to install with the correct rubber side as original, do the newest bearings (I got Moog) not direction specific and work both ways?
06-07-2011, 08:33 PM
#32
7th Gear
Join Date: Jun 2005
Age: 39
Posts: 7
Likes: 0
Received 0 Likes
on
0 Posts
All, I either got the wrong bearings or I thought it would be nice to update a small portion of the DIY.
I got my new bearings and, unlike the OEM bearings, both sides are metal, as opposed to the OEM which has one rubber side. Since the DIY originally said to be sure to install with the correct rubber side as original, do the newest bearings (I got Moog) not direction specific and work both ways?
I got my new bearings and, unlike the OEM bearings, both sides are metal, as opposed to the OEM which has one rubber side. Since the DIY originally said to be sure to install with the correct rubber side as original, do the newest bearings (I got Moog) not direction specific and work both ways?
06-08-2011, 09:03 AM
#33

using a tie rod seperator aka a fork is a risky options on the the tie rod and ball joints, usually you will screw the ball socket joint up or stud and end up replacing them in a short amount of time. It is much quicker and easier using a flat punch in an air gun and hitting the spindle area next to where the stud passes through. Some time you need a pry bar to apply a downward or upward pressure on the control arm depending which one you are working on if they are stuburn while hitting it with air hammer and punch. They key is holding the hammer tight against the spindle before you hit the trigger otherwise it's just bouncing around and your not transferring the force from the hammer to the spindle.
Also there is no reason to worry about marking the tie-rod end it will not move and change the toe of the car, now if you loosen the sleeve and turn the sleeve or tie-rod within the sleeve you just changed the toe and need to have the car aligned.
Side cuts work much better on cotter pins than needle nose pliers.
07-05-2011, 05:48 PM
#34
All, I either got the wrong bearings or I thought it would be nice to update a small portion of the DIY.
I got my new bearings and, unlike the OEM bearings, both sides are metal, as opposed to the OEM which has one rubber side. Since the DIY originally said to be sure to install with the correct rubber side as original, do the newest bearings (I got Moog) not direction specific and work both ways?
I got my new bearings and, unlike the OEM bearings, both sides are metal, as opposed to the OEM which has one rubber side. Since the DIY originally said to be sure to install with the correct rubber side as original, do the newest bearings (I got Moog) not direction specific and work both ways?
We had changed the driver's side a week earlier. The passenger side went pretty smooth after we finally got the axle nut off. I sure wish though that I would have know about this DIY. Would have saved me some head scratching.
We pounded the old bearings out and pounded the new ones in (used the old bearings on top of the new ones to pound in). It was quite the learning experience. Next time I'll use a press!
07-10-2011, 09:27 PM
#35

All, I either got the wrong bearings or I thought it would be nice to update a small portion of the DIY.
I got my new bearings and, unlike the OEM bearings, both sides are metal, as opposed to the OEM which has one rubber side. Since the DIY originally said to be sure to install with the correct rubber side as original, do the newest bearings (I got Moog) not direction specific and work both ways?
I got my new bearings and, unlike the OEM bearings, both sides are metal, as opposed to the OEM which has one rubber side. Since the DIY originally said to be sure to install with the correct rubber side as original, do the newest bearings (I got Moog) not direction specific and work both ways?
i dont think it works both ways cos the bearing has magnet or sensors on one side that sends pulse or signal to the TCS or ABS sensors when spinning. if installed incorrectly or backwards u will have TCS and ABS light on or malfunction.
07-11-2011, 10:23 AM
#36
Senior Moderator
Wrong. The pickup point for that is on the axle, not the bearing.
08-28-2011, 11:48 AM
#37

Just did this job on the left front and thought I�d share some additional info and pics.
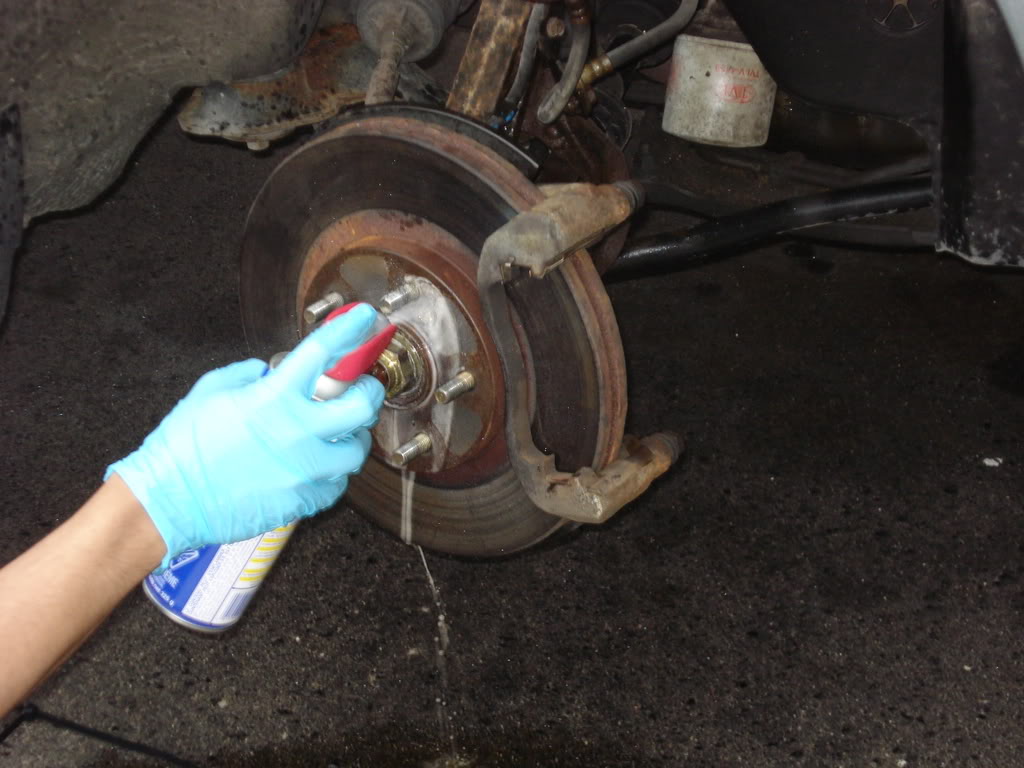
First, here�s the setup I used to get the Phillips screws loose to remove the rotor.

The old double wrench trick gave me all the torque I needed.

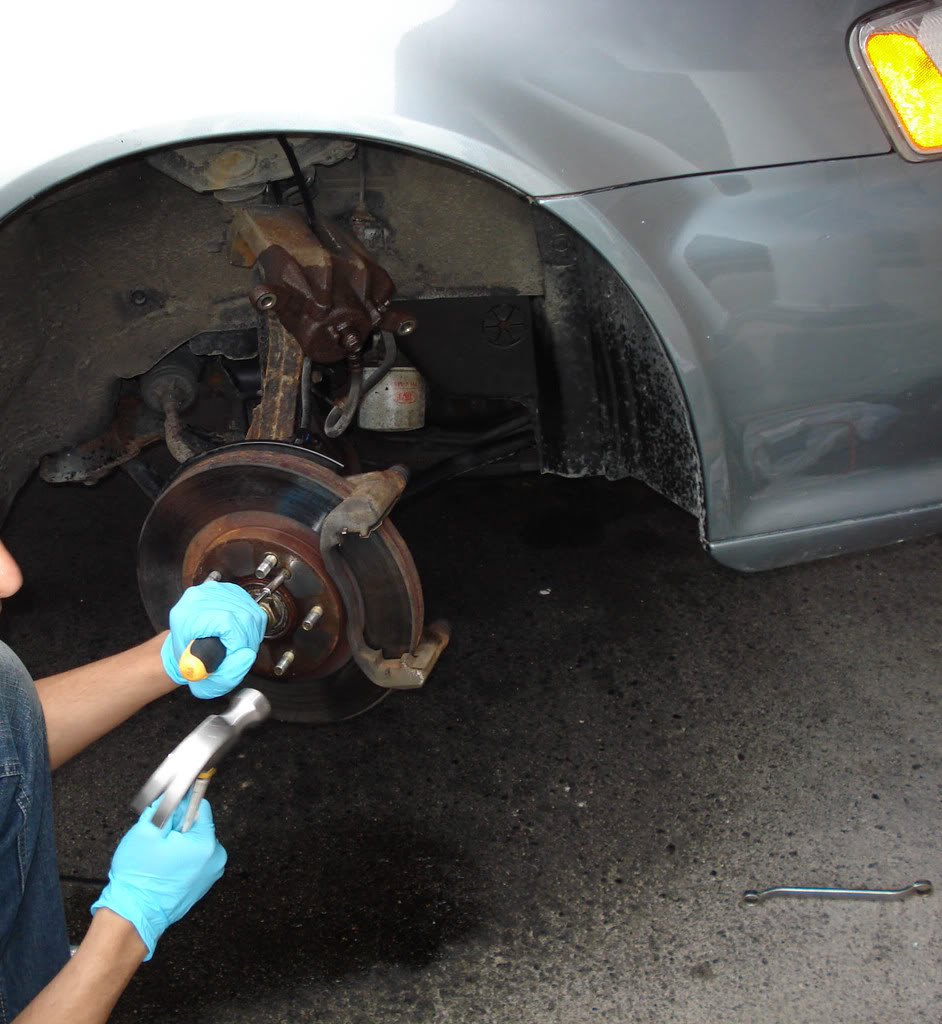
Here�s the 36mm socket and breaker bar, both borrowed from Autozone, on the axle nut which came off without too much struggle.

This was one place where the MurkyRivers posting failed me. This is a pic of the ABS sensor with the retaining nut removed. Try as I might, it wouldn�t come out.

Here�s the three pieces it eventually came off in. Found replacement on Ebay for $35.

Here�s a view from the other side. The remaining piece came off by slipping a socket around it and tapping it out. If I had worked from this side, I could have got it off without damaging it.

Finally, here�s the knuckle with the new wheel bearing and a new lower ball joint.

I�ve got some other pics for folks that still might be unclear about this job if needed.
I cost me a total of $80 for parts and labor. I had a local shop press the new bearings in.
HTH
First, here�s the setup I used to get the Phillips screws loose to remove the rotor.
The old double wrench trick gave me all the torque I needed.
Here�s the 36mm socket and breaker bar, both borrowed from Autozone, on the axle nut which came off without too much struggle.
This was one place where the MurkyRivers posting failed me. This is a pic of the ABS sensor with the retaining nut removed. Try as I might, it wouldn�t come out.
Here�s the three pieces it eventually came off in. Found replacement on Ebay for $35.
Here�s a view from the other side. The remaining piece came off by slipping a socket around it and tapping it out. If I had worked from this side, I could have got it off without damaging it.
Finally, here�s the knuckle with the new wheel bearing and a new lower ball joint.
I�ve got some other pics for folks that still might be unclear about this job if needed.
I cost me a total of $80 for parts and labor. I had a local shop press the new bearings in.
HTH
The following users liked this post:
01tl4tl (08-28-2011)
08-28-2011, 11:56 AM
#38
A 15 dollar impact screw driver will take out those rotor screws. A couple taps will loosen it.
If you take the abs sensor bolt out, you can use it to screw into a hole on the oem rotor to release it from the hub. Not the countersunk rotor screw holes, but the rotor has a small hole that just goes through the rotor mounting surface. It'll go through the mounting surface and push the rotor off of the hub.
To get the abs sensor out, I have found it much easier and less damaging to use a flathead screwdriver placed in between the axle and the sensor, twist the screwdriver and it'll slide right out. I've never had to use too much force at all. Only disclaimer is to watch out and try not to pry on the magnet surface.
Good luck everyone!
The following users liked this post:
01tl4tl (08-28-2011)
08-29-2011, 10:09 PM
#39
May be that 100K in Northern Illinois with the winter road salt had an effect but there was no way that ABS sensor was coming off from that side. Lesson learned.
09-09-2011, 08:14 AM
#40
Instructor

Join Date: Sep 2006
Location: Indianapolis, IN
Posts: 195
Likes: 0
Received 0 Likes
on
0 Posts
before starting this task, i just want make sure that it's the right problem with my car. So my right passenger tire makes noises when i turn the steering wheel. Sounds like a door screeching. getting in and out from the passenger door makes noise as well. At first i thought it was the suspensions, but not sure. any suggestions?