Updated DIY on AC cabin filter change
 01-21-2005, 02:21 AM
#1
Racer
Thread Starter
Updated DIY on AC cabin filter change
Since the old threads on changing the AC cabin filters are missing some pictures, I have decided to post a new one since I have recently changed mine.
The filters that I got was from Pep Boys for $21.99 for the pair. It is model #C15390, manufactured by Micron Air the same ones as the stock filters.
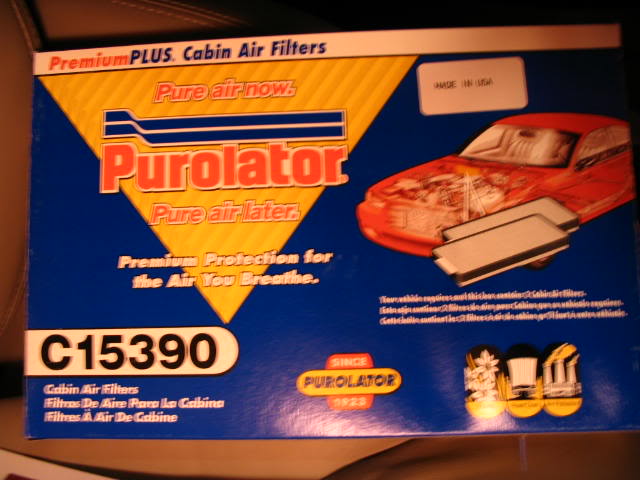

The filters that I got was from Pep Boys for $21.99 for the pair. It is model #C15390, manufactured by Micron Air the same ones as the stock filters.

The following 6 users liked this post by Flounder:
Dual-Saber (04-05-2016),
dunndada27 (06-03-2012),
losymis (12-24-2014),
patgard (01-31-2012),
RONE (01-12-2014),
and 1 others liked this post.
01-21-2005, 02:22 AM
#2
Racer
Thread Starter
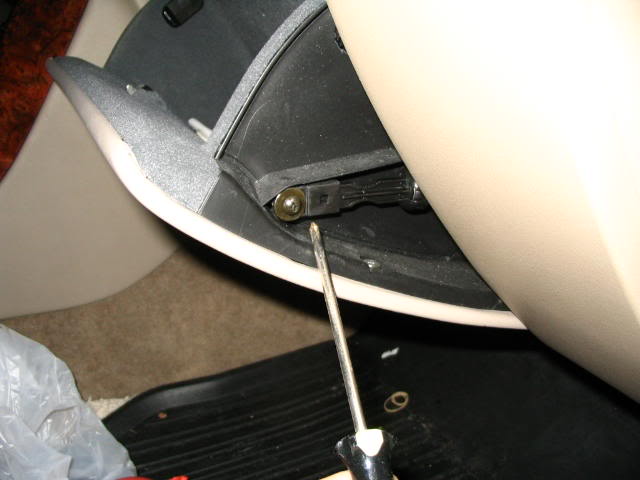
First thing to do is to remove the screw that holds down the glove box dampener.
Next, look inside the glove box & you'll see 2 plastic pieces that prevents the glove box from falling all the way down. You need to remove the 2 clips that's behind here, do this by using a needle nose pliers & a screw driver.
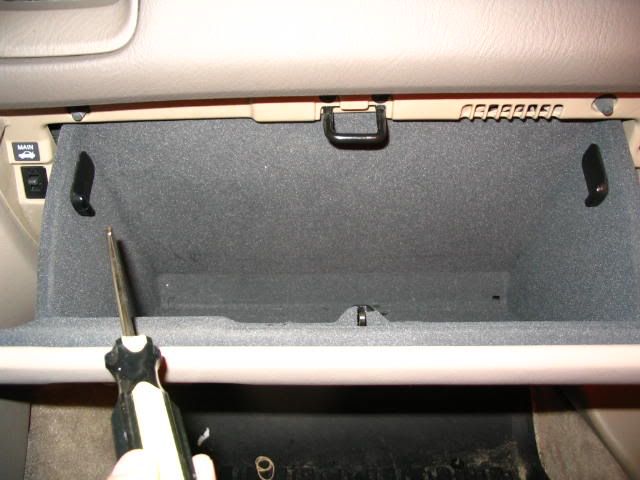
Next, look inside the glove box & you'll see 2 plastic pieces that prevents the glove box from falling all the way down. You need to remove the 2 clips that's behind here, do this by using a needle nose pliers & a screw driver.
The following users liked this post:
dunndada27 (06-03-2012)
01-21-2005, 02:23 AM
#3
Racer
Thread Starter
Remove the 2 screws that is attached to the glove box & take out the box.
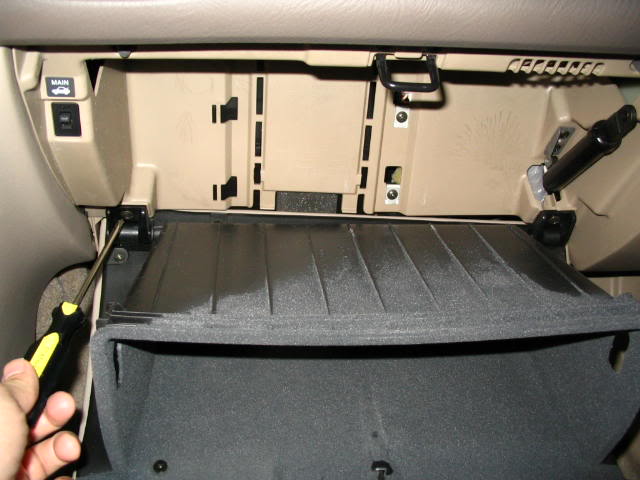
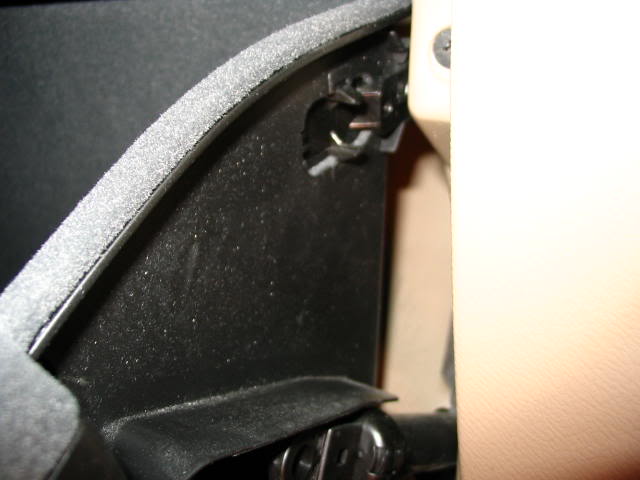
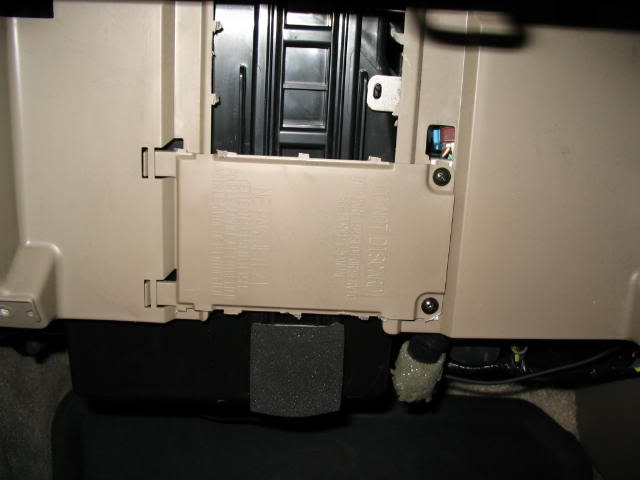
This is what you see on a car w/ the original filter once the box has been removed.
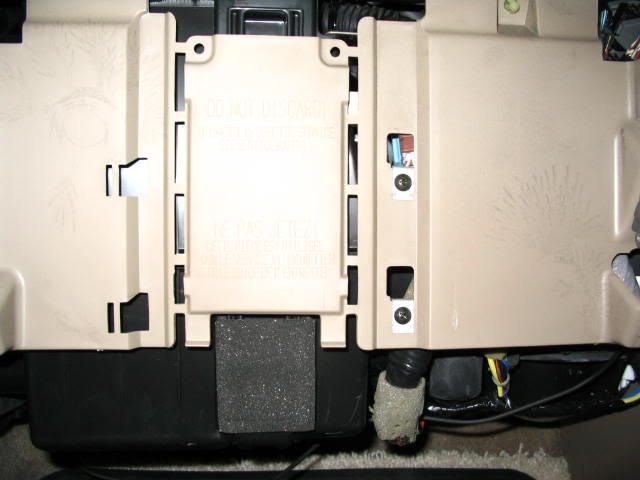
This is what you see on a car w/ the original filter once the box has been removed.
The following users liked this post:
dunndada27 (06-03-2012)
01-21-2005, 02:24 AM
#4
Racer
Thread Starter
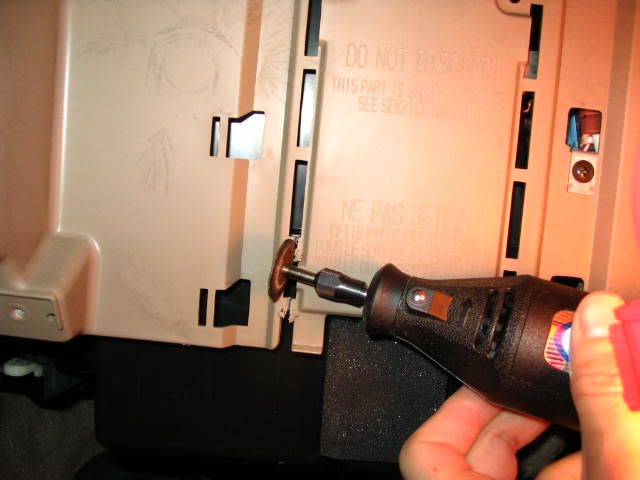
I used a Dremel to cut out the plastic covering in order to get to the filter. DO NOT THROW AWAY THIS PIECE, YOU'LL NEED IT AGAIN.
Now you have access to the filter. Lift up the cover to the filter box & take out the old filter, clean the inside of the chamber and then put the new filters back.
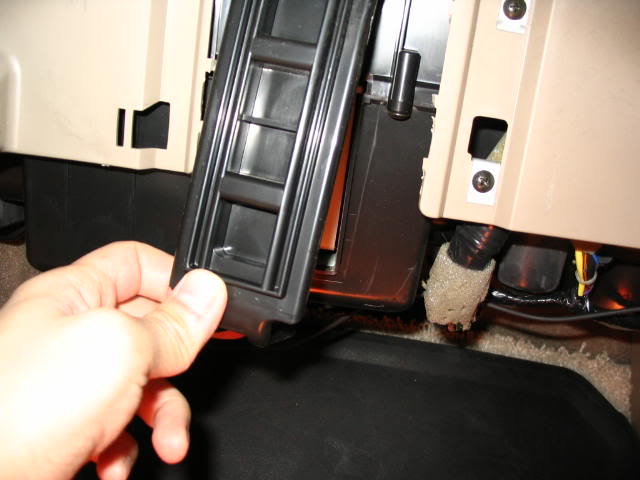
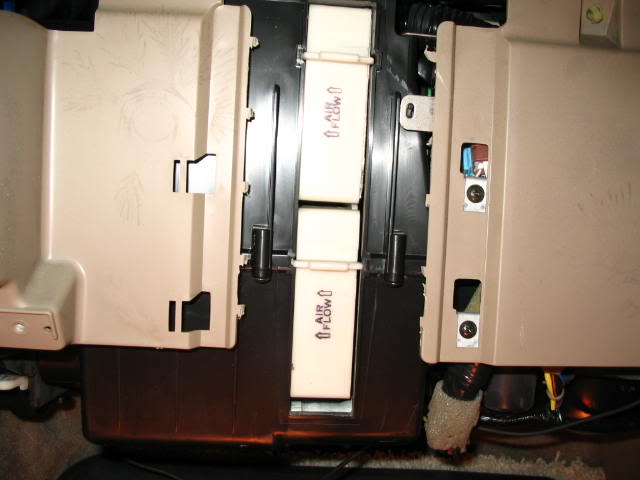
[edit] Make sure you do not throw away the white plastic filter holders.
Now you have access to the filter. Lift up the cover to the filter box & take out the old filter, clean the inside of the chamber and then put the new filters back.
[edit] Make sure you do not throw away the white plastic filter holders.
The following users liked this post:
dunndada27 (06-03-2012)
01-21-2005, 02:24 AM
#5
Racer
Thread Starter
Close the filter cover & use the trim piece that I told you not to throw away to cover up the filter box. Place it back in sideways & screw it down.
Now you are almost done, just reverse the steps to put back the glove box & enjoy the cleaner air from the new filters.
Now you are almost done, just reverse the steps to put back the glove box & enjoy the cleaner air from the new filters.
The following 2 users liked this post by Flounder:
Dual-Saber (04-05-2016),
dunndada27 (06-03-2012)
01-21-2005, 02:26 AM
#6
Racer
Thread Starter
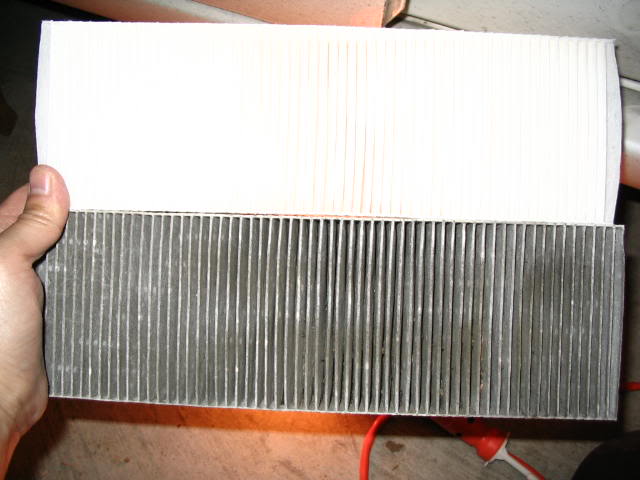
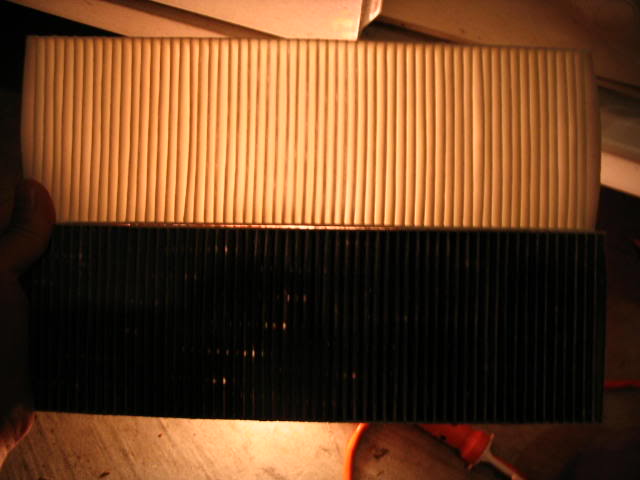
My original filters were NASTY, all black w/ almost full air restriction.
Those that have changed out the filters can really appreciate the fresher air.
Those that have changed out the filters can really appreciate the fresher air.
The following 4 users liked this post by Flounder:
01-21-2005, 09:19 AM
#7
Senior Moderator
Great DIY!
Trending Topics
01-21-2005, 09:59 AM
#8
Advanced

Great DIY, this is something that is very easy to do and will save you some bucks. I've heard of people being charged 40 bucks for parts and labor for doing what you described so well. 
01-21-2005, 11:00 AM
#9
2400 Watts in a TL...Why?
Join Date: Jul 2003
Location: Richmond Hill, Ontario
Age: 44
Posts: 2,308
Likes: 0
Received 1 Like
on
1 Post
Perfect DIY... this should be stickied in a DIY section..
This has been a topic of discussion recently however it was not explained as well as ou have done here.. I didn't know I had to take out my glove box.. and I think it's pretty neat to be able to see if it has ever been done on your car, I'm going to check today....I'm pretty sure it is the origional one.
Well if it is 1/2 hour of labour and the part.. I wouldn't say $40 bucks is a rip off... much cheaper to do it yourself, but mostly everything on your car is cheaper to do yourself, if you have the knowledge, and thanks's to this DIY here's another job we can take from the Mechanics..
Thanks again Flounder.. Much appreciated
Patrick
This has been a topic of discussion recently however it was not explained as well as ou have done here.. I didn't know I had to take out my glove box.. and I think it's pretty neat to be able to see if it has ever been done on your car, I'm going to check today....I'm pretty sure it is the origional one.
Originally Posted by ronvanr
Great DIY, this is something that is very easy to do and will save you some bucks. I've heard of people being charged 40 bucks for parts and labor for doing what you described so well.
Thanks again Flounder.. Much appreciated
Patrick
01-21-2005, 11:05 AM
#10
Kollage is funn!
Join Date: Jan 2004
Location: Saddle River, NJ
Age: 38
Posts: 1,190
Likes: 0
Received 1 Like
on
1 Post
Originally Posted by ronvanr
Great DIY, this is something that is very easy to do and will save you some bucks. I've heard of people being charged 40 bucks for parts and labor for doing what you described so well.
anyway, i did this also, and it's a great diy project
01-21-2005, 11:08 AM
#11
Resident Troll.

Join Date: Apr 2004
Location: Richmond Hill, Ontario
Age: 41
Posts: 1,570
Likes: 0
Received 1 Like
on
1 Post
thats a great diy... i would definately attempt to change my own filter and i probably would be able to take everything apart but knowing me i wont be able to put it all back together. if the dealer is going to charge me over 100 to change it for me i might just have to attempt to do it myself...
01-21-2005, 12:35 PM
#13
Senior Moderator
Originally Posted by bkzjimmy
this is great....i think a-tl should have a section just for diy's......anyone else??
01-21-2005, 12:52 PM
#14
2400 Watts in a TL...Why?
Join Date: Jul 2003
Location: Richmond Hill, Ontario
Age: 44
Posts: 2,308
Likes: 0
Received 1 Like
on
1 Post
Originally Posted by ndawood
thats a great diy... i would definately attempt to change my own filter and i probably would be able to take everything apart but knowing me i wont be able to put it all back together. if the dealer is going to charge me over 100 to change it for me i might just have to attempt to do it myself...
You know we'll help you out there..... I've just got to find the filters.. I'm going to check Canadian Tire today...
Message me when you're back in town..
01-22-2005, 03:23 AM
#16
Mons shaver
Great job. I changed mine a couple of weeks ago. I discovered that instead of unscrewing the arm that holds the compartment shut (dampener) there is a little button on the back that lets you unhook the arm from the glove compartment. When you're done, you just pull the arm and plug it back in. I'm not sure if its better, its just my 2 cents.
01-22-2005, 03:31 AM
#17
woooo!!
Originally Posted by bkzjimmy
this is great....i think a-tl should have a section just for diy's......anyone else??

i think the FAQ section should be renamed as FAQs/DIYs... hope to see that happen in the future. There have been so many good DIY threads that have just been pushed down... I see the need for that new section.
BTW sweet guide, one of these days im gonna do this too!


 01-22-2005, 10:16 AM
#20
Boomer SOONER

Join Date: Jul 2003
Location: McKinney, TX
Age: 41
Posts: 3,729
Likes: 0
Received 14 Likes
on
14 Posts
you really should change them every year or about 10-15k miles. of course that depends on how much you use your air system and if you live in the city/dusty area. I would say every year at the most.
BTW great DIY!!
BTW great DIY!!
01-22-2005, 10:18 AM
#21
NiGhT rIdEr
Join Date: Dec 2003
Location: brooklyn, ny
Age: 45
Posts: 3,269
Likes: 0
Received 2 Likes
on
2 Posts
Originally Posted by ou sig
you really should change them every year or about 10-15k miles. of course that depends on how much you use your air system and if you live in the city/dusty area. I would say every year at the most.
BTW great DIY!!
BTW great DIY!!
01-22-2005, 10:55 AM
#22
Resident Troll.
Join Date: Apr 2004
Location: Richmond Hill, Ontario
Age: 41
Posts: 1,570
Likes: 0
Received 1 Like
on
1 Post
Originally Posted by ResidualFreedom
You know we'll help you out there..... I've just got to find the filters.. I'm going to check Canadian Tire today...
Message me when you're back in town..
Message me when you're back in town..

 02-08-2005, 03:56 PM
#26
Boomer SOONER
Join Date: Jul 2003
Location: McKinney, TX
Age: 41
Posts: 3,729
Likes: 0
Received 14 Likes
on
14 Posts
Originally Posted by MikeTL-S
This DIY is one of the top dealer rip off's. I cringed when I did it because of how simple it was compared to what the dealer would have charged.
for example - on my mom's '02 Avalon, the dealer quoted her $90!!! and it was even alot easier than for the TL - I had no idea what I was doing, and it took me less than 5 minutes to replace hers!!!
 02-08-2005, 04:30 PM
#28
Boomer SOONER
Join Date: Jul 2003
Location: McKinney, TX
Age: 41
Posts: 3,729
Likes: 0
Received 14 Likes
on
14 Posts
Originally Posted by repsol
i assume this is the same procedure for all 1999-2004 TL's?
by the way great info
thx
by the way great info
thx
02-08-2005, 05:02 PM
#29
Senior Moderator
Originally Posted by ou sig
there are many DIYs that the dealers charge way too much for - thats why I try to never go there if I can
for example - on my mom's '02 Avalon, the dealer quoted her $90!!! and it was even alot easier than for the TL - I had no idea what I was doing, and it took me less than 5 minutes to replace hers!!!
for example - on my mom's '02 Avalon, the dealer quoted her $90!!! and it was even alot easier than for the TL - I had no idea what I was doing, and it took me less than 5 minutes to replace hers!!!
02-08-2005, 05:04 PM
#30
Boomer SOONER
Join Date: Jul 2003
Location: McKinney, TX
Age: 41
Posts: 3,729
Likes: 0
Received 14 Likes
on
14 Posts
Originally Posted by fsttyms1
my dad was quoted 80 to do it on his caddy. i did it in less than a min. now thatis a rip off. all you have to do is pop the hood, flip the lid pull the old one out slip the new one in, close the lid. i couldnt believe how easy it was. i wish the TL was that easy
02-08-2005, 06:08 PM
#31

Originally Posted by ou sig
the AC filter is in the engine bay??? or are you talking about the engine air filter?
02-08-2005, 06:12 PM
#32
Senior Moderator
Originally Posted by ou sig
the AC filter is in the engine bay??? or are you talking about the engine air filter?
open the hood and up by the firewall is where teh motor is for the hvac. pop open a littel lid and swapping couldnt be easier
 02-08-2005, 09:29 PM
#34
Boomer SOONER
Join Date: Jul 2003
Location: McKinney, TX
Age: 41
Posts: 3,729
Likes: 0
Received 14 Likes
on
14 Posts
Originally Posted by fsttyms1
yes teh cabin filter
open the hood and up by the firewall is where teh motor is for the hvac. pop open a littel lid and swapping couldnt be easier
open the hood and up by the firewall is where teh motor is for the hvac. pop open a littel lid and swapping couldnt be easier
02-12-2005, 03:30 PM
#35
Head Wanker
Join Date: Sep 2003
Location: Los Angeles, CA
Age: 46
Posts: 101
Likes: 0
Received 0 Likes
on
0 Posts
Thanks Flounder. I just used your guide to replace my cabin air filters at 30K miles. Took me 40 mins since I had a little trouble with those two little blocking clips and did not have a dremel tool (used a Miracle Blade utility scissor). Next time, it would probably only take 15 mins or less to take everything apart and put back together. The guide was an immense help and only cost me $21.99 at Pep Boys and not $$$ from the dealer. I am in your debt.
02-13-2005, 09:50 AM
#36
Burning Brakes
Thanks for the great guide. Changed my filters at 17,500 miles last night and they were really dirty. Took me about 30 minutes. The Bosch filters only cost $12.99 for the pair at AutoZone - I picked up another pair for next time b/c they were so cheap.
02-16-2005, 12:41 PM
#37
Might have waited a bit long
Well this project was much simpler than I would have thought.
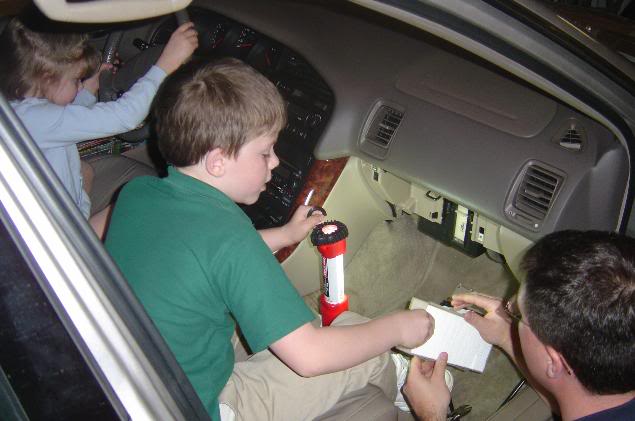
Purchased the filters at O'Reillys brought them home and it was a 15 minute job and I had "help" from my 8 and 6 year old.
Here's the work in progress:
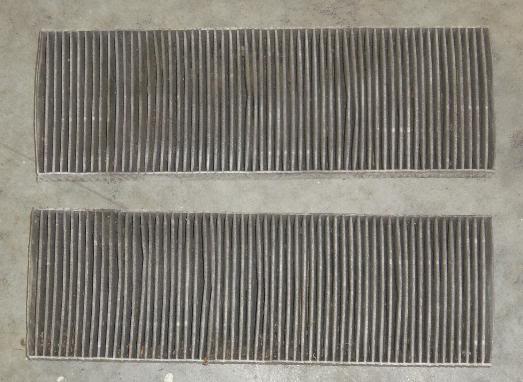
Here's what came out of the car. Yes - '99 and they were original....note the difference between these and the very white ones going in the car above.
Tools required - wire cutters, needle nose pliers and a phillips screw driver.
I won't be waiting this long again.
Rob in Nashvegas
Purchased the filters at O'Reillys brought them home and it was a 15 minute job and I had "help" from my 8 and 6 year old.
Here's the work in progress:
Here's what came out of the car. Yes - '99 and they were original....note the difference between these and the very white ones going in the car above.
Tools required - wire cutters, needle nose pliers and a phillips screw driver.
I won't be waiting this long again.
Rob in Nashvegas
 02-16-2005, 06:42 PM
#39
Racer
Thread Starter
Originally Posted by saad12
How do you screw in the plastic cover that you had cut out using the Dremel.
Look at the before pics of the cover & you'll see 2 screws to the right of that cover.
02-16-2005, 06:57 PM
#40
4th Gear

Join Date: Feb 2005
Age: 51
Posts: 4
Likes: 0
Received 0 Likes
on
0 Posts
I did it myself, dealer wanted $21.90 for a single filter (not a pair) plus $120
I did it myself and was amazed how simple, the dealer wanted $21.90 for a single filter (not a pair) plus $120 for labor. The dealer also told me that they do not offer this kind of service to customers due to the "complexity" quoting, however, when I looked at their service offering list, the change of the cabin filter rang at $70, but not sure if they include their $21.90 per filter part charge. Go figure...complexity 