Power Steering Pressure Hose Replacement Tips?
 11-03-2012, 03:52 PM
#1

Power Steering Pressure Hose Replacement Tips?
Anyone done this before? I got the new hose, and it looks like a beootch to replace. Its preformed and wraps around PS rack. Not much in search on anyone actually doing it, other than someone saying you need a lift because you need 30" of clearance? I dont have a lift, but I have big tall jack stands.
Do I need to take out motor mount, or drop subframe? Tips?
Do I need to take out motor mount, or drop subframe? Tips?

The following users liked this post:
teh CL (12-02-2017)
11-03-2012, 07:28 PM
#2

Hey Marcelft, which hose are you referring to ? The "outlet" pressure hose which originates from the top of the PS pump, then going down to the rack's passenger side ?
The top of this outlet hose is mounted to the pump assembly by fitting (2) 6mm bolts.
The "preformed" hose then is attached at the bottom to a steel line from the rack which is specially flared at the end to accept this hose and a "clamp" to secure the hose. Jack the car up first and safely secure with jackstands.....you'll have enough clearance to work. Check it out from underneath before you start the project.
What is the reason for replacing this hose ? The hardest part of the job will be the refill and purging process of the system after the hose's installation. You may want to do some research on this prior to tackling the job.
The following users liked this post:
01tl4tl (11-04-2012)
11-03-2012, 07:45 PM
#3
Moderator
I have replace it about 3-4 Months ago long story short is a ROYAL PITA!!!!!!
Dont bother jacking up the car you cant do nothing from beneath (only if your planning Un-Bolting the Rack).
You need to remove the OEM Strut Bar to make room for a Breaker Bar becouse the Pressure Line Bolt is almost Binded for ever into the Rack!
I had to actually use Vise-Grips and Hammer it out to Unbolt it even with it having it Blasted with WD-40 3 days in a Row.
Once you have Unbolted the Rack Bolt then just work your way UP!
The High pressure Line Bolt is the one Lower in the Rack! The one closer to the Floor.
DONT UNBOLT THE 2 SCREWS ON TOP OF POWER S. PUMP UNTIL YOU GET THE RACK BOLT OUT OR YOU WILL WASTE YOUR TIME!!!!!!
Last edited by Skirmich; 11-03-2012 at 07:48 PM.
11-03-2012, 09:07 PM
#4
Nothing like advice from a well seasoned pro like Skirmich. Thanks, good detailed advice !
Mine was only from looking at a diagram, Dah....nothing is quite that simple. Sorry man !
Mine was only from looking at a diagram, Dah....nothing is quite that simple. Sorry man !
11-03-2012, 11:27 PM
#5
I have replace it about 3-4 Months ago long story short is a ROYAL PITA!!!!!!
Dont bother jacking up the car you cant do nothing from beneath (only if your planning Un-Bolting the Rack).
You need to remove the OEM Strut Bar to make room for a Breaker Bar becouse the Pressure Line Bolt is almost Binded for ever into the Rack!
I had to actually use Vise-Grips and Hammer it out to Unbolt it even with it having it Blasted with WD-40 3 days in a Row.
Once you have Unbolted the Rack Bolt then just work your way UP!
The High pressure Line Bolt is the one Lower in the Rack! The one closer to the Floor.
DONT UNBOLT THE 2 SCREWS ON TOP OF POWER S. PUMP UNTIL YOU GET THE RACK BOLT OUT OR YOU WILL WASTE YOUR TIME!!!!!!
Dont bother jacking up the car you cant do nothing from beneath (only if your planning Un-Bolting the Rack).
You need to remove the OEM Strut Bar to make room for a Breaker Bar becouse the Pressure Line Bolt is almost Binded for ever into the Rack!
I had to actually use Vise-Grips and Hammer it out to Unbolt it even with it having it Blasted with WD-40 3 days in a Row.
Once you have Unbolted the Rack Bolt then just work your way UP!
The High pressure Line Bolt is the one Lower in the Rack! The one closer to the Floor.
DONT UNBOLT THE 2 SCREWS ON TOP OF POWER S. PUMP UNTIL YOU GET THE RACK BOLT OUT OR YOU WILL WASTE YOUR TIME!!!!!!
11-04-2012, 01:19 AM
#6

tip on filling and burping system
buy HONDA ps fluid--it matters...who has the total capacity number--3 pints?
place cardboard under front wheels (reduces friction),
add fluid to res- start engine and add more fluid as its sucked in
have helper turn the wheel fully to the stop in each direction at a slow rate of turn
keep adding fluid as bubbles of air come out
Wont hurt to remove the upper/return hose from res and pump out any residual old fluid in system--see diy section for details
scheduled time for flush = every 60kmiles
Last edited by 01tl4tl; 11-04-2012 at 01:22 AM.
The following users liked this post:
marcelft (11-04-2012)
11-04-2012, 01:22 AM
#7
before removing hose you can empty the system with the above turning of wheels with upper hose emptying into a container
prevent a lot of mess!
The book says its ok to run it out like that to do a flush
prevent a lot of mess!
The book says its ok to run it out like that to do a flush
The following users liked this post:
marcelft (11-04-2012)
Trending Topics
11-04-2012, 01:56 AM
#8
Moderator
Both the High Pressure and Return Line are Bolted by Flare Nuts into the Rack! the High Pressure Line Itself is bolted into the chasis by a Bracket with 1 Single 10mm Bolt just After the Rack its pretty noticeable and I believe just 2 Plastic Hinges along the Way behind the Rear Engine Mount.
Anyway Unbolting The Flare Nut is the Problem here, I learned that the Hard Way!
THIS WILL MAKE YOUR LIFE EASIER! (The Size is Wrong, Just to Show you the Tool):
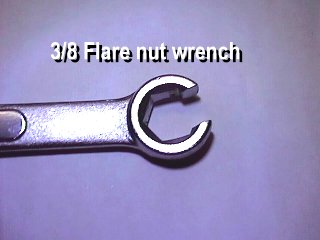
Ill check my Tool Box tomorrow to get you the exact Size of the Flare Nut Wrench..
Just to be Clear even with the Tool I could not Get the Flare Nut out... Wise-Grips + Hammer did the Trick...
Last edited by Skirmich; 11-04-2012 at 01:06 AM.
The following users liked this post:
marcelft (11-04-2012)
11-04-2012, 08:28 AM
#9
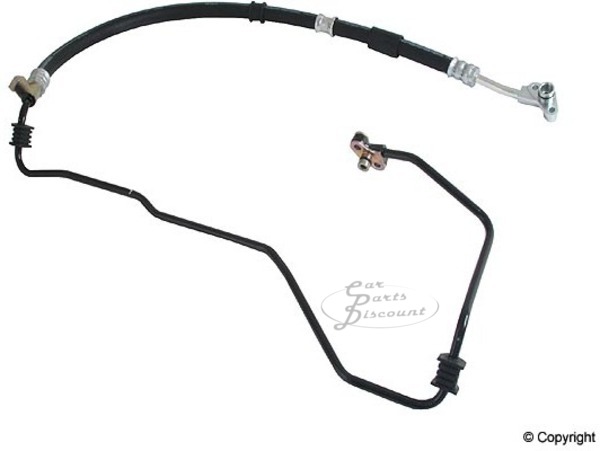
Ok, maybe I am confusing you. The hose I am replacing is the hose which goes from the power steering pump to the rack, there are no flare fittings, just two bolts on each end. This is the hose I am talking about:
11-04-2012, 01:31 PM
#10
Moderator
Thats not the High Pressure line for our Car, Just some Random Ebay Line post it to look like... TRUST THE ONE WHO HAS CHANGED IT 
Youll need to get something like this:
http://www.ebay.ca/itm/01-02-03-Acur...-/330782699876
(Scroll down to see Pics)

And just look at the Manual:
Both the TL-S and TL-P uses Flare Nuts to secure the line into the Rack.
OHHH AND BTW YOU WILL NEED A 14mm FLARE NUT WRENCH (I THINK THEY COME IN 13/14mm Sizes)
Youll need to get something like this:
http://www.ebay.ca/itm/01-02-03-Acur...-/330782699876
(Scroll down to see Pics)
And just look at the Manual:
Both the TL-S and TL-P uses Flare Nuts to secure the line into the Rack.
OHHH AND BTW YOU WILL NEED A 14mm FLARE NUT WRENCH (I THINK THEY COME IN 13/14mm Sizes)
11-04-2012, 01:59 PM
#11
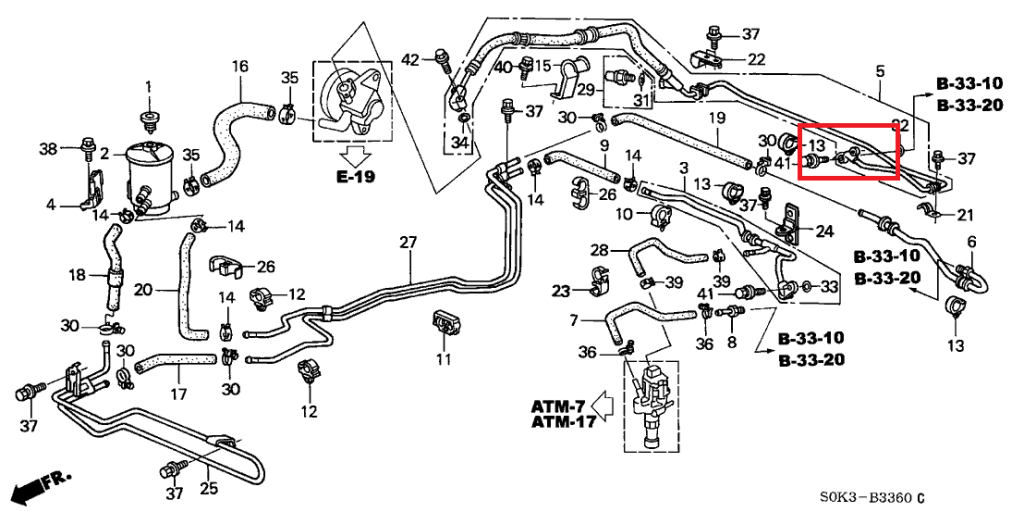
Crap, here is an example where the year matters. I have a 99, that hose if for 01,02,03. Here is the schematic I got hose from Acuraparts:
Which will make my job easier than yours, but still how did you weasel the hose out of there is what I am wondering. Guess I will go and see...time is running out.
Which will make my job easier than yours, but still how did you weasel the hose out of there is what I am wondering. Guess I will go and see...time is running out.
11-04-2012, 02:45 PM
#13
Moderator
Ahhh that is the issue then! BTW The High Pressure line its the same for 00, 01, 02, 03 its the 1999 TL the bizarre Guy from the 2G Family!
Then it will be alot Easier to Remove! I bet its just 2x 10mm Bolts holding into the Rack!
My bad for the Confusion there I never think of the 99 which has alot of differences between the other years in the 2G.
Then it will be alot Easier to Remove! I bet its just 2x 10mm Bolts holding into the Rack!
My bad for the Confusion there I never think of the 99 which has alot of differences between the other years in the 2G.
11-04-2012, 04:16 PM
#14
Ahhh that is the issue then! BTW The High Pressure line its the same for 00, 01, 02, 03 its the 1999 TL the bizarre Guy from the 2G Family!
Then it will be alot Easier to Remove! I bet its just 2x 10mm Bolts holding into the Rack!
My bad for the Confusion there I never think of the 99 which has alot of differences between the other years in the 2G.
Then it will be alot Easier to Remove! I bet its just 2x 10mm Bolts holding into the Rack!
My bad for the Confusion there I never think of the 99 which has alot of differences between the other years in the 2G.
11-04-2012, 07:04 PM
#15
Ok, got it done. I tried to take catalytic converter off, would have made job way easier as tubing could drop straight down, but bolt stripped. After a lot of yanking and pulling got it in. Never want to do that job again.
11-05-2012, 03:31 PM
#16
It's hard to maneuver because you are being careful. if the mechanic did it, he would bend it and squeeze it in. if the hose fails shortly after, it wont be his problem. Certain works require experiment to be efficient, and certain works require careless to be fast.
10-14-2014, 02:34 PM
#17
6th Gear

Join Date: Oct 2014
Posts: 6
Likes: 0
Received 0 Likes
on
0 Posts
92 integra
Hey guys I am trying to do the same thing on a 92 tegra, I am self learning how to repair my own car and have only been doing so for about a year. So i am very green here.
I was trying to follow along but there are differences obviously because of the year/model.. its a 1.8L GS hatchback B18A
So yea, in the diagrams the pressure hose is slightly different than what I have. If anyone knows 92's... please help me out!
I was trying to follow along but there are differences obviously because of the year/model.. its a 1.8L GS hatchback B18A
So yea, in the diagrams the pressure hose is slightly different than what I have. If anyone knows 92's... please help me out!
10-14-2014, 02:42 PM
#18
Moderator
Mmm funny to see there isn't an Integra Forum here.
Your 92 GS is not much harder to work on, Our same steps can be followed to replace your line.
Your 92 GS is not much harder to work on, Our same steps can be followed to replace your line.
10-14-2014, 03:16 PM
#20
6th Gear
Join Date: Oct 2014
Posts: 6
Likes: 0
Received 0 Likes
on
0 Posts
Again, I am very new to all of this so maybe you can help me out starting from under the car... under the hood i am ok with.. but under the car is a foreign wasteland to me. To give you an idea.. I just bought my first hydraulic jack and jack stand set about a month ago.
10-14-2014, 03:57 PM
#21
Moderator
^ OK
First of all. Locate your P/S Pump.
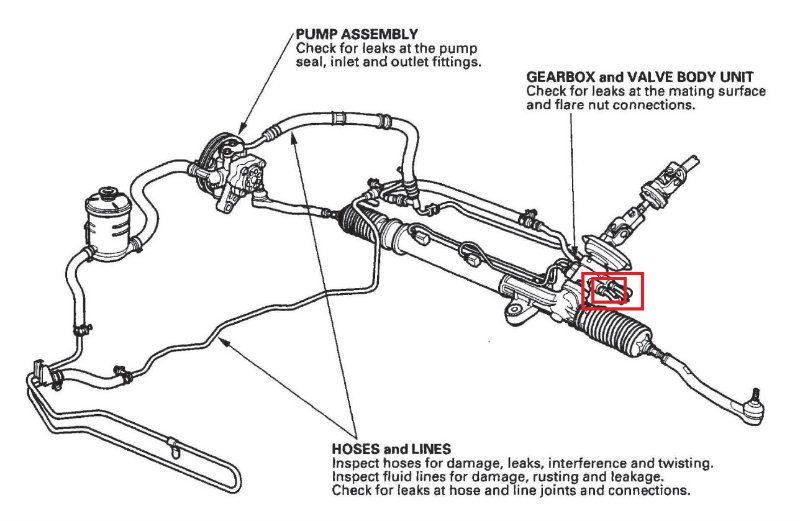
Then follow the High Pressure line (You can pin point it because it has a metal bracket with bolts attached to the pump since it handle high pressure) the Return Line from the P/S Reservoir is called "Low Pressure Return" because it basically works from a vacuum crated by the P/S Pump.
Once you located the High Pressure Line you must follow it to the steering rack. Space must be tight since Honda 4 Cyl places the engine in front of the rack Vs V6 Hondas which places the Engine behind the Passenger Firewall which makes it easier to work on the rack from the engine bay.
Everything must be straight forward after that.
First of all. Locate your P/S Pump.
Then follow the High Pressure line (You can pin point it because it has a metal bracket with bolts attached to the pump since it handle high pressure) the Return Line from the P/S Reservoir is called "Low Pressure Return" because it basically works from a vacuum crated by the P/S Pump.
Once you located the High Pressure Line you must follow it to the steering rack. Space must be tight since Honda 4 Cyl places the engine in front of the rack Vs V6 Hondas which places the Engine behind the Passenger Firewall which makes it easier to work on the rack from the engine bay.
Everything must be straight forward after that.
 09-12-2015, 09:35 AM
#25
Cruisin'

Join Date: Apr 2007
Age: 55
Posts: 18
Likes: 0
Received 0 Likes
on
0 Posts
Trying to replace my power steering hose on my 99 TL. Not finding any other thread than this one and no DIY.
What is the best way to remove the hose from the to or the bottom?
I have the car on ramps now with decent access underneath but can not see an easy way for it to come out, coming from the top does not look much better. There also appears to a sensor connected to the hose just down stream from the pump.
I have the bolts off the rack and have unbolted the clamp from the frame. Hose still seem to be pretty stuck in place.
Appreciate any directions, hints or tips from those that have tackled this before.
09-12-2015, 10:27 PM
#26
It's been a while since I did mine, and I have a 99, supposedly different than newer years. But if I could have dropped the cataytic that would have made it easier. It was a lot of pulling and not being gentle to get it out.
09-13-2015, 07:13 AM
#27
Cruisin'
Join Date: Apr 2007
Age: 55
Posts: 18
Likes: 0
Received 0 Likes
on
0 Posts
Got it done, sorta... Hose is in but I am struggling with getting the two lower clamps back on. These are the two that secure the hose to the frame. Any tips on getting these back on would be appreciated. I am thinking about using zip ties and rubber hose as an alternative to the clamps.
09-13-2015, 09:54 AM
#28
I wasnt able to get the hose in exactly as it was, and also used zip ties. I cant see really getting it in right without taking engine and steering rack out. Mines been going good for 3 years. Make sure you use honda compatible power steering fluid, made the mistake of standard fluid and it does not work.
10-18-2015, 09:47 PM
#29

I wasnt able to get the hose in exactly as it was, and also used zip ties. I cant see really getting it in right without taking engine and steering rack out. Mines been going good for 3 years. Make sure you use honda compatible power steering fluid, made the mistake of standard fluid and it does not work.
 10-23-2015, 08:28 AM
#32
I need to reseal the oil pan to fix a leak anyway, and if I take that off, I should be able to get the power steering pipe back on.
Thanks for the advice, though.
10-23-2015, 11:09 AM
#33
To raise the engine you'd just need a block of 2x4 and a floor jack - support the engine from below with the 2x4 and floor jack on the oil pan, unbolt the mount and raise away. Should be able to get 1-2 inches without risking any damage to anything or needing to unhook anything.
08-06-2017, 01:07 PM
#34

Both the High Pressure and Return Line are Bolted by Flare Nuts into the Rack! the High Pressure Line Itself is bolted into the chasis by a Bracket with 1 Single 10mm Bolt just After the Rack its pretty noticeable and I believe just 2 Plastic Hinges along the Way behind the Rear Engine Mount.
Anyway Unbolting The Flare Nut is the Problem here, I learned that the Hard Way!
THIS WILL MAKE YOUR LIFE EASIER! (The Size is Wrong, Just to Show you the Tool):
Ill check my Tool Box tomorrow to get you the exact Size of the Flare Nut Wrench..
Just to be Clear even with the Tool I could not Get the Flare Nut out... Wise-Grips + Hammer did the Trick...
2002-2003 Acura TL Power Steering Pressure Line Hose Assembly - Gates 365526 - - PartsGeek.com
Actually that service manual that is at internet show 2 different pictures of power stering system. One for regular 99-03 and other for 02 and 03 S. It is at page 1000 or so.
Last edited by bbsitum; 08-06-2017 at 01:22 PM.
08-19-2017, 11:18 PM
#37
3rd Gear

Join Date: Aug 2017
Age: 30
Posts: 3
Likes: 0
Received 0 Likes
on
0 Posts
Hi All,
This is my first post on Acurazine because it is my first time doing what I consider to be actual work on my car. I have a Acura TL 2000 and I am trying to replace the power steering pressure hose. I know next to nothing about cars but am already learning a lot. I got the hose off successfully but I am having a hard time getting the new one on. I am scared of bending it but can't figure out how to get it to fit. I saw someone mentioned taking off the catalytic converter (I assume this is the thing on the exhaust pipe that is right in the way), do you guys think I should do this? I have jack stands. All the videos I have found skip the part about putting the hose back on, probably because it takes such much messing around with to get it in. I don't know if anyone can help me with this but I figured I'd ask. Thanks.
This is my first post on Acurazine because it is my first time doing what I consider to be actual work on my car. I have a Acura TL 2000 and I am trying to replace the power steering pressure hose. I know next to nothing about cars but am already learning a lot. I got the hose off successfully but I am having a hard time getting the new one on. I am scared of bending it but can't figure out how to get it to fit. I saw someone mentioned taking off the catalytic converter (I assume this is the thing on the exhaust pipe that is right in the way), do you guys think I should do this? I have jack stands. All the videos I have found skip the part about putting the hose back on, probably because it takes such much messing around with to get it in. I don't know if anyone can help me with this but I figured I'd ask. Thanks.
08-20-2017, 01:21 PM
#38
^ OK
First of all. Locate your P/S Pump.
Then follow the High Pressure line (You can pin point it because it has a metal bracket with bolts attached to the pump since it handle high pressure) the Return Line from the P/S Reservoir is called "Low Pressure Return" because it basically works from a vacuum crated by the P/S Pump.
Once you located the High Pressure Line you must follow it to the steering rack. Space must be tight since Honda 4 Cyl places the engine in front of the rack Vs V6 Hondas which places the Engine behind the Passenger Firewall which makes it easier to work on the rack from the engine bay.
Everything must be straight forward after that.
08-20-2017, 01:29 PM
#39
Both the High Pressure and Return Line are Bolted by Flare Nuts into the Rack! the High Pressure Line Itself is bolted into the chasis by a Bracket with 1 Single 10mm Bolt just After the Rack its pretty noticeable and I believe just 2 Plastic Hinges along the Way behind the Rear Engine Mount.
Anyway Unbolting The Flare Nut is the Problem here, I learned that the Hard Way!
THIS WILL MAKE YOUR LIFE EASIER! (The Size is Wrong, Just to Show you the Tool):
Ill check my Tool Box tomorrow to get you the exact Size of the Flare Nut Wrench..
Just to be Clear even with the Tool I could not Get the Flare Nut out... Wise-Grips + Hammer did the Trick...
Anyway Unbolting The Flare Nut is the Problem here, I learned that the Hard Way!
THIS WILL MAKE YOUR LIFE EASIER! (The Size is Wrong, Just to Show you the Tool):
Ill check my Tool Box tomorrow to get you the exact Size of the Flare Nut Wrench..
Just to be Clear even with the Tool I could not Get the Flare Nut out... Wise-Grips + Hammer did the Trick...
08-20-2017, 01:33 PM
#40
Hi All,
This is my first post on Acurazine because it is my first time doing what I consider to be actual work on my car. I have a Acura TL 2000 and I am trying to replace the power steering pressure hose. I know next to nothing about cars but am already learning a lot. I got the hose off successfully but I am having a hard time getting the new one on. I am scared of bending it but can't figure out how to get it to fit. I saw someone mentioned taking off the catalytic converter (I assume this is the thing on the exhaust pipe that is right in the way), do you guys think I should do this? I have jack stands. All the videos I have found skip the part about putting the hose back on, probably because it takes such much messing around with to get it in. I don't know if anyone can help me with this but I figured I'd ask. Thanks.
This is my first post on Acurazine because it is my first time doing what I consider to be actual work on my car. I have a Acura TL 2000 and I am trying to replace the power steering pressure hose. I know next to nothing about cars but am already learning a lot. I got the hose off successfully but I am having a hard time getting the new one on. I am scared of bending it but can't figure out how to get it to fit. I saw someone mentioned taking off the catalytic converter (I assume this is the thing on the exhaust pipe that is right in the way), do you guys think I should do this? I have jack stands. All the videos I have found skip the part about putting the hose back on, probably because it takes such much messing around with to get it in. I don't know if anyone can help me with this but I figured I'd ask. Thanks.
Last edited by bbsitum; 08-20-2017 at 01:44 PM.