Spark Plug replace/change DIY
 01-18-2010, 04:17 PM
#1
Racer
Thread Starter
Join Date: Apr 2009
Location: Wilmington, DE
Age: 36
Posts: 359
Likes: 0
Received 20 Likes
on
2 Posts
Spark Plug replace/change DIY
since i didn't see a DIY on how to replace or change spark plugs and had to search around the forum for numerous threads to see how to change them. i decided to make a thread on how to change spark plugs on the 2nd gen TL.
what you will need:
- 6 NGK Iridium IX spark plugs (they come pre-gapped)
- anti-seize grease
- 3/8 ratchet, 3" extension, 6" extension and spark plug socket (5/8)
- 6mm allen wrench key (metric)
you will need time and patience, especially the rear passenger side spark plug.
difficulty: easy
time: probably 30 minutes to an 1 hour (if your a noob )
)
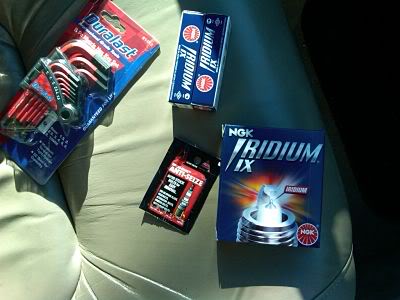
you will need as seen in the above pic:
-6mm allen wrench for the coil packs ($15, i got the whole metric set)
-6 NGK Iridium IX spark plugs ($7 each) ($42 for all 6) (autozone)
-anti-seize grease ($1.25)
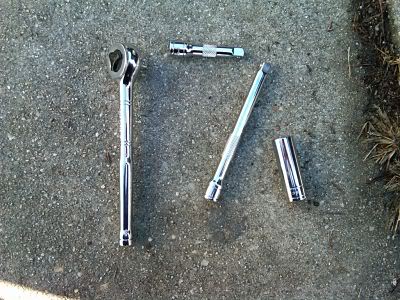
-3/8 ratchet
-3" extension
-6" extension
-5/8 spark plug socket (it will help to have a magnet spark plug socket by the way)
now you can start at whichever bank (front or rear) you feel comfortable with.
i prefer to start with the rear bank, especially the passenger side spark plug, considering its the hardest out of them all and it takes more time then the others.
using your 6mm allen wrench:
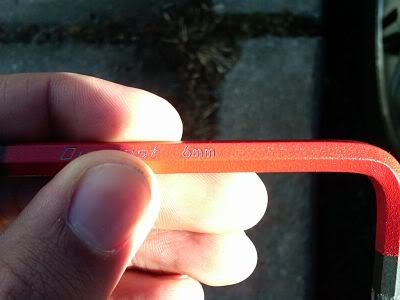
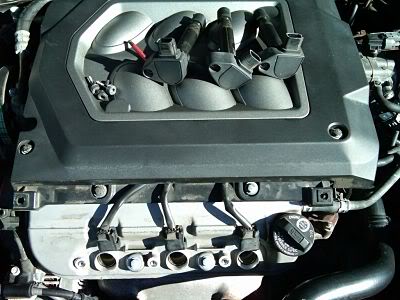
Removing the bolts or screws on the coil packs:
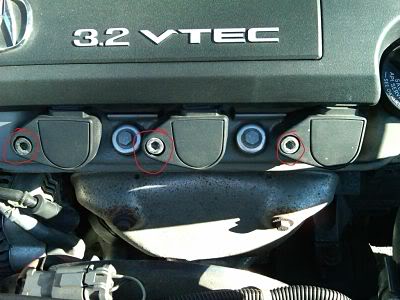
front bank: the bolts i circled red, you will be using the 6mm allen wrench to remove them.
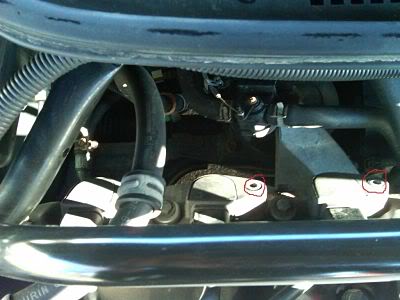
the same can be said about the rear bank (the screws circled in red is what you will using your 6mm allen wrench for)
now i didn't highlight the passenger coil pack because it was difficult to take a picture of considering the power steering hose is in the way.
now thats the passenger coil pack bolt or screw that i circled red thats between the bar and the power steering hose. use your 6mm allen wrench to remove it.
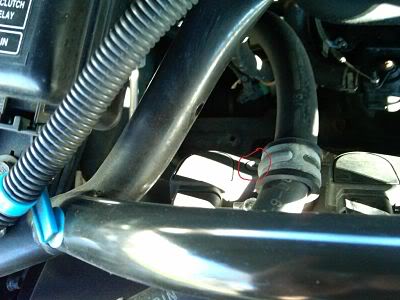
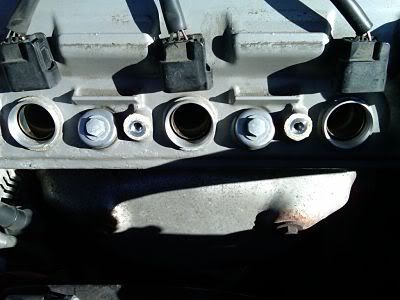
this is optional but i suggest to remove the bolt that's holding the power steering hose, which is in this picture:
because it gives you some room to squeeze your hands in there to get the coil and to get the ratchet in place. the screw or bolt is 10mm deep socket and can be taken out using a 1/4 ratchet and 1/4 3" extension.
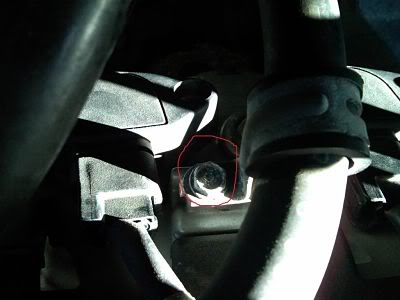
after removing the rear passenger side coil pack
make sure you place the coil pack somewhere in the car so that it doesn't drop or fall. these things are fragile according to 01tl4tl
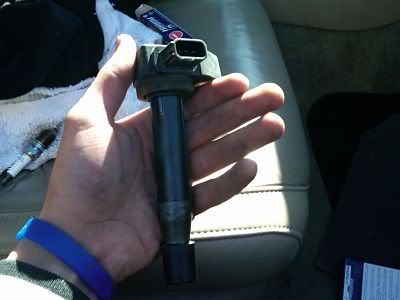
in order to remove the spark plug, i and 01tl4tl suggest to first combine the 3"extension and the spark plug socket and drop it in and then attach the 3/4 ratchet and 6" extension to undo the spark plug. it will take some time but you will get the hang of removing it. it took me 15 minutes to get that one out. but putting it back in was a breeze
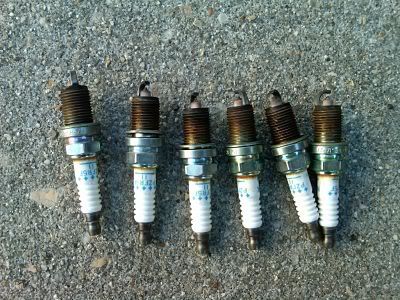
this is what most of my spark plugs looked like compared to the new ones (NGK Iridium IX):
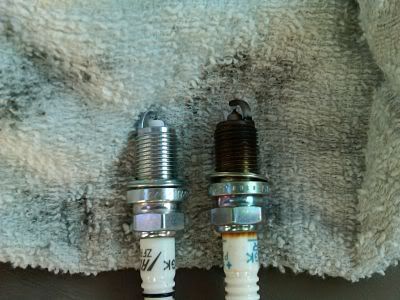
now to add, those plugs were in the car ever since it was rolled off the dealer lot back in 1998
okay now is the best time to add anti-seize around the threads of the new spark plug:
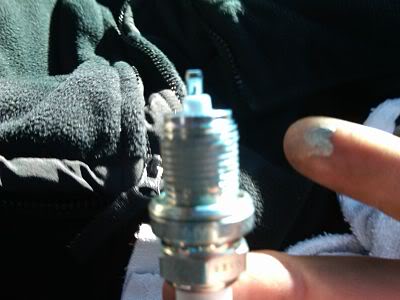
make sure you DO NOT get anti-seize on the first 2 threads of the plug!! you do not what that stuff you in your combustion chamber!
then use the steps above in the reverse order to get the plug back in place. after you do the rear passenger spark plug doing the rest in the back is a breeze and definitely the front bank is easieR!
for torque specs for the spark plugs are 13 foot pounds. but i just hand-tighten mine first and then applied the 3/8 ratchet until they felt snug and then i put back on the coil pack.
Here is all 6 old stock spark plugs
when you put all the coils back. put everything back together and start the engine up!
after the spark plug change:
-i noticed a huge amount of response on the throttle.
-its quieter, also there isn't any shaking at idle like i would feel in the morning and the car just started right up without any hesitation.
-the gas needle on the dash hasn't moved since the replacing of the spark plugs. usually my car goes through gas and i have been wondering why but it was the spark plugs that were old and worn out.
thanks to 01tl4tl and friesm2000 for the help
what you will need:
- 6 NGK Iridium IX spark plugs (they come pre-gapped)
- anti-seize grease
- 3/8 ratchet, 3" extension, 6" extension and spark plug socket (5/8)
- 6mm allen wrench key (metric)
you will need time and patience, especially the rear passenger side spark plug.
difficulty: easy
time: probably 30 minutes to an 1 hour (if your a noob
)you will need as seen in the above pic:
-6mm allen wrench for the coil packs ($15, i got the whole metric set)
-6 NGK Iridium IX spark plugs ($7 each) ($42 for all 6) (autozone)
-anti-seize grease ($1.25)
-3/8 ratchet
-3" extension
-6" extension
-5/8 spark plug socket (it will help to have a magnet spark plug socket by the way)
now you can start at whichever bank (front or rear) you feel comfortable with.
i prefer to start with the rear bank, especially the passenger side spark plug, considering its the hardest out of them all and it takes more time then the others.
using your 6mm allen wrench:
Removing the bolts or screws on the coil packs:
front bank: the bolts i circled red, you will be using the 6mm allen wrench to remove them.
the same can be said about the rear bank (the screws circled in red is what you will using your 6mm allen wrench for)
now i didn't highlight the passenger coil pack because it was difficult to take a picture of considering the power steering hose is in the way.
now thats the passenger coil pack bolt or screw that i circled red thats between the bar and the power steering hose. use your 6mm allen wrench to remove it.
this is optional but i suggest to remove the bolt that's holding the power steering hose, which is in this picture:
because it gives you some room to squeeze your hands in there to get the coil and to get the ratchet in place. the screw or bolt is 10mm deep socket and can be taken out using a 1/4 ratchet and 1/4 3" extension.
after removing the rear passenger side coil pack
make sure you place the coil pack somewhere in the car so that it doesn't drop or fall. these things are fragile according to 01tl4tl
in order to remove the spark plug, i and 01tl4tl suggest to first combine the 3"extension and the spark plug socket and drop it in and then attach the 3/4 ratchet and 6" extension to undo the spark plug. it will take some time but you will get the hang of removing it. it took me 15 minutes to get that one out. but putting it back in was a breeze
this is what most of my spark plugs looked like compared to the new ones (NGK Iridium IX):
now to add, those plugs were in the car ever since it was rolled off the dealer lot back in 1998
okay now is the best time to add anti-seize around the threads of the new spark plug:
make sure you DO NOT get anti-seize on the first 2 threads of the plug!! you do not what that stuff you in your combustion chamber!
then use the steps above in the reverse order to get the plug back in place. after you do the rear passenger spark plug doing the rest in the back is a breeze and definitely the front bank is easieR!
for torque specs for the spark plugs are 13 foot pounds. but i just hand-tighten mine first and then applied the 3/8 ratchet until they felt snug and then i put back on the coil pack.
Here is all 6 old stock spark plugs
when you put all the coils back. put everything back together and start the engine up!
after the spark plug change:
-i noticed a huge amount of response on the throttle.
-its quieter, also there isn't any shaking at idle like i would feel in the morning and the car just started right up without any hesitation.
-the gas needle on the dash hasn't moved since the replacing of the spark plugs. usually my car goes through gas and i have been wondering why but it was the spark plugs that were old and worn out.
thanks to 01tl4tl and friesm2000 for the help
Last edited by bruistopher; 01-18-2010 at 04:21 PM.

The following 19 users liked this post by bruistopher:
!Type-S! (05-16-2012),
augman (02-09-2013),
blackhorse21 (06-13-2017),
ceecees_TL_TYPE_S (10-13-2011),
cheekoo (09-11-2011),
and 14 others liked this post.
01-18-2010, 05:09 PM
#2
Senior Moderator
Awesome. Ill add this to the DIY page. (which i still need to finish  )
)
)
The following users liked this post:
supao (05-18-2012)
01-18-2010, 09:23 PM
#5
Racer
Thread Starter
Join Date: Apr 2009
Location: Wilmington, DE
Age: 36
Posts: 359
Likes: 0
Received 20 Likes
on
2 Posts
no problem and there is a opening at the bottom of the coil pack. its to connect with the top of the spark plug.
and i took the spark plug socket and attached it with the 3" extension first and then i dropped it in the spark plug hole where the coil pack was and then i attached the 6" extension to the 3" extension while it was in the spark plug hole and then attached the 3/8 ratchet and then got the spark plug out.
and i took the spark plug socket and attached it with the 3" extension first and then i dropped it in the spark plug hole where the coil pack was and then i attached the 6" extension to the 3" extension while it was in the spark plug hole and then attached the 3/8 ratchet and then got the spark plug out.
01-19-2010, 07:26 AM
#7

Trending Topics
01-19-2010, 11:49 AM
#8

good job x!
I suggest doing 1 front to get the hang of how it all fits together, then the rears since they are more difficult, then the last 2 fronts to finish up easy~
Celebrate with test drive
I suggest seafoam a week before plug change to make everything like new for them to operate in
I suggest doing 1 front to get the hang of how it all fits together, then the rears since they are more difficult, then the last 2 fronts to finish up easy~
Celebrate with test drive
I suggest seafoam a week before plug change to make everything like new for them to operate in
The following 2 users liked this post by 01tl4tl:
Glockgen4 (10-14-2011),
scubasteve03tl-s (08-07-2011)
01-19-2010, 06:28 PM
#9
good job
ummm.... maybe you should not even be working on your own car
 <(in red)
normally i prefer to just do all the front ones first
and seafoam in advance, never hurts to, cause it can contaminate the plugs some, so why not let it comtaminate the old plugs, they are gonna be changed soon anyways
<(in red)good job x!
I suggest doing 1 front to get the hang of how it all fits together, then the rears since they are more difficult, then the last 2 fronts to finish up easy~
Celebrate with test drive
I suggest seafoam a week before plug change to make everything like new for them to operate in
I suggest doing 1 front to get the hang of how it all fits together, then the rears since they are more difficult, then the last 2 fronts to finish up easy~
Celebrate with test drive
I suggest seafoam a week before plug change to make everything like new for them to operate in
and seafoam in advance, never hurts to, cause it can contaminate the plugs some, so why not let it comtaminate the old plugs, they are gonna be changed soon anyways
01-24-2010, 09:29 PM
#12
Racer
Thread Starter
Join Date: Apr 2009
Location: Wilmington, DE
Age: 36
Posts: 359
Likes: 0
Received 20 Likes
on
2 Posts
UPDATE: i must say after doing the spark replacement i have noticed:
-increase in power
-better gas mileage
-less hesitation
-better start-ups
when i say better gas mileage i mean better gas mileage. because the last couple of months i have been complaining about my gas mileage suffering and there were options:
-bad spark plugs
-bad air filter
-bad o2 sensor
-improper tire pressure
but after looking to all the above i can confirm gas mileage was suffered due to bad an awful spark plugs. they were never changed and original plugs date back to when the car was coming off the dealer lot in 1998!
using the trip meter i averaged 230.9 miles and i'm on a quarter of a tank right now. i will probably get 260 or 270 miles out of this full tank before the light comes on. I drive wide open throttle (WOT) a couple of times and did a lot of city driving.
but man i like the feeling of the car now. i want to add more air pressure to the tires instead of the manufacturer recommended 32 psi. maybe 34 or 36 psi isn't bad for more air in the tire? tell me if i'm wrong.
@everyone
your welcome! i did the diy and i figured there are some future technicians out there like me that would like to get a better understanding of our cars. so what better way to do that with spark plug replacement!
01-25-2010, 04:36 AM
#13
wow if we had known those were oe plugs from 10+ years of use,, and complaint of bad mileage... 2+2= dededee
Try a can of seafoam in half tank of gas and a can thru the master vac port at TB
Clean TB inner plate and check air filter- those will help mileage more
Tire pressure should be set by the actual percentage of vehicle weight on the tire
so 50 psi max cold, TL is 80% of tires max load- subtract 20% or 10 psi in this case and you get 40psi, performance tires like to be up a few psi from that-42-43 as example
OE tires and 32 is a joke for making it ride softer- 36 is fine and will get you mpg!
just read the tire and go from there
01-25-2010, 08:46 AM
#15
Racer
Thread Starter
Join Date: Apr 2009
Location: Wilmington, DE
Age: 36
Posts: 359
Likes: 0
Received 20 Likes
on
2 Posts
@01tl4tl
Wouldn't that contaminate the new spark plugs I just put in a week ago?
And yeah those spark plugs were never replaced! They were there sense 1998. Take a look at the pictures I posted of them. Those are the original oem spark plugs.
Thanks for clarification on the tires because tonight at class I'm going to check and add 36 psi to all four tires.
Sent via BlackBerry
01-25-2010, 01:11 PM
#17
Racer
Thread Starter
Join Date: Apr 2009
Location: Wilmington, DE
Age: 36
Posts: 359
Likes: 0
Received 20 Likes
on
2 Posts
well my "mpg" will not be accurate because this is my first time doing this but i used the trip meter and averaged 255.3 miles until the gas light came on. and then i went to the gas station and filled her up and got a total of 14.169 gallons put in. i also threw a 1/2 can of seafoam in the mix.
i divided 255/14 and got an average of 18 miles per gallon. but that's like 70% city and 30% highway. so i use the car more in the city then i do highway so i look at that being somewhat average for my driving abilites and i do occasionally do wide open throttle. also my mom drives my car regularly and she is somewhat aggressive lol
i divided 255/14 and got an average of 18 miles per gallon. but that's like 70% city and 30% highway. so i use the car more in the city then i do highway so i look at that being somewhat average for my driving abilites and i do occasionally do wide open throttle. also my mom drives my car regularly and she is somewhat aggressive lol
01-25-2010, 05:52 PM
#18
@01tl4tl
Wouldn't that contaminate the new spark plugs I just put in a week ago?
And yeah those spark plugs were never replaced! They were there sense 1998. Take a look at the pictures I posted of them. Those are the original oem spark plugs.
Thanks for clarification on the tires because tonight at class I'm going to check and add 36 psi to all four tires.
Sent via BlackBerry
Wouldn't that contaminate the new spark plugs I just put in a week ago?
And yeah those spark plugs were never replaced! They were there sense 1998. Take a look at the pictures I posted of them. Those are the original oem spark plugs.
Thanks for clarification on the tires because tonight at class I'm going to check and add 36 psi to all four tires.
Sent via BlackBerry
 do not add 36 psi, or they will proably
  , only make it so the "total" psi in them is 36
  01-25-2010, 06:02 PM
#19
Intermediate

Join Date: Aug 2009
Posts: 46
Likes: 0
Received 0 Likes
on
0 Posts
good job
ummm.... maybe you should not even be working on your own car
<(in red)
normally i prefer to just do all the front ones first
and seafoam in advance, never hurts to, cause it can contaminate the plugs some, so why not let it comtaminate the old plugs, they are gonna be changed soon anyways
ummm.... maybe you should not even be working on your own car
<(in red)normally i prefer to just do all the front ones first
and seafoam in advance, never hurts to, cause it can contaminate the plugs some, so why not let it comtaminate the old plugs, they are gonna be changed soon anyways
01-25-2010, 08:19 PM
#22
Racer
Thread Starter
Join Date: Apr 2009
Location: Wilmington, DE
Age: 36
Posts: 359
Likes: 0
Received 20 Likes
on
2 Posts
dude you make me feel like a noob at times!
i know not to fill the tire up to 64 psi.
listen i will have a tire pressure gauge and by using that i will add a few extra psi because i know my tire has about 29 psi in them right now or lower. so with me filling all 4 tires to 36 psi it will be fine.
i know not to fill the tire up to 64 psi.
listen i will have a tire pressure gauge and by using that i will add a few extra psi because i know my tire has about 29 psi in them right now or lower. so with me filling all 4 tires to 36 psi it will be fine.
01-25-2010, 09:51 PM
#23
yes 36 psi will be fine, can even go higher-38 if you want, but thats a good start
Fries thrives on catching phrasing and misunderstandings~ so its a rite of passage to be hassled by him
New spark plugs will be fine to seafoam, the only time there is issue is when they have 100 on them and you do a lousy after drive to clean them off.
new plugs just do a good afterdrive- see my methods postings
note on gas tank seafoam- 1 oz per gallon is maitenance cleaning dose- thats a full can to just under a full tank. ok to do every 5000 miles if you want.
Or super cleaning dose is 2 oz per gal, thats 1 can to 1/2 tank
so 1/2 can in full tank is actually very little action happening
the can directions dont mention to be at 1/4 tank if only adding 1/3 can....
Seafoam website says less than 1/2 oz per gallon is ineffective
 , so nothing personal
01-26-2010, 01:42 AM
, so nothing personal
01-26-2010, 01:42 AM
#25
whats sarcasm? 

 03-27-2010, 02:05 PM
#27
03-28-2010, 04:08 AM
#28
dealer gets 25 per! try oreilly/kragens 7 per
or there is a gen3 thread with 6 dollar find on the plugs
or there is a gen3 thread with 6 dollar find on the plugs
03-28-2010, 04:42 PM
#31
its easier to remove a 2nd upper crossbar for access than fight for knuckle space
The rears are best reached with a 3 and 6 inch extensions and a spark plug socket.
that lets you lower the tool in segements
The rears are best reached with a 3 and 6 inch extensions and a spark plug socket.
that lets you lower the tool in segements
04-18-2010, 09:09 AM
#32
I just picked them up at Autozone. $42 for the plugs and the anti-seize.
However, I believe I do not have the right extensions, so install might not happen this morning.
Higher tire pressure, in addition to higher MPG and shorter stopping distances,
will make you less likely to suffer a blowout if you hit a particularly nasty road crater.
Air filter, cabin filter, clock light, vanity lights, rear-view mirror, and console cup holder parts go in this week, also!
04-18-2010, 11:31 AM
#34
I picked up the 6" extension, and the installation went without incident.
55 minutes, including inspection of the air filter.
Un-be-liev-able how much more smoothly the car idles.
I did 25.17 mpg on my first full tank, 365 miles.
Can't wait to see the improvement.
One can do the job with two 3" extensions or the 6", but both makes it easier.
55 minutes, including inspection of the air filter.
Un-be-liev-able how much more smoothly the car idles.
I did 25.17 mpg on my first full tank, 365 miles.
Can't wait to see the improvement.
One can do the job with two 3" extensions or the 6", but both makes it easier.
04-18-2010, 08:27 PM
#35
a 3 and a 6 make the rear plugs very easy to reach, install tool in sections and there is even a place for the back of your hand against firewall when using ratchet
run a can of seafoam thru half a tank of gas- cleans the parts the plugs work with
run a can of seafoam thru half a tank of gas- cleans the parts the plugs work with
04-18-2010, 10:00 PM
#36
4th Gear

Join Date: Mar 2010
Location: Cincinnati, Ohio
Posts: 4
Likes: 0
Received 0 Likes
on
0 Posts
Did mine today ~1 hr. No prob accessing the passenger aft plug with some minor arm contortions: Also slid a 2.5 ft length of 3/4" copper pipe over the ratchet handle as leverage to unseat the old plug (yes, there is room). Additional tips:
- use a can of C02 (electronics air duster) to blow dirt out of elec. connector sockets (don't hold can upside down lest your hand get frostbite).
- apply a bit of high temp silicone lube to outer rubber seal groove (not to inner plug tip boot) to help keep the seal pliable and the dirt out.
- Secret tweak: apply a schosche of Caig ProGold contact cleaner/enhancer to all elec. connections to inhibit oxidation and to help the electrons slide across the contacts.
'nuff said.
04-19-2010, 02:54 AM
#37

so Iridium plugs are recommended? cause i was thinking of getting something like NGK Laser 2's
i believe thats what they are called???
i believe thats what they are called???
04-19-2010, 06:36 AM
#38
no need for those lasers- it refers to how the electrode is welded on
The TL runs best on NGK Iridium or Iridium IX (supposedly racier)
or ngk Platinum was stock but we are using gen3 stock- iridium- its better metal,
or last choice Denso which cost more and last fewer miles
The TL runs best on NGK Iridium or Iridium IX (supposedly racier)
or ngk Platinum was stock but we are using gen3 stock- iridium- its better metal,
or last choice Denso which cost more and last fewer miles
04-19-2010, 04:11 PM
#40
thats what most of us run NGK Iridium IX
supposedly they last 60kmiles compared to regular iridium which claims 100
BUT the stock plugs claimed 100 and few people go that long- new plugs help anywhere after 60
supposedly they last 60kmiles compared to regular iridium which claims 100
BUT the stock plugs claimed 100 and few people go that long- new plugs help anywhere after 60
The following users liked this post:
ceecees_TL_TYPE_S (10-13-2011)