DIY: ThermoBlok Spacers install / EGR cleaning
 06-24-2008, 09:21 PM
#121

ok- if you have some seafoam left over in the spray can- or liquid you can put in a plastic spray bottle--shoot it thru the TB plate itself and go for another hot drive
CEL should clear itself as heat blows off the crud from O-2, but you can reset the ECU and force a clear by removing the CLOCK fuse in passenger footwell for a minute
Was the after foam hot foot drive not done?
CEL should clear itself as heat blows off the crud from O-2, but you can reset the ECU and force a clear by removing the CLOCK fuse in passenger footwell for a minute
Was the after foam hot foot drive not done?

 06-25-2008, 12:48 AM
#123
inside the big metal thing near where you put seafoam into the vac port- the thing the throttle cables attach to,
thats the TB- inside that is a round plate that operates by throttle cable or electronic input (gen3)
It controls how much air is getting to the engine, and its sides need to be clean for a good seal, and the pivot clean.
The oily mess that comes from the PCV metal pipe from the valve cover (emissions gtarbage) and blows directly at the plate-stixks right to it!
Remove the air filter cover and the rubber snout that attaches with a clamp to the TB unit, there are some other lines you will have to move around to do this.
Or the cheap way- open the air filter top- with the engine running, spray Deep Creep into the rubber snout tube, that will knock the stuff loose on the plate fairly well, and go thru the intake.
Doing it with the plate and everything fully exposed will net a better job, and give you a chance to clean and lube the throtle return spring mechanism and everything in there.
06-25-2008, 12:54 AM
#124
the fusebox covers are removable plastic panels, get to know where all of them are, and inside the cover is a diagram and list of what each fuse is for. Many do more than 1 thing- and more than what is listed. Check many of my post for the link to free owner manual for any acura
Do you know the radio and nav security codes?
if so- remove the NEG battery cable at the battery terminal for a minute- then reattach
That forces a reboot just like shutting off the power to any computer~
it will also require those codes to get the radio working again!
If you dont know the codes- this way does not affect the radio
figure out where the fusebox is in the passeger front seat - near their feet area or possibly on the side of the dash with the door open- then you can see it
Most years is number 12 fuse- its marked CLOCK
06-27-2008, 10:00 PM
#125
I just cleaned my EGR port today. 99TL Nav 100k
It is very easy. I just look at the picture of the bulletin here
http://www.in.honda.com/Rjanisis/pubs/SB/B00-004.PDF
It only takes 2 hrs.
The hard part is to take out the Throttle Body gasket (30mins). I have to use the razor blade to scrape it off.
For the port, just spray with Carburator cleaner the flush with water. I don't have to wait for sun dry, after flush with water, I spray another can of Carburator cleaner and flush with gasoline....then get the hair dryer blow it for 5 mins...
Very easy, but you must have the right tool to get the Throttle Body out. I recommend you look at the 4 bolts on the TB to get the right tool before get into the job. all you need are 10mm and 12mm.
As a result, the car runs smooth, stronger and check engine light off now. (usually it off after disconnected the battery, but hope it not on again).
it runs like a charm now.
so happy, thanks to this thread starter.
09-25-2008, 10:52 AM
#128
Three Wheelin'
i just called acura and they said its sperate they said the gasket for the intake manfold is 7.00 and the gasket for the tb and intake manfold is 7.00 and the bolts are .60 cents does that sound right?
09-25-2008, 03:25 PM
#130
if you order a Outlaw Engineering thermoblock spacer kit- it has all the gaskets- and the certain bolts that need to be replaced- all packaged with it- and instruction with diagrams plus all the pics on azine of the process.
It also contains new gaskets where they are needed-
the very bottem gasket under the manifold is metal and gets reused
everything else requires some gentle, careful, scraping with proper tool or razorblades
No NICKS in the metal, or leaks will occur!!- just like your face bleeds- so will the car.
razor blades not included in kit~
Some spray cleaners will soften the carboard like gasket material for faster removal-
are you really going to ask me what I use?
try seafoam aerosol- Deep Creep
09-25-2008, 06:16 PM
#131
Three Wheelin'
no i didnt buy the spacers im planning on cleaning my intake manfold because i get a insignificent egr flow so im gonna clean the manifold. i thought you have to buy new bolts cause onces you take them off they are no longer as strong and theres a chance they will break if i put them back on
 09-25-2008, 10:23 PM
#134
Then after all that cleaning my EGR isn't opening all the way on demand. When told to open the valve the EGR only reads at peak 3.2 volts and half the time doesn't make it past 2.7ish. Glad I found the test cause I do NOT wanna go to my Acura dealer. When I do I'm installing a GPS tracker first.
09-26-2008, 01:15 AM
#135
try some seafoam on the egr valve- see if its mechanism is sticking
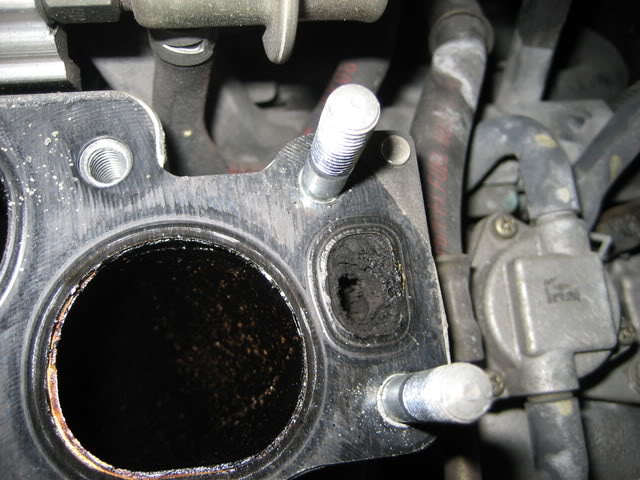
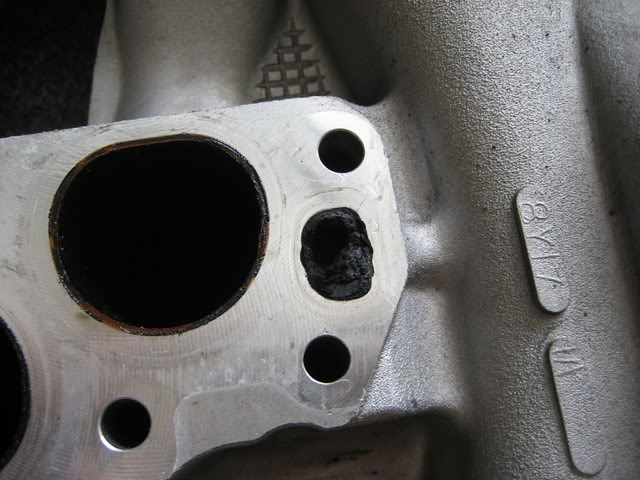
Can everyone see the crud buildup inside the intake manifold runners?- courtesy of the PCV system
thats what the gas and air mix has to get thru to enter the engine, after whatever work each person has done to mod the intake or cool the temps
Clean certainly would be more effective airflow IMO
Can everyone see the crud buildup inside the intake manifold runners?- courtesy of the PCV system
thats what the gas and air mix has to get thru to enter the engine, after whatever work each person has done to mod the intake or cool the temps
Clean certainly would be more effective airflow IMO
09-26-2008, 01:17 AM
#136
Are the batteries fresh on your multimeter- just to be safe about its readings
Seafoam the intake vac port at the TB with a full 16 oz of Deep Creep/seafoam aerosol
Seafoam the intake vac port at the TB with a full 16 oz of Deep Creep/seafoam aerosol
09-26-2008, 01:19 AM
#137
note: those manifold bolts are 16 ft lbs torque iirc- which is not much at all- do not overtighten nor tighten in your own random order- its a very precise method that needs to be done
No need to worry about stress tension and damage to the bolt simply from reuse-
its overtightening that is the killer
No need to worry about stress tension and damage to the bolt simply from reuse-
its overtightening that is the killer
09-26-2008, 11:40 AM
#139
Hope that helps

I definitely plan on doing this soon...

 09-26-2008, 12:59 PM
#141
here is the company website iirc they have a TL dyno chart showing the gains
www.outlawengineering.com great info there on how it all works, and comes with a thermo spacer for the TB to manifold- its a little wider than stock but not as much a change as a P2R spacer for the TB is, but that item has a different intent than just blocking heat transfer
see our vendor Excelerate for a great deal and all th einfo you could want.
He runs a performance shop and the parts are a sideline
Colder air is denser, even 10-20 degree= better combustion. Thats the intent of CAI systems or removing the lower intake resonator box- get cooler air from the front end of the car, down by the foglight area- to the intake manifold-
Notice how well your car runs up in the cold mountains making big HP, then drive to 110 degrees with high humidity--- and the car suffers as much as you do!
09-29-2008, 02:04 AM
#142
I checked the valve multiple times, it wasn't sticking, somehow I guess the way the valve reports it position to ECU was faulty. It read all over the place every time. I tried a different used one and it made my car run much smoother, 3.6v every time.
The following users liked this post:
PVP01CL-P (08-18-2016)
09-29-2008, 05:04 AM
#143
hmmm another part to add to the watch list for all of us!
thanks for the detective work moto x
thanks for the detective work moto x
10-18-2008, 03:32 PM
#144
Advanced

Just finished doing this today - a couple of questions:
What exactly flows through the egr? When I took off the intake plenum, there was a puddle of what looked like old oil on top of the manifold. Pretty nasty stuff.
When re-attaching the manifold, I couldn't torque the two nuts (that screw onto the provided studs) because my sockets weren't deep enough. I tightened them down as much as possible, but I can't know if they're tight enough...I don't know if this is a problem...
Also, when I took off my intake, some oily liquid dripped out of it. It definitely wasn't water, I don't know where it came from. Any idea what that is?
Thanks for your help guys, my intake manifold was filthy with carbon buildup.
10-18-2008, 08:10 PM
#145
thats normal crud you found, and a good reason to do a seafoam treatment!
Lots of cleaning needing in your engine
EGR exhaust Gas Recirculation- while you drive it puts a small amount of exhaust back into the intake manifold- and deposits its crud along the way
Its smog parts
The intake runners were probably filthy too
Acura's method with egr port cleaning is to also run solvent into each intake runner tube and then turn it upside down and wash out the other way- flushing it all out
When egr plugs- it effects the idle really bad
10-18-2008, 08:12 PM
#146
all the bolts have a specific torque and it must be set exact- no guessing- not close enough
intake vac leak will occur if not, and over tight is bad too!
iirc its 12-16 foot pounds on the main intake bolts
intake vac leak will occur if not, and over tight is bad too!
iirc its 12-16 foot pounds on the main intake bolts
10-18-2008, 10:29 PM
#147
Advanced
yeah...all the other bolts on the IM are torqued to 16-18 ft/lbs, it's just the two nuts that I couldn't get a reading on - I'll have to see if I can find a deeper socket to check those two.
What are the torque specs are for the bolts on the plenum? I broke two bolts trying to torque them to 14 ft/lbs. Man, broken bolts are a pain in the ass to get back out... Ended up torquing everything to 10-12 ft/lbs.
Any idea what that stuff was dripping out of my intake? It seemed like hydraulic fluid, but it was clear. No idea what it was, or how it go there. Everything in my car is stock, just have a K&N filter.
thanks for your help, I still have a lot to learn about working on my car....
10-21-2008, 11:49 AM
#148
on the page of directions that came in the box- or in the DIY section is a scan of same, has all the torque numbers- those plenum bolts are small and need less torque
hint for noobs to cars- chech how tight a bolt feels with a wrench or socket by pulling gently on it and seeing how much muscle it takes- now remove
there is muscle memory in your brain that will help bring it right back to what you felt for pull !
the PCV positive crancase ventilation- sends partially burned oil and water vapor residue from the crankcase into the intake to be reburned- thats the oily stuff you see
And people dont want to believe that a cleaner of some sort is a good idea~
11-02-2008, 02:19 PM
#154
Senior Moderator
11-03-2008, 11:22 AM
#156
10th Gear

Join Date: Mar 2008
Age: 38
Posts: 11
Likes: 0
Received 0 Likes
on
0 Posts
Hey Guys just a quick question. I cleaned my EGR port yesterday for the first time (155,000 miles) dang really dirty, I even had some kind of solution inside it. Cleaned that all out but when I was going to put is all back together I moticed that the EGR in the actual motor was pretty bad as well, is it ok to spary carb cleaner down in there or just have to leave it alone?
Great DIY and Info by the way.
Great DIY and Info by the way.
11-03-2008, 07:51 PM
#158
4th Gear

Join Date: Oct 2008
Location: Berlin, NJ
Age: 59
Posts: 4
Likes: 0
Received 0 Likes
on
0 Posts
I did this proceedure to my 99 and indeed this diy was superbly written and was a great aid. The IM port was 100% clogged. Additionally the port in the block was clogged as well.
One question? I cleared the carbon in the port to the block. What happens if some of the deposits drop into the block? Should I have cleared it? Seems to be running fine.
Other issue was that my car had high mileage on it. The gasket on the Throttle Body needed to be replaced. Need to be careful in removing the old one as aluminum is very soft.
11-18-2008, 01:03 PM
#159
4th Gear

Join Date: Nov 2008
Age: 59
Posts: 4
Likes: 0
Received 0 Likes
on
0 Posts
Noobie question
I searched the post but can't find a pic of the egr valve itself or a reference about replacing the egr valve.
I just bought a 99 tl and the mechanic that checked it before I bought it suggested a new valve and cleaning.
Is there a way to tell if I should get a new egr valve or shold I just be able to clean it?
I think I understand the cleaning of the ports, IM & TB but not sure about the EGR valve iteslf.
I just bought a 99 tl and the mechanic that checked it before I bought it suggested a new valve and cleaning.
Is there a way to tell if I should get a new egr valve or shold I just be able to clean it?
I think I understand the cleaning of the ports, IM & TB but not sure about the EGR valve iteslf.
