CD Changer ER-E1 Error Fix
 04-01-2008, 04:19 PM
#1
Advanced
Thread Starter

Hey Everyone:
Well I got tired of listening to the radio and finally fixed my CD Changer... Here is the the step by step guide. Hopefully the Mods will sticky this.
Time = 3 Hours (Taking into account you guys never done this)
Tools =
Dealer Radio Security Code (If you don't have this, look for it or ask the dealer, otherwise don't bother with this repair at all.)
Flat Head screwdriver (One small, one larger for prying)
Philips screwdriver (one small, one larger)
Needle nose tweezers
Step 1
a. Put your car in park and engage foot break. (DO THIS, You will understand later)
b. Remove the consult obd2 port cover just by pulling. This cover is located between the two seat warmer buttons.
c. Screw off the shift knob counter close wise like a screw
Step 2 (Hardest Part of Entire Repair)

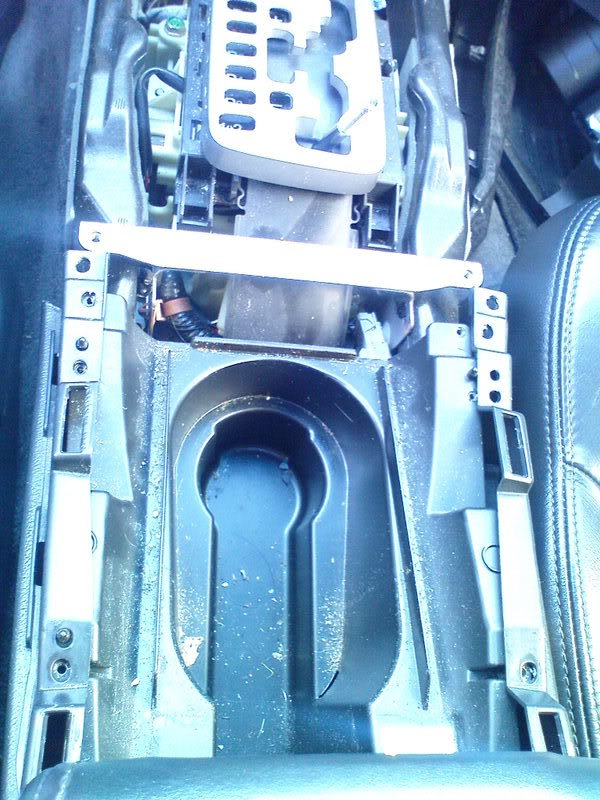
a. You can get to how the picture looks, by literally pulling off the side "L Moldings" on each side of the center console.
b. After pulling off the side "L" panels where it is a charcoal or wooden trim, this will expose more screws to remove the side plastic center console kick covers. Remove all associated screws so the side plastic. (This is the hardest part I think)
(Note there are screws all throughout the center console and below. Remove ALL the screws.
On the driver side of the side plastic black center console kick panel is also attached to the steering column cover in which you can only take off if you remove the fuse cover. There are also screws where the seats are in the way. Move the seat down as much as possible and lean the back part of the seat as much as possible to get to the screws. You can reach these screws in where the seat belts come up.
On the passenger side of the side plastic black center console kick panel, it is just one screw next to the glove box. You DO NOT need to remove the glove box. There are also screws where the seats are in the way. Move the seat down as much as possible and lean the back part of the seat as much as possible to get to the screws. You can reach these screws in where the seat belts come up from the side.)
c. Remove cup holders, by just pulling the center of the two cup holders forward and up.
d. Remove center console trap doors. Here is the prying. You have to pry with the long screw driver in between the black shifter black panel and the trap door panel. You can see they have super LONG tabs. Pull this part out, its VERY tough, but you can do it. Once the front tabs are out of the slots, you can remove the WHOLE trap door panel in one piece. Now trim off most of the 3 LONG tabs (Leave a little), this will not affect the look or anything of how the panels will fit.
Step 3 (Now the easy stuff)
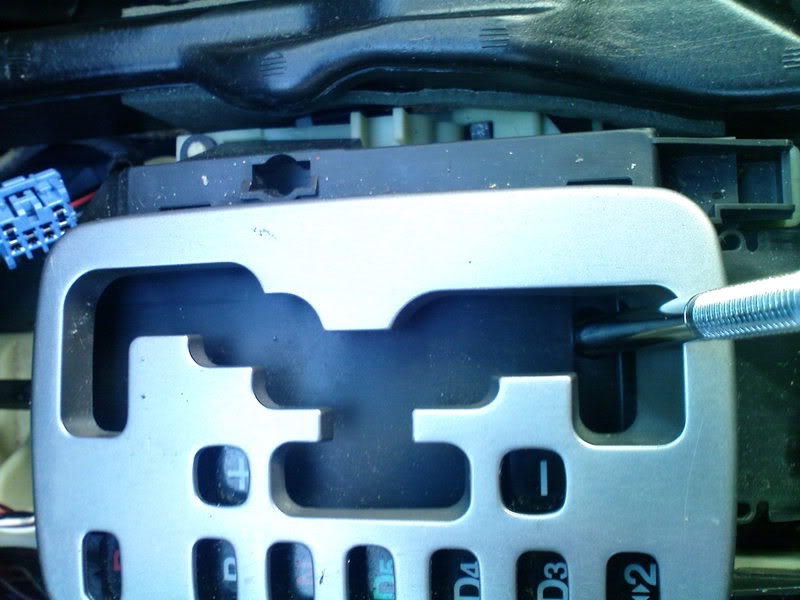
a. Remove the little plastic oval shift lock cover. By prying it off with your smaller flat head.
b. Stick the flat head down the shifter lock hole and shift the shifter to as show in the picture.

c. There are screws exposed now all the way up and down the sides where the "L" trims used to be. Remove all of them now, even the small black ones.
d. When you removed the console port cover, you see two philips screws way in the back. Remove them now.
e. The seat warmer rocker switches can be removed by pushing them up from the sides of the console or from where the console port cover used to be. Each has a plug in them and you can remove these plugs once the rockers switches are out of the black center console.
(Tip: Once the plugs are removed from the back of the rocker switches using a small flat head to slowly pry them out of the switches, you can remove the enter switch by pulling lightly up and towards you.)
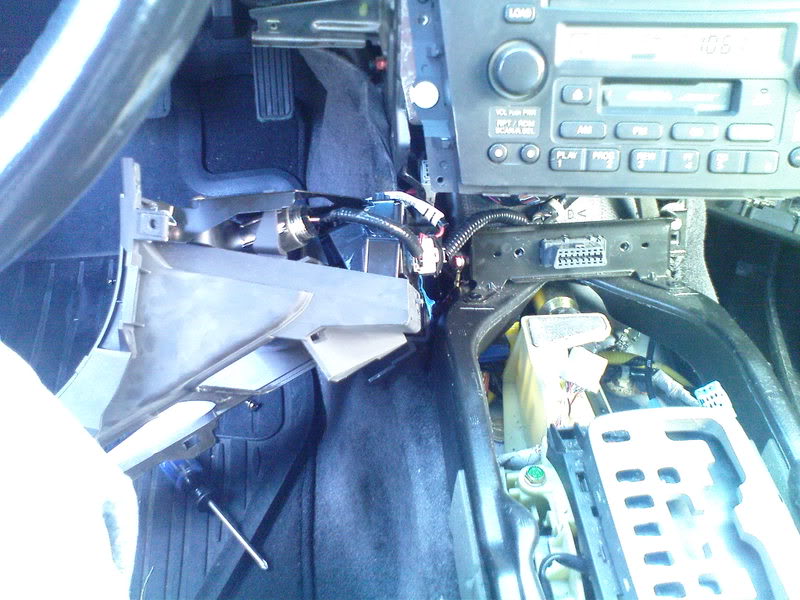
f. SLOWLY roll the piece out now like in the picture and you will see plugs in the back, remove the cigarette light adapter plug out and the console will be free. PLUS its also a good time to fix that loose cigarette light adapter by just holding the front part firmly and screwing the back metal cylinder into it.
Almost Done!

Step 4
Since you removed all the screws where the "L" Trims used to be, you can no remove the FACE of the radio. (Note: Pull a little forward and the face will detach from the actually deck. Watch for the 3 little posts that hold it to the AC Controls, but it will just come out, there areno cables behind the face.

Step 5:
Remove the AC Panel now. Watch out when you pull it forward as it DOES have a plug for it in the back. This pane when you re-assemble the everyone, goes in together with the actual CD Player as one unit.
Step 6:
Now REMOVE the ENTIRE CD player and the tape player TOGETHER. It is screw together as 1 Unit.
Step 7:
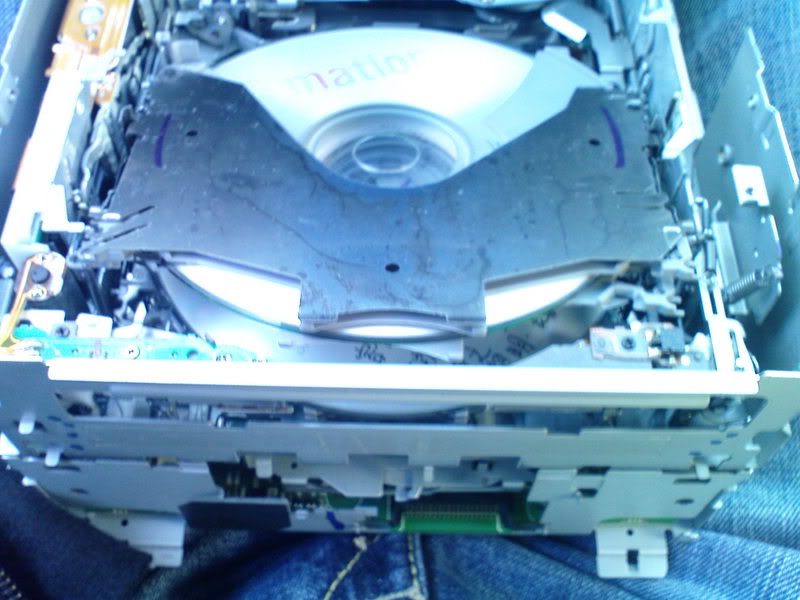
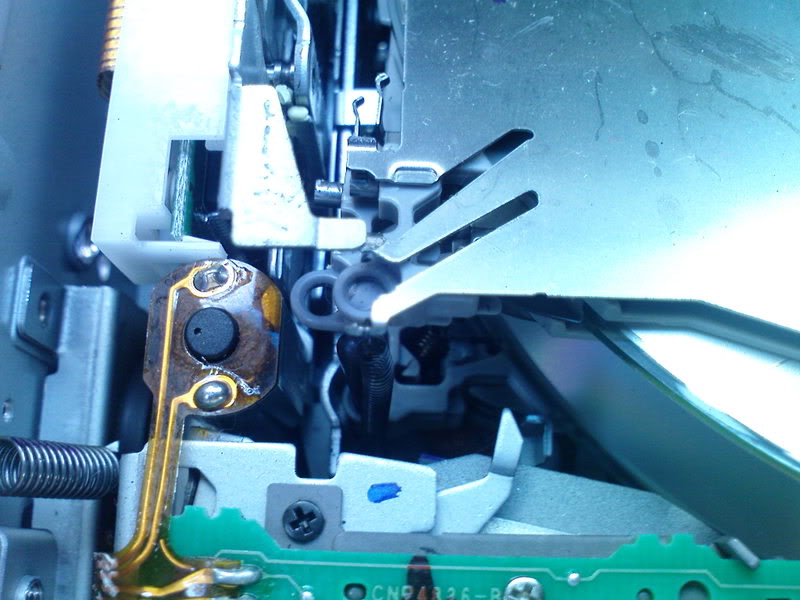
In this picture, this is WHY your player is erroring out. Notice the top 2 trays are propped up and all the other trays are misaligned.

Closer inspection (Left Side)

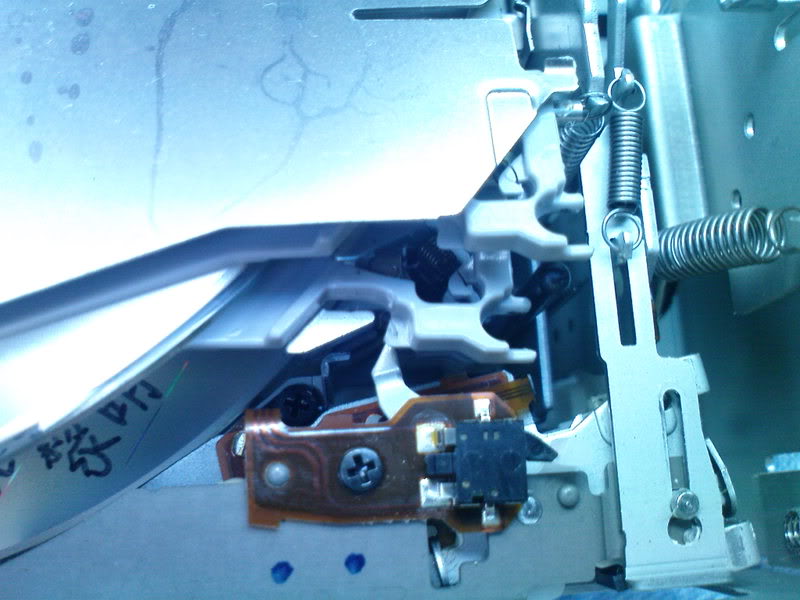
Closer inspection (Right Side)

Step 8:
Fix the trays and put all the trays through the left post and everything will line up. Be VERY VERY VERY careful of the springs in the FRONT next to the posts especially the left one. Don't pull the grey trays too high, just enough to clear the post, hence use the tweezers if you have fat fingers. Stretchy these little springs will really ruin the performance of your player.
(Note: You can try to "improve" the cd players by shortening up the springs that hold the grey plastic tras, but this is very risky if you aren't good at small springs that can fly everywhere. I tried other things such as putting a stopper at the very top of the posts to stop them from flying out and it did NOT work because the tolerance between ejecting the top tray and post is so close, that any stopper would inhibit the trays from moving into the correct position.)
Post install instructions:
Put all the screws back in the right place.
The trap door section might be the hardest to put back and that is why I just TRIMMED the 3 LONG tabs to fit it in easier. I tried all possible ways, to not trim these tabs but it will NOT fit as acura are so stupid to make these panels nearly impossible to remove without removing the arm rest and the WHOLE entire area in between the seat. TRIM IT and save yourself, while installing it will look like it doesn't line up but it will.
(Secret of aligning this trap door, the kick panels. Get them in the right order and the gap WILL be eliminated.)
The black kick panels have tabs to the back part of the black rear passenger kick panels, so just slide them in and take your time.
Email me at kenyu (at) hotmail (dot) com if you have any questions as I don't post too often on this forum.
Good luck!!!
Well I got tired of listening to the radio and finally fixed my CD Changer... Here is the the step by step guide. Hopefully the Mods will sticky this.
Time = 3 Hours (Taking into account you guys never done this)
Tools =
Dealer Radio Security Code (If you don't have this, look for it or ask the dealer, otherwise don't bother with this repair at all.)
Flat Head screwdriver (One small, one larger for prying)
Philips screwdriver (one small, one larger)
Needle nose tweezers
Step 1
a. Put your car in park and engage foot break. (DO THIS, You will understand later)
b. Remove the consult obd2 port cover just by pulling. This cover is located between the two seat warmer buttons.
c. Screw off the shift knob counter close wise like a screw
Step 2 (Hardest Part of Entire Repair)
a. You can get to how the picture looks, by literally pulling off the side "L Moldings" on each side of the center console.
b. After pulling off the side "L" panels where it is a charcoal or wooden trim, this will expose more screws to remove the side plastic center console kick covers. Remove all associated screws so the side plastic. (This is the hardest part I think)
(Note there are screws all throughout the center console and below. Remove ALL the screws.
On the driver side of the side plastic black center console kick panel is also attached to the steering column cover in which you can only take off if you remove the fuse cover. There are also screws where the seats are in the way. Move the seat down as much as possible and lean the back part of the seat as much as possible to get to the screws. You can reach these screws in where the seat belts come up.
On the passenger side of the side plastic black center console kick panel, it is just one screw next to the glove box. You DO NOT need to remove the glove box. There are also screws where the seats are in the way. Move the seat down as much as possible and lean the back part of the seat as much as possible to get to the screws. You can reach these screws in where the seat belts come up from the side.)
c. Remove cup holders, by just pulling the center of the two cup holders forward and up.
d. Remove center console trap doors. Here is the prying. You have to pry with the long screw driver in between the black shifter black panel and the trap door panel. You can see they have super LONG tabs. Pull this part out, its VERY tough, but you can do it. Once the front tabs are out of the slots, you can remove the WHOLE trap door panel in one piece. Now trim off most of the 3 LONG tabs (Leave a little), this will not affect the look or anything of how the panels will fit.
Step 3 (Now the easy stuff)
a. Remove the little plastic oval shift lock cover. By prying it off with your smaller flat head.
b. Stick the flat head down the shifter lock hole and shift the shifter to as show in the picture.
c. There are screws exposed now all the way up and down the sides where the "L" trims used to be. Remove all of them now, even the small black ones.
d. When you removed the console port cover, you see two philips screws way in the back. Remove them now.
e. The seat warmer rocker switches can be removed by pushing them up from the sides of the console or from where the console port cover used to be. Each has a plug in them and you can remove these plugs once the rockers switches are out of the black center console.
(Tip: Once the plugs are removed from the back of the rocker switches using a small flat head to slowly pry them out of the switches, you can remove the enter switch by pulling lightly up and towards you.)
f. SLOWLY roll the piece out now like in the picture and you will see plugs in the back, remove the cigarette light adapter plug out and the console will be free. PLUS its also a good time to fix that loose cigarette light adapter by just holding the front part firmly and screwing the back metal cylinder into it.
Almost Done!
Step 4
Since you removed all the screws where the "L" Trims used to be, you can no remove the FACE of the radio. (Note: Pull a little forward and the face will detach from the actually deck. Watch for the 3 little posts that hold it to the AC Controls, but it will just come out, there areno cables behind the face.
Step 5:
Remove the AC Panel now. Watch out when you pull it forward as it DOES have a plug for it in the back. This pane when you re-assemble the everyone, goes in together with the actual CD Player as one unit.
Step 6:
Now REMOVE the ENTIRE CD player and the tape player TOGETHER. It is screw together as 1 Unit.
Step 7:
In this picture, this is WHY your player is erroring out. Notice the top 2 trays are propped up and all the other trays are misaligned.
Closer inspection (Left Side)
Closer inspection (Right Side)
Step 8:
Fix the trays and put all the trays through the left post and everything will line up. Be VERY VERY VERY careful of the springs in the FRONT next to the posts especially the left one. Don't pull the grey trays too high, just enough to clear the post, hence use the tweezers if you have fat fingers. Stretchy these little springs will really ruin the performance of your player.
(Note: You can try to "improve" the cd players by shortening up the springs that hold the grey plastic tras, but this is very risky if you aren't good at small springs that can fly everywhere. I tried other things such as putting a stopper at the very top of the posts to stop them from flying out and it did NOT work because the tolerance between ejecting the top tray and post is so close, that any stopper would inhibit the trays from moving into the correct position.)
Post install instructions:
Put all the screws back in the right place.
The trap door section might be the hardest to put back and that is why I just TRIMMED the 3 LONG tabs to fit it in easier. I tried all possible ways, to not trim these tabs but it will NOT fit as acura are so stupid to make these panels nearly impossible to remove without removing the arm rest and the WHOLE entire area in between the seat. TRIM IT and save yourself, while installing it will look like it doesn't line up but it will.
(Secret of aligning this trap door, the kick panels. Get them in the right order and the gap WILL be eliminated.)
The black kick panels have tabs to the back part of the black rear passenger kick panels, so just slide them in and take your time.
Email me at kenyu (at) hotmail (dot) com if you have any questions as I don't post too often on this forum.
Good luck!!!
 11-28-2008, 12:25 AM
#2
Racer
This is the only semi walkthrough of FIXING the problem. It turned out the camera I had no battery, so I wasn't able to take pictures. So I'll try to just post a few additions/corrections to the instructions
Hey Everyone:
Time = 3 Hours (Taking into account you guys never done this)
Tools =
Dealer Radio Security Code (If you don't have this, look for it or ask the dealer, otherwise don't bother with this repair at all.)
Flat Head screwdriver (One small, one larger for prying)
Philips screwdriver (one small, one larger)
Needle nose tweezers didn't need it
Step 1
a. Put your car in park and engage foot break. (DO THIS, You will understand later)
b. Remove the consult obd2 port cover just by pulling. This cover is located between the two seat warmer buttons.
c. Screw off the shift knob counter close wise like a screw
Step 2 (Hardest Part of Entire Repair)
a. You can get to how the picture looks, by literally pulling off the side "L Moldings" on each side of the center console.
b. After pulling off the side "L" panels where it is a charcoal or wooden trim, this will expose more screws to remove the side plastic center console kick covers. Remove all associated screws so the side plastic. (This is the hardest part I think)
stop right there. You do not have to take out the screws next to the seats. Where the center console piece w/ shift gate meets the console piece of the cupholders, unscrew the two forward bolts/screws on each side. I don't know how to word it, but it seems that the gold bolts are more important than the black screws as assembly goes because they seem to be the ones that really connect one piece to another.
Why do you not have to take out the impossible screws on the side panels? Flip up the armrest, pull out the carpet, and unscrew the two gold screws/bolts holding the rear piece to the floor. You can now pull out the entire rear console section, and detatch the electrical connection to the power outlet.
You will need the side panels of the console off, so first take off the piece under the steering column. Take off the fuse cover, and take out the gold bolt. It will now pop off with there being about 3 friction fit connections along the top. With this off, you will see a black screw on the driver side console side panel at the lower forward edge that was covered by the under-steering panel. With that out, both sides will now be the same in screws to remove. One at the very top of each side, and maybe 1 more on each side. There are two friction connections to pop out on these console side panels. First there is one about where the shifter is. Once you pop that out, there is one at the very top front of the panels, so just pull the panel straight back to get it out.
I just eliminated prying cutting and other headaches.
Step 3 (Now the easy stuff) This got tricky for me because I got confused
a. Remove the little plastic oval shift lock cover. By prying it off with your smaller flat head. Use a flathead and pry off the black plastic ring AROUND the silver shift gate. Start in one spot and just go around like you are opening a can of paint.
b. Stick the flat head down the shifter lock hole and shift the shifter to as show in the picture.
c. There are screws exposed now all the way up and down the sides where the "L" trims used to be. Remove all of them now, even the small black ones.Already done
d. When you removed the OBD port cover, you see two philips screws way in the back. Remove them now.
e. The seat warmer rocker switches can be removed by pushing them up from the sides of the console or from where the console port cover used to be. Each has a plug in them and you can remove these plugs once the rockers switches are out of the black center console.
(Tip: Once the plugs are removed from the back of the rocker switches using a small flat head to slowly pry them out of the switches, you can remove the enter switch by pulling lightly up and towards you.)
f. SLOWLY roll the piece out now like in the picture and you will see plugs in the back, remove the cigarette light adapter plug out and the console will be free. PLUS its also a good time to fix that loose cigarette light adapter by just holding the front part firmly and screwing the back metal cylinder into it.
Almost Done!
Step 4
YOU DO NOT NEED TO REMOVE THE FACEPLATE. There are two gold screws holding the cd changer to metal brackets on each side. Take them out, and you can now take out the cd changer WITH the above storage or climate control unit. Unplug the 3 connections so that you can now take the unit to a safe place and continue.
Step 5
Now you can remove the above storage piece (AC in nav models) by unscrewing 1 black screw on each side. You will need to do this to open up the top of the changer to get to the guts
Step 7:
In this picture, this is WHY your player is erroring out. Notice the top 2 trays are propped up and all the other trays are misaligned.
kinda yes, kinda no.
Closer inspection (Left Side)
Closer inspection (Right Side)
Step 8:
Fix the trays and put all the trays through the left post and everything will line up. Be VERY VERY VERY careful of the springs in the FRONT next to the posts especially the left one. Don't pull the grey trays too high, just enough to clear the post, hence use the tweezers if you have fat fingers. Stretchy these little springs will really ruin the performance of your player.
(Note: You can try to "improve" the cd players by shortening up the springs that hold the grey plastic tras, but this is very risky if you aren't good at small springs that can fly everywhere. I tried other things such as putting a stopper at the very top of the posts to stop them from flying out and it did NOT work because the tolerance between ejecting the top tray and post is so close, that any stopper would inhibit the trays from moving into the correct position.)
The problem is the alignment, but mine were all straight. Each of the trays has two posts on each side. It gets misaligned when those posts got out of their tracks. For all I know, it could be a malfunctioning cd reader than isn't moving fast enough and blocks the tray from moving while it's trying to shuffle. I had to manually move the laser to the back of the changer because it was snagged on the misaligned tray. Semantics, but just make sure that the trays are completely level and aligned vertically. The only way to do this is to get whichever tray that is supposed to be playing to have those 4 posts seated properly on their tiny guides.
Post install instructions:
Put all the screws back in the right place.
The trap door section might be the hardest to put back and that is why I just TRIMMED the 3 LONG tabs to fit it in easier. I tried all possible ways, to not trim these tabs but it will NOT fit as acura are so stupid to make these panels nearly impossible to remove without removing the arm rest and the WHOLE entire area in between the seat. TRIM IT and save yourself, while installing it will look like it doesn't line up but it will. Aren't you glad I saved you this step now?
(Secret of aligning this trap door, the kick panels. Get them in the right order and the gap WILL be eliminated.)
The black kick panels have tabs to the back part of the black rear passenger kick panels, so just slide them in and take your time.
Email me at kenyu (at) hotmail (dot) com if you have any questions as I don't post too often on this forum.
Good luck!!!
11-28-2008, 04:18 PM
#3
Sok saBai jia dtay?
Excellent info folks, thanks in advance.
A quick question to those who have pulled the unit: can you see the actual laser's optical surface? PPower mentions getting to the sled rail to move the laser assembly, so perhaps there is access to the laser surface with a Q-tip (NO cleaner or liquid needed or advised!) It is a good idea to clean this surface before you put the unit back. Since it sits horizontally it has a tendency to pick up dust / debris and lower the actual output to the D>A converters.
A quick question to those who have pulled the unit: can you see the actual laser's optical surface? PPower mentions getting to the sled rail to move the laser assembly, so perhaps there is access to the laser surface with a Q-tip (NO cleaner or liquid needed or advised!) It is a good idea to clean this surface before you put the unit back. Since it sits horizontally it has a tendency to pick up dust / debris and lower the actual output to the D>A converters.
11-28-2008, 05:56 PM
#4
Racer

Join Date: Nov 2003
Location: Everett, WA
Age: 44
Posts: 389
Likes: 0
Received 0 Likes
on
0 Posts
Excellent info folks, thanks in advance.
A quick question to those who have pulled the unit: can you see the actual laser's optical surface? PPower mentions getting to the sled rail to move the laser assembly, so perhaps there is access to the laser surface with a Q-tip (NO cleaner or liquid needed or advised!) It is a good idea to clean this surface before you put the unit back. Since it sits horizontally it has a tendency to pick up dust / debris and lower the actual output to the D>A converters.
A quick question to those who have pulled the unit: can you see the actual laser's optical surface? PPower mentions getting to the sled rail to move the laser assembly, so perhaps there is access to the laser surface with a Q-tip (NO cleaner or liquid needed or advised!) It is a good idea to clean this surface before you put the unit back. Since it sits horizontally it has a tendency to pick up dust / debris and lower the actual output to the D>A converters.
11-28-2008, 09:31 PM
#5
Sok saBai jia dtay?
Once the laser assembly is stowed, its pretty well hidden I believe. You can clean it, but carefully. Digital is digital and I dont believe in cleaning the lense.
You wont hear better bass or whatever... thats just not how it works (its not a record!). So unless the thing is really skipping or not working, dont waste your time and risk it.
You wont hear better bass or whatever... thats just not how it works (its not a record!). So unless the thing is really skipping or not working, dont waste your time and risk it.
Actually, I know how it works - exactly and completely.
Nowhere do I write nor infer a sound quality difference, simply an increase of light (and thus signal strength in the form of voltage) received from the discs surface from the lasers optical lens (the beam travels through the optical lens 2x, and dust / dirt / debris WILL affect this path.)
Once a set voltage is achieved, the whole system works. At lower output voltages, the error correction circuits are the first to suffer and then skip skip skip skip skip as the signal buffers recycle (sorta like a record.)
Digital is digital, and a belief is not as beneficial as basic maintenance. If you don't use emery cloth or a nail file, there is no risk to the laser. Q-tip, no liquid. If I wanted to really get into it, I would have mentioned cleaning all the crap that sticks to the sled rail, causing the laser assembly's sled motor to occasionally bind up. Without the proper lubricant, there is an opportunity to do more harm than good - so I left it out of my original post.
Electronics exude a natural magnetic property that causes all the FO's (foreign objects) inside a car to gravitate to places where they shouldn't go. Like dropping a wrench, where does it go, in front of you - or into the fenderwell?
11-28-2008, 09:47 PM
#6
............
interesting....instead of trying to use something at the top of the post's as a over travel stopper, couldn't i just use a soldering iron to slightly melt, or mushroom the tip of that post to eliminate over travel?
ill take mine apart next time i feel like taking out my head unit, and give this a shot.
ill take mine apart next time i feel like taking out my head unit, and give this a shot.
11-28-2008, 10:56 PM
#7
Racer
interesting....instead of trying to use something at the top of the post's as a over travel stopper, couldn't i just use a soldering iron to slightly melt, or mushroom the tip of that post to eliminate over travel?
ill take mine apart next time i feel like taking out my head unit, and give this a shot.
ill take mine apart next time i feel like taking out my head unit, and give this a shot.
Trending Topics
03-17-2009, 01:49 AM
#8
Advanced
Thread Starter
***Fixed Pictures *** Sorry everyone
Hey Everyone:
Well I got tired of listening to the radio and finally fixed my CD Changer... Here is the the step by step guide. Hopefully the Mods will sticky this.
Time = 3 Hours (Taking into account you guys never done this)
Tools =
Dealer Radio Security Code (If you don't have this, look for it or ask the dealer, otherwise don't bother with this repair at all.)
Flat Head screwdriver (One small, one larger for prying)
Philips screwdriver (one small, one larger)
Needle nose tweezers
Step 1
a. Put your car in park and engage foot break. (DO THIS, You will understand later)
b. Remove the consult obd2 port cover just by pulling. This cover is located between the two seat warmer buttons.
c. Screw off the shift knob counter close wise like a screw
Step 2 (Hardest Part of Entire Repair)
a. You can get to how the picture looks, by literally pulling off the side "L Moldings" on each side of the center console.
b. After pulling off the side "L" panels where it is a charcoal or wooden trim, this will expose more screws to remove the side plastic center console kick covers. Remove all associated screws so the side plastic. (This is the hardest part I think)
(Note there are screws all throughout the center console and below. Remove ALL the screws.
On the driver side of the side plastic black center console kick panel is also attached to the steering column cover in which you can only take off if you remove the fuse cover. There are also screws where the seats are in the way. Move the seat down as much as possible and lean the back part of the seat as much as possible to get to the screws. You can reach these screws in where the seat belts come up.
On the passenger side of the side plastic black center console kick panel, it is just one screw next to the glove box. You DO NOT need to remove the glove box. There are also screws where the seats are in the way. Move the seat down as much as possible and lean the back part of the seat as much as possible to get to the screws. You can reach these screws in where the seat belts come up from the side.)
c. Remove cup holders, by just pulling the center of the two cup holders forward and up.
d. Remove center console trap doors. Here is the prying. You have to pry with the long screw driver in between the black shifter black panel and the trap door panel. You can see they have super LONG tabs. Pull this part out, its VERY tough, but you can do it. Once the front tabs are out of the slots, you can remove the WHOLE trap door panel in one piece. Now trim off most of the 3 LONG tabs (Leave a little), this will not affect the look or anything of how the panels will fit.
Step 3 (Now the easy stuff)
a. Remove the little plastic oval shift lock cover. By prying it off with your smaller flat head.
b. Stick the flat head down the shifter lock hole and shift the shifter to as show in the picture.
c. There are screws exposed now all the way up and down the sides where the "L" trims used to be. Remove all of them now, even the small black ones.
d. When you removed the console port cover, you see two philips screws way in the back. Remove them now.
e. The seat warmer rocker switches can be removed by pushing them up from the sides of the console or from where the console port cover used to be. Each has a plug in them and you can remove these plugs once the rockers switches are out of the black center console.
(Tip: Once the plugs are removed from the back of the rocker switches using a small flat head to slowly pry them out of the switches, you can remove the enter switch by pulling lightly up and towards you.)
f. SLOWLY roll the piece out now like in the picture and you will see plugs in the back, remove the cigarette light adapter plug out and the console will be free. PLUS its also a good time to fix that loose cigarette light adapter by just holding the front part firmly and screwing the back metal cylinder into it.
Almost Done!
Step 4
Since you removed all the screws where the "L" Trims used to be, you can no remove the FACE of the radio. (Note: Pull a little forward and the face will detach from the actually deck. Watch for the 3 little posts that hold it to the AC Controls, but it will just come out, there areno cables behind the face.

Step 5:
Remove the AC Panel now. Watch out when you pull it forward as it DOES have a plug for it in the back. This pane when you re-assemble the everyone, goes in together with the actual CD Player as one unit.
Step 6:
Now REMOVE the ENTIRE CD player and the tape player TOGETHER. It is screw together as 1 Unit.
Step 7:
In this picture, this is WHY your player is erroring out. Notice the top 2 trays are propped up and all the other trays are misaligned.
Closer inspection (Left Side)
Closer inspection (Right Side)
Step 8:
Fix the trays and put all the trays through the left post and everything will line up. Be VERY VERY VERY careful of the springs in the FRONT next to the posts especially the left one. Don't pull the grey trays too high, just enough to clear the post, hence use the tweezers if you have fat fingers. Stretchy these little springs will really ruin the performance of your player.
(Note: You can try to "improve" the cd players by shortening up the springs that hold the grey plastic tras, but this is very risky if you aren't good at small springs that can fly everywhere. I tried other things such as putting a stopper at the very top of the posts to stop them from flying out and it did NOT work because the tolerance between ejecting the top tray and post is so close, that any stopper would inhibit the trays from moving into the correct position.)
Post install instructions:
Put all the screws back in the right place.
The trap door section might be the hardest to put back and that is why I just TRIMMED the 3 LONG tabs to fit it in easier. I tried all possible ways, to not trim these tabs but it will NOT fit as acura are so stupid to make these panels nearly impossible to remove without removing the arm rest and the WHOLE entire area in between the seat. TRIM IT and save yourself, while installing it will look like it doesn't line up but it will.
(Secret of aligning this trap door, the kick panels. Get them in the right order and the gap WILL be eliminated.)
The black kick panels have tabs to the back part of the black rear passenger kick panels, so just slide them in and take your time.
Email me at kenyu (at) hotmail (dot) com if you have any questions as I don't post too often on this forum.
Good luck!!!
Hey Everyone:
Well I got tired of listening to the radio and finally fixed my CD Changer... Here is the the step by step guide. Hopefully the Mods will sticky this.
Time = 3 Hours (Taking into account you guys never done this)
Tools =
Dealer Radio Security Code (If you don't have this, look for it or ask the dealer, otherwise don't bother with this repair at all.)
Flat Head screwdriver (One small, one larger for prying)
Philips screwdriver (one small, one larger)
Needle nose tweezers
Step 1
a. Put your car in park and engage foot break. (DO THIS, You will understand later)
b. Remove the consult obd2 port cover just by pulling. This cover is located between the two seat warmer buttons.
c. Screw off the shift knob counter close wise like a screw
Step 2 (Hardest Part of Entire Repair)
a. You can get to how the picture looks, by literally pulling off the side "L Moldings" on each side of the center console.
b. After pulling off the side "L" panels where it is a charcoal or wooden trim, this will expose more screws to remove the side plastic center console kick covers. Remove all associated screws so the side plastic. (This is the hardest part I think)
(Note there are screws all throughout the center console and below. Remove ALL the screws.
On the driver side of the side plastic black center console kick panel is also attached to the steering column cover in which you can only take off if you remove the fuse cover. There are also screws where the seats are in the way. Move the seat down as much as possible and lean the back part of the seat as much as possible to get to the screws. You can reach these screws in where the seat belts come up.
On the passenger side of the side plastic black center console kick panel, it is just one screw next to the glove box. You DO NOT need to remove the glove box. There are also screws where the seats are in the way. Move the seat down as much as possible and lean the back part of the seat as much as possible to get to the screws. You can reach these screws in where the seat belts come up from the side.)
c. Remove cup holders, by just pulling the center of the two cup holders forward and up.
d. Remove center console trap doors. Here is the prying. You have to pry with the long screw driver in between the black shifter black panel and the trap door panel. You can see they have super LONG tabs. Pull this part out, its VERY tough, but you can do it. Once the front tabs are out of the slots, you can remove the WHOLE trap door panel in one piece. Now trim off most of the 3 LONG tabs (Leave a little), this will not affect the look or anything of how the panels will fit.
Step 3 (Now the easy stuff)
a. Remove the little plastic oval shift lock cover. By prying it off with your smaller flat head.
b. Stick the flat head down the shifter lock hole and shift the shifter to as show in the picture.
c. There are screws exposed now all the way up and down the sides where the "L" trims used to be. Remove all of them now, even the small black ones.
d. When you removed the console port cover, you see two philips screws way in the back. Remove them now.
e. The seat warmer rocker switches can be removed by pushing them up from the sides of the console or from where the console port cover used to be. Each has a plug in them and you can remove these plugs once the rockers switches are out of the black center console.
(Tip: Once the plugs are removed from the back of the rocker switches using a small flat head to slowly pry them out of the switches, you can remove the enter switch by pulling lightly up and towards you.)
f. SLOWLY roll the piece out now like in the picture and you will see plugs in the back, remove the cigarette light adapter plug out and the console will be free. PLUS its also a good time to fix that loose cigarette light adapter by just holding the front part firmly and screwing the back metal cylinder into it.
Almost Done!
Step 4
Since you removed all the screws where the "L" Trims used to be, you can no remove the FACE of the radio. (Note: Pull a little forward and the face will detach from the actually deck. Watch for the 3 little posts that hold it to the AC Controls, but it will just come out, there areno cables behind the face.
Step 5:
Remove the AC Panel now. Watch out when you pull it forward as it DOES have a plug for it in the back. This pane when you re-assemble the everyone, goes in together with the actual CD Player as one unit.
Step 6:
Now REMOVE the ENTIRE CD player and the tape player TOGETHER. It is screw together as 1 Unit.
Step 7:
In this picture, this is WHY your player is erroring out. Notice the top 2 trays are propped up and all the other trays are misaligned.
Closer inspection (Left Side)
Closer inspection (Right Side)
Step 8:
Fix the trays and put all the trays through the left post and everything will line up. Be VERY VERY VERY careful of the springs in the FRONT next to the posts especially the left one. Don't pull the grey trays too high, just enough to clear the post, hence use the tweezers if you have fat fingers. Stretchy these little springs will really ruin the performance of your player.
(Note: You can try to "improve" the cd players by shortening up the springs that hold the grey plastic tras, but this is very risky if you aren't good at small springs that can fly everywhere. I tried other things such as putting a stopper at the very top of the posts to stop them from flying out and it did NOT work because the tolerance between ejecting the top tray and post is so close, that any stopper would inhibit the trays from moving into the correct position.)
Post install instructions:
Put all the screws back in the right place.
The trap door section might be the hardest to put back and that is why I just TRIMMED the 3 LONG tabs to fit it in easier. I tried all possible ways, to not trim these tabs but it will NOT fit as acura are so stupid to make these panels nearly impossible to remove without removing the arm rest and the WHOLE entire area in between the seat. TRIM IT and save yourself, while installing it will look like it doesn't line up but it will.
(Secret of aligning this trap door, the kick panels. Get them in the right order and the gap WILL be eliminated.)
The black kick panels have tabs to the back part of the black rear passenger kick panels, so just slide them in and take your time.
Email me at kenyu (at) hotmail (dot) com if you have any questions as I don't post too often on this forum.
Good luck!!!
The following 2 users liked this post by slider2828:
blackhorse21 (04-25-2017),
thelastaspec (03-13-2015)
 03-17-2009, 12:23 PM
#11
2G wanting 3G
iTrader: (1)
Join Date: Aug 2007
Location: Germany
Age: 41
Posts: 423
Likes: 0
Received 0 Likes
on
0 Posts
i cant wait to get off work and try this. i've got a 6disk sitting in the closet that i bought of a Aziner that never worked(and i never got my money back). if this works....
03-17-2009, 12:30 PM
#12
Instructor

My 6-disc acts up every so often when shifting to another disc, and when I get the Er-E1 code, or whatever it displays, I quickly run my finger in the slot back and forth and 9 times out of 10 it'll get things..... aligned?.... and the CD loads without a problem. If it doesn't work the first time, I just select the disc # I want again, and before anything comes up on the display, I start doing it again. Usually it doesn't take more than one try for me....
I know this may seem stupid, but it works for me.
 03-17-2009, 01:07 PM
#13
Advanced
Thread Starter
LOL at this thread, I made the inital post like a year ago almost and really no one else responded. Please read the 2nd post after my OP and there are some better instructions, I just reposted because the picture links were changed. But anyways, the red additional instructions make everything much easier.
This is really a case by case fix, but I think it will fix 90% of the problems.... After 1 year, I still don't have any problems....
(Personally, I believe what happens is that the springs which hold the stack of plastic cartridges wear out over time and just doesn't keep enough tension.... I shortened by front springs a little and made them fit..... But eh I dunno how much it truly helps, its just speculation.... Its more pain in the ass then its worth....)
03-17-2009, 01:18 PM
#14
Instructor
LOL at this thread, I made the inital post like a year ago almost and really no one else responded. Please read the 2nd post after my OP and there are some better instructions, I just reposted because the picture links were changed. But anyways, the red additional instructions make everything much easier.
This is really a case by case fix, but I think it will fix 90% of the problems.... After 1 year, I still don't have any problems....
(Personally, I believe what happens is that the springs which hold the stack of plastic cartridges wear out over time and just doesn't keep enough tension.... I shortened by front springs a little and made them fit..... But eh I dunno how much it truly helps, its just speculation.... Its more pain in the ass then its worth....)
This is really a case by case fix, but I think it will fix 90% of the problems.... After 1 year, I still don't have any problems....
(Personally, I believe what happens is that the springs which hold the stack of plastic cartridges wear out over time and just doesn't keep enough tension.... I shortened by front springs a little and made them fit..... But eh I dunno how much it truly helps, its just speculation.... Its more pain in the ass then its worth....)
 03-17-2009, 10:29 PM
#15
Racer
Slider, seriously a big thank you for starting the thread. I couldn't figure out why the ONLY thread to fix the root of such a common problem didn't have a single reply, but it gave me the gonads to crack open my unit. See guys, the "search" button works. With the above instructions, we have taken the stress out of dismantling the car.
11-25-2009, 09:48 PM
#18
Intermediate
Join Date: Mar 2009
Location: Brampton, Ontario
Posts: 47
Likes: 0
Received 0 Likes
on
0 Posts
So here's my deal. I got this error code about 9 months ago. Went to Acura, told me I had to get a new one. Did a research on here, did about just anything, except actually taking it apart. Anyways, I've moved on, got me an iPod and a tape adaptor. This past week something amazing happened to me. My battery had died, and was replaced. I turned my car on, and next thing you know, the CD player had spat out one of the CD's. So I continued to press the eject button and one by one, each CD came out. I finally put the Radio Code and little did I know, my CD player was working again. There I go and pressed the load button, put a CD and it read and played. This was a definite life saver and a pocket saver.
Had this happened to anyone else other than me??
Had this happened to anyone else other than me??
11-26-2009, 01:08 AM
#20
Instructor

Join Date: Feb 2009
Age: 34
Posts: 109
Likes: 0
Received 0 Likes
on
0 Posts
^ The old hit the side method only goes so far.
Took it apart and was not able to put the trays in order.
I'm now trying to get a double din dash monitor because of this stupid terribly made headunit.
Took it apart and was not able to put the trays in order.
I'm now trying to get a double din dash monitor because of this stupid terribly made headunit.
01-15-2010, 11:10 AM
#24
Advanced
Thread Starter
PHOTOBUCKET YOU FAIL!!!! 3rd time I had to relink cause they moved my galleries.....
Hey Everyone:
Well I got tired of listening to the radio and finally fixed my CD Changer... Here is the the step by step guide. Hopefully the Mods will sticky this.
Time = 3 Hours (Taking into account you guys never done this)
Tools =
Dealer Radio Security Code (If you don't have this, look for it or ask the dealer, otherwise don't bother with this repair at all.)
Flat Head screwdriver (One small, one larger for prying)
Philips screwdriver (one small, one larger)
Needle nose tweezers
Step 1
a. Put your car in park and engage foot break. (DO THIS, You will understand later)
b. Remove the consult obd2 port cover just by pulling. This cover is located between the two seat warmer buttons.
c. Screw off the shift knob counter close wise like a screw
Step 2 (Hardest Part of Entire Repair)

a. You can get to how the picture looks, by literally pulling off the side "L Moldings" on each side of the center console.
b. After pulling off the side "L" panels where it is a charcoal or wooden trim, this will expose more screws to remove the side plastic center console kick covers. Remove all associated screws so the side plastic. (This is the hardest part I think)
(Note there are screws all throughout the center console and below. Remove ALL the screws.
On the driver side of the side plastic black center console kick panel is also attached to the steering column cover in which you can only take off if you remove the fuse cover. There are also screws where the seats are in the way. Move the seat down as much as possible and lean the back part of the seat as much as possible to get to the screws. You can reach these screws in where the seat belts come up.
On the passenger side of the side plastic black center console kick panel, it is just one screw next to the glove box. You DO NOT need to remove the glove box. There are also screws where the seats are in the way. Move the seat down as much as possible and lean the back part of the seat as much as possible to get to the screws. You can reach these screws in where the seat belts come up from the side.)
c. Remove cup holders, by just pulling the center of the two cup holders forward and up.
d. Remove center console trap doors. Here is the prying. You have to pry with the long screw driver in between the black shifter black panel and the trap door panel. You can see they have super LONG tabs. Pull this part out, its VERY tough, but you can do it. Once the front tabs are out of the slots, you can remove the WHOLE trap door panel in one piece. Now trim off most of the 3 LONG tabs (Leave a little), this will not affect the look or anything of how the panels will fit.
Step 3 (Now the easy stuff)
a. Remove the little plastic oval shift lock cover. By prying it off with your smaller flat head.
b. Stick the flat head down the shifter lock hole and shift the shifter to as show in the picture.

c. There are screws exposed now all the way up and down the sides where the "L" trims used to be. Remove all of them now, even the small black ones.
d. When you removed the console port cover, you see two philips screws way in the back. Remove them now.
e. The seat warmer rocker switches can be removed by pushing them up from the sides of the console or from where the console port cover used to be. Each has a plug in them and you can remove these plugs once the rockers switches are out of the black center console.
(Tip: Once the plugs are removed from the back of the rocker switches using a small flat head to slowly pry them out of the switches, you can remove the enter switch by pulling lightly up and towards you.)
f. SLOWLY roll the piece out now like in the picture and you will see plugs in the back, remove the cigarette light adapter plug out and the console will be free. PLUS its also a good time to fix that loose cigarette light adapter by just holding the front part firmly and screwing the back metal cylinder into it.
Almost Done!

Step 4
Since you removed all the screws where the "L" Trims used to be, you can no remove the FACE of the radio. (Note: Pull a little forward and the face will detach from the actually deck. Watch for the 3 little posts that hold it to the AC Controls, but it will just come out, there areno cables behind the face.

Step 5:
Remove the AC Panel now. Watch out when you pull it forward as it DOES have a plug for it in the back. This pane when you re-assemble the everyone, goes in together with the actual CD Player as one unit.
Step 6:
Now REMOVE the ENTIRE CD player and the tape player TOGETHER. It is screw together as 1 Unit.
Step 7:
In this picture, this is WHY your player is erroring out. Notice the top 2 trays are propped up and all the other trays are misaligned.

Closer inspection (Left Side)

Closer inspection (Right Side)

Step 8:
Fix the trays and put all the trays through the left post and everything will line up. Be VERY VERY VERY careful of the springs in the FRONT next to the posts especially the left one. Don't pull the grey trays too high, just enough to clear the post, hence use the tweezers if you have fat fingers. Stretchy these little springs will really ruin the performance of your player.
(Note: You can try to "improve" the cd players by shortening up the springs that hold the grey plastic tras, but this is very risky if you aren't good at small springs that can fly everywhere. I tried other things such as putting a stopper at the very top of the posts to stop them from flying out and it did NOT work because the tolerance between ejecting the top tray and post is so close, that any stopper would inhibit the trays from moving into the correct position.)
Post install instructions:
Put all the screws back in the right place.
The trap door section might be the hardest to put back and that is why I just TRIMMED the 3 LONG tabs to fit it in easier. I tried all possible ways, to not trim these tabs but it will NOT fit as acura are so stupid to make these panels nearly impossible to remove without removing the arm rest and the WHOLE entire area in between the seat. TRIM IT and save yourself, while installing it will look like it doesn't line up but it will.
(Secret of aligning this trap door, the kick panels. Get them in the right order and the gap WILL be eliminated.)
The black kick panels have tabs to the back part of the black rear passenger kick panels, so just slide them in and take your time.
Email me at kenyu (at) hotmail (dot) com if you have any questions as I don't post too often on this forum.
Good luck!!!
Well I got tired of listening to the radio and finally fixed my CD Changer... Here is the the step by step guide. Hopefully the Mods will sticky this.
Time = 3 Hours (Taking into account you guys never done this)
Tools =
Dealer Radio Security Code (If you don't have this, look for it or ask the dealer, otherwise don't bother with this repair at all.)
Flat Head screwdriver (One small, one larger for prying)
Philips screwdriver (one small, one larger)
Needle nose tweezers
Step 1
a. Put your car in park and engage foot break. (DO THIS, You will understand later)
b. Remove the consult obd2 port cover just by pulling. This cover is located between the two seat warmer buttons.
c. Screw off the shift knob counter close wise like a screw
Step 2 (Hardest Part of Entire Repair)
a. You can get to how the picture looks, by literally pulling off the side "L Moldings" on each side of the center console.
b. After pulling off the side "L" panels where it is a charcoal or wooden trim, this will expose more screws to remove the side plastic center console kick covers. Remove all associated screws so the side plastic. (This is the hardest part I think)
(Note there are screws all throughout the center console and below. Remove ALL the screws.
On the driver side of the side plastic black center console kick panel is also attached to the steering column cover in which you can only take off if you remove the fuse cover. There are also screws where the seats are in the way. Move the seat down as much as possible and lean the back part of the seat as much as possible to get to the screws. You can reach these screws in where the seat belts come up.
On the passenger side of the side plastic black center console kick panel, it is just one screw next to the glove box. You DO NOT need to remove the glove box. There are also screws where the seats are in the way. Move the seat down as much as possible and lean the back part of the seat as much as possible to get to the screws. You can reach these screws in where the seat belts come up from the side.)
c. Remove cup holders, by just pulling the center of the two cup holders forward and up.
d. Remove center console trap doors. Here is the prying. You have to pry with the long screw driver in between the black shifter black panel and the trap door panel. You can see they have super LONG tabs. Pull this part out, its VERY tough, but you can do it. Once the front tabs are out of the slots, you can remove the WHOLE trap door panel in one piece. Now trim off most of the 3 LONG tabs (Leave a little), this will not affect the look or anything of how the panels will fit.
Step 3 (Now the easy stuff)
a. Remove the little plastic oval shift lock cover. By prying it off with your smaller flat head.
b. Stick the flat head down the shifter lock hole and shift the shifter to as show in the picture.
c. There are screws exposed now all the way up and down the sides where the "L" trims used to be. Remove all of them now, even the small black ones.
d. When you removed the console port cover, you see two philips screws way in the back. Remove them now.
e. The seat warmer rocker switches can be removed by pushing them up from the sides of the console or from where the console port cover used to be. Each has a plug in them and you can remove these plugs once the rockers switches are out of the black center console.
(Tip: Once the plugs are removed from the back of the rocker switches using a small flat head to slowly pry them out of the switches, you can remove the enter switch by pulling lightly up and towards you.)
f. SLOWLY roll the piece out now like in the picture and you will see plugs in the back, remove the cigarette light adapter plug out and the console will be free. PLUS its also a good time to fix that loose cigarette light adapter by just holding the front part firmly and screwing the back metal cylinder into it.
Almost Done!
Step 4
Since you removed all the screws where the "L" Trims used to be, you can no remove the FACE of the radio. (Note: Pull a little forward and the face will detach from the actually deck. Watch for the 3 little posts that hold it to the AC Controls, but it will just come out, there areno cables behind the face.
Step 5:
Remove the AC Panel now. Watch out when you pull it forward as it DOES have a plug for it in the back. This pane when you re-assemble the everyone, goes in together with the actual CD Player as one unit.
Step 6:
Now REMOVE the ENTIRE CD player and the tape player TOGETHER. It is screw together as 1 Unit.
Step 7:
In this picture, this is WHY your player is erroring out. Notice the top 2 trays are propped up and all the other trays are misaligned.
Closer inspection (Left Side)
Closer inspection (Right Side)
Step 8:
Fix the trays and put all the trays through the left post and everything will line up. Be VERY VERY VERY careful of the springs in the FRONT next to the posts especially the left one. Don't pull the grey trays too high, just enough to clear the post, hence use the tweezers if you have fat fingers. Stretchy these little springs will really ruin the performance of your player.
(Note: You can try to "improve" the cd players by shortening up the springs that hold the grey plastic tras, but this is very risky if you aren't good at small springs that can fly everywhere. I tried other things such as putting a stopper at the very top of the posts to stop them from flying out and it did NOT work because the tolerance between ejecting the top tray and post is so close, that any stopper would inhibit the trays from moving into the correct position.)
Post install instructions:
Put all the screws back in the right place.
The trap door section might be the hardest to put back and that is why I just TRIMMED the 3 LONG tabs to fit it in easier. I tried all possible ways, to not trim these tabs but it will NOT fit as acura are so stupid to make these panels nearly impossible to remove without removing the arm rest and the WHOLE entire area in between the seat. TRIM IT and save yourself, while installing it will look like it doesn't line up but it will.
(Secret of aligning this trap door, the kick panels. Get them in the right order and the gap WILL be eliminated.)
The black kick panels have tabs to the back part of the black rear passenger kick panels, so just slide them in and take your time.
Email me at kenyu (at) hotmail (dot) com if you have any questions as I don't post too often on this forum.
Good luck!!!
01-15-2010, 11:40 AM
#26
Advanced
Thread Starter
Ergh, notice the original post date of.... April 08 LOL!!!
I dunno they don't sticky stuff.... and a member was searching and said, man do you have pictures, so I had to quote and then redo the pictures.... Oh wellz.... hopefully now you can fix it yourself!!
I dunno they don't sticky stuff.... and a member was searching and said, man do you have pictures, so I had to quote and then redo the pictures.... Oh wellz.... hopefully now you can fix it yourself!!
01-15-2010, 11:46 AM
#28
Advanced
Thread Starter
you sure it the trays are still in order? Can you see the cd's sideways? Or does the tray mechnism work and just won't read the cds? It all depends on "what" is the problem. You can try this and see if you can save yourself money or just go ahead and buy something new. Nothing wrong with that.....
01-15-2010, 03:23 PM
#29
Instructor
Join Date: Feb 2009
Age: 34
Posts: 109
Likes: 0
Received 0 Likes
on
0 Posts
I took it all apart and tried to re-align the trays. The tray mechanism would try to skim the cd tray, but it would not read it. It still reads the ER-E1 whenever I turn on my car. I just gave up because I didn't know how to fix it, lol.
01-15-2010, 03:52 PM
#30
Advanced
Thread Starter
Yeah what happens is something probably throws the laser calibration off after awhile. I did pretty much soon after I caught it and never turned on the cd any more... But I wouldn't doubt that the misaligned trays and can ruin the track of the laser.....
Oh wellz.... CD Players are very fragile, more so than tap players LOL.
Oh wellz.... CD Players are very fragile, more so than tap players LOL.
07-02-2010, 06:55 AM
#31

It's strange because I'm getting this error now as well. I disconnected the battery for some work on my car, and the AM/FM works but the cd player gives that error. Might try and disconnect battery one more time, if not I may have to do this myself.
07-02-2010, 09:06 AM
#32
I first got this error code months ago. I posted, asking for help and I was told to hit the side of the player. It worked, but now it's getting worse.
The problem is that it's extremely intermittent. Just about the only major variable that seems to affect the frequency of the problem is heat/humidity.
I can't believe that I had never seen this thread before. I searched when I first got the code. I will try this method. Maybe it will work, maybe not, but it's worth a try. It's embarrassing to have my friends in a supposedly premium brand car, then they see me banging on the side of the console to get my CD player to work.
07-02-2010, 10:09 AM
#33
I only started getting this error this week after I disconnected the battery to try and clear some lights on my dash. Perhaps I didn't disconnect the battery long enough. I'll be trying it again today, if not it looks like I'll be ripping the console apart tomorrow.
07-02-2010, 11:04 PM
#34
Burning Brakes
I'd try this but my radio code never works. Dealer says they always have a problem with 02/03's so EVERYTIME I disconnect my battery I have to bring it to the dealer to get it working again but at least they dont charge me for it.
07-04-2010, 10:52 PM
#35
So I spent the morning inspecting my radio. Many of the tracks were out of place, so I adjusted that, and a few other minor things. The door wasn't opening for some reason, so I adjusted that as well.
Got everything in order from what it seemed, but when I load discs I get an error message still. I think the optical eye may have died perhaps? Mechanically things look ok. Any thoughts?
Got everything in order from what it seemed, but when I load discs I get an error message still. I think the optical eye may have died perhaps? Mechanically things look ok. Any thoughts?
 10-20-2010, 06:45 AM
#37
I took my radio out of the console completely and took the face off of it. THere are some tracks on the sides that need to line up. When you hit the eject button, a piece goes back and hits the button to open to door. It looked like that sliding piece was getting caught up on things, so I sanded it lightly.
10-20-2010, 10:54 AM
#38
Advanced
Thread Starter
IE decides to f...ing crash on me so I don't feel like typing eveyrthing out again....
1. banging of the side of the cd player is temp solution, ultimately it will disalign your laser and your done.
2. If you take it apart, you might as well try and send it to a cd repair shop, usually they can fix misaligned lasers pretty chep.
3. DEALERSHIP cheating you... Unlock codes should be entered witht he antenna disconnected. Once you disconnect the antenna and enter the code, it should work. That is the correct "dealership" way to do it. Some people don't need to do this some do....
4. Do yourself a favor, most cheap cd's suck. Memorex and Sony just plain suck.... do your cd player a favor and use verbatim disks.... a little more expensive but works a LOT better....
5. Disconnecting the battery should have no bearing on the er1 errors, its mechanical usually. If disconnect works maybe something is loose in the back and check plugs...
6. If you taken everything apart, see if the tray of the laser is to the side.... Lasers move side to side, at least the motor part... You can very gently slide the laser back to its resting position... This might help
Been like 3-4 years since I posted this and I still have a working cd player, problem never came back.
The following users liked this post:
2003CL (08-27-2011)
09-30-2011, 10:46 AM
#39
3rd Gear

Join Date: Sep 2011
Age: 84
Posts: 3
Likes: 0
Received 0 Likes
on
0 Posts
Electronic Cleaner
First of all, thanks to all who have posted, very helpful with the pictures and detailed instructions.
I'd just pulled the dash & replaced the clock light and was feeling like the CD player was next, but in Wal-Mart I happened across CRC QD Electronic Cleaner (red can with the usual 4" little tube to spray with) and gave a nice shot in the CD door. Presto, it worked for a day until I showed my wife how I could fix thangs, and bingo back to the errror code - she laughed herself silly (I did too). Next day blasted a bunch more into the door (took all 6 cd's out first) and now it's going on 3 days of working like new.
This is a good sounding system! I bought this TL new in late 2003, and just mounted new Yokahama's which are dang good tires. Around 140,000 miles and thanks to this forum, I can see the clock at night & hear sweet music again!