'04 to '08 front lower control arm bushing failure - please read and look

 04-03-2014, 09:51 PM
#1082
I own a Civic and a CRX and I cannot count the number of times I've used a ratchet handle to pop the LBJ's out. They still drive great after hundreds of thousands of miles. That stupid sleeve thing on the TL just makes me super sketchy for some reason. I probably wouldn't hesitate to do it if I knew I could get the handle onto the lip of the sleeve.
Of course the Oreilly's tool set is free and they are only a half mile from my house now. I kinda have no excuse.
Of course the Oreilly's tool set is free and they are only a half mile from my house now. I kinda have no excuse.
04-03-2014, 10:33 PM
#1083
Race Director
I tried the 1/2" ratchet method but could not get it to work on the TL lower ball joint no matter what I tried... and that led to the homemade tool inspiration.
The following 2 users liked this post by nfnsquared:
glennjr15 (01-06-2017),
kingofbytes (11-10-2014)
04-03-2014, 11:33 PM
#1084

I've used the homemade tool as well.
From my experience with them the passenger side pops without issue using the aftermarket honda style tool, but my driver's side sticks no matter what.
I've been able to get the driver's side out with the sleeve attached to the LBJ and re-insert it into the LCA by sliding the sleeve with the balljoint still attached into the LCA then hitting the bottom of the LCA a few times with a big hammer away from the LBJ to get the sleeve to slide further into the LCA.
Once I had a few threads exposed I used the castle nut on the LBJ to pull the sleeve with the LBJ attached to it back into the LCA.
Loosened the castle nut up, loaded the suspension and torqued it to the specified torque then inserted the split pin again.
What a pain, it'd be so much better if they didn't use a sleeve like that.
04-04-2014, 01:01 AM
#1085
You don't need to load the suspension to tighten the ball joint castle nuts. That's only for setting bushings that twist around the bolt through it's center (mostly control arm bushings).
04-04-2014, 07:58 AM
#1087
 04-04-2014, 08:51 AM
#1088
Plus it's gotta be a pain to line up the cotter pin hole w/ the castle nut with the wheel on and the car on the ground.
 05-11-2014, 10:45 PM
#1090
Race Director
06-23-2014, 03:32 PM
#1091
I just replaced my bushings (all 3) with the Heeltoe bearing. No need to sing Marcus' praises as most of you guys already do. He's awesome and answered all the questions pre-sale, during sale, and post-sale  He's one of us.
I have had the bushings on for a week now. Drove about 600 miles on them (Dallas to Houston and back).
Impressions:
Over bumpy roads - yes rougher; but not the metal clunking feel that I was envisioning; it's noticeable however not annoying. I do prefer the feel of the road over completely disconnected smooth feeling. So, if you're a Lexus/Toyota person then you might find the TL rough to begin with (with the original rubber bushings).
Over lane reflector - it's rougher
Over smooth road - fucking awesome. No more random pulls. I also notice a difference with taking corners in a spirited manner. You feel much more confident because the steering is tighter and the car does what you expect it to do. In the past, there would be random gives mid turn. I can't wait to put summer performance tires on it.
My impression is based off of new all seasons tires (6K on it). It might be rougher for you if your tires are worn out (or you have harder tires).
Install was relatively smooth. I knew to take care of all the rusts ahead of time. So, I put some WD40 on it during my last tire rotation. Endlinks were rusted, but not beyond usable. I was able to put an Allen key in it to remove the bolt (some people have problems with this step). I used Marcus' method to separate the arm from ball joint. Yes, one of the sleeves did come off (on the passenger side). However, talked to a friend and honda master tech and he said it was fine as long as I am putting the same arm back. No issue so far and it fit back pretty snug. Maybe IHC can comment on this.
I had both bushings pressed in for $80 at a local shop. I also bought a new rubber bushing that goes to the strut since I had it out.
It was faster for me to put it back together than removing it. The most dangerous part was honestly loading the suspension up when tightening the bolt. That just made me nervous because if my little compact "2 tons" jack gave out, I would probably suffer while reaching in there to tighten the nuts (didn't have enough room to use the large 2Ton jack because I needed the space to park my other car in the garage. So, my work area was relatively tight. I didn't want to park the other car outside in the hot Texas heat while waiting for the bushings to be pressed out and in.
If you guys want a DIY on this, then let me know. I can whip one up.
He's one of us.I have had the bushings on for a week now. Drove about 600 miles on them (Dallas to Houston and back).
Impressions:
Over bumpy roads - yes rougher; but not the metal clunking feel that I was envisioning; it's noticeable however not annoying. I do prefer the feel of the road over completely disconnected smooth feeling. So, if you're a Lexus/Toyota person then you might find the TL rough to begin with (with the original rubber bushings).
Over lane reflector - it's rougher
Over smooth road - fucking awesome. No more random pulls. I also notice a difference with taking corners in a spirited manner. You feel much more confident because the steering is tighter and the car does what you expect it to do. In the past, there would be random gives mid turn. I can't wait to put summer performance tires on it.
My impression is based off of new all seasons tires (6K on it). It might be rougher for you if your tires are worn out (or you have harder tires).
Install was relatively smooth. I knew to take care of all the rusts ahead of time. So, I put some WD40 on it during my last tire rotation. Endlinks were rusted, but not beyond usable. I was able to put an Allen key in it to remove the bolt (some people have problems with this step). I used Marcus' method to separate the arm from ball joint. Yes, one of the sleeves did come off (on the passenger side). However, talked to a friend and honda master tech and he said it was fine as long as I am putting the same arm back. No issue so far and it fit back pretty snug. Maybe IHC can comment on this.
I had both bushings pressed in for $80 at a local shop. I also bought a new rubber bushing that goes to the strut since I had it out.
It was faster for me to put it back together than removing it. The most dangerous part was honestly loading the suspension up when tightening the bolt. That just made me nervous because if my little compact "2 tons" jack gave out, I would probably suffer while reaching in there to tighten the nuts (didn't have enough room to use the large 2Ton jack because I needed the space to park my other car in the garage. So, my work area was relatively tight. I didn't want to park the other car outside in the hot Texas heat while waiting for the bushings to be pressed out and in.
If you guys want a DIY on this, then let me know. I can whip one up.


The following users liked this post:
rockstar143 (06-21-2016)
06-23-2014, 03:35 PM
#1093
I also stuck my head in the wheel well and sprayed liquid wrench + brake cleaner... Very smart hence the stoned eyes. Thought some of you guys might find it amusing or can empathize.

The following users liked this post:
socal3 (08-24-2014)
06-23-2014, 04:20 PM
#1095
This is not a new concept either. It is used on rally cars (told by my mechanic and googled) There's also a similar kit for RSX.
http://www.jscspeed.com/catalog/Hond...Acura_RSX.html
http://www.jscspeed.com/catalog/Hond...Acura_RSX.html
06-23-2014, 04:28 PM
#1096
This is not a new concept either. It is used on rally cars (told by my mechanic and googled) There's also a similar kit for RSX.
http://www.jscspeed.com/catalog/Hond...Acura_RSX.html
http://www.jscspeed.com/catalog/Hond...Acura_RSX.html
Btw, were you high?

The following users liked this post:
EagleEye (06-23-2014)
06-23-2014, 04:38 PM
#1097
No, I wasn't. I needed to remember what I just did to put things back.
06-23-2014, 04:40 PM
#1098
For the cost, effort, and my plan to keep the car for another 150K - I decided to go the permanent fix route.
06-23-2014, 05:04 PM
#1099
BTW - maybe you can protect it with some grease (non-petroleum based). I also heard guys squirting some of polyurethane compound in it to help better support it.
For the cost, effort, and my plan to keep the car for another 150K - I decided to go the permanent fix route.
For the cost, effort, and my plan to keep the car for another 150K - I decided to go the permanent fix route.
.. I think you inject windo-weld into stock rubber bushings to reinforce it.
and I was talking about your picture with bloodshot eye lol
06-24-2014, 08:47 AM
#1100
The most dangerous part was honestly loading the suspension up when tightening the bolt. That just made me nervous because if my little compact "2 tons" jack gave out, I would probably suffer while reaching in there to tighten the nuts (didn't have enough room to use the large 2Ton jack because I needed the space to park my other car in the garage. So, my work area was relatively tight.
A few quick comments for you:
- It's much simpler, less dangerous, and even more accurate to simply put the car on the ground rather than pre-load the suspension with a jack. Get the bolts all 1-turn from snug, then put the car on the ground. Now go around and torque each one to spec. I can access every bolt with my lowered civic on the ground except the front UCA chassis bolts. These are the only two I've had to pre-load using a jack.
- You do NOT need to peload your suspension to tighten a bolt going through a spherical bearings or attaching a ball-joint. Unlike a bushing there is stretch or twist as the suspension moves. The bearings and ball-joints just rotate smooth & freely. These are okay to torque in the air. In your case I think the only bolt that neededs to be preloaded for torquing would be the lower shock-to-LCA bolt. Everything else could have been torqued with the suspension hanging at full droop.
Last edited by 94eg!; 06-24-2014 at 08:50 AM.
The following users liked this post:
EagleEye (06-24-2014)
06-24-2014, 12:00 PM
#1101
Nice work. These parts sure are tempting.
A few quick comments for you:
- It's much simpler, less dangerous, and even more accurate to simply put the car on the ground rather than pre-load the suspension with a jack. Get the bolts all 1-turn from snug, then put the car on the ground. Now go around and torque each one to spec. I can access every bolt with my lowered civic on the ground except the front UCA chassis bolts. These are the only two I've had to pre-load using a jack.
- You do NOT need to peload your suspension to tighten a bolt going through a spherical bearings or attaching a ball-joint. Unlike a bushing there is stretch or twist as the suspension moves. The bearings and ball-joints just rotate smooth & freely. These are okay to torque in the air. In your case I think the only bolt that neededs to be preloaded for torquing would be the lower shock-to-LCA bolt. Everything else could have been torqued with the suspension hanging at full droop.
 They are awesome (think I said that already).
You are right. I knew it was pretty trivial to load it up for the spherical. However, it was the rear one that I was referring to. It was also the one that required me to really "hug" the loaded arm to tighten.
08-22-2014, 09:20 PM
#1102
7th Gear

Has anyone had any luck with the wheel bearing adapter tool set from Harbor Freight to push out the bushing? I saw some people had mentioned it earlier in the post, but there were questions about whether it would fit or not. I didn't see any replies from anyone who may have tried it.
08-22-2014, 10:28 PM
#1103
7th Gear
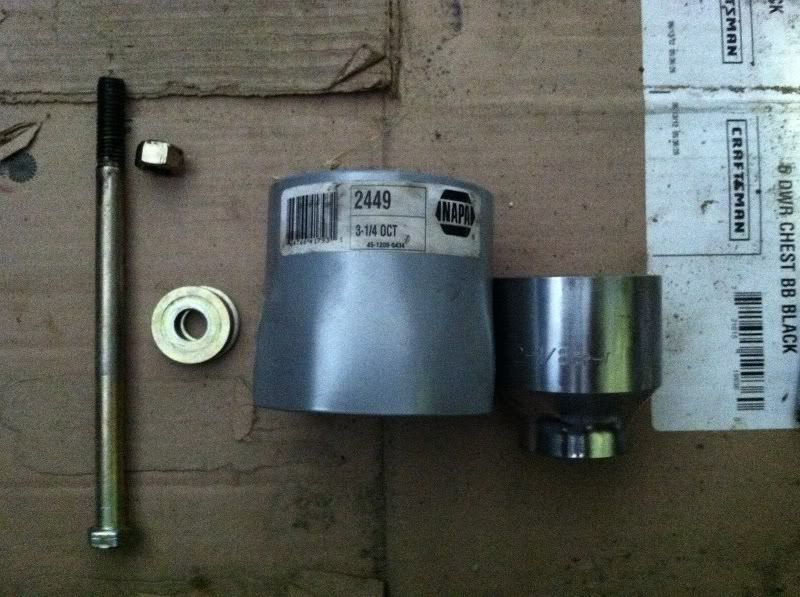
I can confirm what MLue1 posted in #650 and #651: There is plenty of room to press out all 3 bushings with the control arm still on the car (still attached via the ball joint). If you have the tool or a homemade tool like I made, there is absolutely no reason to mess with the ball joint. My homemade tool cost me about $50 after taxes and military discounts:
A. 1/2" x 8" Grade 5 bolt (press out)
B. 1/2" x 9"" Grade 5 bolt (press in) (10" will work if you can't find a 9", also, the 8" will work, but you'll have to manually tap the bushing in about 3/8" to have enough threads for the nut to catch)
C. Grade 5 1/2" washers and nuts
D. 3 1/4" socket from Napa ($35)
E. 2 1/8" socket from Tractor Supply ($15)
Notes:
1. I did freeze the bushings as previously suggested. They went in very easy.
2. Lightly sanded the inside of the control arm and put a light coat of grease on it and the bushing.
3. You'll want to use a cheater/breaker bar. I used the jack handle. Slid right over my 1/2" Craftsman socket wrench.
Works perfectly!! (And yes, I need to sweep my garage. Having no floor drains in a heated garage sucks!!)
11-01-2014, 05:58 PM
#1104
10th Gear

Join Date: Feb 2012
Location: Chicago, IL
Age: 31
Posts: 14
Likes: 0
Received 0 Likes
on
0 Posts
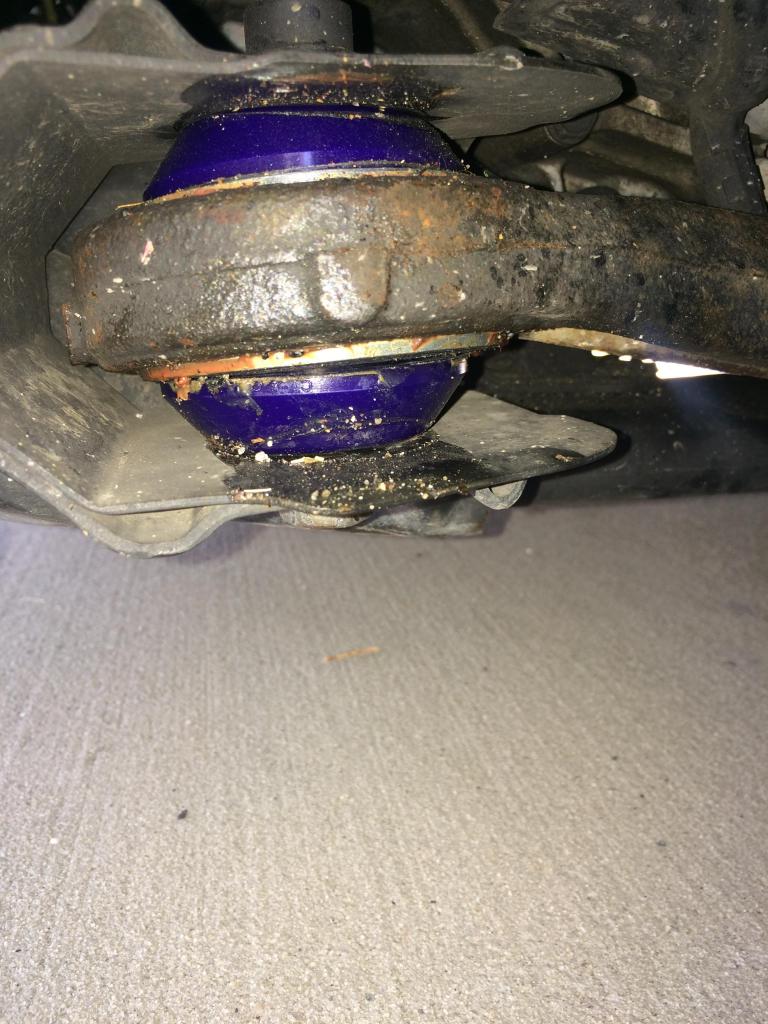
I have a questions for those of you that installed the super pro compliance bushing. I have a 06 accord and i wasnt sure if the 2 round cone shaped pieces on this way or if they were supposed to be flipped? Also is it normal for there to be a gap like so in the picture?
 11-07-2014, 01:15 PM
#1106
Banned
 11-08-2014, 06:11 AM
#1107
11-08-2014, 10:13 AM
#1108
Banned
11-09-2014, 06:50 AM
#1109
11-09-2014, 05:44 PM
#1110

[QUOTE=EagleEye;15057730]
Hi guys,
Sorry for being dumb as I am not anyway good at these mechanical stuff. Then one on the image is following?
Fastline Performance Compliance Bearings by PCI, 2004-08 Acura TSX / TL TL-S - HeelToe Automotive
I have an Acura TL06 85000 miles on it. I was told the the front lower arm bushing has given up and need to be replaced. Dealer says to replace the whole arm as that is how they normally do it. I do not believe it and want to replace only the bushing. So what is the advantage of replacing it with healtoe item was OEM bushing? Is it heeltoe realy expensive comparing to OEM bushing? Appreciate the feedback.
11-10-2014, 10:20 AM
#1111

What about Compliance replacement bushings for the Acura RL?
Hi All,
I've spent probably 3 hours reading all 28 pages of posts the last two days. I've been told by the stealership that:
"Both lower ball joints have play - recommend replacing in future to ensure best possible driveability and handling characteristics - $1429 installed - includes parts/labor and 4WA"
I, unfortunately, laughed at the guy when presented with this as I didn't mean too - my inner monologue got away from me . The new LCA's are $700 for both (approx $350 a piece) before installation. so there's around $400-500 of stealing going on after labor.
This thread made me wonder if the compliance bearings were replaceable in the Acura RL as well. I'd be willing to go with the Fastline ones if they have them.
Thoughts?
I've spent probably 3 hours reading all 28 pages of posts the last two days. I've been told by the stealership that:
"Both lower ball joints have play - recommend replacing in future to ensure best possible driveability and handling characteristics - $1429 installed - includes parts/labor and 4WA"
I, unfortunately, laughed at the guy when presented with this as I didn't mean too - my inner monologue got away from me
. The new LCA's are $700 for both (approx $350 a piece) before installation. so there's around $400-500 of stealing going on after labor. This thread made me wonder if the compliance bearings were replaceable in the Acura RL as well. I'd be willing to go with the Fastline ones if they have them.
Thoughts?
11-10-2014, 10:28 AM
#1112
Kinggape12
Your inbox is full and could not respond to your message.
Hey dude... You don't need a DIY.
1. Jack up
2. put in stands
3. remove end link (rust could be a bitch... it's a 5mm allen key and 14mm bolt)
4. Remove fork bolt
5. Put your 1/2 craftsman ratchet socket wrench handle between lower arm and knuckle ... kick down to remove ball joint
6. remove front bushing bolt (19mm or 3/4 inch bolt)
7. remove rear bolt (17mm)
8. remove arm (CAREFUL to not yank it out too hard like I did and separate the inner CV joint... pain in the ass to put it back... and super messy)
9. Take it to your local machine/independent shop to have stuff pressed out and in. I was charged $75 for all 3 (2 bushings and 1 fork since I was at it). Or you can make your own tools like some of the boys here.
10. Put back (use your jack to get things align by supporting the knuckle assembly. It will make your life easier. I used my cheap 2-ton compact jack. For suspension fork bolt, i used a 3/8 extension on one side to keep it aligned while hammering the bolt in from front to back)
All these steps and tips can be seen on this forum as well as Ericthecarguy (he works on a lot of Hondas). It's all the same. Rust will be your biggest PITA. Spray/clean rust a day ahead... spray again a few hours before doing it will save you aggravation. All in all.. pretty freaking easy and fun. I rate it at 2/5 in difficulty. Just some nuts and bolts. There's a video from Heeltoe on step #5 - separating ball joint.
And BTW - why are you replacing the ENTIRE control arm?... If you're going to do that... you might as well replace your lower ball joints since your metal sleeve might get stuck with the ball joint. Otherwise, reuse the arms man.
Originally Posted by Kinggabe12
Could you make a DIY on how to remove the control arms? im looking to replace the entire control arm and have new bushings installed also.
Last edited by EagleEye; 11-10-2014 at 10:36 AM.
The following users liked this post:
glennjr15 (01-06-2017)
11-10-2014, 10:41 AM
#1113
I have 06 TL with 150K miles. Did it at 135K.
Heeltoe spehrical bearings are more expensive $200 or something (google).
But once and done. WD40 it all up before putting in... They replace the whole arm cause it's more money for them and quicker to do.
Heeltoe Replacement
pros:
1. solid
2. more responsive
3. should be the last time you have to deal with these bushings (OEM start to give at around 20-30K)
cons:
1. more expensive (one time vs $60 * every 30K miles)
2. slightly noisier ride (i don't mind... i drive my wife's lexus when I want disconnection from the road)
[QUOTE=woow14623;15230045]
Hi guys,
Sorry for being dumb as I am not anyway good at these mechanical stuff. Then one on the image is following?
Fastline Performance Compliance Bearings by PCI, 2004-08 Acura TSX / TL TL-S - HeelToe Automotive
I have an Acura TL06 85000 miles on it. I was told the the front lower arm bushing has given up and need to be replaced. Dealer says to replace the whole arm as that is how they normally do it. I do not believe it and want to replace only the bushing. So what is the advantage of replacing it with healtoe item was OEM bushing? Is it heeltoe realy expensive comparing to OEM bushing? Appreciate the feedback.
The following users liked this post:
glennjr15 (01-06-2017)
11-11-2014, 04:07 PM
#1114
[QUOTE=EagleEye;15230807]I have 06 TL with 150K miles. Did it at 135K.
3. should be the last time you have to deal with these bushings (OEM start to give at around 20-30K)
Thanks for the information. I got my vehicle brand new but it did not give up till 80+ K. So isn't that bad.
3. should be the last time you have to deal with these bushings (OEM start to give at around 20-30K)
Thanks for the information. I got my vehicle brand new but it did not give up till 80+ K. So isn't that bad.
11-12-2014, 12:22 AM
#1116
10th Gear

Join Date: Mar 2012
Posts: 10
Likes: 0
Received 0 Likes
on
0 Posts
Sorry if asked before. I tried skimming through but its late at night and its all starting to blur.
How does one tell if it is a lower or upper control arm issue? If the dealer or local shop is recommending replacing the control arm on one side (front driver's side), are they referring to both or is this something I need to get more details from them on?
Thanks in advance. As you probably can tell from this post I'm clueless on this.
11-12-2014, 09:57 AM
#1117
It's cool dude. Wouldn't be on the forum if you already knew everything.
Not sure about the upper arm bushings frequently failing. You would probably deal with the upper arm bushings when your upper ball joint is bad. Take a look at some pics of how double-wishbone suspension works and you'll figure out how to test it.
Lower arm bushings. I noticed that there were very subtle and random "pulls" at highway speed when my bushings were bad. You lose that tight "riding on rails" feeling (coined by elegant-s).
Ask your service adviser what is bad? "Is it the bushings or upper ball joint?" If he says "upper control arm bushings." I would get a second opinion.
Good luck man.
Sorry if asked before. I tried skimming through but its late at night and its all starting to blur.
How does one tell if it is a lower or upper control arm issue? If the dealer or local shop is recommending replacing the control arm on one side (front driver's side), are they referring to both or is this something I need to get more details from them on?
Thanks in advance. As you probably can tell from this post I'm clueless on this.
How does one tell if it is a lower or upper control arm issue? If the dealer or local shop is recommending replacing the control arm on one side (front driver's side), are they referring to both or is this something I need to get more details from them on?
Thanks in advance. As you probably can tell from this post I'm clueless on this.
11-12-2014, 10:13 AM
#1118
Heeltoe Spherical Bearing Update and WHAT NOT TO DO!
So, I still absolutely love the Heeltoe spherical bearing upgrade from Marcus. After almost a year and 15K, it is still very tight and solid.
A few notes:
1. The rear bushing is ALSO a bearing. Someone on this thread who didn't have it said it looked like it's just a regular bushing (rubber/urethane). It is not. Similar construction to the front compliance bushing with a more restricted free rotation angle.
2. Something in the rear one on my passenger side rusted. I started getting this annoy creaking noise. Somewhat embarrassing driving to the valet in a well-kept NBP TL that sounds like a beat up 400K Ford F150. Because of #1, I looked everywhere BUT the bushing. I thought it was the bolt to the subframe that was loose. I thought the waster was bad. I thought the sway bar bushing had cracked and scraped against the bracket.
I finally took it all out again and sprayed WD40 in there after Marcus told me that it's a bearing. A lot of rust came out and I noticed that the movement gradually became smooth again after about 30 minutes. I am not really sure what rusted in there. Bearing construction seems high quality like the front compliance bearing. I didn't see any rust on the bearing itself. Not sure if it's one of the lock rings. There is a little seal to protect it, but obviously water can still get in. Though it rusted, there seems to be no looseness or play on the bearing itself.
Now that I now it's actually a bearing, I will spray WD40 into it every time that I do an oil change/tire rotation like I always do with the front.
What NOT to do:
Don't yank the lower control arm out like a brute when it's still connected to the knuckle via lower ball joint. I happened to separate the inner CV spider from the cup... NOT FUN and extremely messy to put back together (and have to order more grease and a new band... and banding tool.... effing hell).

