Intake resonator removal
 06-08-2012, 12:17 AM
#1
Cruisin'
Thread Starter

Intake resonator removal
I was wondering what those of you who have done this think about it. I've been debating and could use a push in either direction.
07 TLS 6SM
07 TLS 6SM
 06-08-2012, 12:57 PM
#4
Cruisin'
Thread Starter
Haters gonna hate.
06-08-2012, 01:01 PM
#5
Cruisin'
Thread Starter
06-08-2012, 01:14 PM
#7
Cruisin'
Thread Starter
Very true and actually a good idea. I didn't even think about the possibility of objective data, such as youtube sound clips. I'll have to look up that velocity stack. I'm glad to hear that it sound like a cold air intake b/c I do like that sound. If it sounded cheaper than I wouldn't be happy.
Trending Topics
The following 3 users liked this post by justnspace:
06-12-2012, 12:35 PM
#9
Cruisin'
I did this mod yesterday and couldn't be happier. It sounds great and feels stronger! The DIY links helped a lot from the 3G garage. Heat gun and bumper removal a must
06-12-2012, 02:01 PM
#10
Drifting
iTrader: (1)
Join Date: Nov 2010
Location: Salt Lake City, UT
Age: 42
Posts: 3,490
Received 849 Likes
on
605 Posts
^ I did this without removing the bumper.  A word of advice. Don't try it. If you want to take out the resonator, do yourself a favor and take the time to remove the bumper first. It's a right PITA otherwise.
A word of advice. Don't try it. If you want to take out the resonator, do yourself a favor and take the time to remove the bumper first. It's a right PITA otherwise.
 06-13-2012, 05:23 PM
#12
Instructor
Did this awhile back noticed a little better throttle response and it was louder at higher RPMS. Although you get a little bit of hissing at 2k rpms and that fart sound when you shut your car off but I think you also get that with a CAI.
If your going to try it remove the bumper there are no shortcuts it will take way longer to remove it with the bumper on.
If your going to try it remove the bumper there are no shortcuts it will take way longer to remove it with the bumper on.
06-13-2012, 08:22 PM
#13
Burning Brakes
iTrader: (3)
I cut mine off right above the upper "box" looking deal, then I re-used some of the plastic tube to extend it past the hole to the engine bay and down farther into the bumper area. You can barely hear a "whistling" noise while accelerating between certain RPMs, but only with the music really low and if youre listening for it. It doesnt bother me at all.
06-17-2012, 05:17 PM
#14
5th Gear

Turbocoop, any way of reducing or eliminating that "whistling sound" during exceleration? Ive searched thru the site, but havent found an answer. Just wondering if you possibly had an idea. thnx
06-26-2012, 12:31 PM
#15
Cruisin'

Join Date: Jan 2012
Location: Tacoma WA. (Ft. Lewis)
Age: 35
Posts: 16
Likes: 0
Received 1 Like
on
1 Post
I did this and it took me about an hour from start to finnish.. LOVE IT.. Super easy.. From the removal and the drop in Kn'N I have a 2mpg increase.. It sounds louder and (I dont know if my mind is playin games on me but) slight but noticeable increase in power! Wont regret it..
06-26-2012, 04:09 PM
#20
Intermediate

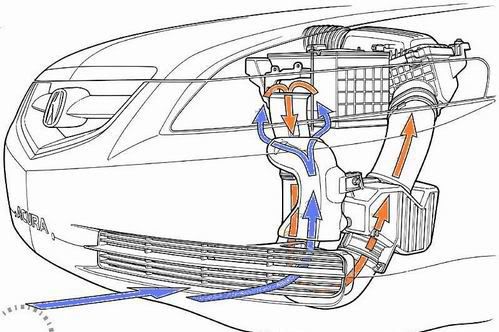
it will end up looking like this:

This will provide the engine with cooler air from down by the bumper instead of sucking in hot air from the engine bay.
Plus, the PVC looks ghetto IMO

 06-26-2012, 04:31 PM
#22
Intermediate
The piece is about 8 inches long from its connection to the bottom of the air box to where is sucks air by the bumper.
I did this mod over the weekend. Taking off the bumper was interesting, but it was a good learning experience.
The sound of the engine sucking in the air is beautiful, but it is different from the tone I am used to with just the mid-muffler delete. It takes away from the sweet sound of hitting 2,500 RPM, but the aggressive sound of the engine from 1k to 2k is nice. It's just different. It sounds great when I lightly rev the engine in my parking garage leaving work
 09-24-2012, 08:54 PM
#23
Drifting
iTrader: (9)
So I think this is what I'm going for. I want to remove my resonator, partially just to have access to the bolts that hold my headlight on. But I don't feel the need to pay for something that doesn't add power. Does using the velocity stack remove the ability to grab cold air from up top tho? Would it make sense to just use a different connector tube where the resonator was? Also, is cutting the resonator out the only way to do this?

 09-25-2012, 06:58 AM
#25
Drifting
iTrader: (9)
So that last picture is the final product correct? Any downside or potential water danger of just having the open pipe hang there? Also, where does that rubber gasket come from that connects the velocity stack to where the resonator was?
What I was wondering was if it made more sense to use a new section of tubing to literally remove only the resonator box and reconnect the rest of the stock tubing.
Thanks for the help. Its crazy how almost anything you can think of, a quick google search starting with tl.acurazine will pull up at least one topic on it.
09-25-2012, 07:09 AM
#26
^both pictures are final products.
I re-used everything from the stock setup.
so the rubber coupler on the velocity stack DID come from the velocity stack near the battery. ALL i did was just relocate it.
YOU COULD use all new piping. BUTT, this is all stock parts.
which made it easy. I DID not have to go buy anything.
I used my brain to figure out which parts I needed to connect to make it extend near the lower bumper.
again, all stock parts from the intake. Just relocated.
the resonator, I did have to use a saw because its plastic welded.
as seen here:
09-25-2012, 08:56 AM
#27
Drifting
iTrader: (9)
Gotcha, and the rest of the piping is removed. Is there any chance of water getting sucked in like that? And it looks like you cut off the resonator right above where the big box ends, correct?
09-25-2012, 09:05 AM
#28
if you cut it anywhere else, you wont get a long enough tube.
I have the type-s bumper but dont have fog lights.
so, the velocity stack sits right next to or a little below the opening to the fog lights. if you do have fog lights, it will still fit and will still draw colder air.
ive driven in rain, droplets WILL NOT make it up the tube.
if you submerge your bumper into a puddle, then I can see it sucking water.
Just dont drive into lakes.
The following users liked this post:
KJ TL-S (09-25-2012)
05-28-2015, 12:41 AM
#31
sorry to bump such an old thread, but im looking to do this mod over the weekend.. i feel like i know what i have to do, except i have one question.. due to the thread having some dead links to the pictures im unsure what you need to use a saw on.. is a saw needed? if i wanted to revert back to stock can i without having to replace anything?
 07-30-2015, 12:48 PM
#34
Instructor

Planning on do this to my '07 TLS. I'm sure my hack saw can tackle the job. What were some of you using a Heat Gun for?
That's correct. The Orange Arrows at the top of the Blue are for the Velocity Stack.
That's correct. The Orange Arrows at the top of the Blue are for the Velocity Stack.

Thread
Thread Starter
Forum
Replies
Last Post
cycdaniel
1G TSX Performance Parts & Modifications
8
12-17-2019 10:58 AM
elietania
4G TL Problems & Fixes
1
09-05-2015 06:52 AM