Rockstar143's Home Fixer Upper Thread - 6/2/15


 07-02-2015, 07:54 PM
#127
Thanks, man!
Well, they don't break the bank either...amazon prime, you can find a lot of 25 of them, or maybe even 10's...we did that for the bathroom pulls too!
Just got done sealing the concrete tile backsplash...just need grout and some paint touch up and we're done! It looks incredible!
Well, they don't break the bank either...amazon prime, you can find a lot of 25 of them, or maybe even 10's...we did that for the bathroom pulls too!
Just got done sealing the concrete tile backsplash...just need grout and some paint touch up and we're done! It looks incredible!
07-07-2015, 07:21 PM
#129
Sooo...
Ironic, granite installed meant I had to figure out the plumbing and some electrical. The backsplash could not have been more of a pain in my dickhole. Chip had warned me that I should pay someone to do it...he told me of $500 in labor...fuck that. We did it, and we'd do it again, but I can surely understand why people DO opt to pay.
Some lessons learned would have likely saved us an entire 2 days on the project.
1) check that all the fucking tiles you buy are the same color across all the boxes/cases. we spent the whole project chasing our tails and the mastic drying time trying to get a uniform look.
2) buy new thinset...my friend gave me a half bucket but it was partially dry. didn't realize how sucky it was until we started the new one halfway through the project.
3) grout with your fingers...for the very porous tile...it dries super fast so the less you put on, the better.
4) use the right tool to get your old tile off...hammering it made it fall right off...using this little chisel would have been tits. using a sharp wood chisel was absolutely NOT the way to go unless you're interesting in replacing your drywall unnecessarily.
IMG-20150630-WA0017_zpsq372jfix.jpeg
here's us getting started...ooh, ahhh...looks awesome!
20150628_122223_zpspbup2lvc.jpg
opted for 1/16" spacer...awesome...perfect small grout line
20150628_131338_zps3itokuc2.jpg
20150628_142955_zps4aa3dno4.jpg
20150628_143007_zpsjkmupsdc.jpg
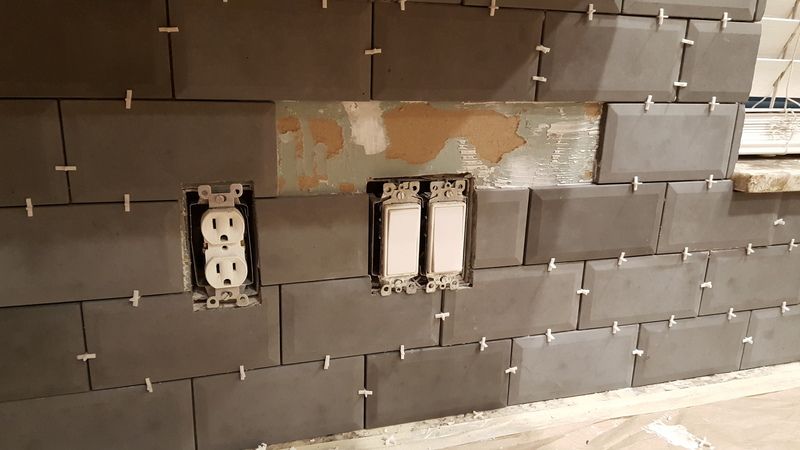
and here...is where the disaster starts
finished first case...hit 2nd
20150628_165304_zpsncbtaa5x.jpg
fuckk...all dark...got out butter knife and pried some darks and inserted into the lights
20150628_202713_zpst4sffx77.jpg
20150628_183408_zpsyxfjfguk.jpg
so then that led to our bigger issue...the REST of our stock was all dark...
got started the next day and ended up with a totally dark wall...it was very obvious and bothered me. I stopped the project and B and I ran to a different lowes and found 6 boxes of light colored. In the end, we realized that the dark ones were aberrations as I didn't find them in any other of the 4 Lowes I ended up going to.
We were up until 1am pulling darks off the wall..., even at 6am the next day as I made my coffee I pulled more off...we were aiming to mimic the light colored wall with dark inserts and not end up with a dark wall with light inserts.
the day after, the thinset was just too dry and would require wall or tile damage.
left side light with dark, right side dark with light. In the end, I'm glad we had some darks, it added depth and contrast.
here you can see it's dark with some lights...needed to correct that
20150629_211805_zpsgzfzmrgl.jpg
and here, it's corrected
20150630_215300_zpscrydzkgp.jpg
20150630_223006_zps0ovgmdys.jpg
getting there!
paid $33 for a small bottle of this natural finish penetrating sealant...we wanted to stop the ability to stain without making it glossy. Topical wasn't the answer. Now, the water beads up
20150702_190521_zpsnckziq3g.jpg
20150702_191147_zpsybeqrybl.jpg
sealed!
20150702_192001_zps2qmxvnr5.jpg
and grout! best 4 hours of our life!
20150703_101912_zpsxanwdnuc.jpg
20150703_102433_zpss8eq4whi.jpg
20150703_102439_zpsagkcb1bb.jpg
20150703_102442_zpszwyzteww.jpg
ta dah!
20150703_120622_zpsain17yjq.jpg
Ironic, granite installed meant I had to figure out the plumbing and some electrical. The backsplash could not have been more of a pain in my dickhole.
Chip had warned me that I should pay someone to do it...he told me of $500 in labor...fuck that. We did it, and we'd do it again, but I can surely understand why people DO opt to pay. Some lessons learned would have likely saved us an entire 2 days on the project.
1) check that all the fucking tiles you buy are the same color across all the boxes/cases. we spent the whole project chasing our tails and the mastic drying time trying to get a uniform look.
2) buy new thinset...my friend gave me a half bucket but it was partially dry. didn't realize how sucky it was until we started the new one halfway through the project.
3) grout with your fingers...for the very porous tile...it dries super fast so the less you put on, the better.
4) use the right tool to get your old tile off...hammering it made it fall right off...using this little chisel would have been tits. using a sharp wood chisel was absolutely NOT the way to go unless you're interesting in replacing your drywall unnecessarily.
IMG-20150630-WA0017_zpsq372jfix.jpeg
here's us getting started...ooh, ahhh...looks awesome!
20150628_122223_zpspbup2lvc.jpg
opted for 1/16" spacer...awesome...perfect small grout line
20150628_131338_zps3itokuc2.jpg
20150628_142955_zps4aa3dno4.jpg
20150628_143007_zpsjkmupsdc.jpg
and here...is where the disaster starts
finished first case...hit 2nd
20150628_165304_zpsncbtaa5x.jpg
fuckk...all dark...got out butter knife and pried some darks and inserted into the lights
20150628_202713_zpst4sffx77.jpg
20150628_183408_zpsyxfjfguk.jpg
so then that led to our bigger issue...the REST of our stock was all dark...
got started the next day and ended up with a totally dark wall...it was very obvious and bothered me. I stopped the project and B and I ran to a different lowes and found 6 boxes of light colored. In the end, we realized that the dark ones were aberrations as I didn't find them in any other of the 4 Lowes I ended up going to.
We were up until 1am pulling darks off the wall..., even at 6am the next day as I made my coffee I pulled more off...we were aiming to mimic the light colored wall with dark inserts and not end up with a dark wall with light inserts.
the day after, the thinset was just too dry and would require wall or tile damage.
left side light with dark, right side dark with light. In the end, I'm glad we had some darks, it added depth and contrast.
here you can see it's dark with some lights...needed to correct that
20150629_211805_zpsgzfzmrgl.jpg
and here, it's corrected
20150630_215300_zpscrydzkgp.jpg
20150630_223006_zps0ovgmdys.jpg
getting there!
paid $33 for a small bottle of this natural finish penetrating sealant...we wanted to stop the ability to stain without making it glossy. Topical wasn't the answer. Now, the water beads up
20150702_190521_zpsnckziq3g.jpg
20150702_191147_zpsybeqrybl.jpg
sealed!
20150702_192001_zps2qmxvnr5.jpg
and grout! best 4 hours of our life!
20150703_101912_zpsxanwdnuc.jpg
20150703_102433_zpss8eq4whi.jpg
20150703_102439_zpsagkcb1bb.jpg
20150703_102442_zpszwyzteww.jpg
ta dah!
20150703_120622_zpsain17yjq.jpg
07-07-2015, 07:22 PM
#130
Sooo...
Ironic, granite installed meant I had to figure out the plumbing and some electrical. The backsplash could not have been more of a pain in my dickhole. Chip had warned me that I should pay someone to do it...he told me of $500 in labor...fuck that. We did it, and we'd do it again, but I can surely understand why people DO opt to pay.
Some lessons learned would have likely saved us an entire 2 days on the project.
1) check that all the fucking tiles you buy are the same color across all the boxes/cases. we spent the whole project chasing our tails and the mastic drying time trying to get a uniform look.
2) buy new thinset...my friend gave me a half bucket but it was partially dry. didn't realize how sucky it was until we started the new one halfway through the project.
3) grout with your fingers...for the very porous tile...it dries super fast so the less you put on, the better.
4) use the right tool to get your old tile off...hammering it made it fall right off...using this little chisel would have been tits. using a sharp wood chisel was absolutely NOT the way to go unless you're interesting in replacing your drywall unnecessarily.
IMG-20150630-WA0017_zpsq372jfix.jpeg
here's us getting started...ooh, ahhh...looks awesome!
20150628_122223_zpspbup2lvc.jpg
opted for 1/16" spacer...awesome...perfect small grout line
20150628_131338_zps3itokuc2.jpg
20150628_142955_zps4aa3dno4.jpg
20150628_143007_zpsjkmupsdc.jpg
and here...is where the disaster starts
finished first case...hit 2nd
20150628_165304_zpsncbtaa5x.jpg
fuckk...all dark...got out butter knife and pried some darks and inserted into the lights
20150628_183408_zpsyxfjfguk.jpg
so then that led to our bigger issue...the REST of our stock was all dark...
got started the next day and ended up with a totally dark wall...it was very obvious and bothered me. I stopped the project and B and I ran to a different lowes and found 6 boxes of light colored. In the end, we realized that the dark ones were aberrations as I didn't find them in any other of the 4 Lowes I ended up going to.
We were up until 1am pulling darks off the wall..., even at 6am the next day as I made my coffee I pulled more off...we were aiming to mimic the light colored wall with dark inserts and not end up with a dark wall with light inserts.
the day after, the thinset was just too dry and would require wall or tile damage.
left side light with dark, right side dark with light. In the end, I'm glad we had some darks, it added depth and contrast.
here you can see it's dark with some lights...needed to correct that
20150629_211805_zpsgzfzmrgl.jpg
and here, it's corrected

getting there!
paid $33 for a small bottle of this natural finish penetrating sealant...we wanted to stop the ability to stain without making it glossy. Topical wasn't the answer. Now, the water beads up
20150702_190521_zpsnckziq3g.jpg
20150702_191147_zpsybeqrybl.jpg
sealed!
20150702_192001_zps2qmxvnr5.jpg
and grout! best 4 hours of our life!
20150703_101912_zpsxanwdnuc.jpg
20150703_102433_zpss8eq4whi.jpg
20150703_102439_zpsagkcb1bb.jpg
20150703_102442_zpszwyzteww.jpg
ta dah!
Ironic, granite installed meant I had to figure out the plumbing and some electrical. The backsplash could not have been more of a pain in my dickhole.
Chip had warned me that I should pay someone to do it...he told me of $500 in labor...fuck that. We did it, and we'd do it again, but I can surely understand why people DO opt to pay. Some lessons learned would have likely saved us an entire 2 days on the project.
1) check that all the fucking tiles you buy are the same color across all the boxes/cases. we spent the whole project chasing our tails and the mastic drying time trying to get a uniform look.
2) buy new thinset...my friend gave me a half bucket but it was partially dry. didn't realize how sucky it was until we started the new one halfway through the project.
3) grout with your fingers...for the very porous tile...it dries super fast so the less you put on, the better.
4) use the right tool to get your old tile off...hammering it made it fall right off...using this little chisel would have been tits. using a sharp wood chisel was absolutely NOT the way to go unless you're interesting in replacing your drywall unnecessarily.
IMG-20150630-WA0017_zpsq372jfix.jpeg
here's us getting started...ooh, ahhh...looks awesome!
20150628_122223_zpspbup2lvc.jpg
opted for 1/16" spacer...awesome...perfect small grout line
20150628_131338_zps3itokuc2.jpg
20150628_142955_zps4aa3dno4.jpg
20150628_143007_zpsjkmupsdc.jpg
and here...is where the disaster starts
finished first case...hit 2nd
20150628_165304_zpsncbtaa5x.jpg
fuckk...all dark...got out butter knife and pried some darks and inserted into the lights

20150628_183408_zpsyxfjfguk.jpg
so then that led to our bigger issue...the REST of our stock was all dark...
got started the next day and ended up with a totally dark wall...it was very obvious and bothered me. I stopped the project and B and I ran to a different lowes and found 6 boxes of light colored. In the end, we realized that the dark ones were aberrations as I didn't find them in any other of the 4 Lowes I ended up going to.
We were up until 1am pulling darks off the wall..., even at 6am the next day as I made my coffee I pulled more off...we were aiming to mimic the light colored wall with dark inserts and not end up with a dark wall with light inserts.
the day after, the thinset was just too dry and would require wall or tile damage.
left side light with dark, right side dark with light. In the end, I'm glad we had some darks, it added depth and contrast.
here you can see it's dark with some lights...needed to correct that
20150629_211805_zpsgzfzmrgl.jpg
and here, it's corrected


getting there!
paid $33 for a small bottle of this natural finish penetrating sealant...we wanted to stop the ability to stain without making it glossy. Topical wasn't the answer. Now, the water beads up
20150702_190521_zpsnckziq3g.jpg
20150702_191147_zpsybeqrybl.jpg
sealed!
20150702_192001_zps2qmxvnr5.jpg
and grout! best 4 hours of our life!
20150703_101912_zpsxanwdnuc.jpg
20150703_102433_zpss8eq4whi.jpg
20150703_102439_zpsagkcb1bb.jpg
20150703_102442_zpszwyzteww.jpg
ta dah!
 07-07-2015, 07:24 PM
#131
and for contrast
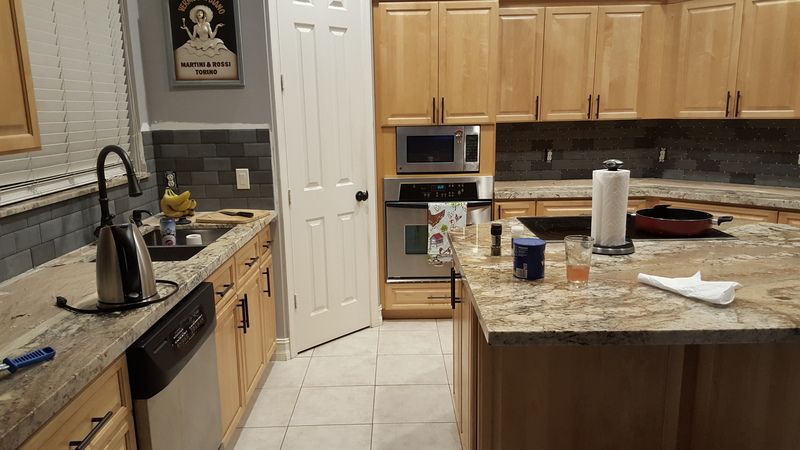
the day we first saw the house...
this is what we started with:
2015-07-03_10-36-41_zpsszpaklqo.jpg
2015-07-03_10-36-49_zpssqvq2upy.jpg
2015-07-03_10-36-57_zpsowskrzsc.jpg
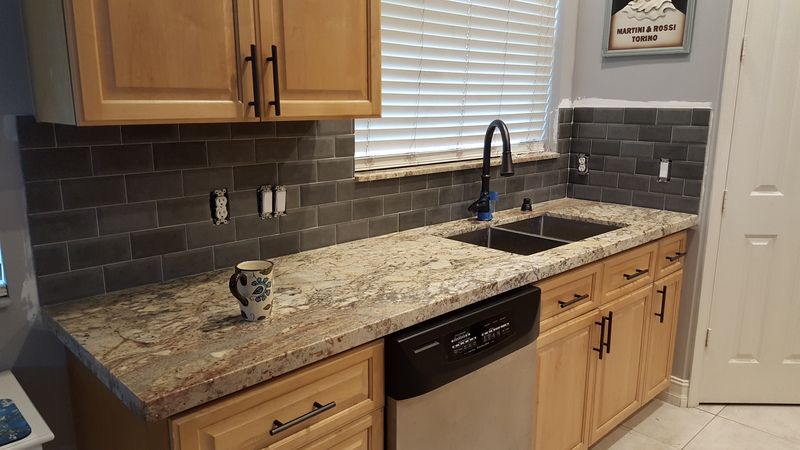
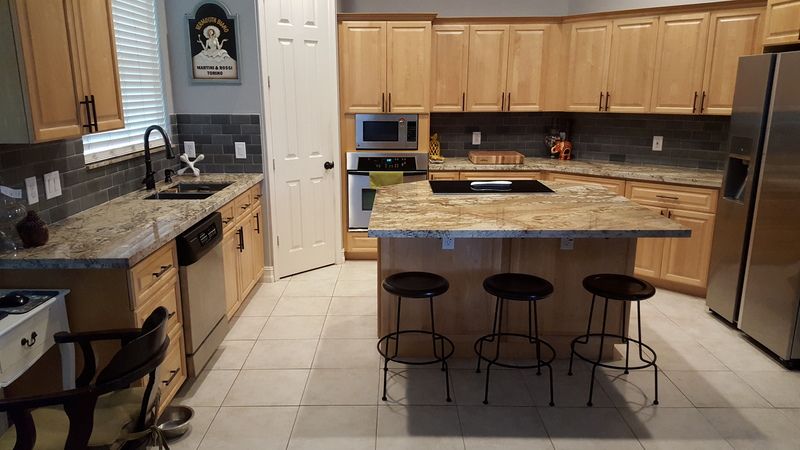
now
20150703_161115_zpsm6ubqf9c.jpg
we love our kitchen!
Now, onto bathroom lighting and framing out the mirrors!
the day we first saw the house...
this is what we started with:
2015-07-03_10-36-41_zpsszpaklqo.jpg
2015-07-03_10-36-49_zpssqvq2upy.jpg
2015-07-03_10-36-57_zpsowskrzsc.jpg
now
20150703_161115_zpsm6ubqf9c.jpg
we love our kitchen!

Now, onto bathroom lighting and framing out the mirrors!
07-07-2015, 11:27 PM
#134
Ex-OEM King

Awesome man, looks great! Good job on getting it all done!
07-08-2015, 06:57 AM
#137
Thank you Jake!
I was telling Betty, I bet you we're more concerned with perfection than even a professional would be...even though there are minor imperfections that only we would see...stepping back, there is a little bit of pride.
Thanks again, man.
J.
I was telling Betty, I bet you we're more concerned with perfection than even a professional would be...even though there are minor imperfections that only we would see...stepping back, there is a little bit of pride.
Thanks again, man.
J.
07-08-2015, 07:05 AM
#138
Pro
Wow, came out great Rockstar!  Kitchen looks so much better.
I'm sure even though you hit some bumps and it was a pain-in-the-ass, you feel better knowing you guys were able solve the problems and complete the project yourselves. Well done man.
Kitchen looks so much better.I'm sure even though you hit some bumps and it was a pain-in-the-ass, you feel better knowing you guys were able solve the problems and complete the project yourselves. Well done man.
The following users liked this post:
DarkTower19 (07-08-2015)
The following users liked this post:
rockstar143 (07-08-2015)
The following 2 users liked this post by Flipster23:
97BlackAckCL (07-08-2015),
rockstar143 (07-08-2015)
07-08-2015, 11:27 AM
#144
Senior Moderator
Regional Coordinator
(Mid-Atlantic)
Regional Coordinator
(Mid-Atlantic)
iTrader: (6)
Nice updates, I was hoping the tires were the vanity for the sink 
The following users liked this post:
rockstar143 (07-08-2015)
07-08-2015, 11:28 AM
#145
Senior Moderator
Regional Coordinator
(Mid-Atlantic)
Regional Coordinator
(Mid-Atlantic)
iTrader: (6)
And good call not messing with that weirdo tile, would have been such a pain for the backsplash
The following users liked this post:
rockstar143 (07-08-2015)
07-08-2015, 11:29 AM
#146
Senior Moderator
Regional Coordinator
(Mid-Atlantic)
Regional Coordinator
(Mid-Atlantic)
iTrader: (6)


 07-08-2015, 12:21 PM
#148
tehLEGOman
Join Date: Dec 2004
Location: Charlotte, NC
Age: 40
Posts: 9,135
Received 1,982 Likes
on
1,335 Posts
Wow nice work. Looks amazing compared to before.
 07-09-2015, 10:19 AM
#151
Moderator
Regional Coordinator (Southeast)
Regional Coordinator (Southeast)
Join Date: Dec 2003
Location: Mooresville, NC
Age: 37
Posts: 43,472
Received 3,657 Likes
on
2,491 Posts
Awesome work. The kitchen looks beautiful.
07-09-2015, 02:26 PM
#153
Ex-OEM King


The following users liked this post:
rockstar143 (07-10-2015)
07-09-2015, 06:19 PM
#156
Needs more Lemon Pledge
Awesome kitchen work, looks great!
Have you tiled before or did you practice at all first?
Have you tiled before or did you practice at all first?
The following users liked this post:
rockstar143 (07-10-2015)
07-10-2015, 07:46 AM
#157
Race Director
iTrader: (1)
Thin-set (can be bought premixed ready to go), tile, spacer, tile, spacer, etc, grout (can be bought premixed ready to go), done. Hardest part of that job was certainly cutting the tiles.
It's really not that hard to do. Especially when you can just youtube a few videos and get all the info you need. People just get overwhelmed because they think if they screw up it's a disaster.
It's really not that hard to do. Especially when you can just youtube a few videos and get all the info you need. People just get overwhelmed because they think if they screw up it's a disaster.
The following users liked this post:
rockstar143 (07-10-2015)
07-10-2015, 08:58 AM
#158
Senior Moderator
Regional Coordinator
(Mid-Atlantic)
Regional Coordinator
(Mid-Atlantic)
iTrader: (6)

The following users liked this post:
rockstar143 (07-10-2015)
07-10-2015, 10:02 AM
#159
Chris
Yeah, it wasn't a hard job if I hadn't made some rookie mistakes with the not checking uniformity and using the wrong tool for previous removal.
We bought pre-mixed thinset...very easy. Concrete is pretty soft to cut, so it wasn't bad...only problem was small aggregate in corners would sometimes chip/fling off instead of cutting but it added to the rustic look.
The following users liked this post:
97BlackAckCL (07-10-2015)