DIY: 1st Gen Acura RL Instrument Cluster LED Bulbs
 05-12-2008, 08:29 PM
#41
Senior Moderator
Join Date: May 2003
Location: Better Neighborhood, Arizona
Posts: 45,634
Received 2,328 Likes
on
1,308 Posts
EVERY screw must be put in exactly where it belongs or else your gauges and lights will not work properly. First time I did it, I goofed the temp gauge. Fixed it immediately.
 05-13-2008, 01:18 AM
#42
Ultimate DIYer
Thread Starter
Originally Posted by super-rl
Thanks 97 Rler for all the information, I really like the new look I been wanted to get ready of those yellow light for the longest, I just replace my light bulbs with the led bulbs I run into a little problem, now my speed cluster not working, I fallow all the instruction all the screws or in the right place, do you know if there a fuse that I can check or if it expensive to replace
05-13-2008, 06:34 PM
#43
Advanced

Join Date: Oct 2007
Age: 38
Posts: 60
Likes: 0
Received 0 Likes
on
0 Posts
got mine in!! wooo. i'll have to barrow my gf's camera and take a pic. however, my D4 light doesnt come on anymore  i forget, do you have to take off those 20 bulbs to get to the gear lights? i think it may have come loose, lets hope!
i forget, do you have to take off those 20 bulbs to get to the gear lights? i think it may have come loose, lets hope!
05-14-2008, 12:04 AM
#44
Ultimate DIYer
Thread Starter
Originally Posted by MasterD86
got mine in!! wooo. i'll have to barrow my gf's camera and take a pic. however, my D4 light doesnt come on anymore i forget, do you have to take off those 20 bulbs to get to the gear lights? i think it may have come loose, lets hope!
i forget, do you have to take off those 20 bulbs to get to the gear lights? i think it may have come loose, lets hope!In my case, I exchanged the D4 bulbs with 1st gear bulb which I never use it. You may swap the bulb with some other in the guage you don't use at all or buy an wire-lead bulb.
97_RLer

 05-18-2008, 11:26 PM
#47
Cruisin'

Join Date: Mar 2008
Location: Toronto, ON
Age: 38
Posts: 21
Likes: 0
Received 0 Likes
on
0 Posts
Originally Posted by 97_RLer
I'm sorry to hear that! But, yeah! as others stated, you gotto check your screws on the back of the cluster again. If they are correct and didn't mar the threads, you may need a new gauge cluster.
05-19-2008, 09:41 PM
#48
Ultimate DIYer
Thread Starter
Originally Posted by thrillhouse
I tried this a while ago and stripped the threads on the board putting one of the screws back in. Now only half my cluster lights up. I'm pretty sure it's the board that stripped and not the screw. So, am I screwed? or is there a way to fix this?
05-19-2008, 11:34 PM
#50
Senior Moderator
Join Date: May 2003
Location: Better Neighborhood, Arizona
Posts: 45,634
Received 2,328 Likes
on
1,308 Posts
Originally Posted by Big Green Acura
How can you tell what is the correct polarity? I had to do trial and error for mine. It was not marked at all.
05-20-2008, 03:00 AM
#52
Ultimate DIYer
Thread Starter
You can check the LED polarity with 9V, 12V, or 14.4V tool battery. Don't worry about LED burn out. LED will do nothing even though you connect it in wrong polarity.
The only error and trial required is to figure out which side is positive on the board. You may install a LED bulb on the board and connect wire harness to light it up and then you will know.
Or you may install all LED bulbs on the board regardless of polarity and connect wire harness to light them up. Some of them will on and the others will off. Now you reinstall those LED, which were not on, in reverse.
05-21-2008, 07:26 PM
#53
Cruisin'
Join Date: Mar 2008
Location: Toronto, ON
Age: 38
Posts: 21
Likes: 0
Received 0 Likes
on
0 Posts
Originally Posted by 97_RLer
I don't think you busted the board but you put the LED in wrong polarity. As I mentioned earlier, do not trust the polarity indicator on the LED bulbs. Some of them are wrong, you may write which bulbs are not on and put them in reverse, and then, they will all light up! If you had busted the cluster by screws, the needle will not move.
I don't think I busted the bulbs either, because at first when I put the cluster back it was completely dark except for the needles and indication lights. After moving the cluster around a bit a couple of the back lights came on. I tried moving it some more and tapping it and was able to get half of them to light up. So it seems like the stripped screw is causing some loose circuits. Other than the backlights the rest of the cluster works fine.
I'm not sure if this means my board is necessarily damaged, but if it is can I simply swap the whole cluster with a new one? What would happen to my mileage?
05-21-2008, 11:47 PM
#54
Ultimate DIYer
Thread Starter
Originally Posted by thrillhouse
I actually didn't replace the bulbs, I didn't even get the board off. I had to put it back together before I got that far.
I don't think I busted the bulbs either, because at first when I put the cluster back it was completely dark except for the needles and indication lights. After moving the cluster around a bit a couple of the back lights came on. I tried moving it some more and tapping it and was able to get half of them to light up. So it seems like the stripped screw is causing some loose circuits. Other than the backlights the rest of the cluster works fine.
I'm not sure if this means my board is necessarily damaged, but if it is can I simply swap the whole cluster with a new one? What would happen to my mileage?
I think your instrument cluster board is working fine. The screws are only related with gauge needles but are not related with bulbs. Your gauge needles are light up and moving properly. That does mean they are fine. The problem is the aged filament bulbs, which are weakly connected inside bulbs or broken.
It is time to upgrade to LED bulbs, which have 180,000 hours lifetime theoretically. LED fails sometimes not because of the LED itself failure but because of resistors or diodes built-in LED failure, but it's rare.
Good luck on your project! If you need diagrams for the instrument cluster removal, just pm me with your email. I can send you PDF documents for better understanding.
97_RLer
05-22-2008, 11:00 AM
#55
Cruisin'
Join Date: Mar 2008
Location: Toronto, ON
Age: 38
Posts: 21
Likes: 0
Received 0 Likes
on
0 Posts
Well I hope your right. Broken bulbs are much less of a problem than a broken cluster. I'll take it apart one day to test the bulbs. I pm'd you for the diagrams. Thanks for your help!
05-22-2008, 08:46 PM
#56
Ultimate DIYer
Thread Starter
Originally Posted by thrillhouse
Well I hope your right. Broken bulbs are much less of a problem than a broken cluster. I'll take it apart one day to test the bulbs. I pm'd you for the diagrams. Thanks for your help!
Trust me I'm sure your gauge clusters are working and the filament bulbs are gone.
Good luck!
06-10-2008, 09:05 PM
#57
60mph Soapbox Racer
Join Date: Jun 2007
Location: Baltimore County
Age: 37
Posts: 117
Likes: 0
Received 14 Likes
on
10 Posts
ok, here's something to help everyone who's doing this: pictures and a 'which direction do I put the darn things in?' guide
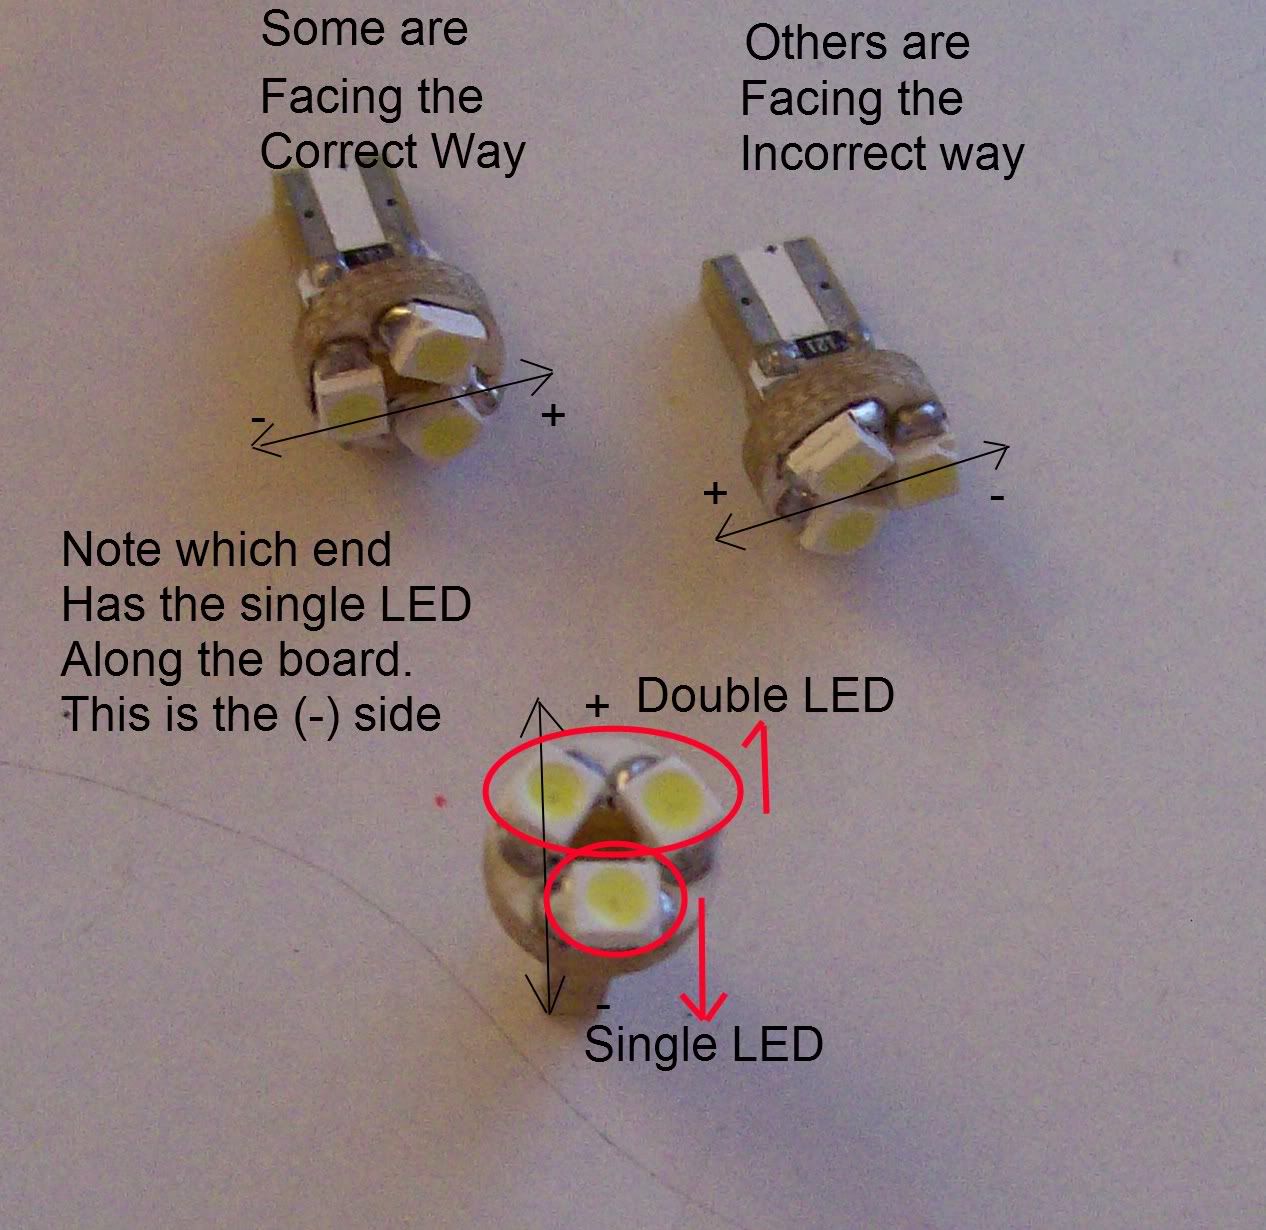
First off, the LED's. If you buy them from the seller that 97_RLer recommended, as i did, there are some that are facing the right way with respect to the little (+) symbol on the bottom of each LED, and some that are not. You can figure out which is which (which side is the positive vs negative) by comparing your LED's to this picture. I strongly recommend using a marker to indicate which side is positive (red) and which is negative (usually black). The lines with the arrows indicate the direction the longer, insert board is polarized.
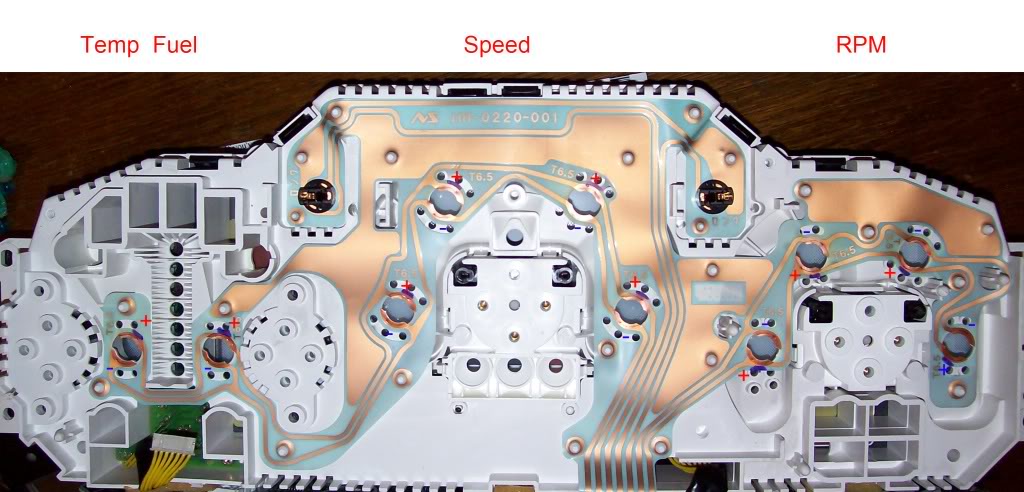
This second picture is of the place where the LED's go. For instructions on how to get to this phase, see the original instructions (here) and the PDF version of the service manual (here) . Insert the LED's so that the positive terminals from the first picture (now inserted into the holders) are in contact with the parts of the sheet that are labeled as positive in the second picture. I got 10 for 10 on the first try after some circuit tracing.
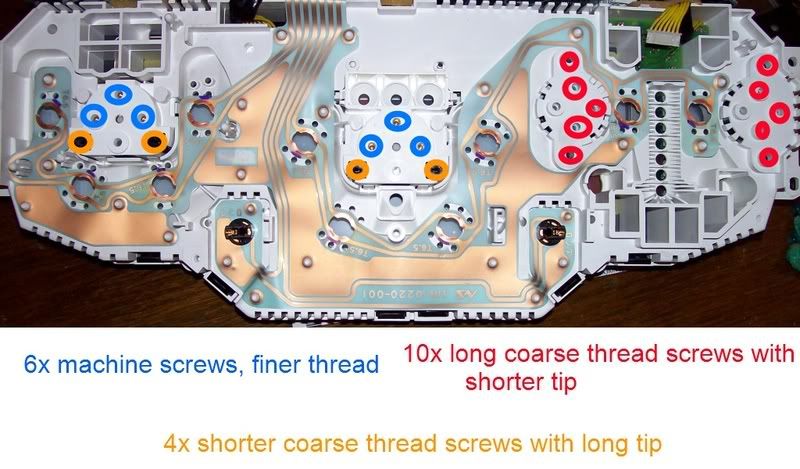
For your convenience, I have included a color-coded diagram of which screws go where. Take it easy on the coarse thread ones (orange and red), use a #2-#3 philips and make sure not to strip them. I used a new leatherman wave and it was pretty much perfect. note that in this picture, the rear of the console is shown oriented upside-down
First off, the LED's. If you buy them from the seller that 97_RLer recommended, as i did, there are some that are facing the right way with respect to the little (+) symbol on the bottom of each LED, and some that are not. You can figure out which is which (which side is the positive vs negative) by comparing your LED's to this picture. I strongly recommend using a marker to indicate which side is positive (red) and which is negative (usually black). The lines with the arrows indicate the direction the longer, insert board is polarized.
This second picture is of the place where the LED's go. For instructions on how to get to this phase, see the original instructions (here) and the PDF version of the service manual (here) . Insert the LED's so that the positive terminals from the first picture (now inserted into the holders) are in contact with the parts of the sheet that are labeled as positive in the second picture. I got 10 for 10 on the first try after some circuit tracing.
For your convenience, I have included a color-coded diagram of which screws go where. Take it easy on the coarse thread ones (orange and red), use a #2-#3 philips and make sure not to strip them. I used a new leatherman wave and it was pretty much perfect. note that in this picture, the rear of the console is shown oriented upside-down
06-10-2008, 09:14 PM
#58
60mph Soapbox Racer
Join Date: Jun 2007
Location: Baltimore County
Age: 37
Posts: 117
Likes: 0
Received 14 Likes
on
10 Posts
All told it took me about an hour and a half to do the process. I strongly recommend the Service Manual , as it has pictures and more detailed instructions on how to get the panel out.
07-29-2008, 09:25 AM
#60
Advanced
Join Date: Oct 2007
Age: 38
Posts: 60
Likes: 0
Received 0 Likes
on
0 Posts
i dont know if its just me, but the bulbs dont light up evenly. I got the same ones in white that 97RLer has, but its really noticable that 40 and 80 are prett dim and the brightest is where the bulb is located.
just wondering if I did something wrong or if this is normal.
thanks jerm for the pics! would havecame in handy before haha, but if i ever change it, this will be helpful
just wondering if I did something wrong or if this is normal.
thanks jerm for the pics! would havecame in handy before haha, but if i ever change it, this will be helpful
08-04-2008, 06:32 PM
#61
Instructor
Join Date: Dec 2006
Age: 53
Posts: 213
Likes: 0
Received 0 Likes
on
0 Posts
Nice job guys,I had this done almost 2 years ago and I was unhappy with the outcome.The inconsistency in the cluster lighting pissed me off and I took them out. I guess my sickness is I,m to much of a perfectionist , which can make me crazy at times. Anyway to bad sylvania dos'nt make a blue bulb # 24 you can get them in any straus store.they only have white & amber . tell you one thing there bright as hell.I tried them both just to see the outcome, and they fit and work great.....but I really wanted blue.....again nice job guys and keep up the good work modding RL's 
08-05-2008, 09:53 AM
#62
Advanced
Join Date: Oct 2007
Age: 38
Posts: 60
Likes: 0
Received 0 Likes
on
0 Posts
Originally Posted by GSARL
Nice job guys,I had this done almost 2 years ago and I was unhappy with the outcome.The inconsistency in the cluster lighting pissed me off and I took them out. I guess my sickness is I,m to much of a perfectionist , which can make me crazy at times. Anyway to bad sylvania dos'nt make a blue bulb # 24 you can get them in any straus store.they only have white & amber . tell you one thing there bright as hell.I tried them both just to see the outcome, and they fit and work great.....but I really wanted blue.....again nice job guys and keep up the good work modding RL's
hahaha yeah I'm the exact same way, I think I'm going to look for some white incandescent bulbs so its all consistent. Damn our perfectionist nature!!!
or maybe even amber would be good, hmm.
what did you put in GSARL after you took the LEDs out?
08-05-2008, 01:54 PM
#63
Instructor
Join Date: Dec 2006
Age: 53
Posts: 213
Likes: 0
Received 0 Likes
on
0 Posts
Originally Posted by MasterD86
hahaha yeah I'm the exact same way, I think I'm going to look for some white incandescent bulbs so its all consistent. Damn our perfectionist nature!!!
or maybe even amber would be good, hmm.
what did you put in GSARL after you took the LEDs out?
or maybe even amber would be good, hmm.
what did you put in GSARL after you took the LEDs out?
08-06-2008, 12:10 AM
#64
Advanced
Join Date: Oct 2007
Age: 38
Posts: 60
Likes: 0
Received 0 Likes
on
0 Posts
Originally Posted by GSARL
I have the silvania amber # 24 bulbs and I was thinking about putting the white ones back in? gotta be real careful this time ...already broke one cluster....thank god for ebay I found a used one on there for $149.00 with almost the same milage...It was a miracle.As I,m sure you know the dealer wants $1100.00 for a new cluster and thats with my connection in the parts dep..I think rregular price is about $1500.00

also whats the difference between these white bulbs?
http://www.servicelighting.com/EiKo-...ent-Light-Bulb
and
http://www.servicelighting.com/EiKo-...ent-Light-Bulb
may just go with amber though. i can't trust LEDs anymore and not sure how those white bulbs would look
08-06-2008, 06:15 PM
#65
Instructor
Join Date: Dec 2006
Age: 53
Posts: 213
Likes: 0
Received 0 Likes
on
0 Posts
Originally Posted by MasterD86
I'll buy your ambers off you if they're still good
also whats the difference between these white bulbs?
http://www.servicelighting.com/EiKo-...ent-Light-Bulb
and
http://www.servicelighting.com/EiKo-...ent-Light-Bulb
may just go with amber though. i can't trust LEDs anymore and not sure how those white bulbs would look
also whats the difference between these white bulbs?
http://www.servicelighting.com/EiKo-...ent-Light-Bulb
and
http://www.servicelighting.com/EiKo-...ent-Light-Bulb
may just go with amber though. i can't trust LEDs anymore and not sure how those white bulbs would look
08-07-2008, 08:05 PM
#66
Advanced
Join Date: Oct 2007
Age: 38
Posts: 60
Likes: 0
Received 0 Likes
on
0 Posts
ohh duh
these right? thinking of goin with amber. whats the difference between natural amber and amber?
http://www.bulbtown.com/24NA_NATURAL...ASE_p/24na.htm
these right? thinking of goin with amber. whats the difference between natural amber and amber?
http://www.bulbtown.com/24NA_NATURAL...ASE_p/24na.htm
08-07-2008, 09:03 PM
#67
Instructor
Join Date: Dec 2006
Age: 53
Posts: 213
Likes: 0
Received 0 Likes
on
0 Posts
Originally Posted by MasterD86
ohh duh
these right? thinking of goin with amber. whats the difference between natural amber and amber?
http://www.bulbtown.com/24NA_NATURAL...ASE_p/24na.htm
these right? thinking of goin with amber. whats the difference between natural amber and amber?
http://www.bulbtown.com/24NA_NATURAL...ASE_p/24na.htm
08-09-2008, 05:05 PM
#68
Cruisin'
Join Date: Apr 2008
Age: 38
Posts: 23
Likes: 0
Received 0 Likes
on
0 Posts
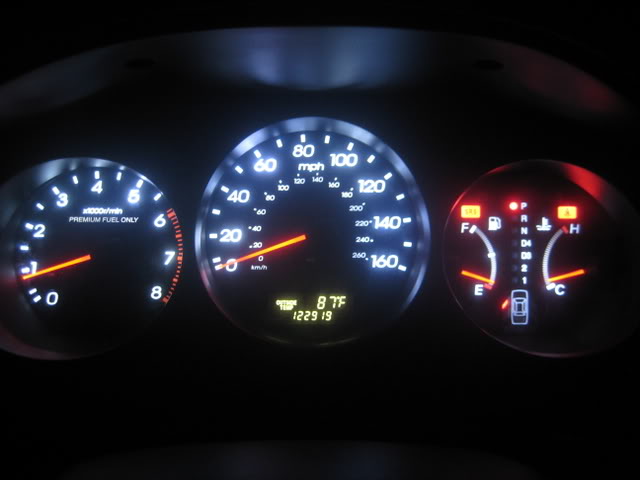
Here are my pics during the day...There is not so much glare as the pics show. but they look absolutely amazing. I wish i could change the odometer to match the hyper whites!
[IMG]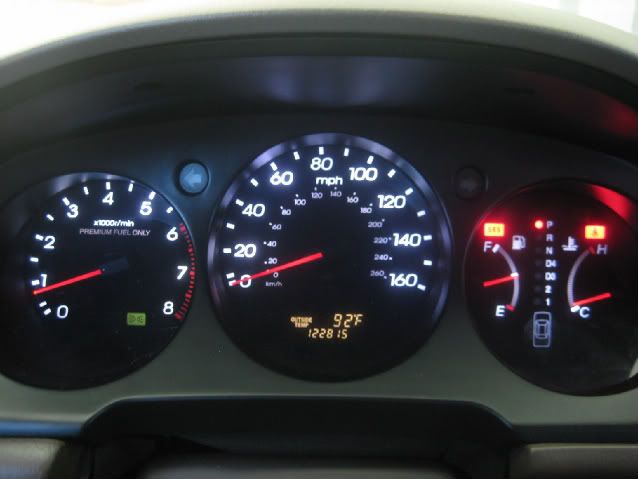 [/IMG]
[IMG]
[/IMG]
08-10-2008, 11:08 PM
#71
Cruisin'
Join Date: Apr 2008
Age: 38
Posts: 23
Likes: 0
Received 0 Likes
on
0 Posts
Here are night pics from brightest on the control knob...then in the middle and last as dim as possible.
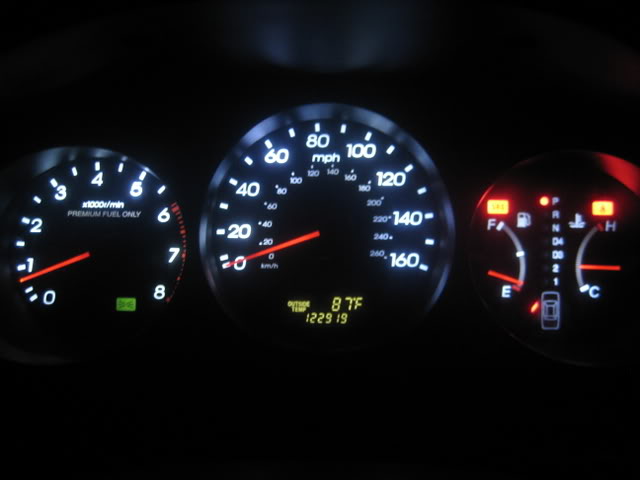
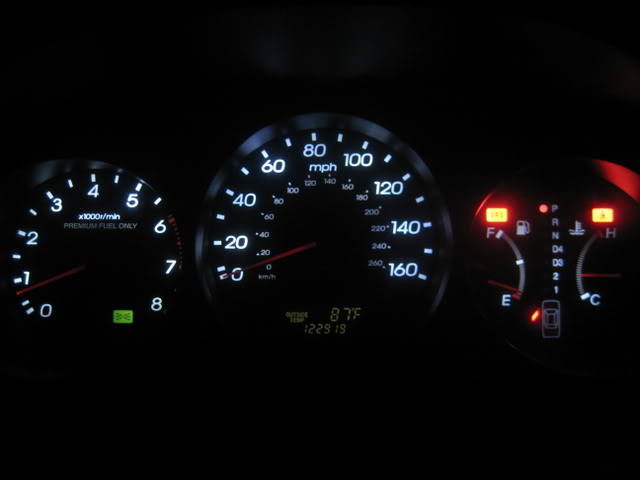
97_RLer: It looks as though my odometer is yellowish and yours is hyperwhite?
Am I wrong?
97_RLer: It looks as though my odometer is yellowish and yours is hyperwhite?
Am I wrong?
08-11-2008, 02:58 PM
#73
Cruisin'
Join Date: Apr 2008
Age: 38
Posts: 23
Likes: 0
Received 0 Likes
on
0 Posts
trust me its not that big of a deal..i know that some people are perfectionists but your not driving down the road and staring at the gauges and its not really noticible...definately worth the $18
08-11-2008, 04:41 PM
#74
Instructor
Join Date: Dec 2006
Age: 53
Posts: 213
Likes: 0
Received 0 Likes
on
0 Posts
The cluster needs bulbs that shoot 360 degrees of light.Those led ,s only shoot straight beams,although the white looks pretty good.If you use the sylvania #24 bulb the cluster will light up perfectly....there clear bulbs are very bright.someone should give it a shot and post the pics .as for me I,m done messing with my cluster.....I have so much other shit going on with my car, this is the least important to me right now....just looking to help out .
08-12-2008, 10:01 AM
#75
Advanced
Join Date: Oct 2007
Age: 38
Posts: 60
Likes: 0
Received 0 Likes
on
0 Posts
Originally Posted by GSARL
The cluster needs bulbs that shoot 360 degrees of light.Those led ,s only shoot straight beams,although the white looks pretty good.If you use the sylvania #24 bulb the cluster will light up perfectly....there clear bulbs are very bright.someone should give it a shot and post the pics .as for me I,m done messing with my cluster.....I have so much other shit going on with my car, this is the least important to me right now....just looking to help out .
 08-22-2008, 01:22 AM
#77
Advanced
Join Date: Oct 2007
Age: 38
Posts: 60
Likes: 0
Received 0 Likes
on
0 Posts
oh ok, thanks for the pic.
I wish i could see how it would look with clear bulbs but afraid if i get em and take all the time to put them and and they turnout bad, i will kick my self.
are they more of a white?
I wish i could see how it would look with clear bulbs but afraid if i get em and take all the time to put them and and they turnout bad, i will kick my self.
are they more of a white?
08-26-2008, 03:49 PM
#79
Instructor

Join Date: Mar 2006
Age: 48
Posts: 198
Likes: 0
Received 0 Likes
on
0 Posts
Hey guys.
I need to replace my bulbs as well. Below is a link with all the items sold by jwarden. I would like to get the all white. Can someone please tell me which ones that I need to purchase? Thanks.
http://search.ebay.com/_W0QQsassZwar...QQfsooZ2QQrdZ0
I need to replace my bulbs as well. Below is a link with all the items sold by jwarden. I would like to get the all white. Can someone please tell me which ones that I need to purchase? Thanks.
http://search.ebay.com/_W0QQsassZwar...QQfsooZ2QQrdZ0
08-27-2008, 03:58 PM
#80
Instructor
Join Date: Dec 2006
Age: 53
Posts: 213
Likes: 0
Received 0 Likes
on
0 Posts
Hey guys.
I need to replace my bulbs as well. Below is a link with all the items sold by jwarden. I would like to get the all white. Can someone please tell me which ones that I need to purchase? Thanks.
http://search.ebay.com/_W0QQsassZwar...QQfsooZ2QQrdZ0
I need to replace my bulbs as well. Below is a link with all the items sold by jwarden. I would like to get the all white. Can someone please tell me which ones that I need to purchase? Thanks.
http://search.ebay.com/_W0QQsassZwar...QQfsooZ2QQrdZ0

