Easy DIY tire storage rack (winter is a'comin)
 10-17-2010, 01:55 PM
#1
Instructor
Thread Starter
Easy DIY tire storage rack (winter is a'comin)
I finally broke down this year and bought some snow tires for the Minnesota winter. I decided to build a rack to store them and here is the result. This took me about an hour and cost about $30 in parts. I figured I’d share this little project since so many folks have asked about tire racks in previous posts. You are basically going to make a super-strong frame that has 2 pockets for the tires to sit in. The frame gets lag-bolted into wall studs and is also supported on either side by cables that are eye-bolted into the same wall studs.


Materials:
· 2 - 2”x4” 8’ framing lumber
· 12 – 3” deck screws
· 6 – 2x4 joist hangers
· 24 – short nails (I used 1” roofing nails)
· 4 – 5/16” x 3˝” lag bolts and washers
· 2 –Machine-threaded eye hooks, washers, and nuts. I think I used 5/16”
· 2 - Wood-threaded eye hooks, same size as the other eye hooks
· About 4 feet of cable, I think I used 3/8”
· 2 – turnbuckles
· 4 – cable clamps
Tools:
· Skill saw (or a miter box)
· Framing square
· Level
· Cordless drill with screw bit
· Assorted wood drill bits for the lag bolts and eye hooks
· Socket wrench for the lag bolts (I think I needed a 9/16” socket)
· Hammer
· Adjustable wrench (for the turnbuckles)
· Tape measure and Pencil
If you have stock wheels then these sizes should work for you, otherwise, you’ll need to adjust a bit. Also, you need to make sure that your wall studs are 16” on center otherwise you may need to make the back piece longer to span at least 3 studs (I was able to lag into 4 studs). Lastly, make sure you have enough overhead clearance to the ceiling so the tires can roll into the pockets. You’ll need about 24” ceiling clearance.
I decided on pockets that are square: 20” wide by 20” deep. Taking into account the framing pieces on the sides and middle the outside dimensions of the frame are 50” wide by 23˝” deep:

1. Front and back pieces: are 50” long so cut 50” from each of the 8’ 2x4’s and save the scrap as you will need this for the side and middle pieces.
2. Side and middle pieces: 20” long so cut 3 of these from the scrap. The end cuts should be nice and square so use a framing square with the skill saw (or a miter box if ya got one ;-)
3. Back piece: dry-fit and level the back piece against your wall and mark where the studs are on the back piece. Lay the back piece on your workbench and drill holes in the back for the lag bolts. You’ll want to drill holes that are a little larger than the bolt.
4. Place the back piece back on the wall and level it. Mark where the holes are on the wall. Remove the back piece and drill SMALLER holes into the wall studs so your lag bolts will go in nice and tight. DO NOT drill a hole that is too large or your lag bolts will not hold. The drill bit size is going to depend on the lag bolt size but smaller is better so start small and go bigger if the bolt is a bitch to get in.
5. Front and back pieces: using the framing square mark the locations for all 3 joist hangers so they are not in the way of the lag bolt holes that you just made. I started with the middle hanger and centered it and then measured 20” to the side hangers. It is easiest to line up the front and back pieces of wood for this so you mark them both together. Nail the joist hangers and drop in your side and middle pieces. Next you’ll want to use the deck screws to secure the side and middle pieces. I pre-drilled to counter-sink the screws to keep the wood from splitting. Screw through the front and back pieces and then into the ends of the side and middle pieces. Now your frame is strong!
6. Drill a hole in the front piece on the far ends for the threaded eye bolts. Install the eye bolts and use washers on both sides and secure with a nut.
7. Mount the frame to the wall using a level. Use the socket wrench to secure the lag bolts. It is easiest to put in the 2 end bolts first and keep one loose to level the frame (hammer comes in handy here as well ;-)
8. Drill 2 holes for the screw-in eye bolts about 20”-24” higher than the frame and in the same studs as the outer sides of the frame. Screw the eye bolts into these holes.
9. Side cables - for each side: cut about 30” of cable and thread one side into the LOWER eye bolt on the frame. Secure with a cable clamp. Attach a turn buckle to the top eye bolt. Secure the other side of the cable into this turn buckle and secure with a clamp. You’ll want to take up as much slack as possible so that you can adjust the turn buckle. Level the sides using the turn buckle. Lastly, put you wheels in the frame and re-level the sides (mine sagged by a good 1/8” from the weight!)
-Cheers
Materials:
· 2 - 2”x4” 8’ framing lumber
· 12 – 3” deck screws
· 6 – 2x4 joist hangers
· 24 – short nails (I used 1” roofing nails)
· 4 – 5/16” x 3˝” lag bolts and washers
· 2 –Machine-threaded eye hooks, washers, and nuts. I think I used 5/16”
· 2 - Wood-threaded eye hooks, same size as the other eye hooks
· About 4 feet of cable, I think I used 3/8”
· 2 – turnbuckles
· 4 – cable clamps
Tools:
· Skill saw (or a miter box)
· Framing square
· Level
· Cordless drill with screw bit
· Assorted wood drill bits for the lag bolts and eye hooks
· Socket wrench for the lag bolts (I think I needed a 9/16” socket)
· Hammer
· Adjustable wrench (for the turnbuckles)
· Tape measure and Pencil
If you have stock wheels then these sizes should work for you, otherwise, you’ll need to adjust a bit. Also, you need to make sure that your wall studs are 16” on center otherwise you may need to make the back piece longer to span at least 3 studs (I was able to lag into 4 studs). Lastly, make sure you have enough overhead clearance to the ceiling so the tires can roll into the pockets. You’ll need about 24” ceiling clearance.
I decided on pockets that are square: 20” wide by 20” deep. Taking into account the framing pieces on the sides and middle the outside dimensions of the frame are 50” wide by 23˝” deep:
1. Front and back pieces: are 50” long so cut 50” from each of the 8’ 2x4’s and save the scrap as you will need this for the side and middle pieces.
2. Side and middle pieces: 20” long so cut 3 of these from the scrap. The end cuts should be nice and square so use a framing square with the skill saw (or a miter box if ya got one ;-)
3. Back piece: dry-fit and level the back piece against your wall and mark where the studs are on the back piece. Lay the back piece on your workbench and drill holes in the back for the lag bolts. You’ll want to drill holes that are a little larger than the bolt.
4. Place the back piece back on the wall and level it. Mark where the holes are on the wall. Remove the back piece and drill SMALLER holes into the wall studs so your lag bolts will go in nice and tight. DO NOT drill a hole that is too large or your lag bolts will not hold. The drill bit size is going to depend on the lag bolt size but smaller is better so start small and go bigger if the bolt is a bitch to get in.
5. Front and back pieces: using the framing square mark the locations for all 3 joist hangers so they are not in the way of the lag bolt holes that you just made. I started with the middle hanger and centered it and then measured 20” to the side hangers. It is easiest to line up the front and back pieces of wood for this so you mark them both together. Nail the joist hangers and drop in your side and middle pieces. Next you’ll want to use the deck screws to secure the side and middle pieces. I pre-drilled to counter-sink the screws to keep the wood from splitting. Screw through the front and back pieces and then into the ends of the side and middle pieces. Now your frame is strong!
6. Drill a hole in the front piece on the far ends for the threaded eye bolts. Install the eye bolts and use washers on both sides and secure with a nut.
7. Mount the frame to the wall using a level. Use the socket wrench to secure the lag bolts. It is easiest to put in the 2 end bolts first and keep one loose to level the frame (hammer comes in handy here as well ;-)
8. Drill 2 holes for the screw-in eye bolts about 20”-24” higher than the frame and in the same studs as the outer sides of the frame. Screw the eye bolts into these holes.
9. Side cables - for each side: cut about 30” of cable and thread one side into the LOWER eye bolt on the frame. Secure with a cable clamp. Attach a turn buckle to the top eye bolt. Secure the other side of the cable into this turn buckle and secure with a clamp. You’ll want to take up as much slack as possible so that you can adjust the turn buckle. Level the sides using the turn buckle. Lastly, put you wheels in the frame and re-level the sides (mine sagged by a good 1/8” from the weight!)
-Cheers
 10-17-2010, 01:57 PM
#2
Race Director
iTrader: (8)
Nice =)
Damn your garage is clean.
Damn your garage is clean.
10-17-2010, 02:32 PM
#4
Instructor
Thread Starter

Trending Topics

 10-21-2010, 12:34 PM
#11
Instructor
Thread Starter
 If my x-ray had been working, I could've seen what was in it.
 10-22-2010, 09:44 AM
#14
Three Wheelin'
I built almost the same thing this summer to hold my stock wheels. Now I have a little 12x20 garage so its not all high up and hidden like that but its like it. I didnt think of the joist hangers and turn buckles... may have to do that as well! Nice DIY I am sure alot more people will have this now too! I have built it for 2 friends already!
 10-22-2010, 05:41 PM
#21
Senior Moderator
I have 2 steel poles bolted to my wall in the basement that the rims slide onto thru the center hub hole and they hang from.
10-23-2010, 11:58 AM
#23

Otherwise...
If the tires are still mounted on wheels, they need to be stacked on the sidewalls and restacked every few weeks. Also, deflate to 1 bar.
If the tires are off the wheels, then they can be stored standing.
10-23-2010, 06:26 PM
#24
Instructor
Thread Starter
Excellent point and i will mull it over since they are only being stored for 6 months at a time. If i decide to modify the setup it is an easy step to insert a bar to let them hang free from the center of the rim...stay tuned!
 11-09-2010, 04:04 PM
#26
Your idea has given me much more inspiration than intended.
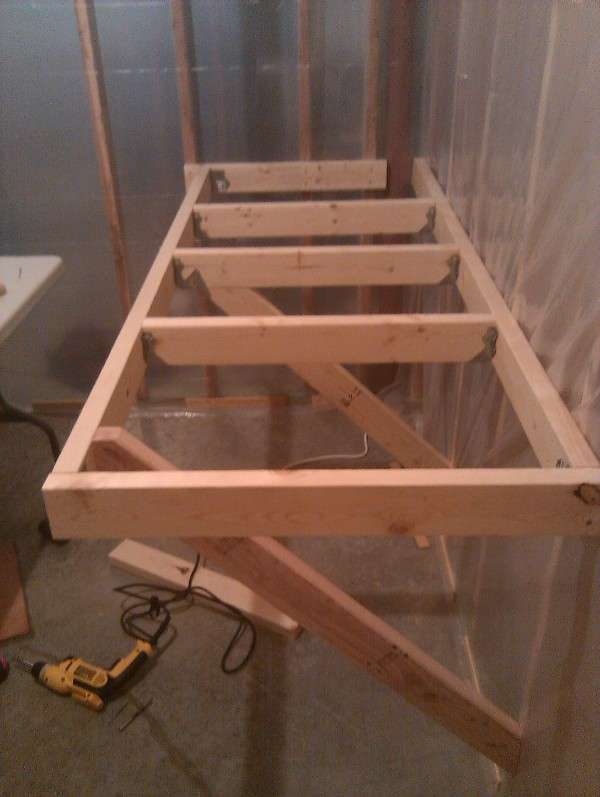
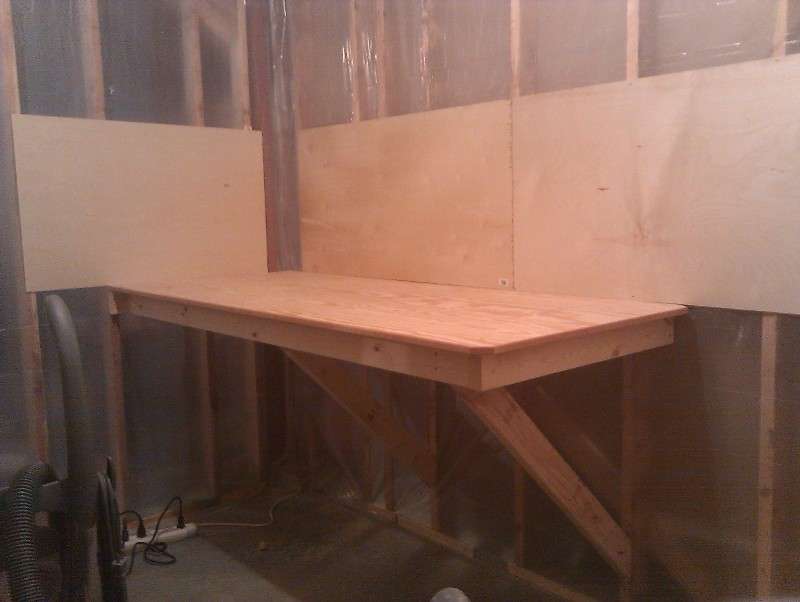
I was going to build the rack but then got to thinking that Why not just build a big shelf that sits in the corner and the outside edges hang from the ceiling. Then I can put the tires and other stuff up there. I have already designed an L shaped shelf that extends out 8 feet along both walls and has a shelf depth of 30". Just have to figure out how I want to mount the floating edge to the ceiling.
In thinking about building that I realized I needed a work area to make it easier to work during the winter so I decided to build that first. Here are a couple of pics of the progress on that. Finish this up (peg board and some shelves) and then I will build the ceiling/wall mounted shelf and give my tires a proper home.
My Man side that yearned for a workspace thanks you for the inspiration. My wallet however scorns you for the cost.

Thread
Thread Starter
Forum
Replies
Last Post
cycdaniel
1G TSX Performance Parts & Modifications
8
12-17-2019 10:58 AM

