When you click on links to various merchants on this site and make a purchase, this can result in this site earning a commission. Affiliate programs and affiliations include, but are not limited to, the eBay Partner Network.
HOW TO: OEM Audio Amp Repair - fix buzzing/noise/no volume!
Looking through the forum, I've seen several threads on audio amp issues, and there seems to be a pretty common issue with our amps. Either there's a noise at low volumes (alternator/spark noise) or the volume is much reduced, or both. I had the same problem (both) recently, and decided to figure out why the amp failed. Turns out, all that was wrong was that the small 5mm capacitors in the amp were going bad. Bad caps are a fairly common thing in older electronics, and fortunately they're pretty easy (and cheap!) to replace.
If you know how to use a soldering iron, you should be able to fix this yourself. The parts should cost less than $20. Even if you're not that good at soldering, there are lots of YouTube videos that will give you everything you need to know, and this will be good practice.
Even though it's easy, it's a little tedious, so give yourself 3 hours to do it. It'll be worth it.
Here's what you will need:
Safety Glasses
Soldering Iron
Solder (use the thin electronics kind- the plumbing stuff is way too thick for this)
Screwdriver (Philips #2)
Needle Nose Pliers
Solder Sucker (You can get this at Radio Shack, see YouTube for how to use it)
9x 10uF 50V electrolytic capacitors
18x 1uF 50V electrolytic capacitors
I had bought my capacitors here: Futurlec.com as part of a different project, but you can get them wherever. I didn't use exact replacements, some of the OEM caps were 3.3uF, 4.7uF, etc, and I just replaced all those with 10uF. I just used what I had and it worked out fine. If you want to be Type-A and use the exact values, be my guest, but using only 1uF and 10uF didn't alter the sound as far as I could tell. Just make sure they're 50V or higher rated.
Start by removing the amplifier from behind the passenger kick panel. There is a plastic cover, the kick panel, right next to the passenger's feet. Remove that. It may also help to remove the black panel above it to give yourself some room. Just pull on them and they'll pop loose- there are no screws holding them down.
Remove the connectors from the bottom of the amp, black and grey. Then remove the two bolts holding the bottom of the amp to the car's frame. There is one more bolt (a nut, actually) at the top of the amp. It's tricky to get to, but you only need to loosen it. There's another wire harness in your way that you can release by pulling straight down on it. I was able to get to the nut using a ratchet, 3" extension, and a universal joint. DO NOT completely remove that nut- once it's loose you just slide the amp off the stud. You don't want to have to get that nut back on there, trust me.
Open up the amp by removing the four screws on the long edge of the amp, and then the four screws from the top bracket (the side without connectors). The circuit board should slide out of the case still connected to the top bracket.
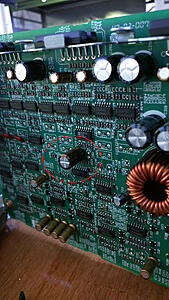
Locate the capacitors you will be replacing. The pictures show all the 1uF caps circled in red, and the rest that I replaced with 10uF in yellow.
Before trying to yank out the old caps, straighten out their leads. Safety glasses are really important here! Heat up and melt the solder joint around each lead and use a tiny screwdriver or your pliers to straighten out the lead a little. It doesn't need to be perfect, just close. Please don't use the soldering iron tip to pry at the leads- this is a guaranteed way to get a face full of molten solder.
With your pliers, grab the body of one of the caps. They're weak and squishy, so don't squeeze too hard. On the opposite side of the board, Use your soldering iron to heat both leads of the cap simultaneously. Pull gently on the cap to free it from the board. Don't pull hard. If it's not coming out, the solder is not melted yet. If you pull really hard you will pull the plating out of the hole, which would be very bad. You should actually add more solder to help spread the heat- it makes it much easier. You will probably end up squashing and maiming a few of the little buggers, but that's okay. It's their fault you're doing this in the first place and they deserve it.
Use your soldering iron to heat each hole from the top of the board, and use your solder sucker to clean out the hole from the bottom. When you're done, each hole should be clear of solder and ready for a new capacitor. If you encounter a hole that you can't clear out, try poking a regular straight pin through the hole while heating it with the iron.
Insert the correct replacement capacitor to each location. Refer to the picture above if you've forgotten which goes where. After threading the leads through the holes, you can bend the leads in opposite directions flush to the circuit board to hold it down.
Now solder those things down! Make sure to completely heat each joint and use enough solder to prevent a cold joint, but not so much that you're globbing it everywhere. Look at the other solder joints on the board as a reference. When you're done, clip the leads close to the joint to make it look all professional-like.
Reassemble your amplifier and reinstall it in your gorgeous TL. Remember to reconnect the wire harnesses and tighten that annoying nut on the top bracket.
Go for a drive and enjoy your newly-restored audio with no weird noises or buzzing. Party like it's 2004. Or '05. Or whatever year your TL is.
Here are the actual capacitance values read off of the original capacitors in the amplifier, vs the approximate values that most of us have been using thus far.
Note that all capacitors were originally rated at 105 degrees C. This is a durability specification. The audio-quality capacitors recommended in this thread (Nichicon FW series) are rated at 85 degrees C. TL owners might choose the 105 degree capacitors considering the severe environment inside the car, particularly in the summer, in order to get a longer service life from the replacement capacitors. Nichicon offers the KT series which is audio-grade and 105 degree rated, however TL owners should check the height requirement before ordering as I had already purchased the FW series (85 degrees C) in advance of removing the amp from the car and opening it up. Therefore I can't confirm if the KT series will fit. Note that the FW series were taller than the factory original parts (see the 4 capacitors that were replaced before the photo was taken, for reference) but they all fit in fine. The Nichicon KA series are for "high-grade audio" and are also 105 degree rated, but at a higher price.
I used the correct values above with only a few exceptions. Both my audio hum and low volume level issues were fixed after all 36 capacitors were replaced.
Good luck with yours!
Actual factory original capacitor values, read off of the original parts.
I should add that you can get the capacitors you need on Digikey (in the US) as well, and the shipping would probably be cheaper and faster than Futurlec. Plus you can get nice, Nichicon top-shelf audio caps and they're still like $5 total.
If you order from Digikey, pay attention to the price breakdowns. It's actually cheaper, at the time of this posting, to buy 25 1uF caps than it is to buy 18 of them.
Did any of these capacitors showed signs of going out like swelling/being crooked or their capacity simply degraded? Hard to tell from the picture haha
That's a good question- and the answer is no, they looked completely normal. I think since they're so small, they don't have as much tendency to puff up when they go bad. There was a slight reddish discoloration at the base of each one, but I'm not sure if that was related or not. Several of the caps that were working just fine also had similar discoloration.
I tested them after I pulled them out with an Agilent DMM, and most showed a capacitance of below 2nF. A few had maybe 50% of their original rated capacitance.
Sorry about the pics. I didn't think to start taking pictures until I had replaced a few of them already. If you notice, the caps without black marker on the top are the ones I had already replaced.
Thanks for the very informative post and clear pictures!! This information is extremely helpful to me.
I have a question - why did you not also replace the largest capacitors on the board? I'm thinking of doing this repair on my amp and I would like to do them all at once. Do you recall the value of the largest capacitors?
Also do we have to be concerned with polarity on the capacitors?
That's a good question- and the answer is no, they looked completely normal. I think since they're so small, they don't have as much tendency to puff up when they go bad. There was a slight reddish discoloration at the base of each one, but I'm not sure if that was related or not. Several of the caps that were working just fine also had similar discoloration.
I tested them after I pulled them out with an Agilent DMM, and most showed a capacitance of below 2nF. A few had maybe 50% of their original rated capacitance.
Sorry about the pics. I didn't think to start taking pictures until I had replaced a few of them already. If you notice, the caps without black marker on the top are the ones I had already replaced.
Interesting to know they just failed without any signs other than degradation. I'm well aware of the batch of faulty caps that plagued electronics in the 2000's but it's weird to see so many caps go bad without any visual cue.
Thanks for the writeup though, I'm sure many people could find this useful!
I wish I would have written down exact values for everything, but I did take a lot of pictures, so I've done my best to piece together the values of all of the other caps. Here is what I've got:
1x 4.7uF 50V
1x 47uF 25V
1x 100uF 50V
4x 470uF 16V
2x 1000uF 16V
If anyone does this fix and can verify this list (even better, a comprehensive list of all electrolytic caps on the board) that would be awesome. If I end up pulling my amp out again I'll post it. I'm 99% sure this is right, though.
I didn't replace these simply because they're not directly part of the signal chain, and they seemed to be working fine. Also I already had the 1uF and 10uF caps, but not replacements for the bigger ones. If they go bad eventually I'll just have to crack it open again and do it then. If you're going to do this and are buying caps anyways, I say go for it. It certainly can't hurt, and the Nichicons are definitely an upgrade.
As for polarity: yes, it does matter. You can buy nonpolarized capacitors, but the original ones, the ones I used, and the ones I linked are all polarized. They will fail quickly (and sometimes spectacularly) if you get them backwards, so make sure you get it right!
If you care about the technical details: the reason they're polarized even though audio is an "AC" signal, the "zero" point is actually at about 2.5v in most stages of this amp. Because of this, the signal is always at a higher voltage than ground. That way they can use simpler single-supply op-amps instead of power supplies and op-amps to do both positive and negative amplification. This is slightly oversimplifying it, but I hope you get what I'm saying.
Thanks for posting. I noticed I had strange sounds like a high pitch noise coming from the speakers, but wasn't sure if it was from the engine bay or something. It doesn't happen often, which is why I haven't bothered finding out the cause. My daily drives are too short, but when I go on long drives I sometimes notice it.
I was shopping for a new amp, but thanks to your post, looks like I'm going to save a good chunk of change. Could you post the digikey part numbers? For whatever reason, the links aren't working.
Last edited by CrazyEights; 12-16-2014 at 07:33 PM.
I didn't replace these simply because they're not directly part of the signal chain..
As for polarity: yes, it does matter. You can buy nonpolarized capacitors, but the original ones, the ones I used, and the ones I linked are all polarized. They will fail quickly (and sometimes spectacularly) if you get them backwards, so make sure you get it right!
Just curious how you checked the signal flow through it, did you spend time tracing it with a DMM or do you have a schematic of the amp?
Good note on the polarity, also it's easy to identify a polarity sensitive capacitor by it's style. The can type with the rib on the top are electrolytic capacitors which are always polarity sensitive.
If they were the flat mica type of capacitors that are round or different shapes, mostly flat with two long legs those aren't polarity sensitive.
Sorry the links died- I swear they worked when I posted them.. I should have known better.
I actually found higher-quality caps (KZ/FG series) than the ones I had posted earlier (FW). I'll give the part numbers for those. Just know that really, the difference between these and the cheap ones you can get anywhere else is pretty small. Even with these super-nice ones, you're looking at a total cost of like $15 plus shipping.
mzilvar: I actually spent a lot of time probing around the board with an old analog oscilloscope and a function generator pushing a 1kHz sine wave through the signal chain. I don't have a schematic, though that would have been nice! What clued me in to the failed caps was that I was seeing different signal drops across them between channels. On one channel I would see almost no drop across a certain cap, while another channel would show a 90% drop in p-p voltage. I wasn't surprised. Bad caps are probably the number one cause for failed electronics, especially boards from the early/mid 2000s (as polobunny mentioned). After I pulled a few and measured them with my DMM, I was positive that I had found the problem.
Question, I have a 04 and the radio will play, cd, cassette, and navi then no sound at all for 10 mins or so. every function works just no sound. could this be the cause ? I'm not hearing any buzzing or whining.
Sorry the links died- I swear they worked when I posted them.. I should have known better.
I actually found higher-quality caps (KZ/FG series) than the ones I had posted earlier (FW). I'll give the part numbers for those. Just know that really, the difference between these and the cheap ones you can get anywhere else is pretty small. Even with these super-nice ones, you're looking at a total cost of like $15 plus shipping.
Just placed my order guys, def. plan on adding to this awesome post, always pondered fixing my amp myself, but didn't want to be the first to open her up.
I actually went up a little on some of my caps, here's my order in case anyone is curious. I order a little extra in terms of the 1000uF and counts on the 10uF and and 1uF, but that's because this will be my first time soldering on an amp and an extra 65 cents isn't going to break the bank.
Sorry the links died- I swear they worked when I posted them.. I should have known better.
I actually found higher-quality caps (KZ/FG series) than the ones I had posted earlier (FW). I'll give the part numbers for those. Just know that really, the difference between these and the cheap ones you can get anywhere else is pretty small. Even with these super-nice ones, you're looking at a total cost of like $15 plus shipping.
mzilvar: I actually spent a lot of time probing around the board with an old analog oscilloscope and a function generator pushing a 1kHz sine wave through the signal chain. I don't have a schematic, though that would have been nice! What clued me in to the failed caps was that I was seeing different signal drops across them between channels. On one channel I would see almost no drop across a certain cap, while another channel would show a 90% drop in p-p voltage. I wasn't surprised. Bad caps are probably the number one cause for failed electronics, especially boards from the early/mid 2000s (as polobunny mentioned). After I pulled a few and measured them with my DMM, I was positive that I had found the problem.
Cool nice work, actually makes sense too with that company repairing them the only components that really look replace-able on the board are the caps anyhow. Most of the other components are so tiny replacing some of those would be tough.
i would like to put the jl subwoofer replacement in, but it blows the stock amp. can i up one of the caps to handle that woofer and which cap if possible?
Shamrock: It's really hard to say what the problem could be just from a few symptoms. Did your sound just suddenly disappear one day or did it gradually fade over time? If it was sudden, then it is less likely to be capacitors as they tend to die slowly.
wjo: Capacitors have little to do with overall power handling of an amplifier, unfortunately. If this JL subwoofer is too much of a load for the OEM amp, then your only reasonable option is an outboard sub amp. The only thing that would help with handling a bigger load is replacing the power stage, and its really not worth trying to re-engineer your amp to squeeze a beefier power stage into it. It's not as simple as a component swap.
Thanks for the excellent post chefboyardee. I had the engine induced buzz, but after I replaced all of the filter caps it's gone.
If anyone needs a little help removing the amp, here's a link to a youtube video. I believe that you can also send your amp to the video host and they'll repair it for about $150.
chefboyardee --This is a truly fantastic post. I have recently had to turn the volume up to 40 (Max) to equal the volume at 8-10 when it was new. Also had a slight noise that was only bothersome at low volume. I installed all the Nichicon 1 and 10 uf (FW) caps as outlined in post. I read in subsequent posts that polarity is important and unfortunately I did not pay attention to this when installing. When I powered the system up after this upgrade, the volume was totally restored and the sound quality was great. However, after a few seconds, I got a loud hum on the left channel. Could this be caused by incorrect polarity of the caps, or maybe a cold solder joint ??
My sense is that I should redo the entire installation and add the replacement of the larger caps you recently posted. So, I have 2 questions before re-ordering the recommended parts. Is a loud buzz/noise in 1-2 channels that wasn't there before likely due to incorrect polarity of the caps ?? Secondly, is the board and caps marked so that it is evident how they should be installed now that I know this is important ?? If not, how do you tell the proper orientation ??
Thanks for all your help so far. It is more than worth it to do it over and get it right if you think that incorrect polarity could be the cause of the noise and not some other more serious problem.
cyrowth: bummer that you're going to have to pull your amp again. The good news is that, yes, I think the polarity was probably your issue. It's obviously possible something else is wrong, but the fact that it worked for a few seconds makes me think that we're on the right track. That's pretty much what I would expect from backwards capacitors. I don't know your soldering skill level, but since you're back in there, check your solder joints too.
The polarity is marked on the board as a white tag off the white circle around each cap. That tag marks the negative (-) side of the capacitor. If you look at my picture of the top of the board, you might make out the white markings on the caps themselves too. The caps in red circles in the top half of the picture have negatives towards the closer edge of the board (up in the pic), all the rest have negatives on the other side (bottom in the pic). The capacitors themselves are marked with a painted stripe that usually also has a "-" on it to mark the negative side. It should be fairly obvious once you look closely at it.
Good luck!
chefboyardee: Thamks. I just ordered the complete set of new capacitors from Digi-key. Based on my "almost correct" upgrade, this makes a major difference in sound quality. FYI: I did order the KZ caps you recommended except for the 470uF where I ordered the FW. I measured the clearance from the top of the board to the inside of the case at about 0.875. The KZ cap was listed at 0.984 -- so I didn't want to risk an interference issue when you said there was a diminishing return on incresing quality of the caps. There looks like there is room on the board to tilt the caps if necessary for clearance -- as long as you do it before you solder and cut the excess leads off. Others have "upgraded" to even larger 1000uF caps that are over 1.5" in height. The 0.875 may be slightly off, but not by much.
Looking forward to receiving the new parts and the quality sound they will provide.
chefboyardee: is it possible that some connections between adjacent components on the Acura Amp circuit board are actually made by small wire strands embedded in the epoxy board (top side) rather than through the etched copper links on traditional "printed circuit" boards ? The reason I ask is that the solder joint on one capacitor required multiple reheatings to get it out (all others came out very easily). When I looked at the top side of the board, there was a small wire sticking up just to the side of the removed capacitor area. I thought it was a waste piece of wire and since it was sticking up I pulled it to get it out of the way so I could clean up the holes in preparation for re-inserting the new components. It "looks" like after removing the "whisker", there is a small, shallow track in the top of the board that runs less than 1/2" in length from the 1uF capacitor circle (neg. side) to the outermost leg on one of the power transistors. If it is possible that this whisker was actual an electronic connection, I can always solder in a small jumper between the neg lead of the cap and the outermost power transistor leg. Do you know whether any boards are made with "embedded wire strands" rather than copper printed circuits -- or was this likely just a stray wire strand as I originally thought ?? I could always try it without a jumper first and then if there is an obvious issue go back and put one in. Any thoughts would be appreciated ?
cyrowth: It does sound like maybe you accidentally pulled up a trace from the board. You can test with a multimeter to see if there is still a connection between the cap and the power amp lead. If that's what happened, you can fix it as you described. Just run a thin wire jumper.
When those traces are etched really thin into the board, they end up like little wires that could be pulled off.
I just did this today and it worked great!! I had that super annoying squealing/buzzing noise when the car was running. I bought some capacitors on ebay and followed this diy and i was astonished when i turned the radio on and it was silent! until i turned the volume up of course. great write up thanks op.
schwannman: Awesome! Great to hear that it worked for you!
It's rewarding enough to have fixed my own amp, but the fact that others are benefiting just puts the icing on the cake!
If anyone else has done this and it worked- let us know! You may have some extra insight that could help the rest of us!
I'm curious to see if anyone notices a difference in sound quality after also replacing the larger caps. If people think it helps, I may go back in and do that too.
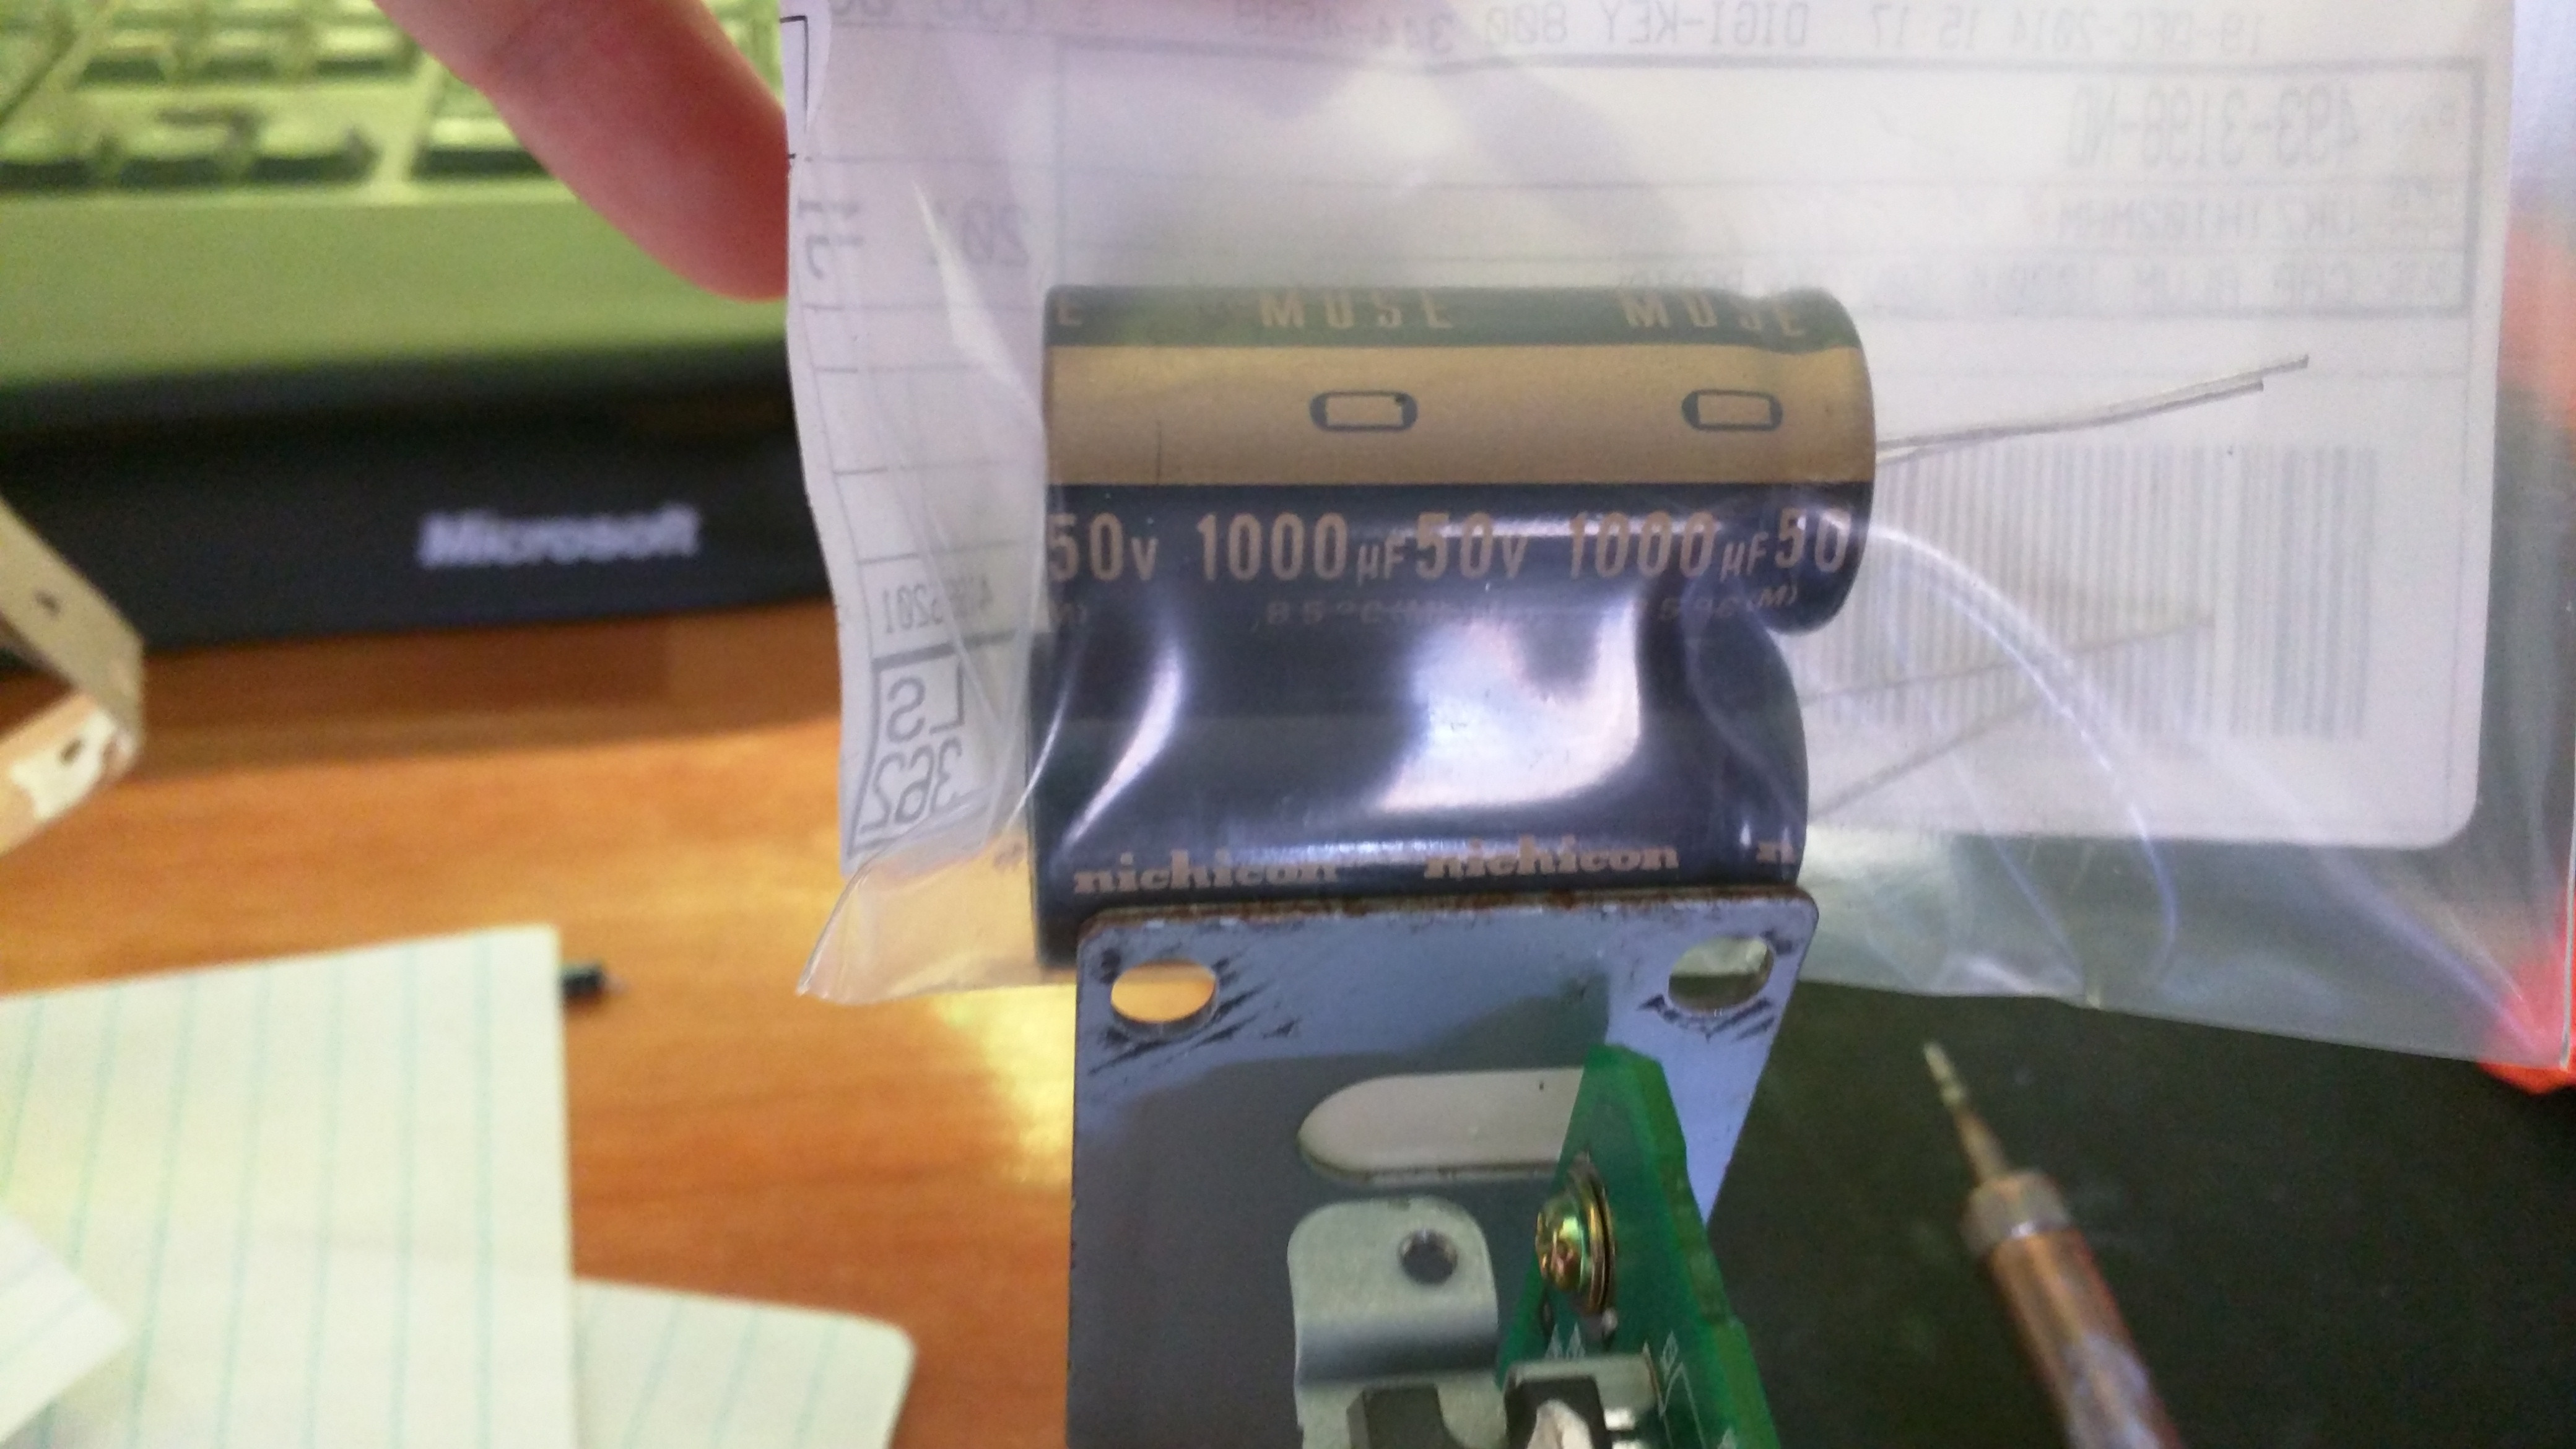
Hopefully this will save a lot of headache. The KZ Series form Nichicon, is a little, large. The 1uf Caps will work, but the 10's on up.
As you can see, getting the second 10uF in there isn't happening
And the 1000's...
I'm going to be going to a local place on the 2nd since I'm already tired of not having audio in the car, here's what "should" fit if you order from digikey, all of these are smaller diameter and shorter than the Muse KZ series that I ordered, but I can't promise they'll fit.
CrazyEights- You're right that you're not going to be able to fit it flush to the board, but nothing says you can't just have the cap laying off to the side a bit with the leads running to the original holes. The extra lead length won't make a difference in this case. For mechanical strength, you can hot-glue the body of the cap to the board. Hot glue is nice because it's strong but removable without breaking anything.
Sorry again for not checking sizes before I posted my recommendations. Maybe a mod will let me edit the OP so I can list ones I know will fit exactly?
Thanks chefboyardee for this awesome post. The volume on my system was very low even at 40. I was looking for an aftermarket amp when I came across this post. I just ordered the 1uF and 10uF caps from DigiKey and got them in yesterday. I was concerned about the size of the 10uF caps but after trying to test fit two without soldering I knew they would work. I was a bit worried about my soldering abilities but after I plugged the amp back in, everything worked great and I have normal volume levels now.
So I did what zsameer did and the buzzing is gone. Everything sounds great, here's a crappy video of the buzzing prior to installing the new capacitors.
Here are the actual capacitance values read off of the original capacitors in the amplifier, vs the approximate values that most of us have been using thus far.
Note that all capacitors were originally rated at 105 degrees C. This is a durability specification. The audio-quality capacitors recommended in this thread (Nichicon FW series) are rated at 85 degrees C. TL owners might choose the 105 degree capacitors considering the severe environment inside the car, particularly in the summer, in order to get a longer service life from the replacement capacitors. Nichicon offers the KT series which is audio-grade and 105 degree rated, however TL owners should check the height requirement before ordering as I had already purchased the FW series (85 degrees C) in advance of removing the amp from the car and opening it up. Therefore I can't confirm if the KT series will fit. Note that the FW series were taller than the factory original parts (see the 4 capacitors that were replaced before the photo was taken, for reference) but they all fit in fine. The Nichicon KA series are for "high-grade audio" and are also 105 degree rated, but at a higher price.
I used the correct values above with only a few exceptions. Both my audio hum and low volume level issues were fixed after all 36 capacitors were replaced.
Good luck with yours!
Actual factory original capacitor values, read off of the original parts.
Seems most folks are having luck replacing just the 1 uF and 10 uF capacitors. I chose to replace all of them so that I won't have to remove the amplifier and start again, and also to get the best sound out of my system since the capacitors degrade over time. Cost of the parts was less than $20 for all 36 capacitors. It's your call...
okay I think this may help my issue. but has anyone had the issue where the drivers' door speaker is extremely quiet and the passenger front door speaker is the loudest in the car??
okay I think this may help my issue. but has anyone had the issue where the drivers' door speaker is extremely quiet and the passenger front door speaker is the loudest in the car??
I had that issue along with very low volume. I had to replace the driver side speaker and after i checked the volume level on each speaker the driver side was low. I do believe that after i changed the caps that issue has been resolved for the most part as i dont feel the difference when both speakers are on but there is a slight difference when i change the balance from left to right the right front speaker is a bit louder. I only changed the 1uf and 10uf caps tgat chef has listed in the first post.
I had that issue along with very low volume. I had to replace the driver side speaker and after i checked the volume level on each speaker the driver side was low. I do believe that after i changed the caps that issue has been resolved for the most part as i dont feel the difference when both speakers are on but there is a slight difference when i change the balance from left to right the right front speaker is a bit louder. I only changed the 1uf and 10uf caps tgat chef has listed in the first post.
okay. i think ill be replacing all the caps on the board and see how that goes.
The sound is driving me crazy
Replaced the ones that chefboyardee did but when I reinstalled and cranked on the car, the buzz was still there and it sounds worse.
This was my first experienc doing this kind of work. It took me a really long time to remove the old caps. In the process of removing one of them, I may have damaged one of the adjacent tiny rectangle things - not sure because they are so small.
Could damaging one of these have any effect?
I did buy the larger caps but did not replace them because chefboyardee said they weren't part of the chain and this was taking me a long time. I may pull the amp again and replace these larger ones too since I have them.
I based the polarity on the pictures in this thread, there is a little bolded part of the circle where the cap sits and there is a verticle black stripe on the caps - I matched these together as the negative, is this correct?
Any other thoughts as to why this fix didn't resolved the issue?
tntsweeper - if this was your first experience soldering electronic components then there are a few things that might have gone wrong. One of them is the tiny rectangles that are quite near the electrolytic capacitors we are trying to replace. Yes they are essential components, probably mostly resistors and capacitors. Each one costs money so it's likely that the manufacturer only put them there because they were necessary, some more than others. Therefore damaging one of them, or causing one to become unsoldered (lose it's electrical connection), could have a detrimental effect. Use a microscope if you have one to see if the parts are damaged (or a strong magnifying lens). If one looks crooked it might have lost it's connection and could probably be fixed by an expert. If it is missing or cracked then that's a different story.
Also the quality of your solder joints could be an issue if you are not skilled in electronic soldering. The solder needs to "flow" (look smooth from the capacitor lead wire to the electronic circuit board) in order to create a good electrical connection. This is where the skill comes in, knowing how long to heat the solder to get it to flow without heating for too long which will "cook" the capacitor and degrade it's performance. It takes a practiced touch.
Polarity - yes the "bolded part of the circle" is the negative connection. This is the marking on the circuit board. On the capacitors itself the marking is a stripe with a minus sign " - " on it, which is a white stripe on the original capacitors but shows as a black stripe on the replacement parts in the pictures of this thread. It's the only stripe on the part, whatever color it is.
Since the buzz is worse then I would guess that you either damaged a "tiny rectangle" part, didn't solder the replacement capacitors properly, or cooked a replacement capacitor too long and it's not working anymore. If the buzz was the same then possibly you didn't get to the bad capacitor on your board.
Chefboyardee did a great job helping us all to find out what was the source of the problem, documenting how to remove the amp from the car, providing pictures and links to suggested replacement parts, and providing other valuable guidance. Since he works in the field then he used some parts he already had handy for the fix and it worked well in his case. For others now deciding to fix their amp I recommend getting the exact replacement values and also I recommend to replace all 36 electrolytic capacitors (not just the smaller values in the audio chain). The larger parts are probably for the power supply, which will reduce noise (buzz and hiss) and improve the bass response. In my case the improvement in the audio was dramatic and the music in my car is so much better sounding then before the fix, after replacing all 36 parts. I had forgotten how good this factory stereo is! I can't be certain if replacing the larger capacitors made any difference, but the manufacturer chose those values for a reason and all of the original capacitors are from the same manufacturer, same series, and same time period. It's probably due to the known Taiwan "http://en.wikipedia.org/wiki/Capacitor_plague" from the late 90s and early 2000s. If one of the capacitors has degraded enough to make a difference then it's possible that others have degraded too.
For other folks considering this fix - I don't recommend an amateur to take a soldering iron to their $400 car stereo amplifier. It doesn't require an expert either, however you should be someone who has some skill in the art of electronic soldering (which is quite different from plumbing soldering, BTW). If not then you might consider taking the amp to an electronics repair shop and tell them what needs to be done (to save money on troubleshooting the problem, which chefboyardee has already done for us!). If I didn't have my current skill in electronics then I would have bought the $20 worth of parts and brought the amp and parts to an expert to complete the job.
 12-08-2014, 04:31 PM