ucf_bronco’s Progress Thread (Updated September 2015)
 12-31-2014, 07:07 PM
#321

there are a ton of options on ebay for both the chrome dipped markers and plasma. could you point me in the right direction? i also did my headights and looking for a better replacement for my side marker lights.
 01-02-2015, 12:12 AM
#322
The Original Shawdy
Updated photos of your lights on the car with the Amber bulbs?
01-02-2015, 10:41 AM
#323
Drifting
Thread Starter
iTrader: (1)
Chrome dipped amber bulbs are the way to go so you don't have any color unless you want it. Ebay, usually about $10. 
Look good, man...glad you're happy.
Do the hairdryer thing before reinstalling them...trust me.
https://acurazine.com/forums/problem...e-help-763392/
Look good, man...glad you're happy.
Do the hairdryer thing before reinstalling them...trust me.
https://acurazine.com/forums/problem...e-help-763392/
Unfortunately I didn't see your trick until after I re-installed. I did do a test before installing them...ran the shower on hot in the bathroom with the lights sitting in there. After about 10 minutes when the mirrors and outside of the lights were fogged up I inspected them and found no condensation inside. I'm hoping that was sufficient and I won't see any going forward but time will tell.
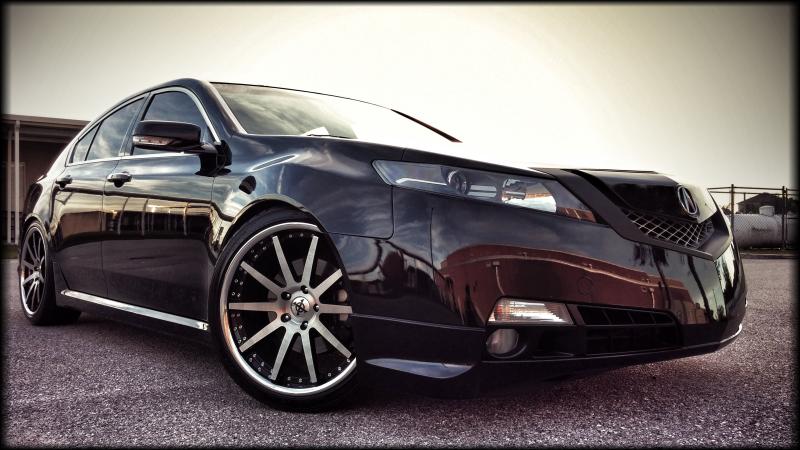
I'm traveling and didn't have a chance to get any good pics yet, but here you go:


As you'll notice I also painted the plastic piece that sits in the front bumper. I originally just did the part surrounding the fog lights but it didn't match well so I ended up doing the whole piece. I also changed the fogs from 6k to 5k but I'm having an issue with the passenger side and need to investigate. I also need to adjust the low beams on the headlights.
01-11-2015, 03:49 PM
#324
Team Owner
iTrader: (2)
Join Date: Jan 2008
Location: Kansas City, MO (Overland Park, KS)
Posts: 36,545
Received 6,470 Likes
on
5,162 Posts
 01-14-2015, 02:00 PM
#325
Drifting
Thread Starter
iTrader: (1)
Thanks Steven!
Well it looks like I'll be taking the headlights apart again in order to fix the horrible cutoff I have since I didn't even look at it prior to resealing (click here). I'm hoping it will be easier to get them apart the second time around but not sure since I used OCI Butyl Rubber Glue when resealing.
I'm anxious to give them a good wipe down inside because I think the slight condensation I had left a residue (on a side note I haven't seen it since I tried the hairdryer trick...thanks rockstar!). I'm also going to see what they will look like with the amber reflectors back in but with a few coats of VHT. I ordered some 180 lumen led's so hopefully they can be dark but still functional. I also have some amber colored plasma led's on hand if I decide to leave out the reflector.
I got a defective HID fog from HIDextra as well so I'll be swapping that out while I'm at it. I ordered the 5k kit since the 6k seemed so blue but now my 6k low beams have more blue. I'm going to test out the OEM bulbs and see how they match the new fogs. I'm wondering though if once I have the clear cutoff on the low beams they'll match better because when looking at it from certain angles it does match.
Hopefully when I'm done this time around the results will be what I expected after the first time! My "automotive OCD" is killing me so I can't wait to get it done! At this point I'm planning for the weekend of Jan 24-25.
01-14-2015, 02:06 PM
#326

sorry to hear, man...
what I will suggest also, which I forgot...is when you first paint the housing...depending on the paint, they give off a vapor when exposed to heat (kinda like curing) that can coat the inner lens. I now always bake anything I paint separately in the oven for 10 minutes.
Trust me...I had done my research and have never felt like they were finished perfectly.
The following users liked this post:
ucf_bronco (01-14-2015)
01-14-2015, 02:15 PM
#327
Drifting
Thread Starter
iTrader: (1)
Good to know, thanks for the tip! I was wondering why the inside of the lens looked like it had a film b/c I never saw condensation where I'm seeing the film (in front of the low beams). If that is what I'm seeing, is it hard to get off? Is there a cleaner I need to use or will it wipe off with a microfiber towel?
It's frustrating that I have to take them apart again but I'm kinda glad the low beams were messed up so I'm "forced" to re-open them. The film (which is also on the side marker housing) along with wondering how they'd look with the tinted amber reflectors made me want to do it again but now I have to. That will make it easier to get the led side markers in too. Not to mention I need to fix my foglight so the bumper is coming off anyway.
Do you feel it's easier or harder to get them apart once it's been done already? Also, do you use the butyl glue when re-sealing?
01-14-2015, 02:20 PM
#328
Drifting
Thread Starter
iTrader: (1)
I also decided that when I'm done I'm going to remove the side marker and high beam bulbs and leave the headlights in the guest bathroom (since it's small) over night with a dehumidifier. I'm thinking this should remove any humidity that's trapped inside. I'm going to try this rather than the hair dryer trick because I'm afraid that the latter introduces contaminants. I swear I got some dust in there when doing it last time, which is probably due to using my shop vac hose to route the air to the headlight (since it will still installed).
I may still end up using the hair dryer, but before re-installing, so I don't have to use the shop vac hose.
I may still end up using the hair dryer, but before re-installing, so I don't have to use the shop vac hose.
The following users liked this post:
ucf_bronco (01-15-2015)
01-14-2015, 02:36 PM
#330
Oh, and about spacers...I had that same issue with spacers. Installed 2 in my old headlights and it was a tight fit...so much so that it broke the lens retainer on both sides.
Tried to install some on these other headlights and got 2 in on one, and the other, I couldn't get the stupid fkng lens out...I even tried pushing it out with the screwdriver from the back to no avail. Rather than scratch, shatter and crack it...I opted to remove the other spacers too to keep them even and lived without it. A tad sharper, sure...but it shouldn't change the shape of the cutoff on the wall...
I have ZKW-R on both mine.
Bottom line, I'd choose to live with imperfections for a while...keep a running list of round 2 mods...and when the time comes to change up the look...tackle everything again.
The following users liked this post:
ucf_bronco (01-15-2015)
01-14-2015, 03:17 PM
#331
Drifting
Thread Starter
iTrader: (1)
Yeah, I'm sure I will. I do not want to deal with condensation again! It will be so much easier this time around with them off the car too.
Ah, the "joy" of modding, haha!
While I agree it's a great idea to keep a list going and tackle everything at once...this is going to be it for a while. I hate taking off the bumper (it's a bitch to get back on by myself) so I try to limit the amount of times I do it, and since my passenger side fog isn't working I'm anxious to get the new one in. I might as well knock it all out then. Plus I've already warned my wife that an upcoming weekend I'm going to be dedicating a lot of time to my car.
Oh, and about spacers...I had that same issue with spacers. Installed 2 in my old headlights and it was a tight fit...so much so that it broke the lens retainer on both sides.
Tried to install some on these other headlights and got 2 in on one, and the other, I couldn't get the stupid fkng lens out...I even tried pushing it out with the screwdriver from the back to no avail. Rather than scratch, shatter and crack it...I opted to remove the other spacers too to keep them even and lived without it. A tad sharper, sure...but it shouldn't change the shape of the cutoff on the wall...
I have ZKW-R on both mine.
Bottom line, I'd choose to live with imperfections for a while...keep a running list of round 2 mods...and when the time comes to change up the look...tackle everything again.
Tried to install some on these other headlights and got 2 in on one, and the other, I couldn't get the stupid fkng lens out...I even tried pushing it out with the screwdriver from the back to no avail. Rather than scratch, shatter and crack it...I opted to remove the other spacers too to keep them even and lived without it. A tad sharper, sure...but it shouldn't change the shape of the cutoff on the wall...
I have ZKW-R on both mine.
Bottom line, I'd choose to live with imperfections for a while...keep a running list of round 2 mods...and when the time comes to change up the look...tackle everything again.
While I agree it's a great idea to keep a list going and tackle everything at once...this is going to be it for a while. I hate taking off the bumper (it's a bitch to get back on by myself) so I try to limit the amount of times I do it, and since my passenger side fog isn't working I'm anxious to get the new one in. I might as well knock it all out then. Plus I've already warned my wife that an upcoming weekend I'm going to be dedicating a lot of time to my car.
01-15-2015, 08:54 AM
#332
Well, I know the urge...and I know the sense of urgency...
but taking off the bumper now, or in 5 months from now when you're bored or want the change something (which you inevitably will) it'll still only be one more time taking off the bump and not 2.
but taking off the bumper now, or in 5 months from now when you're bored or want the change something (which you inevitably will) it'll still only be one more time taking off the bump and not 2.
01-15-2015, 09:36 AM
#333
Drifting
Thread Starter
iTrader: (1)
Damn you and your logic! haha!
Unfortunately my level of impatience exceeds the level of logic in your suggestion
This is really a few months in the making. I wanted to do all this work to my front end earlier in 2014 but had to wait until the holidays. It's driving me nuts now that it's not in the condition I wanted since I was patient in the beginning.
If I do decide to change something up in a couple months I will let you know so you can give me a big fat "I told you so".
As usual, I appreciate your input!
The following users liked this post:
rockstar143 (01-15-2015)
01-15-2015, 10:00 AM
#334
I wouldn't "I told you so"...real friends don't. 
Ha ha...I just share my logic, but only after not following it for the longest time, man. I just realized recently that sometimes I'm in a rush for absolutely no good reason. I've also embraced the fact that my headlights jobs will always have flaws and I have to accept it.
Ha ha...I just share my logic, but only after not following it for the longest time, man. I just realized recently that sometimes I'm in a rush for absolutely no good reason. I've also embraced the fact that my headlights jobs will always have flaws and I have to accept it.
01-15-2015, 12:55 PM
#335
Drifting
Thread Starter
iTrader: (1)
Damn, I could learn a lot from you. I have trouble accepting anything less than perfection (at least what I deem to be perfect). Unfortunately that extends well beyond my car and into my personal and professional life. Sometimes it's good, sometimes it's bad. It's helped me move up the ranks in my career but also stresses me out to no end at times.
I've gotten better about it the older I've gotten (you should see my vinyl wrapped grille up close, haha), but there's still room for improvement! I'll definitely keep that in mind when I do my headlights again. If I go into expecting some flaws them I'm sure I'll be happier with the finished product.
I've gotten better about it the older I've gotten (you should see my vinyl wrapped grille up close, haha), but there's still room for improvement! I'll definitely keep that in mind when I do my headlights again. If I go into expecting some flaws them I'm sure I'll be happier with the finished product.
01-15-2015, 01:16 PM
#336

I'm with you there, man.
At some point though, I realized that, like happiness, perfection was fleeting and mostly perception. So to keep my sanity I decided to change what I considered "perfect" and I've been a lot more normal now.
01-22-2015, 10:28 AM
#338
Thanks! I went with about 1.25" in the front and 1" in the back...give or take 1/8". I still have some adjustments to make as it's not sitting perfectly even...then I'll get the final measurements.
I can adjust the front with no issues but I have to either jam my arms in to get at the rears or remove my tires. I have bruises all over both arms from jamming them in there since I was over it and didn't feel like taking the tires off.
I'm hoping to get the final adjustments in either tonight or tomorrow night. I found that measuring from the fender to the top lip of the wheel is the easiest and allows for the most accurate measurements.
Why did you choose SS over SA?
Are you still running 6 clicks from stiffest rear and 4 clicks front? How does it ride at these settings compared to stock? I was probably going to go with the exact same drop but -4 RR and -2 FR.
 01-22-2015, 10:43 AM
#340
Drifting
Thread Starter
iTrader: (1)
Here is the post by UCF indicating 1 inch rear and 1.25 front. In my humble opinion, the is a very ideal drop.
Are you still running 6 clicks from stiffest rear and 4 clicks front? How does it ride at these settings compared to stock? I was probably going to go with the exact same drop but -4 RR and -2 FR.
Are you still running 6 clicks from stiffest rear and 4 clicks front? How does it ride at these settings compared to stock? I was probably going to go with the exact same drop but -4 RR and -2 FR.
I am still running -4 FR and -6 RR and think those are the ideal settings, though I'm sure I could quickly get used to the slightly stiffer settings that you mentioned. I found the stock suspension to be a bit stiff anyway so the change to the coils wasn't a drastic difference IMO. I should note though that I am not the most sensitive person when it comes to things like this. I went from 19's to 20's and didn't notice much of a difference, and the same goes for the OEM to TEIN change. You�ll see some on AZ swear that the TEIN SA are more comfortable than the OEM setup, but I find it to be pretty comparable.
Overall I am extremely happy with my setup and have quickly adjusted. I had an RLX loaner for a day and couldn't stand the way it rode. It was way to bouncy and floaty IMO, if that even makes sense. I really like the way my car quickly returns to normal height after going over a bump. I don't really know the correct terms to describe it but hopefully you know what I mean.
LOL! Ain't that the truth! I'm at the point where I might need to see a doc to get rid of it
01-22-2015, 08:42 PM
#341
Team Owner
iTrader: (2)
Join Date: Jan 2008
Location: Kansas City, MO (Overland Park, KS)
Posts: 36,545
Received 6,470 Likes
on
5,162 Posts
01-26-2015, 09:13 AM
#342
Drifting
Thread Starter
iTrader: (1)
Well I took my headlights apart again this weekend, and though I'm extremely happy with the outcome it didn't come without some headaches.
For starters, spacing the lenses was a major PITA. Trying to balance multiple washers between the two pieces was extremely difficult. I kept dropping them and was getting so pissed. I couldn't get the beams to be perfect but I got pretty close using two regular washers and one fiber washer.
On to the next step...I wanted to clean the inside of the clear plastic housing since I had them apart, and I figured I'd use a 50/50 mixture of IPA and water. Big mistake! I sprayed it and wiped it and immediately it turned very hazy/cloudy and there were what looked like scratches from the microfiber towel I was using. I wet another towel and wiped it down but it made no difference. At this point I'm sweating like a pig thinking I've just ruined it. I picked up some Meguiar's PlastX and went to work. The first couple passes did nothing, but I kept trying and I noticed a tiny clear spot. I used more PlastX and kept wiping it off and realized the clear spot was getting bigger. After probably an hour and a half it was back to its original form...nice and clear.
I got everything sealed back up and wanted to see which bulbs matched my 5k fogs the best (OEM or 6k). Well getting the lights in and out can be a bitch because they get caught in certain areas. What I didn't realize is one part that was catching was the back plastic part of the housing, and by pulling on it I broke the seal. Of course I didn't notice this until I had everything back on the car and all the tools put away. I went to go inside and have a nice dinner and enjoy a job well done...then I see condensation. My mood quickly changed! At this point it's about 8pm and I'm so over it, but back to work I go.
I bought some clear RTV sealant and figured I'd just put it where I suspected the leak was. Of course it made a mess and it was in a spot where you'd be able to see it once the headlight was back on the car, but at this point I didn't give a f***. I let that dry overnight and did a quick test in the morning, only to see condensation again. I figured the best bet was to take it apart again and then re-seal the proper way. Fortunately it wasn't all bad though because I was able to clean off the RTV when I had it apart. I got it back together and did another test and...no condensation! I should mention I did the "hairdryer trick" every time just to be safe.
So it was a very mentally and physically exhausting weekend, but with better focused low beams and blacked out reflectors I'm VERY happy with the results! I have some 180 lumen LED side markers so they illuminate the reflectors nicely (even though I put 4 coats of VHT).
 01-26-2015, 08:23 PM
#343
Team Owner
iTrader: (2)
Join Date: Jan 2008
Location: Kansas City, MO (Overland Park, KS)
Posts: 36,545
Received 6,470 Likes
on
5,162 Posts
Looks great! More pics.

 01-27-2015, 09:54 PM
#346
Team Owner
iTrader: (2)
Join Date: Jan 2008
Location: Kansas City, MO (Overland Park, KS)
Posts: 36,545
Received 6,470 Likes
on
5,162 Posts
^^^^ This.
01-28-2015, 08:19 AM
#347
Drifting
Thread Starter
iTrader: (1)
Thanks! It really did make a huge difference. I love the way they look now...no yellow, just white / blue / purple. I'm really digging that in combo with the new 5k fogs!
 01-29-2015, 04:44 PM
#350
Intermediate

Join Date: Nov 2014
Posts: 46
Likes: 0
Received 0 Likes
on
0 Posts
Well I took my headlights apart again this weekend, and though I'm extremely happy with the outcome it didn't come without some headaches.
For starters, spacing the lenses was a major PITA. Trying to balance multiple washers between the two pieces was extremely difficult. I kept dropping them and was getting so pissed. I couldn't get the beams to be perfect but I got pretty close using two regular washers and one fiber washer.
On to the next step...I wanted to clean the inside of the clear plastic housing since I had them apart, and I figured I'd use a 50/50 mixture of IPA and water. Big mistake! I sprayed it and wiped it and immediately it turned very hazy/cloudy and there were what looked like scratches from the microfiber towel I was using. I wet another towel and wiped it down but it made no difference. At this point I'm sweating like a pig thinking I've just ruined it. I picked up some Meguiar's PlastX and went to work. The first couple passes did nothing, but I kept trying and I noticed a tiny clear spot. I used more PlastX and kept wiping it off and realized the clear spot was getting bigger. After probably an hour and a half it was back to its original form...nice and clear.
I got everything sealed back up and wanted to see which bulbs matched my 5k fogs the best (OEM or 6k). Well getting the lights in and out can be a bitch because they get caught in certain areas. What I didn't realize is one part that was catching was the back plastic part of the housing, and by pulling on it I broke the seal. Of course I didn't notice this until I had everything back on the car and all the tools put away. I went to go inside and have a nice dinner and enjoy a job well done...then I see condensation. My mood quickly changed! At this point it's about 8pm and I'm so over it, but back to work I go.
I bought some clear RTV sealant and figured I'd just put it where I suspected the leak was. Of course it made a mess and it was in a spot where you'd be able to see it once the headlight was back on the car, but at this point I didn't give a f***. I let that dry overnight and did a quick test in the morning, only to see condensation again. I figured the best bet was to take it apart again and then re-seal the proper way. Fortunately it wasn't all bad though because I was able to clean off the RTV when I had it apart. I got it back together and did another test and...no condensation! I should mention I did the "hairdryer trick" every time just to be safe.
So it was a very mentally and physically exhausting weekend, but with better focused low beams and blacked out reflectors I'm VERY happy with the results! I have some 180 lumen LED side markers so they illuminate the reflectors nicely (even though I put 4 coats of VHT).
01-30-2015, 08:16 AM
#352
Drifting
Thread Starter
iTrader: (1)
^^^^Thank you both!
I am much happier with the tinted reflectors than I was when I just took them out. It doesn't look right IMO with them missing. Not only do you have an exposed bulb but there's also a gap at the bottom of that section that the reflector fills. You can clearly tell something is missing. Putting it back in tinted looks much cleaner IMO.
I am much happier with the tinted reflectors than I was when I just took them out. It doesn't look right IMO with them missing. Not only do you have an exposed bulb but there's also a gap at the bottom of that section that the reflector fills. You can clearly tell something is missing. Putting it back in tinted looks much cleaner IMO.
 02-02-2015, 08:36 AM
#357
Drifting
Thread Starter
iTrader: (1)
Thank you!
Thanks man! Haha, congrats on your pickup! I'm sure you won't regret going with silver. I love my CBP but it definitely takes a lot of work to keep it looking good. Fortunately I don't mind putting in the effort.
-----------------------------
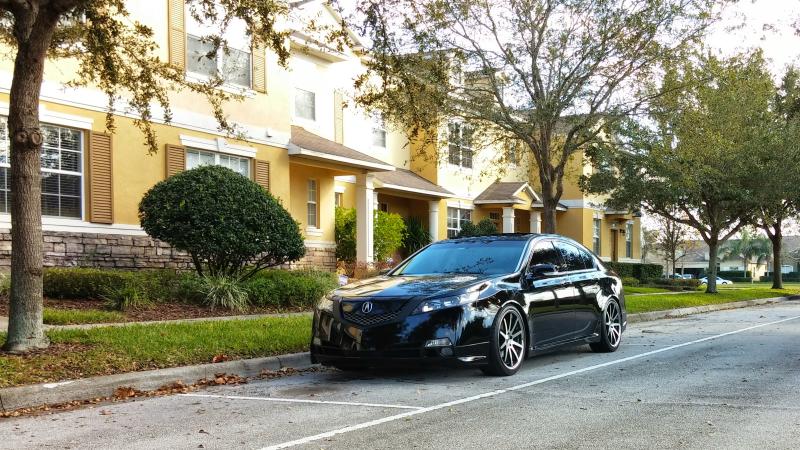
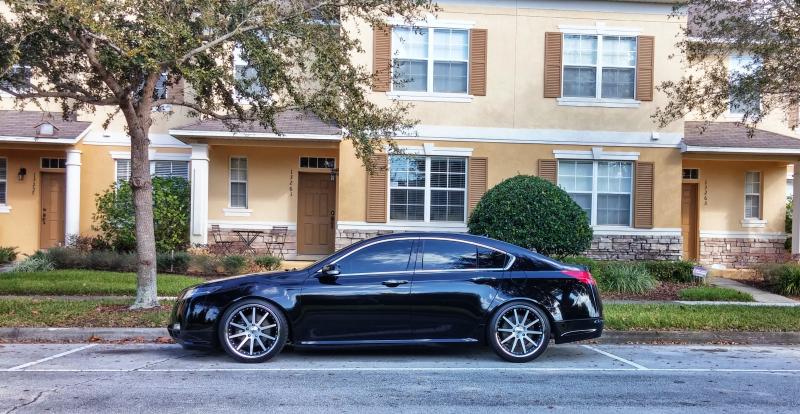
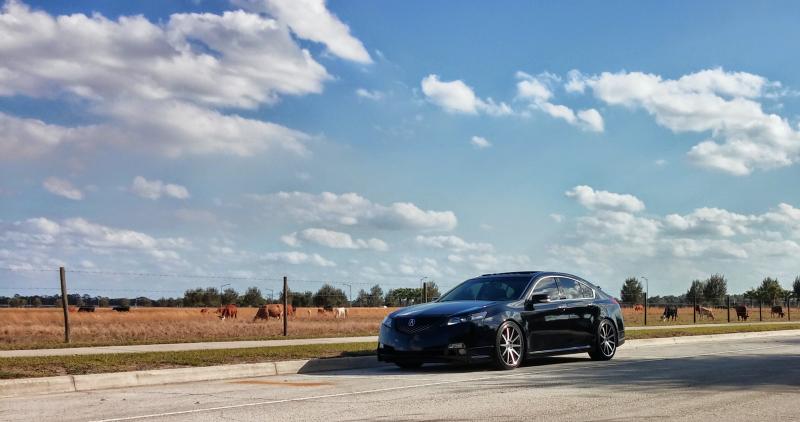
I was able to snap a few more quick pics this weekend.
-----------------------------
I was able to snap a few more quick pics this weekend.


The following 2 users liked this post by ucf_bronco:
nats007 (02-02-2015),
rockstar143 (02-02-2015)
02-02-2015, 08:59 AM
#358
Burning Brakes

Just went through your thread! Very nice 4G and awesome Ody, Sir.
I'm in Orlando as well and recently acquired a 2011 CBP MDX Tech with RES for my kids to replace her 2000 Acura TL. It'll definitely be a benefit for the little ones! I hope to come across a nice 3G/4G Acura 6MT sedan for a DD one day.
I'm in Orlando as well and recently acquired a 2011 CBP MDX Tech with RES for my kids to replace her 2000 Acura TL. It'll definitely be a benefit for the little ones! I hope to come across a nice 3G/4G Acura 6MT sedan for a DD one day.
02-02-2015, 09:25 AM
#359
It's funny, for years I have read "professional" reviews on the 4G TL as well as reviews of guys here (mostly 3G'ers) about the beak this and the beak that and then after the 2012 MMC how the car is neutered and bland.
I love the looks of this car, even more so than my Type S I got rid of as that looked dated to me(even as nice as it was). So happy to be fortunate enough to have found this car in 6MT form.