J-Power camber kit review
 08-01-2012, 10:05 AM
#1
Intermediate
Thread Starter
J-Power camber kit review
Bought this to try them since they were looking exactly like the Ingalls. Installation and adjustment went perfect.
Car was set at -1 camber and 0 toe
1 month later, tires started to wear uneven and car feels sloppy.
Went back to alignment. The rear is now at -2 camber and 0.75 toe each side.
Left side was better but not exactly like 1 month ago.
Here's what I found
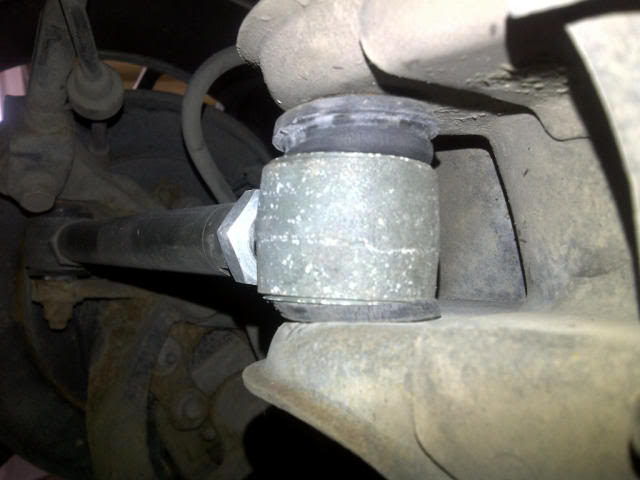
The bushing went out and was cracked. Left side looks OK. Maybe only a bad bushing, will try to contact the company to get a replacement.
Car was set at -1 camber and 0 toe
1 month later, tires started to wear uneven and car feels sloppy.
Went back to alignment. The rear is now at -2 camber and 0.75 toe each side.
Left side was better but not exactly like 1 month ago.
Here's what I found
The bushing went out and was cracked. Left side looks OK. Maybe only a bad bushing, will try to contact the company to get a replacement.

The following users liked this post:
shenrie (08-01-2012)
08-01-2012, 03:16 PM
#5
takin care of Business in
iTrader: (5)
Join Date: Jan 2008
Location: Kansas City, MO
Age: 40
Posts: 30,994
Received 4,732 Likes
on
4,064 Posts
^^^ 
go with Ingalls....
go with Ingalls....
08-01-2012, 04:21 PM
#7
Instructor
another member posted pix of his Ingalls kit doing the exact same thing (only not quite as extreme damage/wear). bushings look super soft to me in both those and the ingalls so i went with the spc. was happy to see the bushing material on the spc's almost as hard as polyurethane.
either way, thanks for the heads up on the product. hopefully more owners of these will take a closer look at thiers and report back. Would be good to hear from the owners of the Ingalls too
either way, thanks for the heads up on the product. hopefully more owners of these will take a closer look at thiers and report back. Would be good to hear from the owners of the Ingalls too
The following users liked this post:
4drviper (04-29-2013)
Trending Topics
08-02-2012, 07:32 AM
#8
Intermediate
Thread Starter
I had Skunk2 kit on my civic SI, bushings were hard like polyurethane. After 2 months of riding, bushings were oversize thus creating a clok clok sound in the suspension.
I thought softer bushings were to be better..... NOT
I may take the OEM one and make them adjustable!
I thought softer bushings were to be better..... NOT
I may take the OEM one and make them adjustable!
08-07-2012, 09:40 AM
#9
Intermediate
Thread Starter
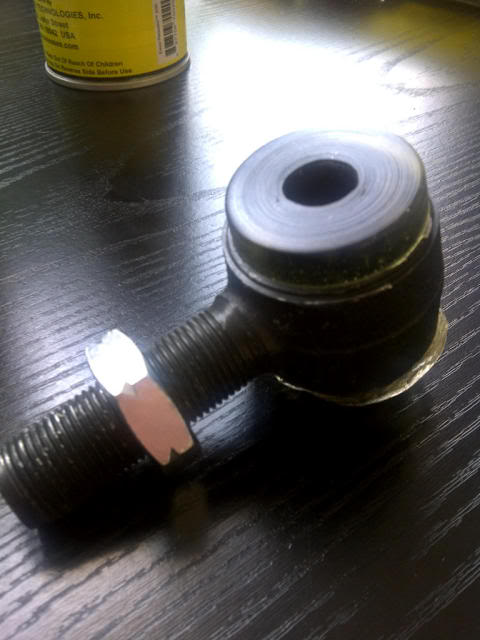
After sending these pictures to the seller, he sent me a set of new rod end.
Excellent service from both the company and the seller.
Will install them and see if it solves the problem.
Excellent service from both the company and the seller.
Will install them and see if it solves the problem.
08-16-2012, 04:20 AM
#10
Intermediate

I had these and they're terrible. Like what others say, you get what you pay for. They are basically knock offs of the Ingalls. After having those in for a month, the bushings popped out and they were already starting to crack.
08-16-2012, 07:39 AM
#11
Intermediate
Thread Starter
Yes and they are soft as butter. I lost a lot of road feeling with these. Now my car acts like an old Ford mustang, the rear end goes wobble every bump I hit.
The following users liked this post:
4drviper (04-28-2013)
The following users liked this post:
4drviper (04-28-2013)
The following 2 users liked this post by max 1.6:
4drviper (04-28-2013),
Jordan00711 (04-27-2013)
08-16-2012, 03:11 PM
#14
 hopefully doesn't happen to mine, over 3 months and tire wear seems even, I put on anywhere from 30-60 miles a day -knock on wood-. not sure about the bushing, have not checked :bite nails:
 08-23-2012, 09:45 AM
#17
takin care of Business in
iTrader: (5)
Join Date: Jan 2008
Location: Kansas City, MO
Age: 40
Posts: 30,994
Received 4,732 Likes
on
4,064 Posts
^^^ holy hell....that looks SOLID !!!
08-23-2012, 11:30 AM
#19
takin care of Business in
iTrader: (5)
Join Date: Jan 2008
Location: Kansas City, MO
Age: 40
Posts: 30,994
Received 4,732 Likes
on
4,064 Posts
^^^ DIY on how you made that 
08-24-2012, 08:38 AM
#21
Intermediate
Thread Starter
Ok
Sorry but I have no pictures
It's not complicated at all, all you need is urethane mix and a release agent.
1- Remove your old bushings by pressing them or burning them.
2- For a clean job, you will need to do yourself a mold. Since these rod end are thinner than the steel insert, you need to have something to offset the insert. I made a simple mold out of aluminum to get the correct insert offset. As for the steel insert, I wanted to make sure they couldn't move in the bushings so I machined 2 small groves in the outer center so the urethane could fill these gap.
3- For the top of the rod end, you can use duct tape to create a wall to retain the urethane inside.
4- Remember that urethane mix is liquid like heated honey so be careful to seal what you want to create.
5- Spray the release agent in your mold but not in the rod end so the urethane will stick to the steel. http://www.smooth-on.com/Release-Age...226/index.html
6- Mix your urethane and pour it in. I've use the PMC780 dry from smooth on. Its a 80A urethane without any release agent in it. http://www.smooth-on.com/Urethane-Ru...148/index.html
7- Let it dry, cut any excess and your done.
The following 2 users liked this post by max 1.6:
rockstar143 (01-14-2015),
swoosh (08-24-2012)
08-24-2012, 10:18 AM
#22
takin care of Business in
iTrader: (5)
Join Date: Jan 2008
Location: Kansas City, MO
Age: 40
Posts: 30,994
Received 4,732 Likes
on
4,064 Posts
might have to try that
10-05-2012, 10:13 AM
#23
Intermediate
Thread Starter
Finally installed them on the vehicle. I have been running the vehicle for about 1000 km with the new urethane bushings. A lot better than before with the rubber bushings but still not perfect.
When going highway speeds, there is deflection in the bushings cause the urethane/rubber thickness in the bushings is way more than what it is OEM. This is a problem also with Ingalls kit. I have a friend with the same problem as me and also a guy here on the forums
https://acurazine.com/forums/showpos...2&postcount=15
If you take a look at the OEM bushing that control the TOE setting
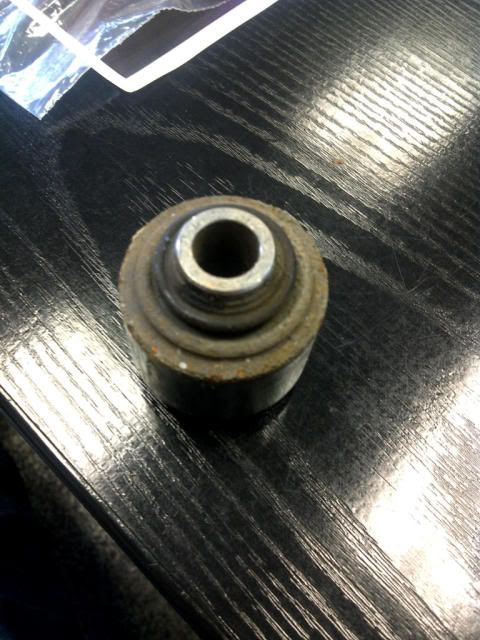
It is a sealed spherical bearing thus allowing no knuckle movement in the toe adjustment.
I think that right now in the market, there is no good toe correction kit. The only kit I could recommend is the SPC camber kit and to stay with the OEM toe adjustment.
In my situation, the OEM toe adjustment is maxed out and I cant get it "in spec"
I will build my own toe kit with OEM bushings. To be continued...
When going highway speeds, there is deflection in the bushings cause the urethane/rubber thickness in the bushings is way more than what it is OEM. This is a problem also with Ingalls kit. I have a friend with the same problem as me and also a guy here on the forums
https://acurazine.com/forums/showpos...2&postcount=15
If you take a look at the OEM bushing that control the TOE setting
It is a sealed spherical bearing thus allowing no knuckle movement in the toe adjustment.
I think that right now in the market, there is no good toe correction kit. The only kit I could recommend is the SPC camber kit and to stay with the OEM toe adjustment.
In my situation, the OEM toe adjustment is maxed out and I cant get it "in spec"
I will build my own toe kit with OEM bushings. To be continued...
The following users liked this post:
4drviper (04-28-2013)
10-11-2012, 04:17 PM
#25
takin care of Business in
iTrader: (5)
Join Date: Jan 2008
Location: Kansas City, MO
Age: 40
Posts: 30,994
Received 4,732 Likes
on
4,064 Posts
looks pretty solid !!!
 10-12-2012, 05:50 PM
#27
Intermediate
Thread Starter
My J-power kit will be for sale with the urethane bushings I made.
The following users liked this post:
Slpr04UA6 (10-12-2012)
 10-13-2012, 10:36 AM
#29
Intermediate
Thread Starter
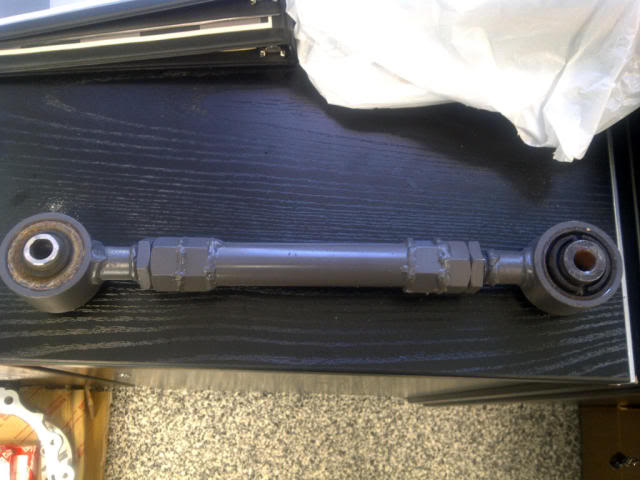
It's all "off the shelf" tubing, nuts and threaded rod.
I started by removing the bushings off the OEM arms and cutted the end of the arms leaving about 3\4 of an inch of tubing.
I machined the threaded rod so it could be inserted in the remaining tubing of the original arm end then welded it in place. I then cutted the middle tube to get the approximate original lenght when rod ends are half extended so that could give me adjustment both ways. After that I welded nuts on each end of the tubing (left and right hand thread) and added the lock nut on the rod end thread. You're done after that.
Ideally you need:
- Lathe or a machinist
- Welding machine or a welder
- I used 3\4-10 nuts and threaded rod,both left and right hand thread (75$)
- Stock arms, 3\4 OD, 1\2 ID (200$)
- Press to remove original bushings and put them in after
That's not really a DIY job for someone not experimented or without proper equipment. I did it since I couldn't find anything on the market that could act like an OEM part can. Either Ingalls or J-Power have too much play in the bushings so rear wheels tends to wear way too fast and SPC doesn't allow toe adjustment cause your stuck with OEM toe adjustment.
The following users liked this post:
Slpr04UA6 (04-26-2013)
04-26-2013, 01:15 PM
#31
Intermediate
Thread Starter
^Awesome!
I've put down 30k km on them and they are still like new and my tires are like new also. No more uneven wear and no more wobble from the rear.
Since these are OEM bushings I should be good for a long run.
I'm on 19inch this summer so I wanted to be sure I wouldn't eat tires!
I've put down 30k km on them and they are still like new and my tires are like new also. No more uneven wear and no more wobble from the rear.
Since these are OEM bushings I should be good for a long run.
I'm on 19inch this summer so I wanted to be sure I wouldn't eat tires!

Last edited by max 1.6; 04-26-2013 at 01:18 PM.
The following users liked this post:
Slpr04UA6 (04-26-2013)
04-26-2013, 01:30 PM
#33
takin care of Business in
iTrader: (5)
Join Date: Jan 2008
Location: Kansas City, MO
Age: 40
Posts: 30,994
Received 4,732 Likes
on
4,064 Posts
04-26-2013, 01:36 PM
#34
Intermediate
Thread Starter
I'm currently reading this https://acurazine.com/forums/3g-tl-tires-wheels-suspension-97/rear-toe-keep-getting-slightly-out-after-ingalls-camber-kit-885207/
All I can say is, Shit!
I had the exact same problem last year, replaced with urethane bushings and it did nothing.
The only "off the shelf" solution to get the toe adjusted is the ingalls which comes with crappy bushings.... When you look at the OEM toe arm you understand why Honda developped a sealed spherical bearing instead of a normal rubber bushing on this arm.
The following users liked this post:
Slpr04UA6 (04-26-2013)
04-28-2013, 01:48 AM
#36

now it all makes sense why my car feels like a slush box
i thought it was just in my head.
make a set of that with OEM spherical bearings...
i'd pay $200 per side.
free shipping?
after the ingalls crap, i'm scared to try SPC,,, and there's really no way to tell how the body side bushing is.
i thought it was just in my head.
make a set of that with OEM spherical bearings...
i'd pay $200 per side.
free shipping?
after the ingalls crap, i'm scared to try SPC,,, and there's really no way to tell how the body side bushing is.
04-28-2013, 04:41 PM
#38
you mean was it only under acceleration? definitely not.
i'm not him, but,,,, the wobbles is,, rear toe keep changing as you cruise down the interstate so you have to keep adjusting "center trim" on steering wheel to make the car go straight.
I could feel the ass of the car moving left and right.
it feels like you hand-tightened lugnuts, or some suspension bolts are loose, or ,,, feels like 2002 suburban with 200k miles.
thank god i only wasted $170 on ingalls and $70 on alignment.
i really don't get how so many people are satisfied with ingalls and avoid SPC for such a petty issue like ball joint boot - ordered OEM boot for SPC kit on the way. same ball joint, should fit right over, just like OEM boot for front skunk2 ball joint arms.
04-28-2013, 05:03 PM
#40
i'll probably do a writeup in a new thread about why you shouldn't even poke ingalls with a 10foot pole if you're even a bit concerned about driving (as opposed to hellaflush)
plus install of SPC and swapping dust boot. i'll have it posted by the first half of May, if not earlier.
my ingalls rear toe thread and this, i would like to combine both info and help people not fear SPC because of some dust boot ..
hey i just noticed, mr heeltoe says to stay away from camber kits with aftermarket ball joint but he recommends skunk2 kit lol, and does not mention that it's a simple matter of swappig out the dust boot for a $2 retail part at honda dealership. also my negative review about ingalls on his site (where i purchased it from) was "being reviewed". it probably won't get posted for obvious reasons.
HT spec coilover(for HPDE) and now camber kit(not even for HPDE, just everyday commuting), i'm losing faith in "HT spec"
Last edited by 4drviper; 04-28-2013 at 05:08 PM.
The following users liked this post:
robocam (05-03-2014)

