DIY - 2004 TL Dashboard Replacement Images
 04-20-2014, 08:40 PM
#1
Love My Ride!!!
Thread Starter
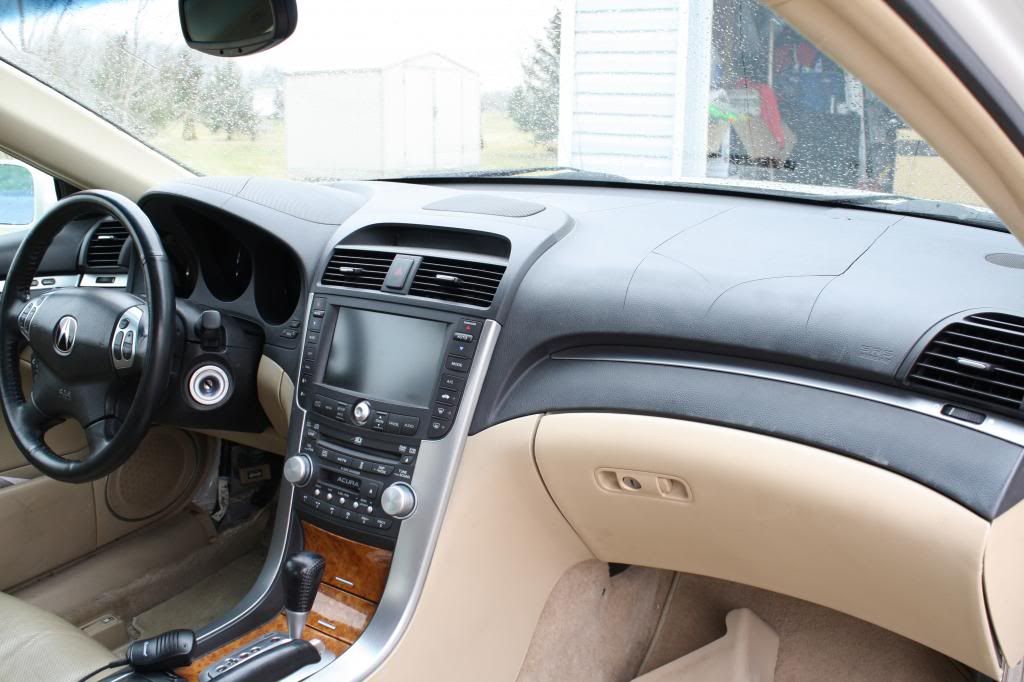
I've been on AcuraZine for many years as a 1.7 EL owner and for the last six years, the proud owner of a 2004 Acura TL WDP. Three years ago, my dashboard started breaking up but I've been following the posts reference this problem for many years before. There are great videos on YouTube for taking and removing the panels and trim but no detailed images of everything else.
I'm not a mechanic or even involved in the automotive industry and was still able to complete this task. All I needed was a service manual, the YouTube videos and a lot of reading and planning.
I found a mint 2006 TL dashboard at my local auto salvage for $150. I'm posting these images as a reference to anybody else who is thinking of doing what I just completed. I took me two days (16 hours) of work to do this. The step by step is in the service manual.
These are some reference images.... hope this helps.
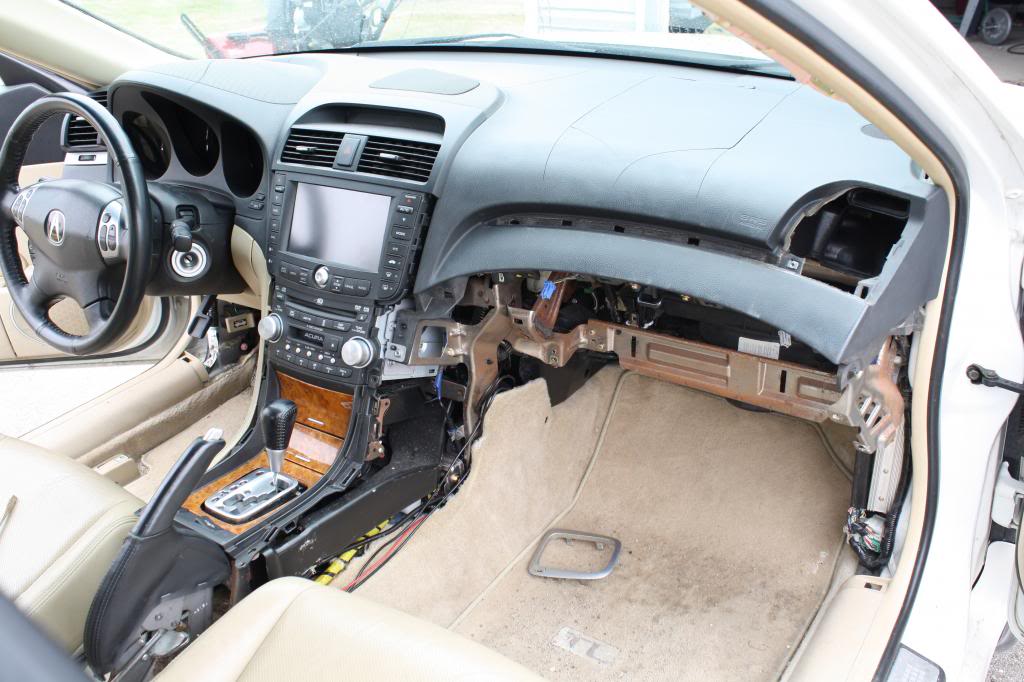
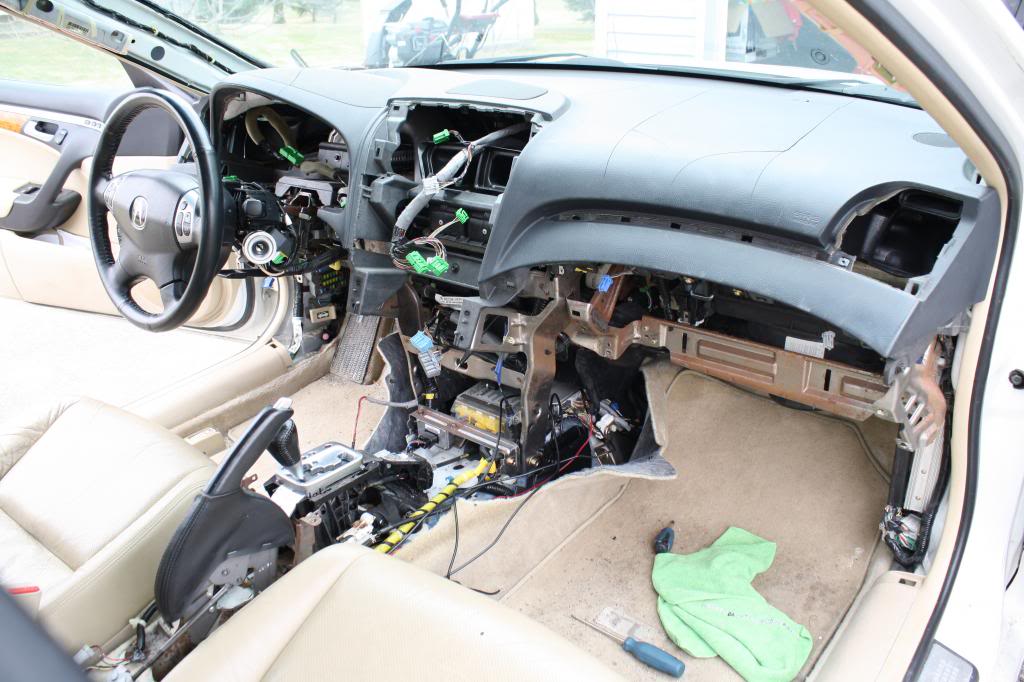
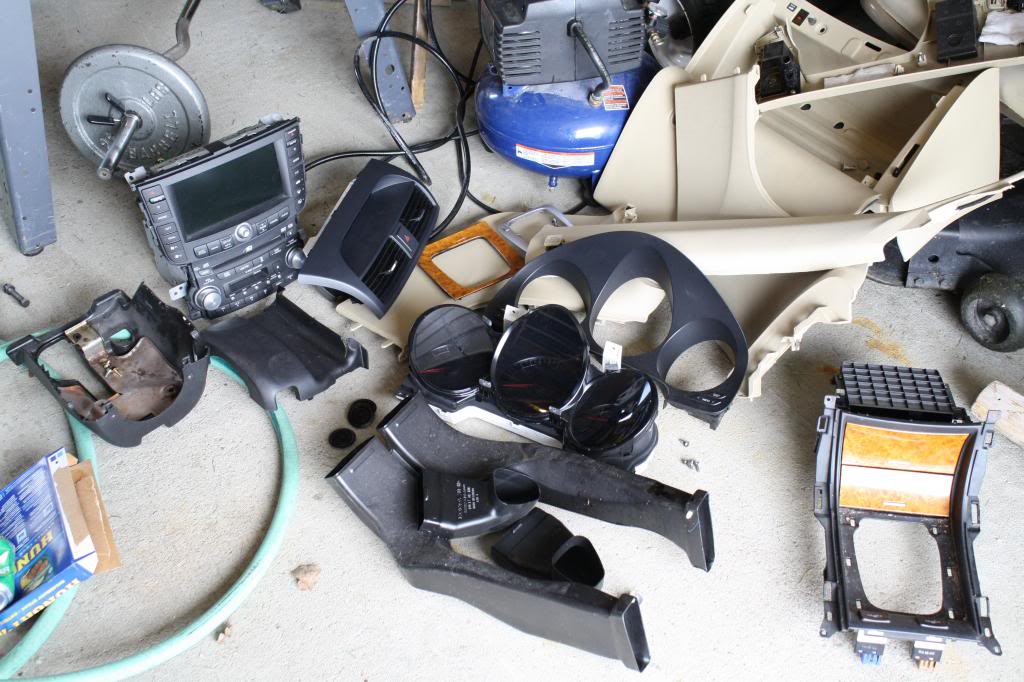
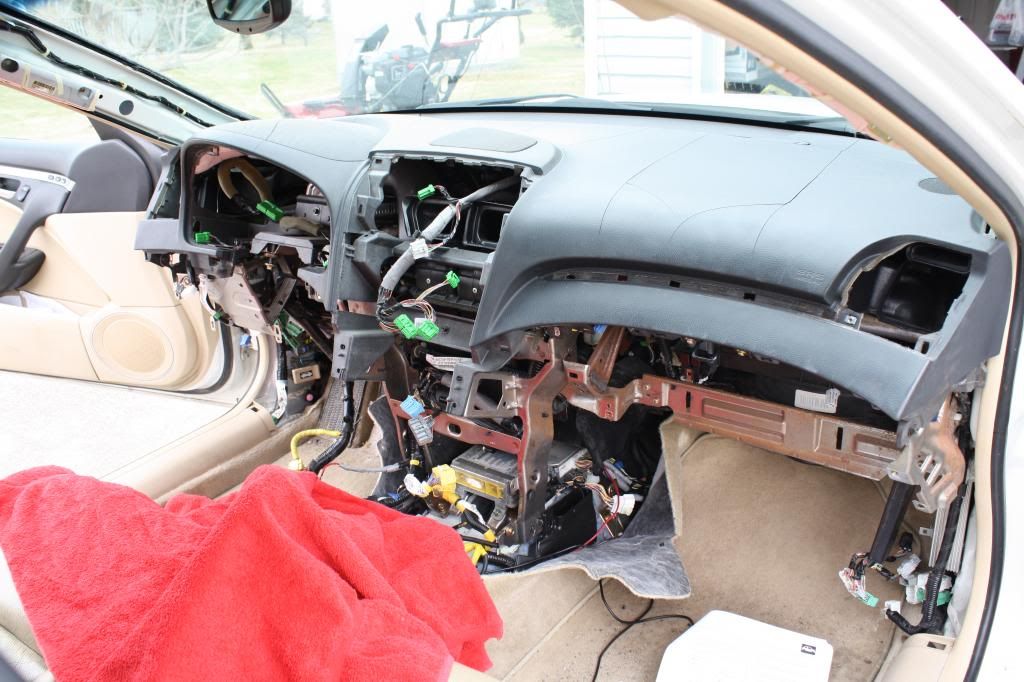
Stuff I removed...
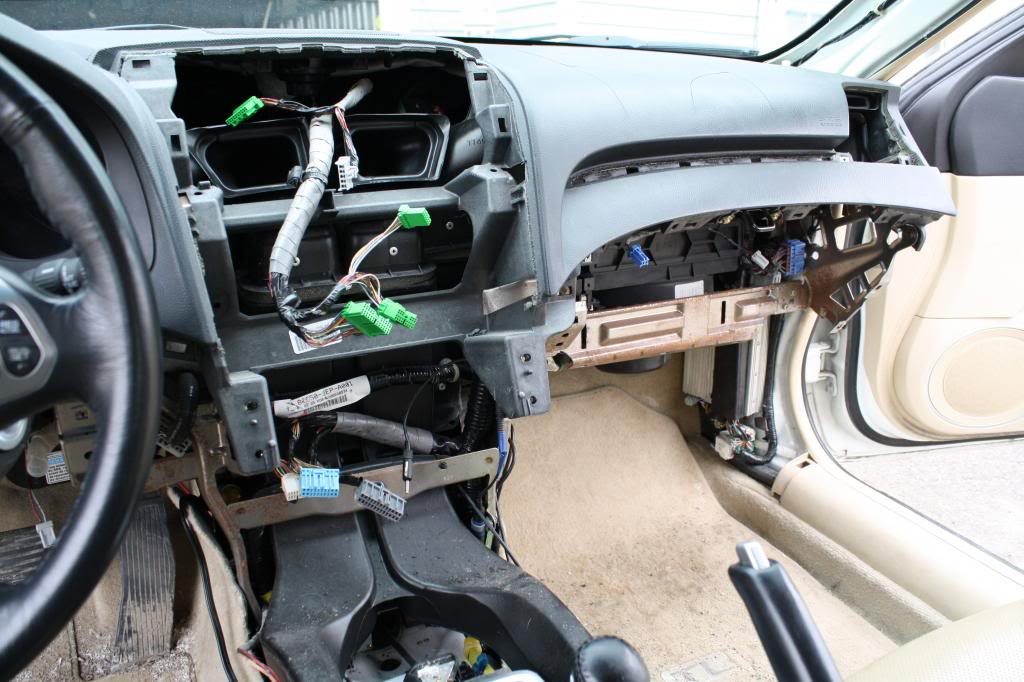
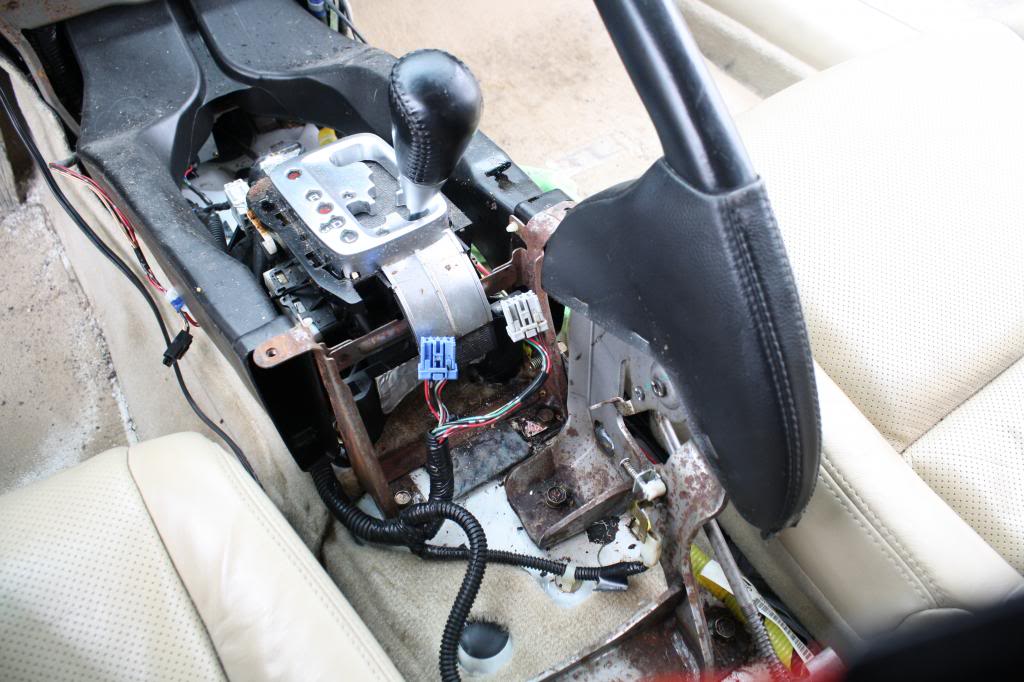
-Entire center console: Radio, storage tray, center vent.
-Glove box assembly
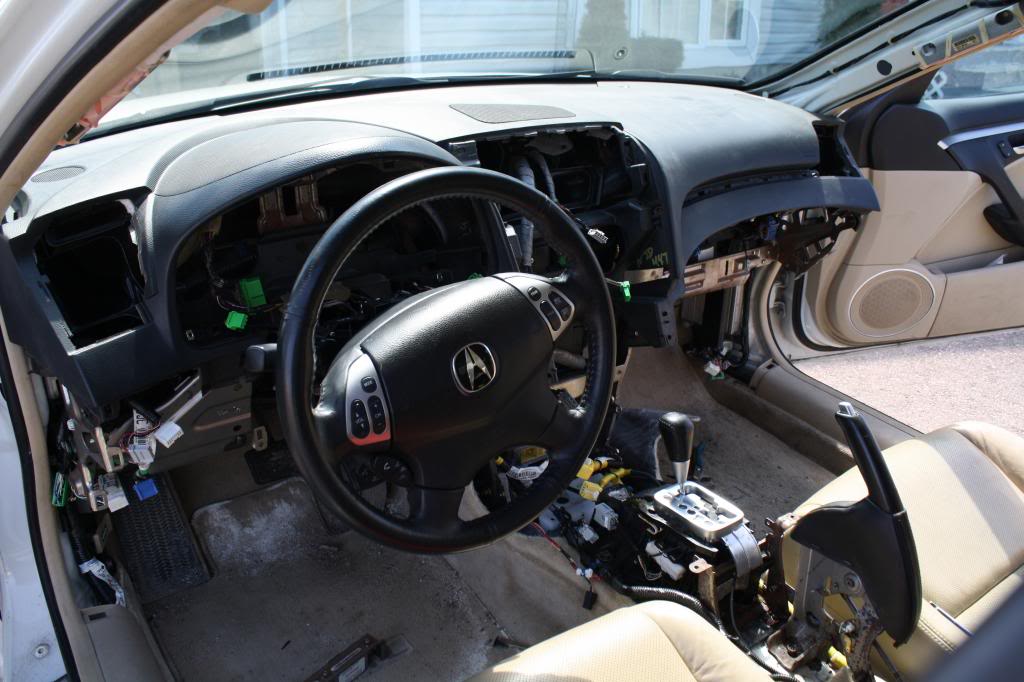
-Gauge cluster and trim
-knee booster panels
-Side panels going to glove box and ignition
-A-pillars
-End dash vents
-Steering column.
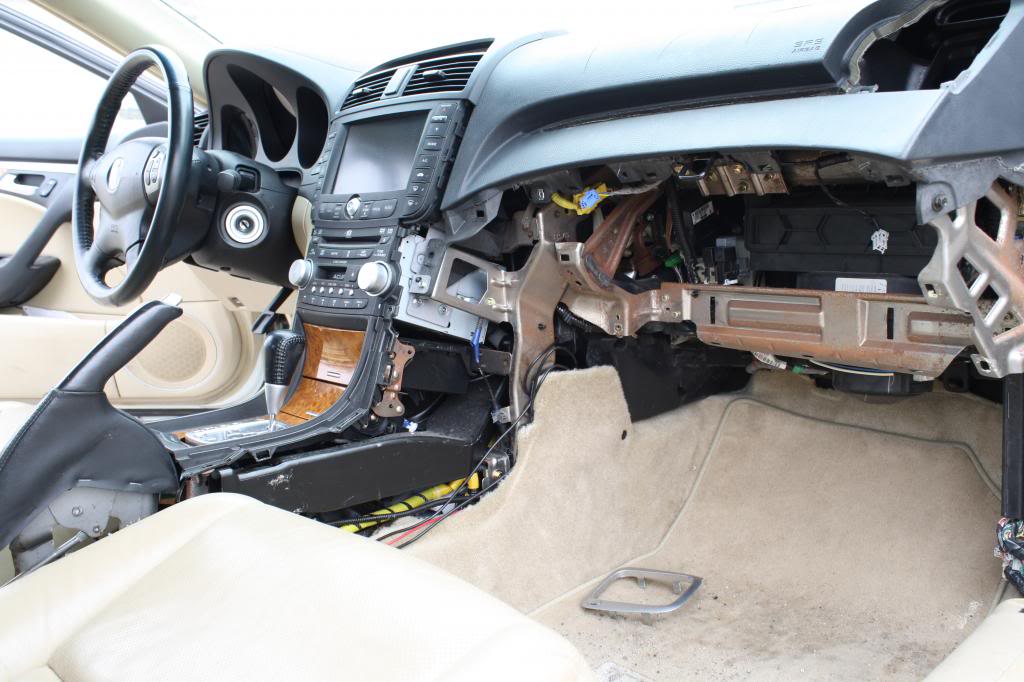
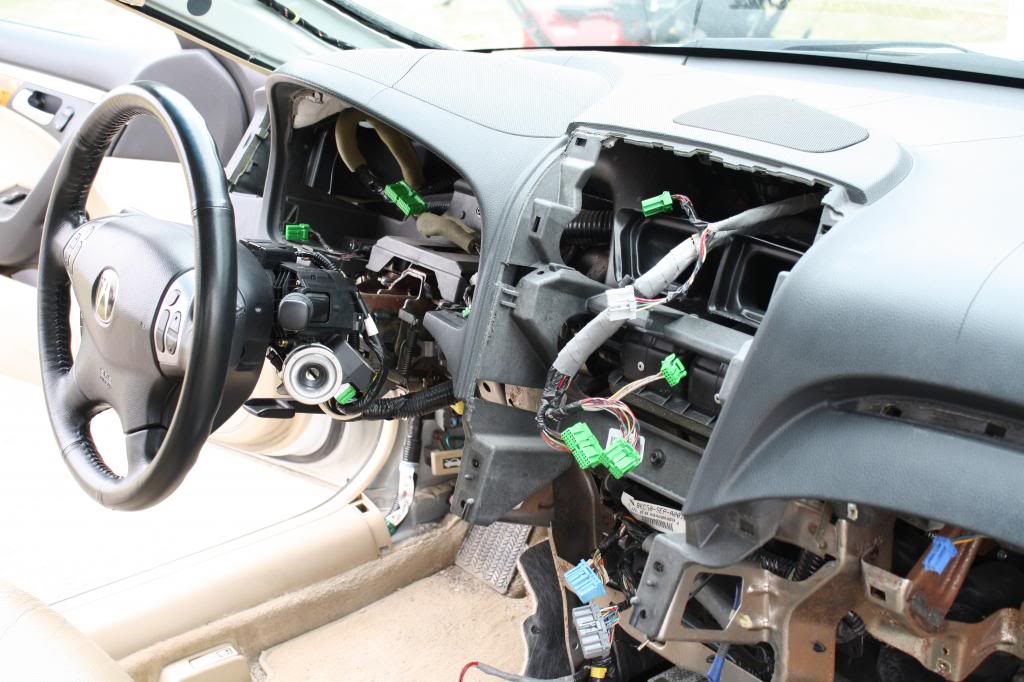
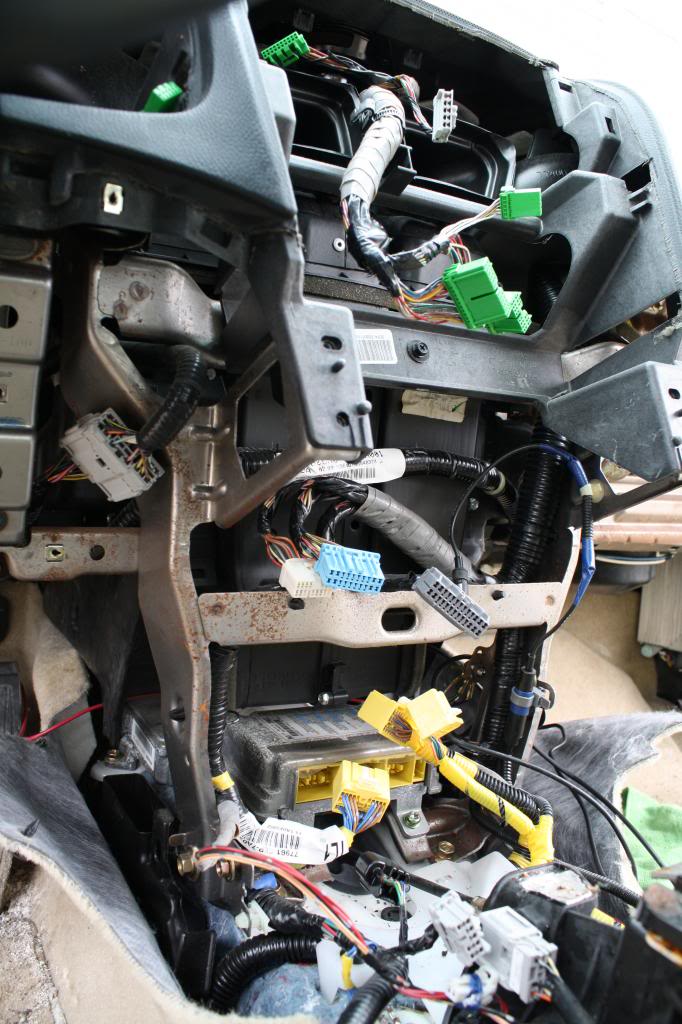
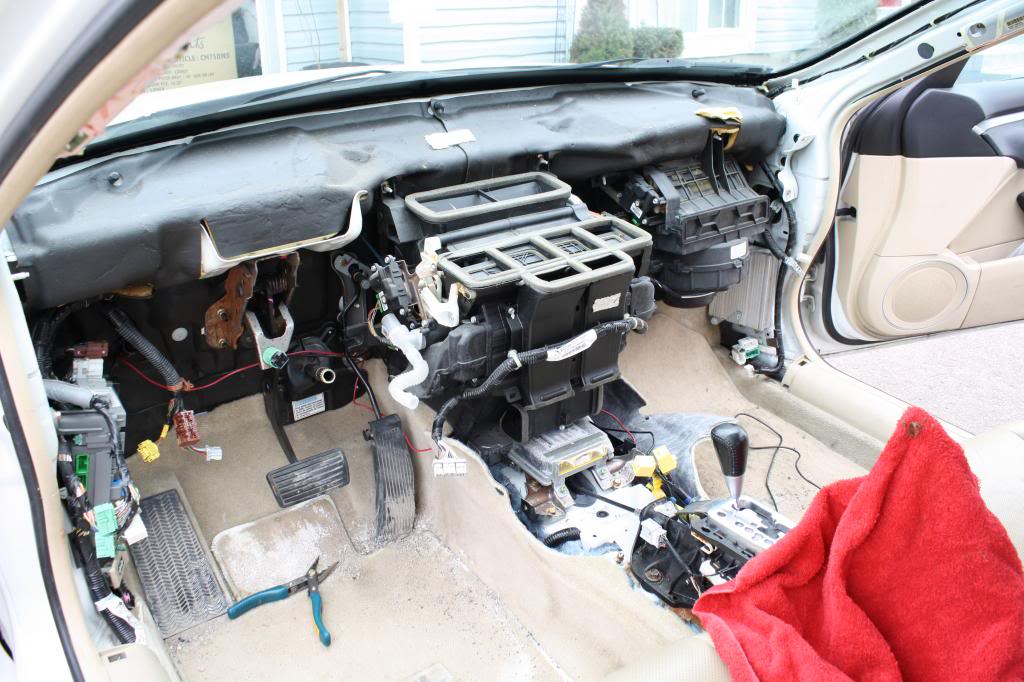
-Disconnect any harness connectors under the dash - this is the hardest part of the job as many are hidden. I had left some plugged in wish caused me a little trouble. So if in doubt, unplug it....
-when you open up the doors, there are 3 rubber plugs on the frame looking to the dashboard. Remove them and there will be bolts holding the dashboard to the sides of the car
-There are 2x-4x-6x bolts hidden behind the wiring harness holding the dash to the firewall.
-By where the storage tray is, there are 2 bolts that need to be removed.
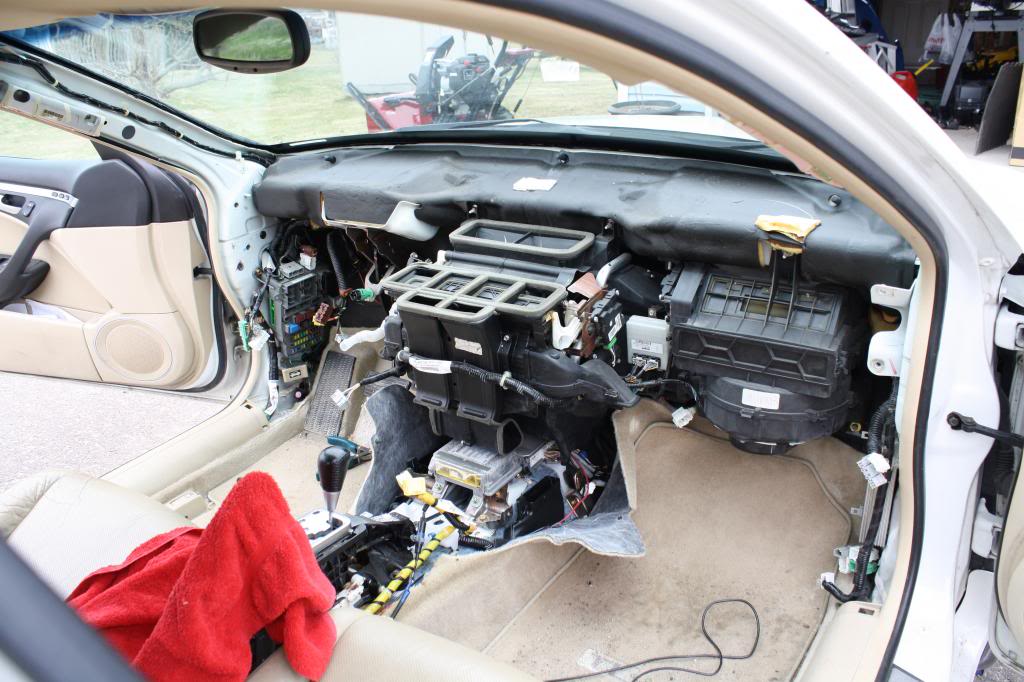
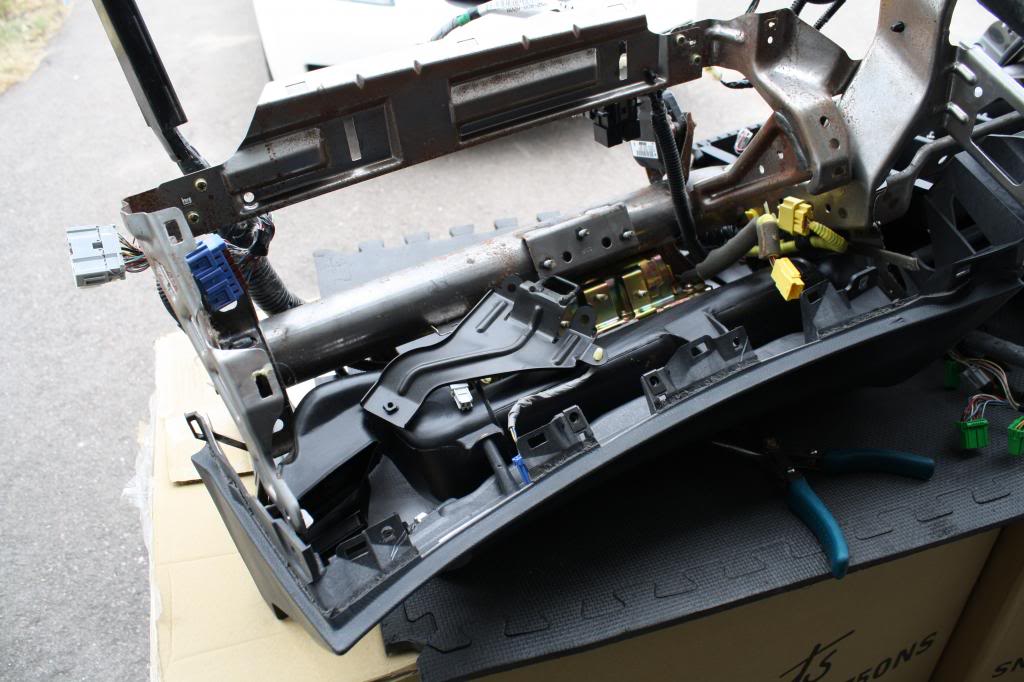
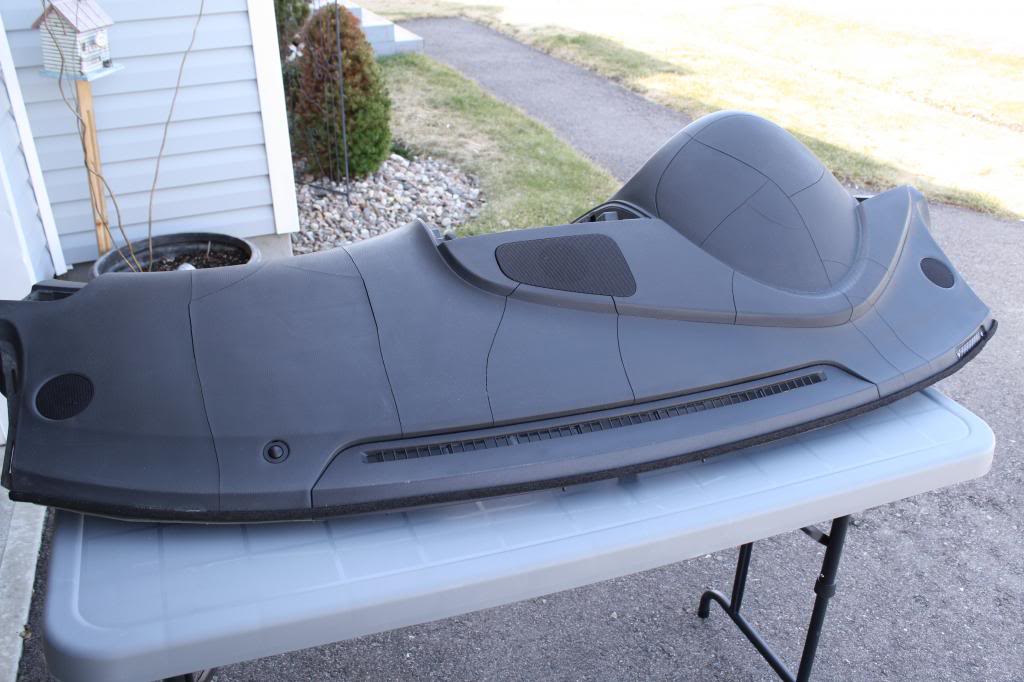
-When you remove the dashboard, you remove it with the metal brace bar that runs from one side to another and it will have the harness attached with the airbag and the vent tubes for HVAC. This is a two man lift. Don't try this by yourself.
You need to swap all that hardware over to the new dashboard. Sorry I have no images of me doing this. Be careful of where you place your harness cables and plugs...
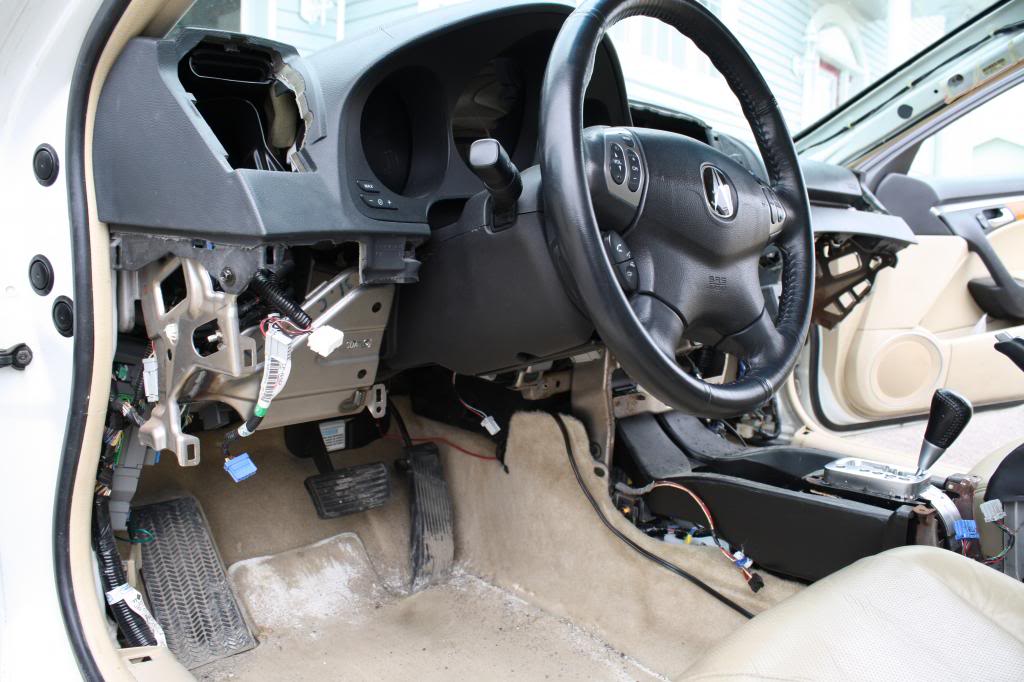
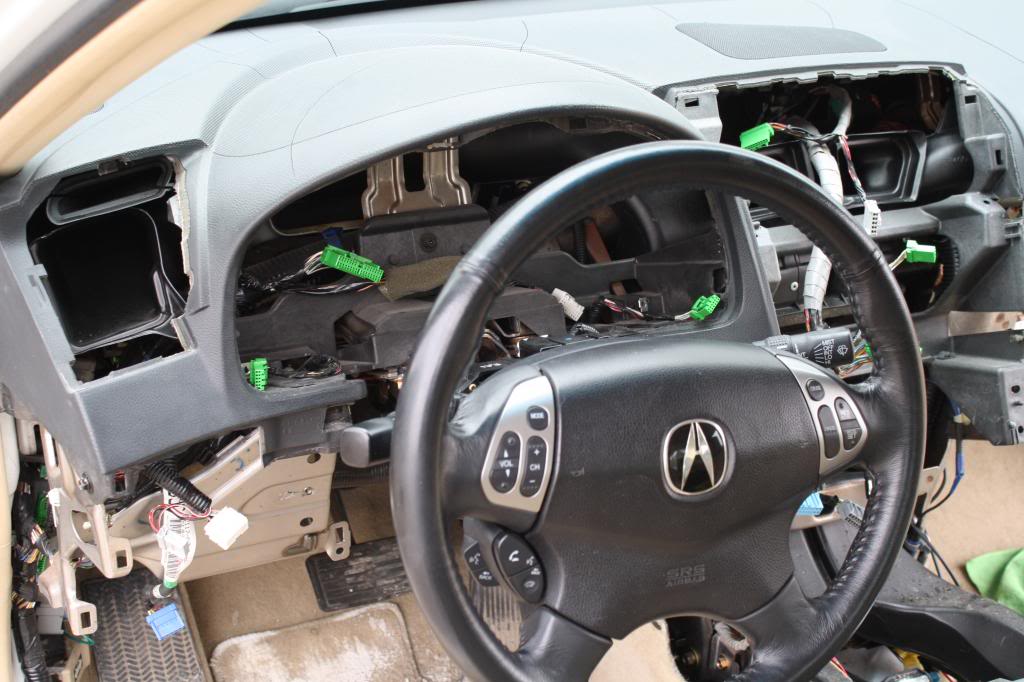
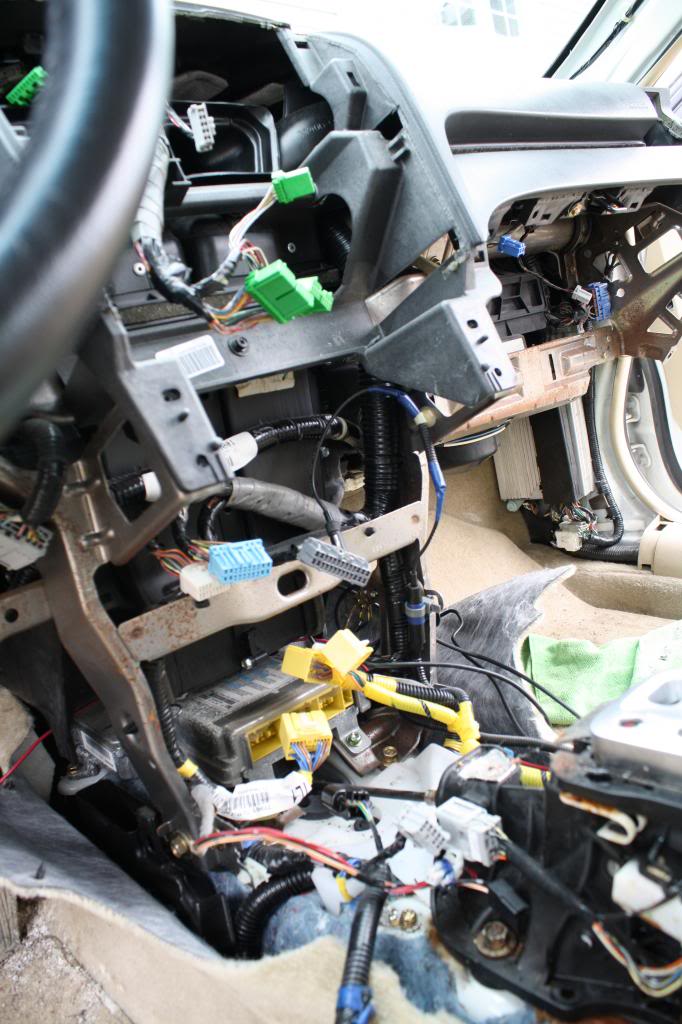
I took the steering wheel and column off. This made the dashboard removal a lot easier.
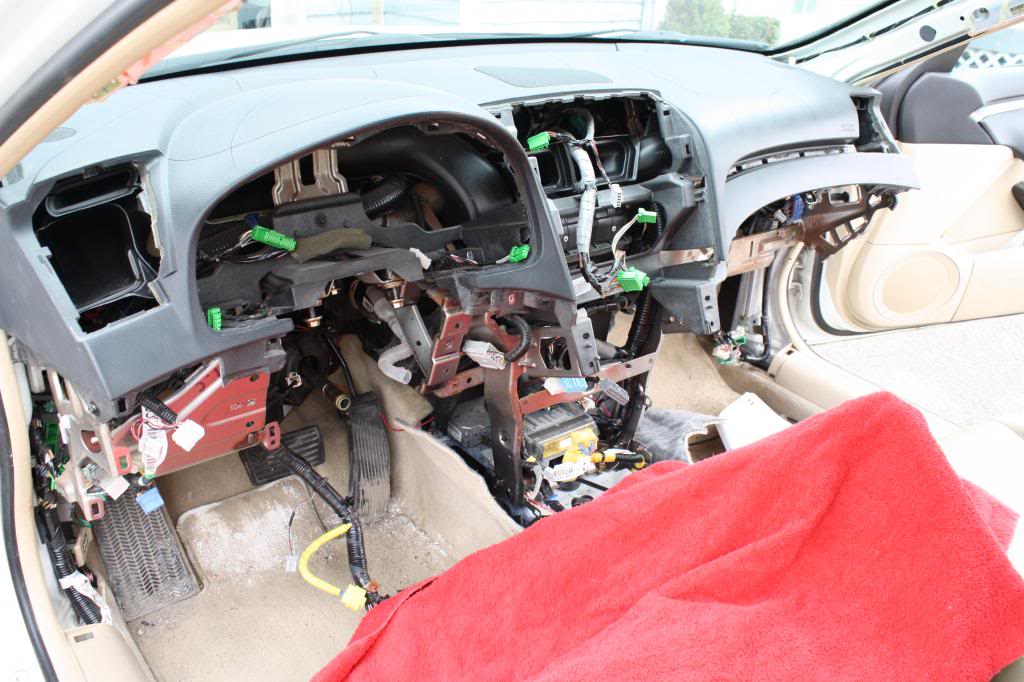
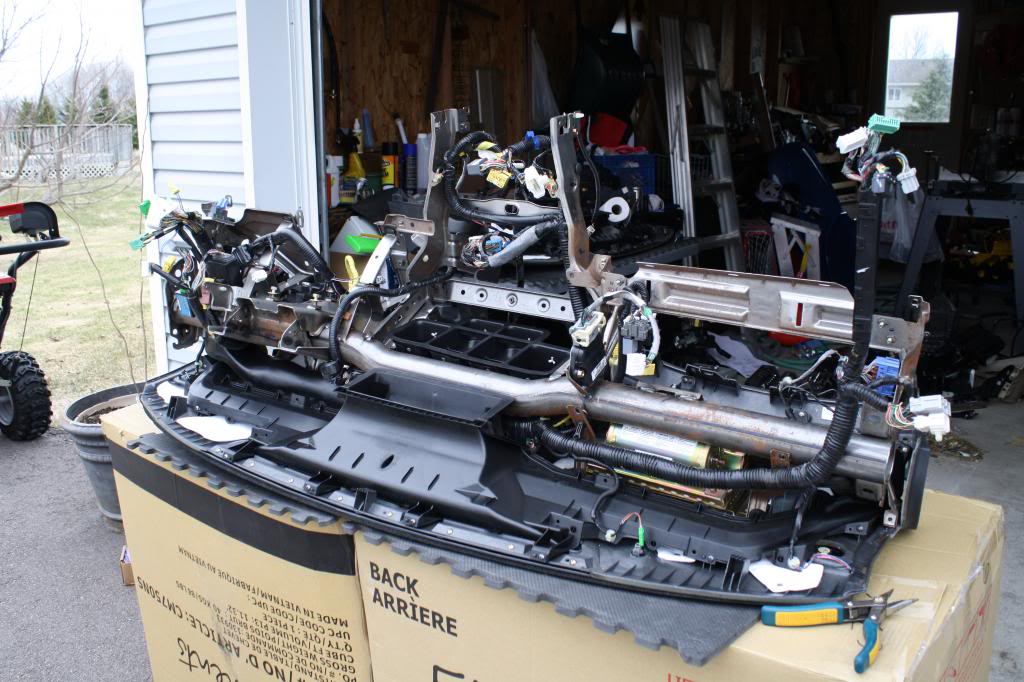
Here is the assembly out of the vehicle and inverted on a table. Move all of it to the other dashboard. Pay attention to where the wires and cables are run. Careful with the airbag handling. I looked at it a long time before I started moving stuff. It can only be done in a certain sequence.
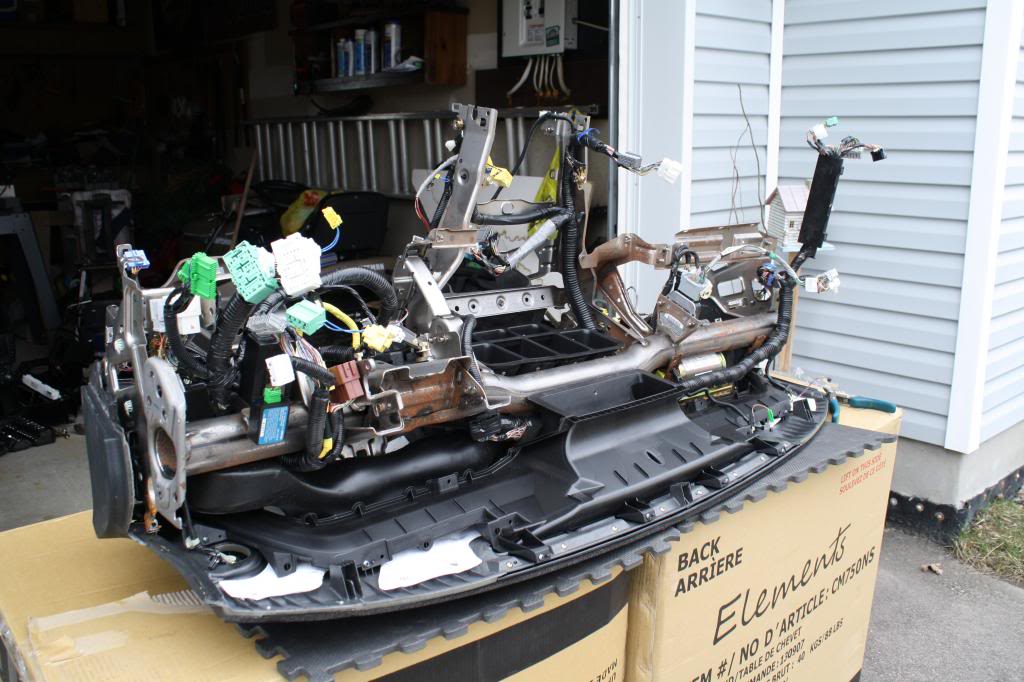


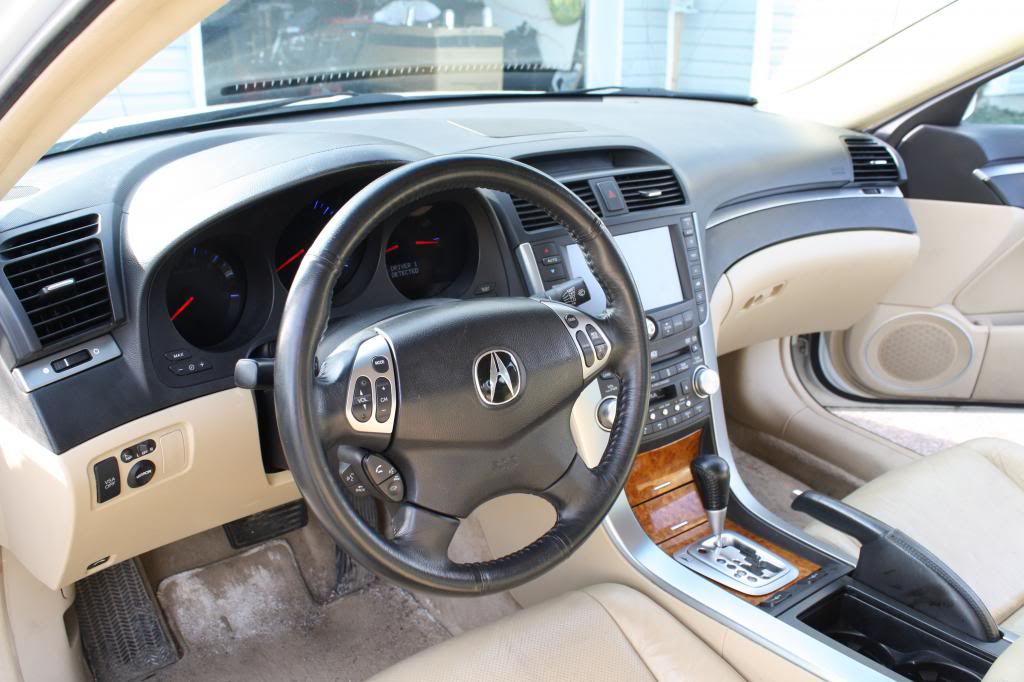
When you re-install the column, make sure your align the >< marks on the end of the column. If not, your steering wheel will be off center.... Just like this one. I had to removed it and try it again lined up. It worked with more care.
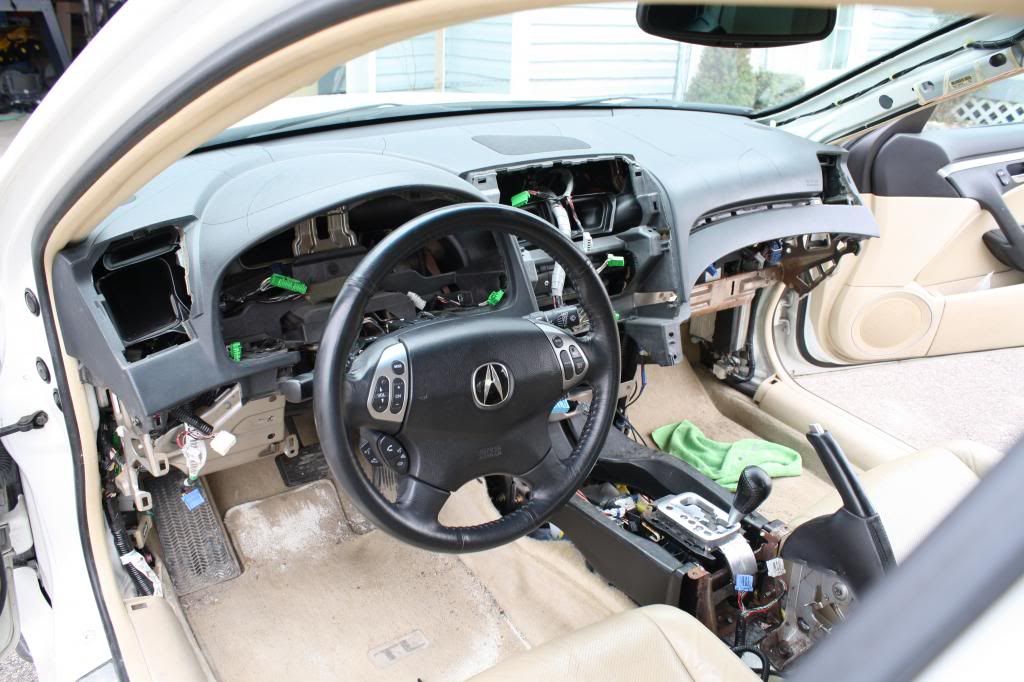
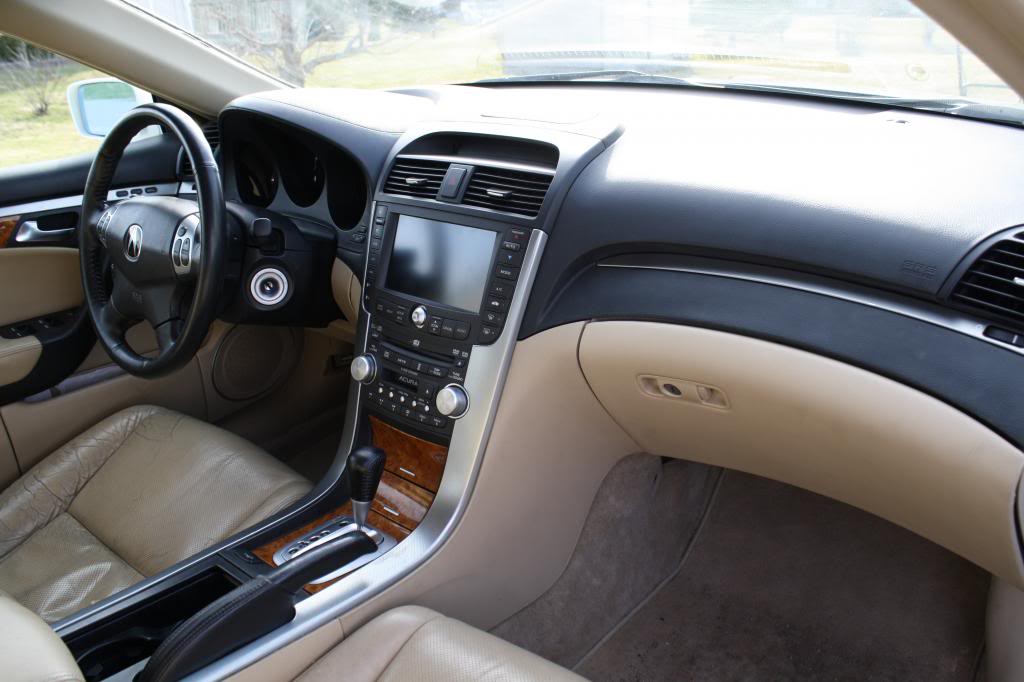
Here is an image of the old dashboard and then the job completed.
Looks like new.
Sorry for the large number of images, but it's hard to know what is important for everybody. I just hope these help in your planning stages.
As I stated earlier, I'm not in this business, as I'm a medical professional. I'm 59 years old and working full time. If I can do this, you should be able to as well.
Total cost... $150 with scrapes and bruises. Wear gloves if you can.
DO AT YOUR OWN RISK !!!!
I'm not a mechanic or even involved in the automotive industry and was still able to complete this task. All I needed was a service manual, the YouTube videos and a lot of reading and planning.
I found a mint 2006 TL dashboard at my local auto salvage for $150. I'm posting these images as a reference to anybody else who is thinking of doing what I just completed. I took me two days (16 hours) of work to do this. The step by step is in the service manual.
These are some reference images.... hope this helps.
Stuff I removed...
-Entire center console: Radio, storage tray, center vent.
-Glove box assembly
-Gauge cluster and trim
-knee booster panels
-Side panels going to glove box and ignition
-A-pillars
-End dash vents
-Steering column.
-Disconnect any harness connectors under the dash - this is the hardest part of the job as many are hidden. I had left some plugged in wish caused me a little trouble. So if in doubt, unplug it....
-when you open up the doors, there are 3 rubber plugs on the frame looking to the dashboard. Remove them and there will be bolts holding the dashboard to the sides of the car
-There are 2x-4x-6x bolts hidden behind the wiring harness holding the dash to the firewall.
-By where the storage tray is, there are 2 bolts that need to be removed.
-When you remove the dashboard, you remove it with the metal brace bar that runs from one side to another and it will have the harness attached with the airbag and the vent tubes for HVAC. This is a two man lift. Don't try this by yourself.
You need to swap all that hardware over to the new dashboard. Sorry I have no images of me doing this. Be careful of where you place your harness cables and plugs...
I took the steering wheel and column off. This made the dashboard removal a lot easier.
Here is the assembly out of the vehicle and inverted on a table. Move all of it to the other dashboard. Pay attention to where the wires and cables are run. Careful with the airbag handling. I looked at it a long time before I started moving stuff. It can only be done in a certain sequence.
When you re-install the column, make sure your align the >< marks on the end of the column. If not, your steering wheel will be off center.... Just like this one. I had to removed it and try it again lined up. It worked with more care.
Here is an image of the old dashboard and then the job completed.
Looks like new.
Sorry for the large number of images, but it's hard to know what is important for everybody. I just hope these help in your planning stages.
As I stated earlier, I'm not in this business, as I'm a medical professional. I'm 59 years old and working full time. If I can do this, you should be able to as well.
Total cost... $150 with scrapes and bruises. Wear gloves if you can.
DO AT YOUR OWN RISK !!!!

The following 23 users liked this post by Hyrdgun:
Acurafan86 (05-06-2014),
bp_spets (05-06-2014),
frankjnjr (04-26-2018),
gatrhumpy (11-18-2017),
ggesq (08-20-2014),
and 18 others liked this post.
The following users liked this post:
DuoDSG (05-06-2014)
05-06-2014, 10:44 AM
#4
Chapter Leader (Southern Region)
Nice OP. I'll add that it might be easier to replace the dash cover and reuse the current frame.. and you don't need to remove the steering wheel, just remove the few securing bolts and let the steering wheel rest on the footwell with the seat pushed back.
A little late but I suggest anyone doing this to apply thin styrofoam sheets beetween the dash cover and the dash frame, especially around the metal components like the airbag frame, etc. These cracks develop from the flex of the polyurethane and the components (metal, plastic, etc) it's sealed on. Hot day, hot dash, kick the cold AC on.. hyper flexing (thermal expansion).. crack. It should mitigate the dash cracks in the future. I'll try to find pics of my replacement.
A little late but I suggest anyone doing this to apply thin styrofoam sheets beetween the dash cover and the dash frame, especially around the metal components like the airbag frame, etc. These cracks develop from the flex of the polyurethane and the components (metal, plastic, etc) it's sealed on. Hot day, hot dash, kick the cold AC on.. hyper flexing (thermal expansion).. crack. It should mitigate the dash cracks in the future. I'll try to find pics of my replacement.
The following users liked this post:
JC06TL (11-14-2019)


Trending Topics
11-16-2017, 12:55 PM
#10
Love My Ride!!!
Thread Starter
11-16-2017, 01:19 PM
#12
Love My Ride!!!
Thread Starter
It took me two days.... first day to get everything undone, unplugged, apart and out of the vehicle.
The next day with a fresh brain get the dashboard swapped and back into the vehicle making sure everything is plugged back in :-)
Good luck and take your time.
Happy to see this post was helpful.
The next day with a fresh brain get the dashboard swapped and back into the vehicle making sure everything is plugged back in :-)
Good luck and take your time.
Happy to see this post was helpful.
11-18-2017, 07:54 PM
#13
Intermediate

Join Date: Sep 2017
Age: 65
Posts: 26
Likes: 0
Received 0 Likes
on
0 Posts
i could use you advice. I had someone swap dashboards for me today and now the car wont shift out of park. Additionally the VSA light is on as well as a couple other lights. Is this because the battery was disconnected?
11-18-2017, 08:03 PM
#14
Love My Ride!!!
Thread Starter
No that shouldn't matter, All I can think is that something is not reconnected properly. Sorry to hear that.
Last edited by Hyrdgun; 11-18-2017 at 08:05 PM.
03-08-2018, 10:27 PM
#17

Love my Acura - Hate my Dash
New owner / New member just signing up ..... after about a month of lurking and reading various Whatnots.
This seems like the best GO - TO thread for dash replacement , that I could find.
I found a PDF adobe acrobat posting that has the Acura service manual pages for dash removal.
Its a little sparse , but will try to post them as an attachment.
Just in case I cannot attach them , I found them on www here
https://www.justanswer.com/acura/7etkl-tl-remove-dash-2005-acura-tl.html
My 04 TL Dash looks very similar to the OP's Dash ..... Chronic-Crackoholic
Car was in Virginia from 2004-2013, and North Carolina since 2013.
Found a perfect dash in local J-Yard , going to pull it out tomorrow - I hope - using what I have read here , and the PDF from the manual.
On other threads here, have read it will eventually crack also. oh well. I'll do it once and see how long it lasts.
Then fork out the $200 for a Coverlay - if this one gets hooked on Crack too
On the Coverlay option ... many questioned the Airbag ability ( another thread on here).
I can report that just this past Sunday .... in a different J-Yard ... there was a 2005 TL hit hard in front.
It had a Coverlay installed , the Passenger Airbag fully deployed with no problem.
Just an FYI
It did render the Coverlay unsuitable for further use ... or else I would have gotten it myself.
The "corners" around the Coverlay Blowout Flap were split about 1 inch or so , at all 4 corners , from the protrusion of the Airbag at its base area upon deployment.
Regret that I didn't take any pics of its aftermath.
If I go back there soon , I will get pics to post.
If I come across any further tips or insight while removing this dash , I will post the info.
It will be a while before I actually install the dash into my car.
Great Forum you guys have here.
BVZ
The following users liked this post:
Mark Buxton (07-24-2020)
03-09-2018, 08:52 PM
#18
Got my replacement dash today at a NC location of LKQ pull-your-part
$60 for the dash shell
Included the vents, some a/c ductwork, defroster ductwork, and center speaker.
Took about 3.5 hours to remove .... because I was determined to try and pull it without the bar attached , and as bare as possible.
It simply is NOT possible to remove the dash without taking the steel bar and wiring harnesses along with it.
Removed all the wiring harnesses and steel cross-bar after getting it out , to save money.
Maybe another 15-20 minutes
At that point its only 12-15 screws that are 100% non-accessibe while installed , and some more wiring fastners that were non-accessible.
Then the big bar, metal bracketry, and wiring harnesses come off clean.
Would have been around $150 as pulled.
Was in too big of a hurry under the time restraint of getting there later than planned , to do any pictures.
But will say this thread could use a lot more in-depth details to be more useful to the general masses.
Even though very few will probably ever tackle this job at this point , along with worthy replacement specimens getting fewer everyday.
Could probably pull another in about 2 hours , from a Parts Car .
When I remove mine from my car .... probably spend 4-5 hours using more care and consideration for all things.
Will post some helpful insights maybe later tonight or tomorrow night.
BVZ
The following users liked this post:
frankjnjr (09-01-2019)
03-09-2018, 11:04 PM
#19
Chapter Leader (Southern Region)
$60?!?!? holllly ballls that's a great price.
I'd consider insulating the underside of the shell by the structural sections
Otherwise that PU will probably still be prone to crack
There are styro sheets you could use.. maybe even spray foam.. just a suggestion.
I'd consider insulating the underside of the shell by the structural sections
Otherwise that PU will probably still be prone to crack
There are styro sheets you could use.. maybe even spray foam.. just a suggestion.
03-10-2018, 11:40 AM
#20
Regardless of how rare the item is or what type of car.
I knew about this dash for 2 weeks .... was sitting on pins and needles the whole time hoping no one else got it or damaged it.
Money and time were just too tight to get it sooner.
 I'm one happy MoFo to have it !
Definitely going to look into the styrofoam sheets or cut strips of rubber from an old bicycle inner tube.
03-11-2018, 05:50 PM
#21
Here is some more Heads - Up info about the dash REMOVAL process defacto.
Just things I remember that seem the most important.
May do a more comprehensive outline when I pull mine and install the replacement - which could be in 3 weeks or 3 months , not sure.
But this , along with the .PDF from Manual , and info/images supplied by Hyrdgun the OP , should get you through the initial removal from a parts car with confidence and less lost time trying to figure out unknowns and invisibles.
* First of all I want to say - IF you have more Money than Time - just buy the whole dash assembly intact , and reinstall it with very little time spent tearing down and swapping over all your pre-existing items and whatnots from your old dash.
In my case , have more Time than Money , plus 100's of other things begging for every dollar I get , so I went the cheapest route / long way.
* DO remove the driver seat , as a personal favor to yourself.
The passenger side of the operation isn't as involved or intricate , and you can get by okay leaving pass seat in car.
When you do the final remove/install operation into your personal vehicle , I would pull Both Seats , if your seats are Nice.
* You Do Not have to remove the side vents or instrument cluster to pull dash , but you will likely be pulling them anyway after removal , so there you go.
I would remove the cluster beforehand , and the side vents afterwards.
You have to remove the molding from above the glovebox to access the pass side vent screws , and it is MUCH easier to get a grip and a visual on the funky tab clips that secure the molding - after the dash is out . You could easily damage the molding or dash going at this carelessly.
* The pillar trim that runs along side of the windshield - those actually "might" can stay in place if you're scared of them.
They aren't really difficult , you just need the correct approach.
The little square tabs that say to the effect of Airbag or Curtain ... those are the main fasteners holding them on.
The inner square is the tab for the index type fastener lock.
The outer rim stays in place.
Look Closely and use a thin plastic or wooden device to wedge in and gently pry the inner square outwards.... towards your face in other words.
Work all 4 sides gently if needed , it only needs to pop out about half an inch to release.
After they are un-indexed , the pillar trim unsnaps very easily from Top to Bottom.
Don't cut a corner and use a metal screwdriver - cobble it all up - and come back crying about it.
You were warned.
* Disconnect EVERY SINGLE SOLITARY connector from driver side to passenger side , top to bottom , all the way back to the light inside the console box.
Every bit of this has to come out cleanly with the monstrosity.
And cut loose all the loom fasteners that are not directly on the dash assembly.
Everything at fuse box , everything below radio at floor , pull carpet way down on passenger side of center and get all of those
Everything
* You CAN remove the passenger AirBag - BEFORE - removing the dash , and I would advise removing it Before.
That is where the First Cracks start on an Uncracked Dash.
The Big Steel Bar has the airbags bottom resting directly on it , it also has a bracket bolted from Bar to bottom of Airbag , as you grapple with this whole monstrosity , any forces applied could put additional pressure against the bottom of the airbag assy and ... accidentally / suicidally ..,.. cause it to crack the dash.
The top of the Airbag Assy is bolted directly to the underside of the dash.
When you see this setup firsthand , you immediately understand why it is ground zero for dash-kill.
Also Stage 2 of this precaution , after dash is out of car , resting upside down with the pretty side facing down on a cushioned mat on a work table , all the weight of the monstrosity is now applying onto the airbag area and entire skin while you are dismantling the wiring harnesses and Steel Bar. ..... on both sides top and bottom , of your new prize.
That might seem overkill , but I would advise all the overkill you can dream of while you are involved in this.
Mine is mine , yours is yours , do as you wish .
The far pass side of Steel Bar has 2 larger nuts (14 or 17mm) securing its clamp to the body. Remove them.
All the bolts securing the middle bracketry (under radio area at floorboard) - Remove.
The 3 bolts hidden in behind the rubber plugs , in driver door jamb pillar - Remove.
About 6 nuts/bolts holding the Steel Bar to Airbag Bracket in place - Remove.
3 nuts securing Airbag to top underside of dash - Remove.
Now you can get "some" free movement with the dash , but very very little.
But its enough to leverage the Steel Bar away from bottom of Airbag Assy , and remove the Airbag.
* I may have overlooked it , or maybe it was too far out of sight , but I don't remember coming across a connector to disconnect the steering column harness as a whole from the rest of the harness.
So anyway , All the connectors going up about the column (maybe 8 or more) have to be unplugged so all that wiring can come out with the rest of the harness and monstrosity. So you need to have full access top and bottom of column , and the plastic shroud below steering wheel has to be removed to get most of them.
Before you remove the column in your personal car , make note of alignment on steering shaft , even use paint dobs and scratch awl marks at the joint if you can.
The column has a slip joint inside the car near firewall where it slides apart from the shaft that goes through the firewall into the steering rack.
Very convenient.
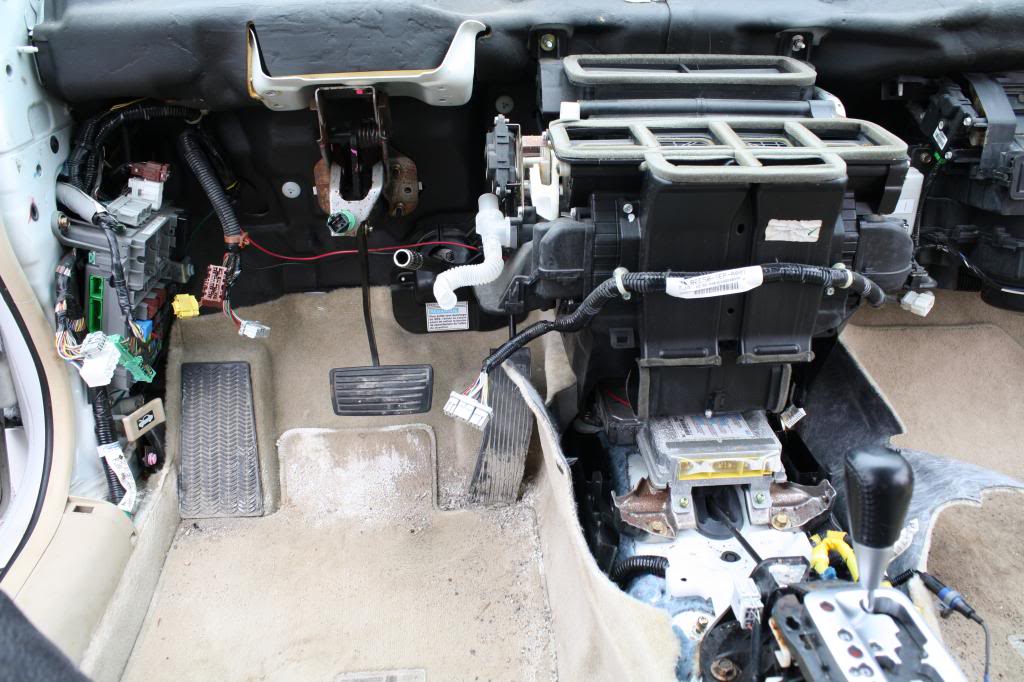
I wanted the steering column OUT anyhow , and it turns out , the steering column nuts/bolts are the last thing holding the dash firmly in place.
There is also a brake pedal mount bracket - iirc - that needs to be removed from column.
You go through all the hoopla up to that point and feel like you are getting almost nothing gained.
But that is the last step , and it is ready to lift right out of there .... come to Poppa !
* DO have someone help you make the final lift up and out of the car.
The monstrosity is not lightweight and doesn't have suitcase handles
Handle With Care and Think Ahead
Remember this isnt an A - Z write up
Use this info along with the other info and images already supplied
A good flashlight , and a confident demeanor
You should now be able to set a new worlds record when you pull your prize from a parts car .
All the best to you,
BVZ
Just things I remember that seem the most important.
May do a more comprehensive outline when I pull mine and install the replacement - which could be in 3 weeks or 3 months , not sure.
But this , along with the .PDF from Manual , and info/images supplied by Hyrdgun the OP , should get you through the initial removal from a parts car with confidence and less lost time trying to figure out unknowns and invisibles.
* First of all I want to say - IF you have more Money than Time - just buy the whole dash assembly intact , and reinstall it with very little time spent tearing down and swapping over all your pre-existing items and whatnots from your old dash.
In my case , have more Time than Money , plus 100's of other things begging for every dollar I get , so I went the cheapest route / long way.
* DO remove the driver seat , as a personal favor to yourself.
The passenger side of the operation isn't as involved or intricate , and you can get by okay leaving pass seat in car.
When you do the final remove/install operation into your personal vehicle , I would pull Both Seats , if your seats are Nice.
* You Do Not have to remove the side vents or instrument cluster to pull dash , but you will likely be pulling them anyway after removal , so there you go.
I would remove the cluster beforehand , and the side vents afterwards.
You have to remove the molding from above the glovebox to access the pass side vent screws , and it is MUCH easier to get a grip and a visual on the funky tab clips that secure the molding - after the dash is out . You could easily damage the molding or dash going at this carelessly.
* The pillar trim that runs along side of the windshield - those actually "might" can stay in place if you're scared of them.
They aren't really difficult , you just need the correct approach.
The little square tabs that say to the effect of Airbag or Curtain ... those are the main fasteners holding them on.
The inner square is the tab for the index type fastener lock.
The outer rim stays in place.
Look Closely and use a thin plastic or wooden device to wedge in and gently pry the inner square outwards.... towards your face in other words.
Work all 4 sides gently if needed , it only needs to pop out about half an inch to release.
After they are un-indexed , the pillar trim unsnaps very easily from Top to Bottom.
Don't cut a corner and use a metal screwdriver - cobble it all up - and come back crying about it.
You were warned.
* Disconnect EVERY SINGLE SOLITARY connector from driver side to passenger side , top to bottom , all the way back to the light inside the console box.
Every bit of this has to come out cleanly with the monstrosity.
And cut loose all the loom fasteners that are not directly on the dash assembly.
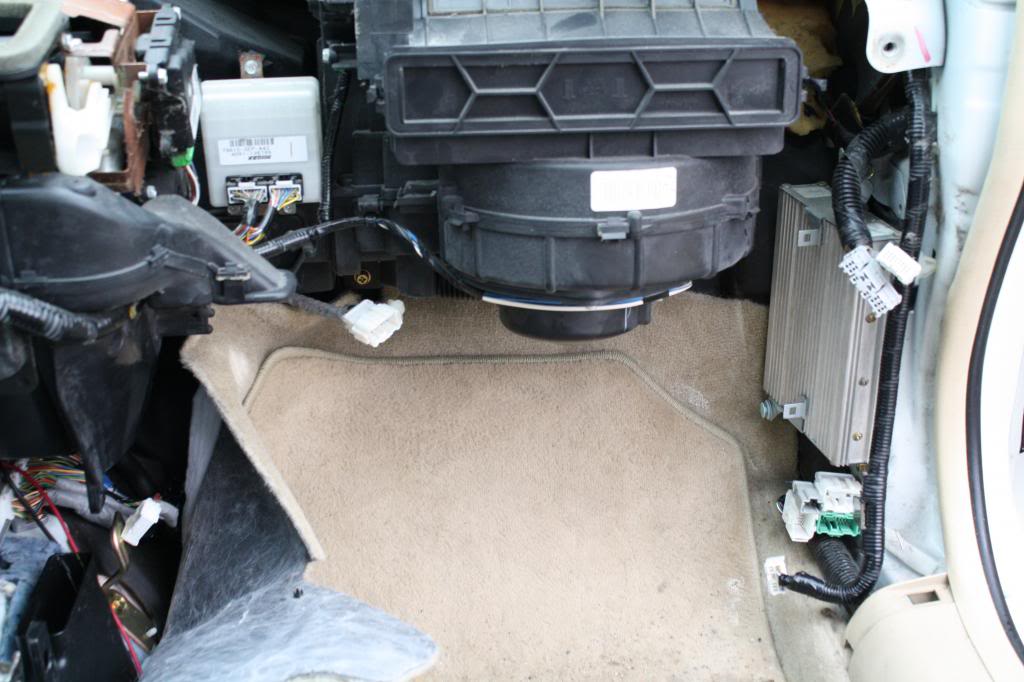
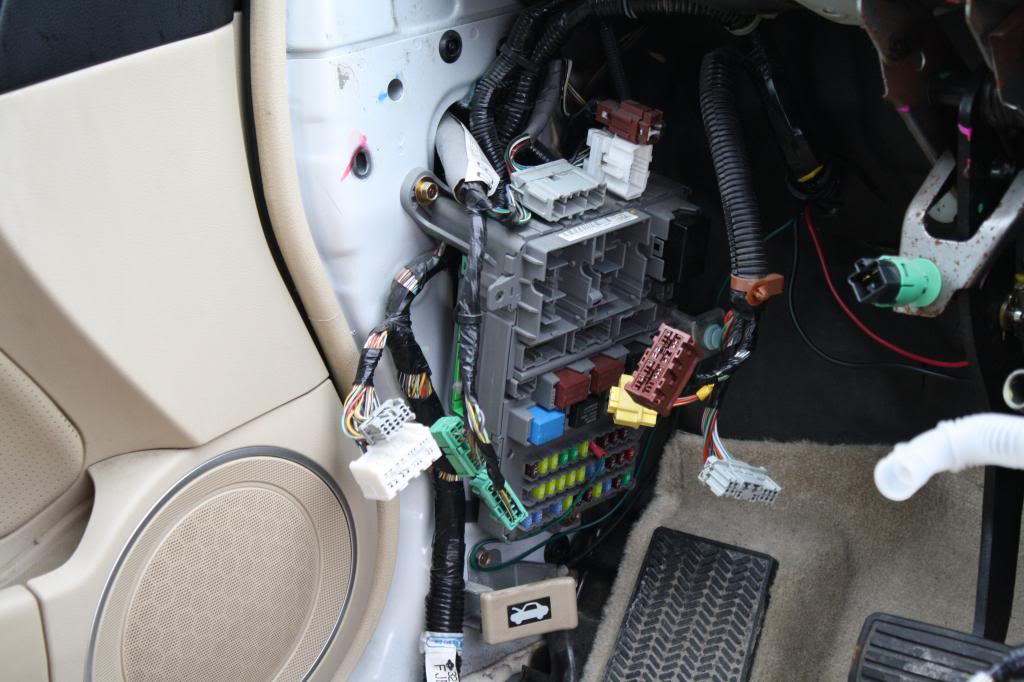
Everything at fuse box , everything below radio at floor , pull carpet way down on passenger side of center and get all of those
Everything
* You CAN remove the passenger AirBag - BEFORE - removing the dash , and I would advise removing it Before.
That is where the First Cracks start on an Uncracked Dash.
The Big Steel Bar has the airbags bottom resting directly on it , it also has a bracket bolted from Bar to bottom of Airbag , as you grapple with this whole monstrosity , any forces applied could put additional pressure against the bottom of the airbag assy and ... accidentally / suicidally ..,.. cause it to crack the dash.
The top of the Airbag Assy is bolted directly to the underside of the dash.
When you see this setup firsthand , you immediately understand why it is ground zero for dash-kill.
Also Stage 2 of this precaution , after dash is out of car , resting upside down with the pretty side facing down on a cushioned mat on a work table , all the weight of the monstrosity is now applying onto the airbag area and entire skin while you are dismantling the wiring harnesses and Steel Bar. ..... on both sides top and bottom , of your new prize.
That might seem overkill , but I would advise all the overkill you can dream of while you are involved in this.
Mine is mine , yours is yours , do as you wish .
The far pass side of Steel Bar has 2 larger nuts (14 or 17mm) securing its clamp to the body. Remove them.
All the bolts securing the middle bracketry (under radio area at floorboard) - Remove.
The 3 bolts hidden in behind the rubber plugs , in driver door jamb pillar - Remove.
About 6 nuts/bolts holding the Steel Bar to Airbag Bracket in place - Remove.
3 nuts securing Airbag to top underside of dash - Remove.
Now you can get "some" free movement with the dash , but very very little.
But its enough to leverage the Steel Bar away from bottom of Airbag Assy , and remove the Airbag.
* I may have overlooked it , or maybe it was too far out of sight , but I don't remember coming across a connector to disconnect the steering column harness as a whole from the rest of the harness.
So anyway , All the connectors going up about the column (maybe 8 or more) have to be unplugged so all that wiring can come out with the rest of the harness and monstrosity. So you need to have full access top and bottom of column , and the plastic shroud below steering wheel has to be removed to get most of them.
Before you remove the column in your personal car , make note of alignment on steering shaft , even use paint dobs and scratch awl marks at the joint if you can.
The column has a slip joint inside the car near firewall where it slides apart from the shaft that goes through the firewall into the steering rack.
Very convenient.
I wanted the steering column OUT anyhow , and it turns out , the steering column nuts/bolts are the last thing holding the dash firmly in place.
There is also a brake pedal mount bracket - iirc - that needs to be removed from column.
You go through all the hoopla up to that point and feel like you are getting almost nothing gained.
But that is the last step , and it is ready to lift right out of there .... come to Poppa !
* DO have someone help you make the final lift up and out of the car.
The monstrosity is not lightweight and doesn't have suitcase handles
Handle With Care and Think Ahead
Remember this isnt an A - Z write up
Use this info along with the other info and images already supplied
A good flashlight , and a confident demeanor
You should now be able to set a new worlds record when you pull your prize from a parts car .
All the best to you,
BVZ
The following 3 users liked this post by Baron Von Zeppelin:
03-11-2018, 08:38 PM
#22
-------Tim-------
Awesome added info to original post. How long did it take you to pull from the donor car? $60 damn!
Before you replace, another member here added rubber o-rings/washers to the main bolts where dash attaches to car. I assume in between dash and frame that dash sits on. I have no idea how he did this, but he did say dash was in place, and this was a precautionary measure to help prevent the cracking. Idk if it worked, but like Majofo�s idea of styrofoam, it seems it could help.
Before you replace, another member here added rubber o-rings/washers to the main bolts where dash attaches to car. I assume in between dash and frame that dash sits on. I have no idea how he did this, but he did say dash was in place, and this was a precautionary measure to help prevent the cracking. Idk if it worked, but like Majofo�s idea of styrofoam, it seems it could help.
Last edited by Slpr04UA6; 03-11-2018 at 08:46 PM.
03-11-2018, 11:40 PM
#23
Took about 3.5 hours to remove .... because I was determined to try and pull it without the bar attached , and as bare as possible.
It simply is NOT possible to remove the dash without taking the steel bar and wiring harnesses along with it.
Removed all the wiring harnesses and steel cross-bar after getting it out , to save money.
Maybe another 15-20 minutes
At that point its only 12-15 screws that are 100% non-accessibe while installed , and some more wiring fastners that were non-accessible.
Then the big bar, metal bracketry, and wiring harnesses come off clean.
Could probably pull another in about 2 hours , from a Parts Car .
When I remove mine from my car .... probably spend 4-5 hours using more care and consideration for all things.
I am going to explore some preventive measures like you and Majofo have mentioned.
The donor car was a 2008 , mine is a 2004.
Since there were some changes in various things on the 2007-2008 , I really didn't want to risk paying for the dash complete (150+) and the wiring harness wind up having several different incompatible plug-in connectors , or any monkey business like that.
Another thing that weighed heavy on my mind , was where Hrydgun mentioned to the effect -
- there are 2x-4x-6x bolts hidden behind the wiring harness that hold the dash to the firewall -
Evidently I found them without any trouble , or that was a typo .
But .... it was weighing heavy on me when I had everything out except the steering column .... and the dash would barely budge on either side.
I felt like a 2x-4x-6x headache was about to happen.
Removing one of these from a Parts Car is nowhere near as bad when its over , as it seems like it will be while your doing your homework and taking it all in , beforehand.
It is intimidating , but really , its not that bad at all .
Getting to all of the wiring connectors and un-clicking them is the grunt work overall .
By the time you remove one from a Donor , then remove the one from your Personal Car , you will have a firm handle on this operation when it comes time to reassemble.
03-12-2018, 12:56 AM
#24
Another tidbit to add
Virtually most everything centers around the steel bar.
The metal bracketry and wiring harness will stay attached to the bar in their proper mounted position.
Transferring your pre-existing Bar Etc .... to a new donor dash shell ... is probably only going to take 20-30 minutes total .
So don't sweat that aspect if you buy just a bare dash shell.
Another thing we know for sure , is that all our Cracks beyond the Airbag area , were NOT caused by stress of the Airbag Assy.
Real World Exposure to various Real World Driving Conditions along with the nature of the material actually being OVERLY lenient to allow for the Airbag to blow through it when needed , was a lab rat project gone bad at Acura .... at our suffering and expense. per se'
If you used a preservative/protectant when you felt like doing it - they say you should not have.
If you didn't use any - they say you should have.
Any type of vinyl protectant/preservative you can use has always been better for any dash in any car.
A couple of coats of catalyzed polyurethane clear would suffocate it perhaps , but not a couple coats of non-hardening vinyl preservative.
I'm 54 and have always used some type of protectant/preservative on my cars dashes for the past 38 years.
When a manufacturer screws the pooch , its most always the consumers fault.
They spin propaganda and try to make it all sound over our head.
I will keep this dash SLATHERED in my current protectant of choice on a weekly or bi-weekly basis.
From the feel of the surface, the previous owner kept this dash treated regularly.
You can glide your knuckles right across it.
The 04 that I just bought about 6 weeks ago would skin your knuckles if you tried to glide them across the dash.
I'm a firm believer that something is better than nothing .
Not necessarily a Cure All , but definitely good medication.
My 14cents
04-25-2018, 11:14 PM
#25
I have to put a new engine room harness which is the lights harness. The harness goes all around the engine bay and I to the fuse box then into the firewall. Do I need to remove the dash to access the harness to unplugg it?
04-27-2018, 10:48 AM
#26
Can't say for 100%
But 99% you should Not have to pull the dash to do what you need to.
Everything should have a disconnect point so that no wires have to be cut or any major assemblies removed.
If an additional TL or Accord is available in a nearby junkyard , you could experiment with it first for practice.
Good luck
The following users liked this post:
Ceaze (05-01-2018)
04-27-2018, 11:00 AM
#27
Chapter Leader (Southern Region)
Just remove the carpeting in the footwell and glove box, should be enough access
The following users liked this post:
Ceaze (05-01-2018)

 06-13-2018, 06:08 PM
#29
2nd Gear

Join Date: May 2018
Age: 27
Posts: 2
Likes: 0
Received 0 Likes
on
0 Posts
Location of the 2x-4x-6x bolts
Took about 3.5 hours to remove .... because I was determined to try and pull it without the bar attached , and as bare as possible.
It simply is NOT possible to remove the dash without taking the steel bar and wiring harnesses along with it.
Removed all the wiring harnesses and steel cross-bar after getting it out , to save money.
Maybe another 15-20 minutes
At that point its only 12-15 screws that are 100% non-accessibe while installed , and some more wiring fastners that were non-accessible.
Then the big bar, metal bracketry, and wiring harnesses come off clean.
Could probably pull another in about 2 hours , from a Parts Car .
When I remove mine from my car .... probably spend 4-5 hours using more care and consideration for all things.
I am going to explore some preventive measures like you and Majofo have mentioned.
The donor car was a 2008 , mine is a 2004.
Since there were some changes in various things on the 2007-2008 , I really didn't want to risk paying for the dash complete (150+) and the wiring harness wind up having several different incompatible plug-in connectors , or any monkey business like that.
Another thing that weighed heavy on my mind , was where Hrydgun mentioned to the effect -
- there are 2x-4x-6x bolts hidden behind the wiring harness that hold the dash to the firewall -
Evidently I found them without any trouble , or that was a typo .
But .... it was weighing heavy on me when I had everything out except the steering column .... and the dash would barely budge on either side.
I felt like a 2x-4x-6x headache was about to happen.
Removing one of these from a Parts Car is nowhere near as bad when its over , as it seems like it will be while your doing your homework and taking it all in , beforehand.
It is intimidating , but really , its not that bad at all .
Getting to all of the wiring connectors and un-clicking them is the grunt work overall .
By the time you remove one from a Donor , then remove the one from your Personal Car , you will have a firm handle on this operation when it comes time to reassemble.
It simply is NOT possible to remove the dash without taking the steel bar and wiring harnesses along with it.
Removed all the wiring harnesses and steel cross-bar after getting it out , to save money.
Maybe another 15-20 minutes
At that point its only 12-15 screws that are 100% non-accessibe while installed , and some more wiring fastners that were non-accessible.
Then the big bar, metal bracketry, and wiring harnesses come off clean.
Could probably pull another in about 2 hours , from a Parts Car .
When I remove mine from my car .... probably spend 4-5 hours using more care and consideration for all things.
I am going to explore some preventive measures like you and Majofo have mentioned.
The donor car was a 2008 , mine is a 2004.
Since there were some changes in various things on the 2007-2008 , I really didn't want to risk paying for the dash complete (150+) and the wiring harness wind up having several different incompatible plug-in connectors , or any monkey business like that.
Another thing that weighed heavy on my mind , was where Hrydgun mentioned to the effect -
- there are 2x-4x-6x bolts hidden behind the wiring harness that hold the dash to the firewall -
Evidently I found them without any trouble , or that was a typo .
But .... it was weighing heavy on me when I had everything out except the steering column .... and the dash would barely budge on either side.
I felt like a 2x-4x-6x headache was about to happen.
Removing one of these from a Parts Car is nowhere near as bad when its over , as it seems like it will be while your doing your homework and taking it all in , beforehand.
It is intimidating , but really , its not that bad at all .
Getting to all of the wiring connectors and un-clicking them is the grunt work overall .
By the time you remove one from a Donor , then remove the one from your Personal Car , you will have a firm handle on this operation when it comes time to reassemble.
11-05-2019, 08:42 PM
#31
Intermediate
Join Date: Sep 2017
Age: 65
Posts: 26
Likes: 0
Received 0 Likes
on
0 Posts
I did the dash replacement....
I did the whole � replacement by pulling one from a donor car like others have done in this thread. It�s a challenge just to find a nice clean Dash. But I found one. Had it pulled from the car and hired someone to do the installation. It was absolutely perfect for about a year and then the replacement � cracked as well. I just think it�s unavoidable. The design of the dash from Acura is just inferior. Oh well. Not doing it again.
11-13-2019, 06:31 PM
#32
Yeah, I'm going to see how long this one lasts. Hopefully I can get it to last for several years.
Were there any bolts that were a pain in the ass to take off, either because of the access or the torque required to break them free?
Were there any bolts that were a pain in the ass to take off, either because of the access or the torque required to break them free?
 11-13-2019, 08:24 PM
#34
OK, still didn't answer my question. You had someone replace your dash for you. I'm doing it myself.
Just making sure I ask as many questions as I can so as to avoid problems in the future. Any good engineer does the same thing.
Just making sure I ask as many questions as I can so as to avoid problems in the future. Any good engineer does the same thing.
11-14-2019, 06:54 AM
#36
I do a TON of research before I tackle shit but there's a point where sitting there tickling your pud hoping it gets hard is a waste of time. Just
get in your garage and stick it in.
I had them pay for it and they did the swap but like I mentioned I went there to reroute all my wiring and label things as I didn't realize the lower
part of the structural part of the dash was coming out with it. So I actually got to see what they removed and how, more or less.
Plus, just because I haven't done a particular job doesn't mean logic and previous experience in other areas doesn't apply. You're not technically
doing it yourself if you're asking pioneers to tell you how hard your nuts might be.

 11-14-2019, 09:57 AM
#38
Analysis Paralysis. You must be awesome in bed.
I do a TON of research before I tackle shit but there's a point where sitting there tickling your pud hoping it gets hard is a waste of time. Just
get in your garage and stick it in.
I had them pay for it and they did the swap but like I mentioned I went there to reroute all my wiring and label things as I didn't realize the lower
part of the structural part of the dash was coming out with it. So I actually got to see what they removed and how, more or less.
Plus, just because I haven't done a particular job doesn't mean logic and previous experience in other areas doesn't apply. You're not technically
doing it yourself if you're asking pioneers to tell you how hard your nuts might be.
The following users liked this post:
frankjnjr (11-14-2019)