DIY: S4Play Rear Replica Diffuser Install
 06-18-2016, 11:42 AM
#1
DIY: S4Play Rear Replica Diffuser Install

Found this diffuser on the Lexus form and decided to give it a shot.
DIY - How to install a S4play Diffuser - Club Lexus Forums
I based this DIY off another DIY on the lexus forum but we will have a few changes.
First, the distance between muffler cutouts on the ASPEC Lip is about 35"+. This diffuser is about 32.75", so it fits! It should also fit base models and base aspecs.
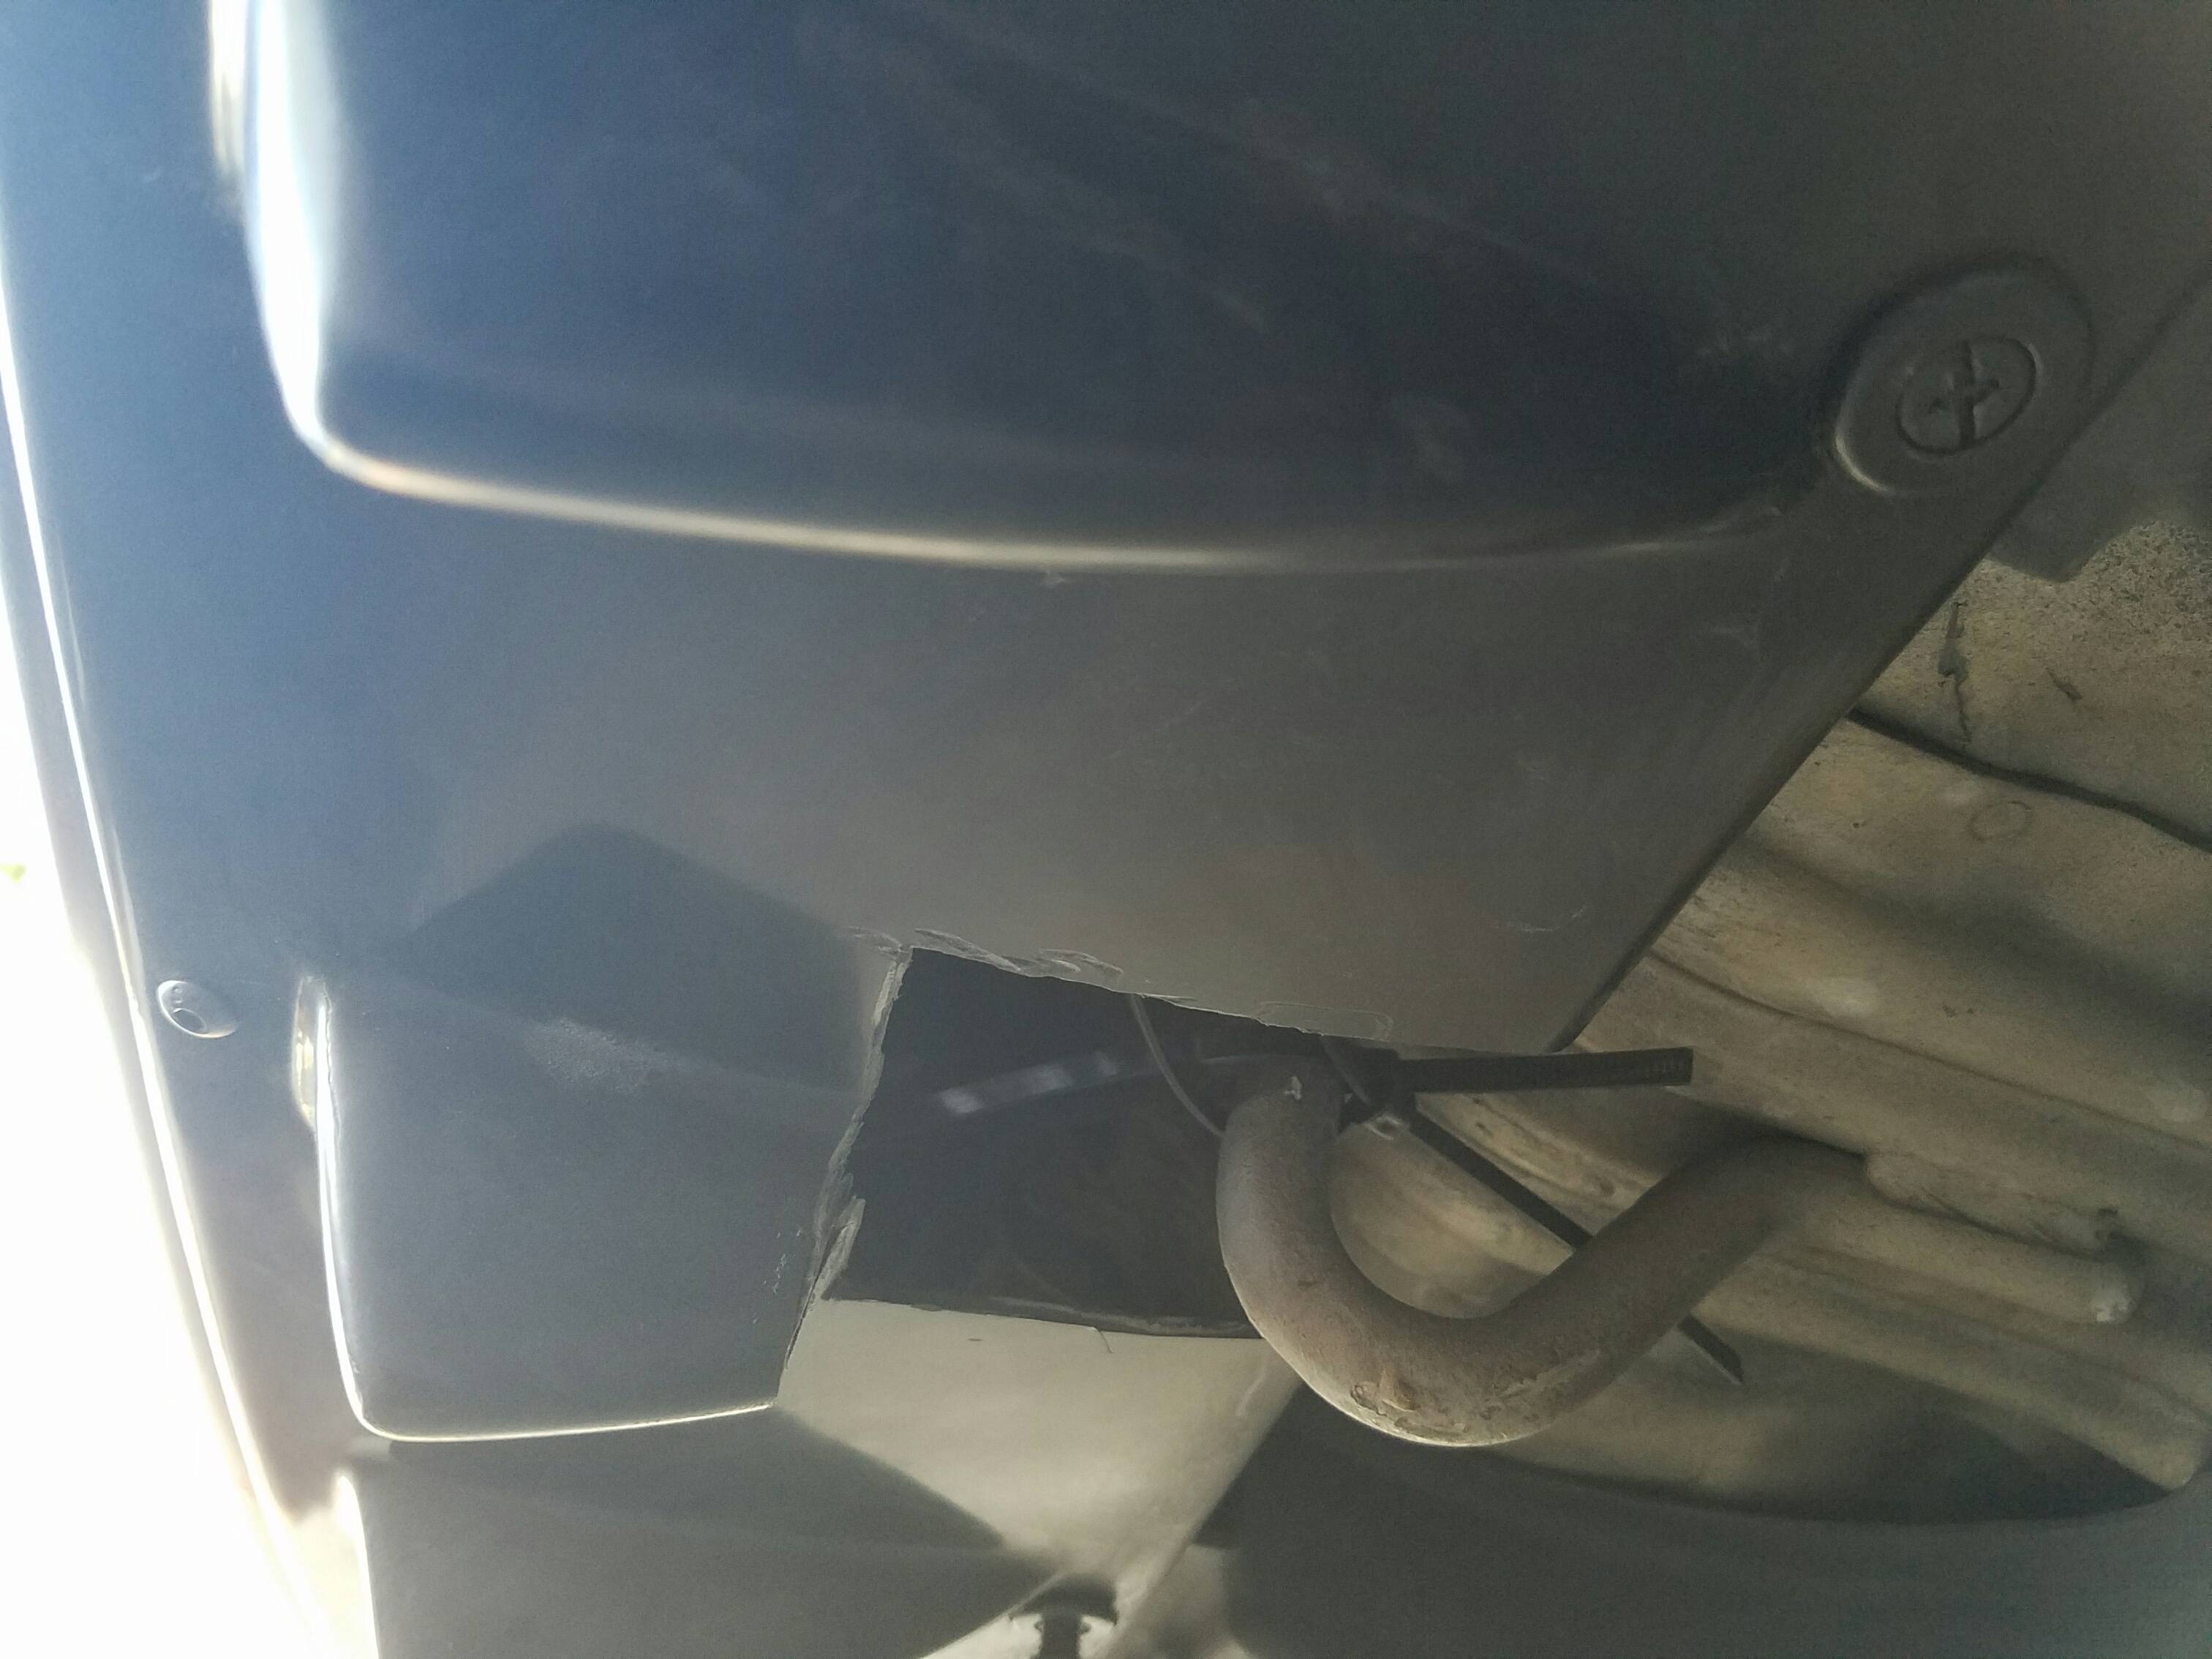
My bumper is completely cut to fit the ASPEC, so I dont have this bumper flap http://i17.photobucket.com/albums/b6...2/IMG_3582.jpg
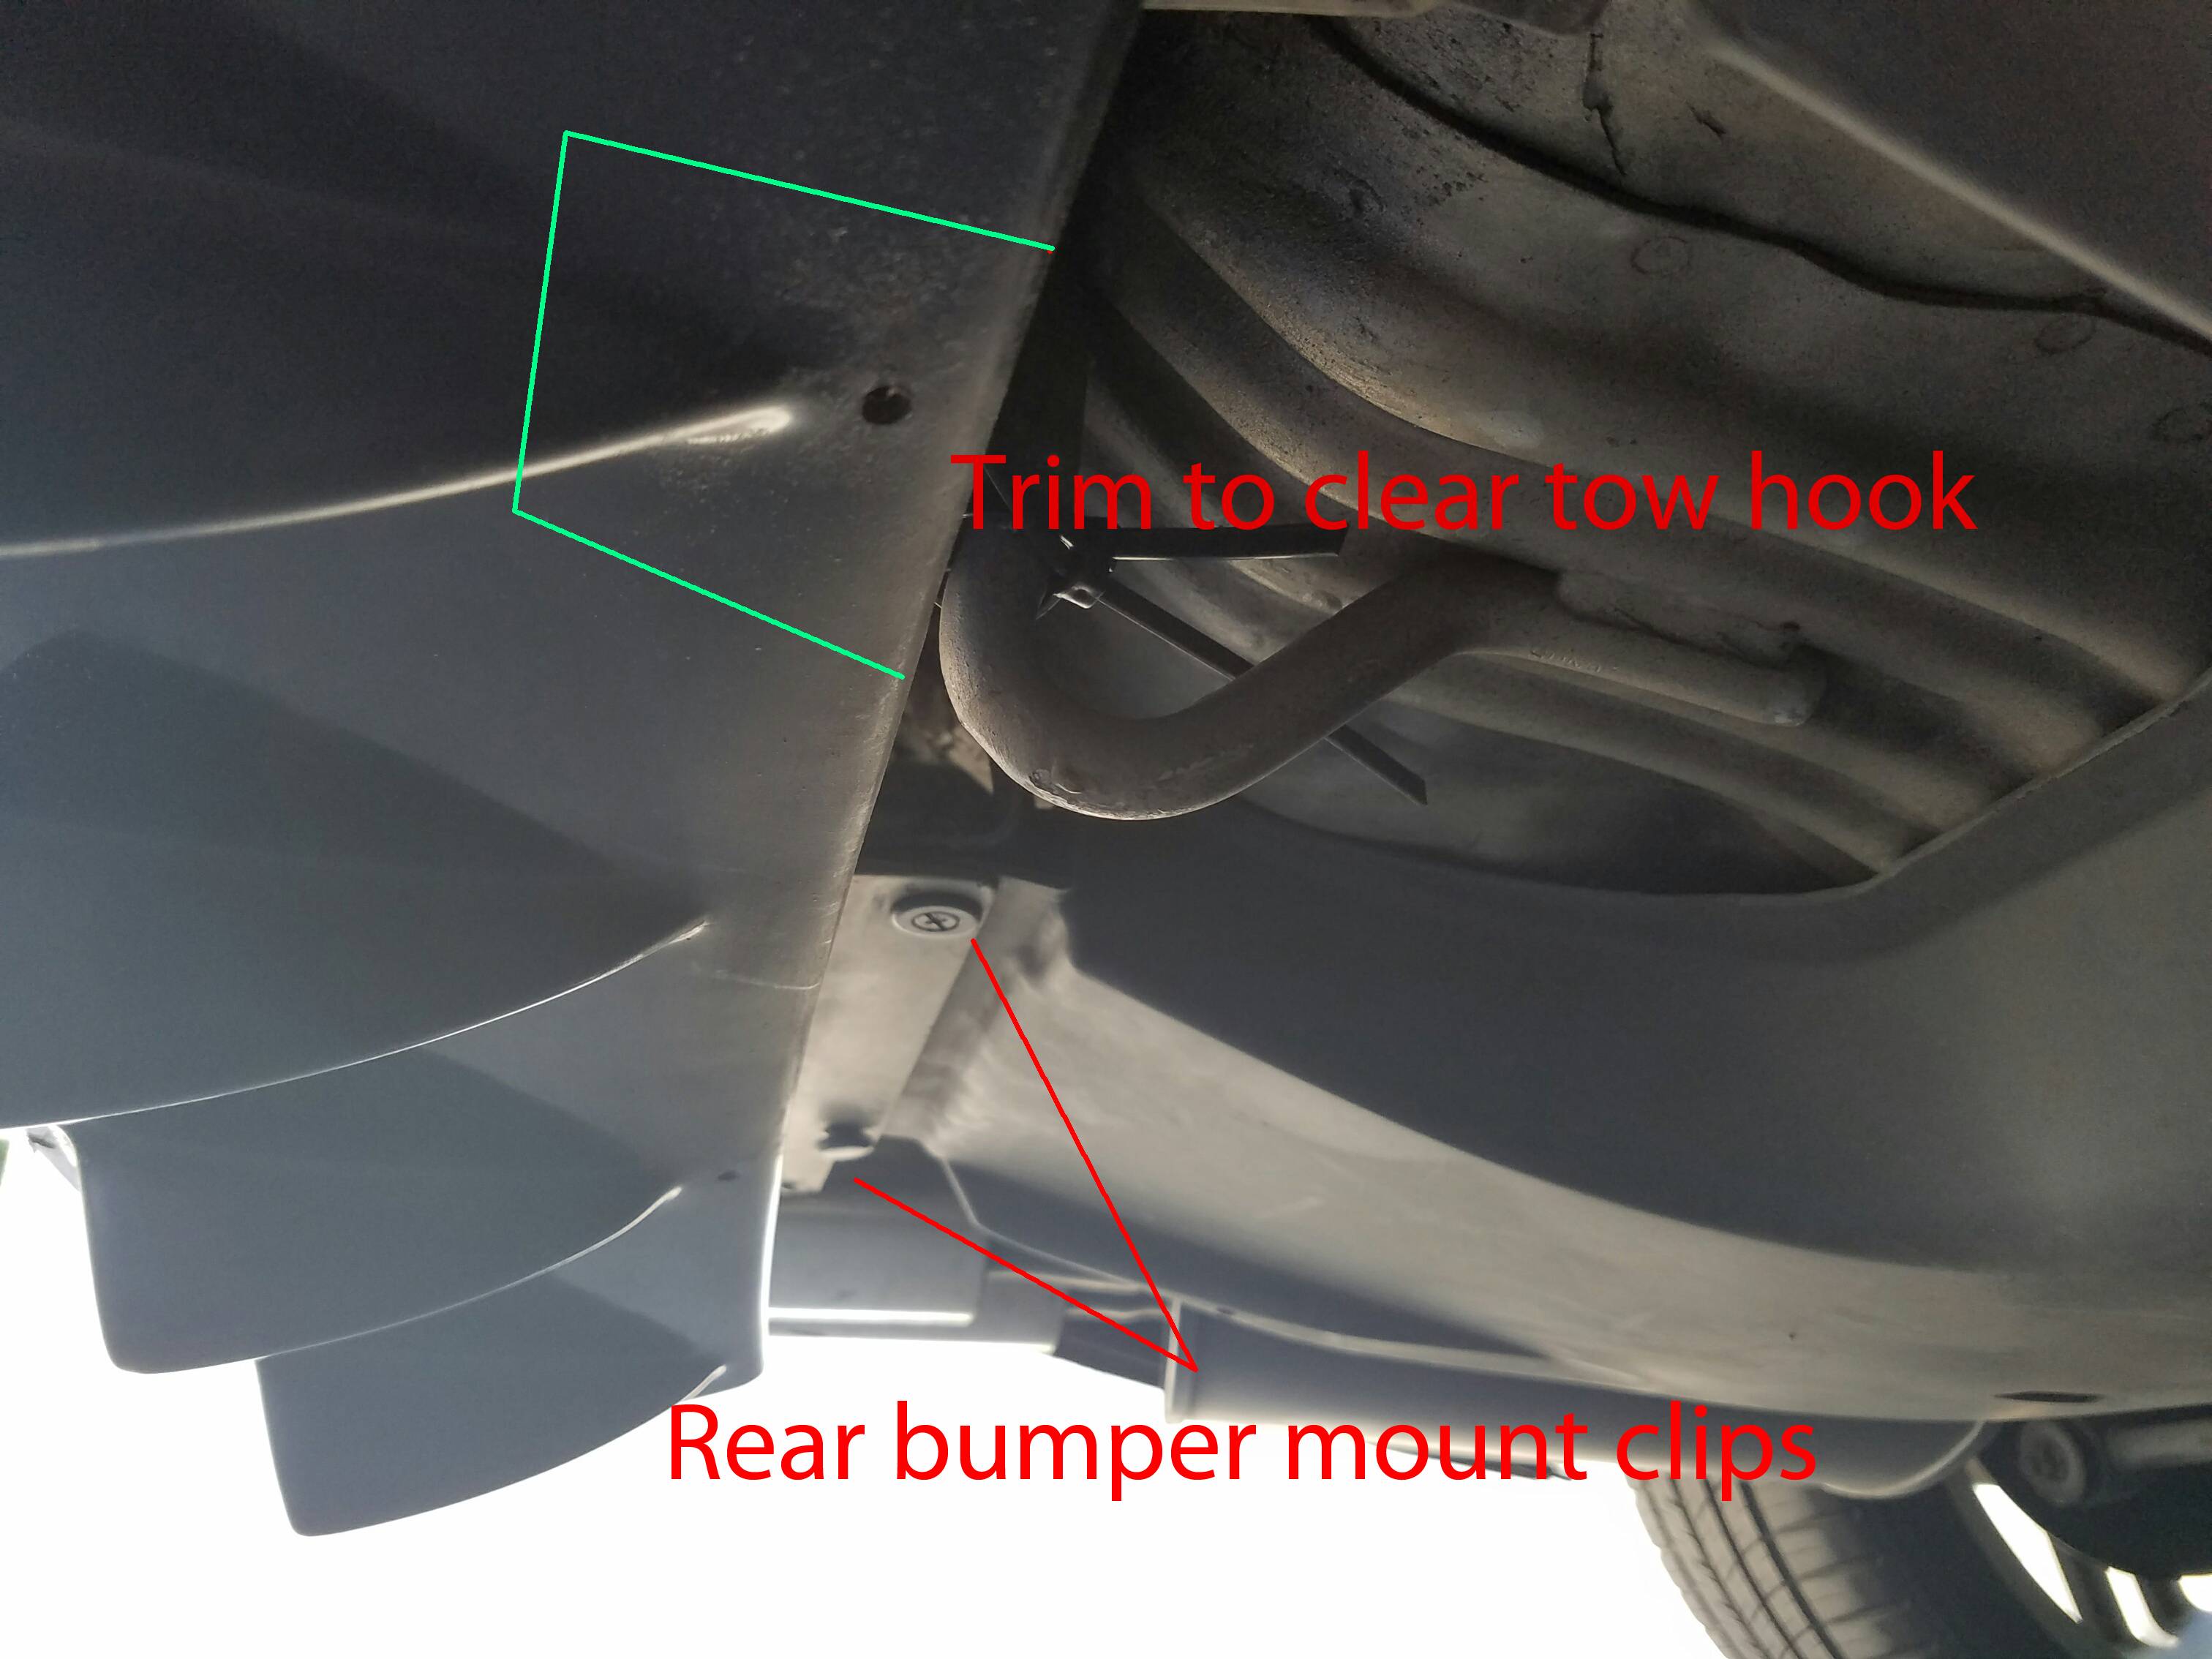
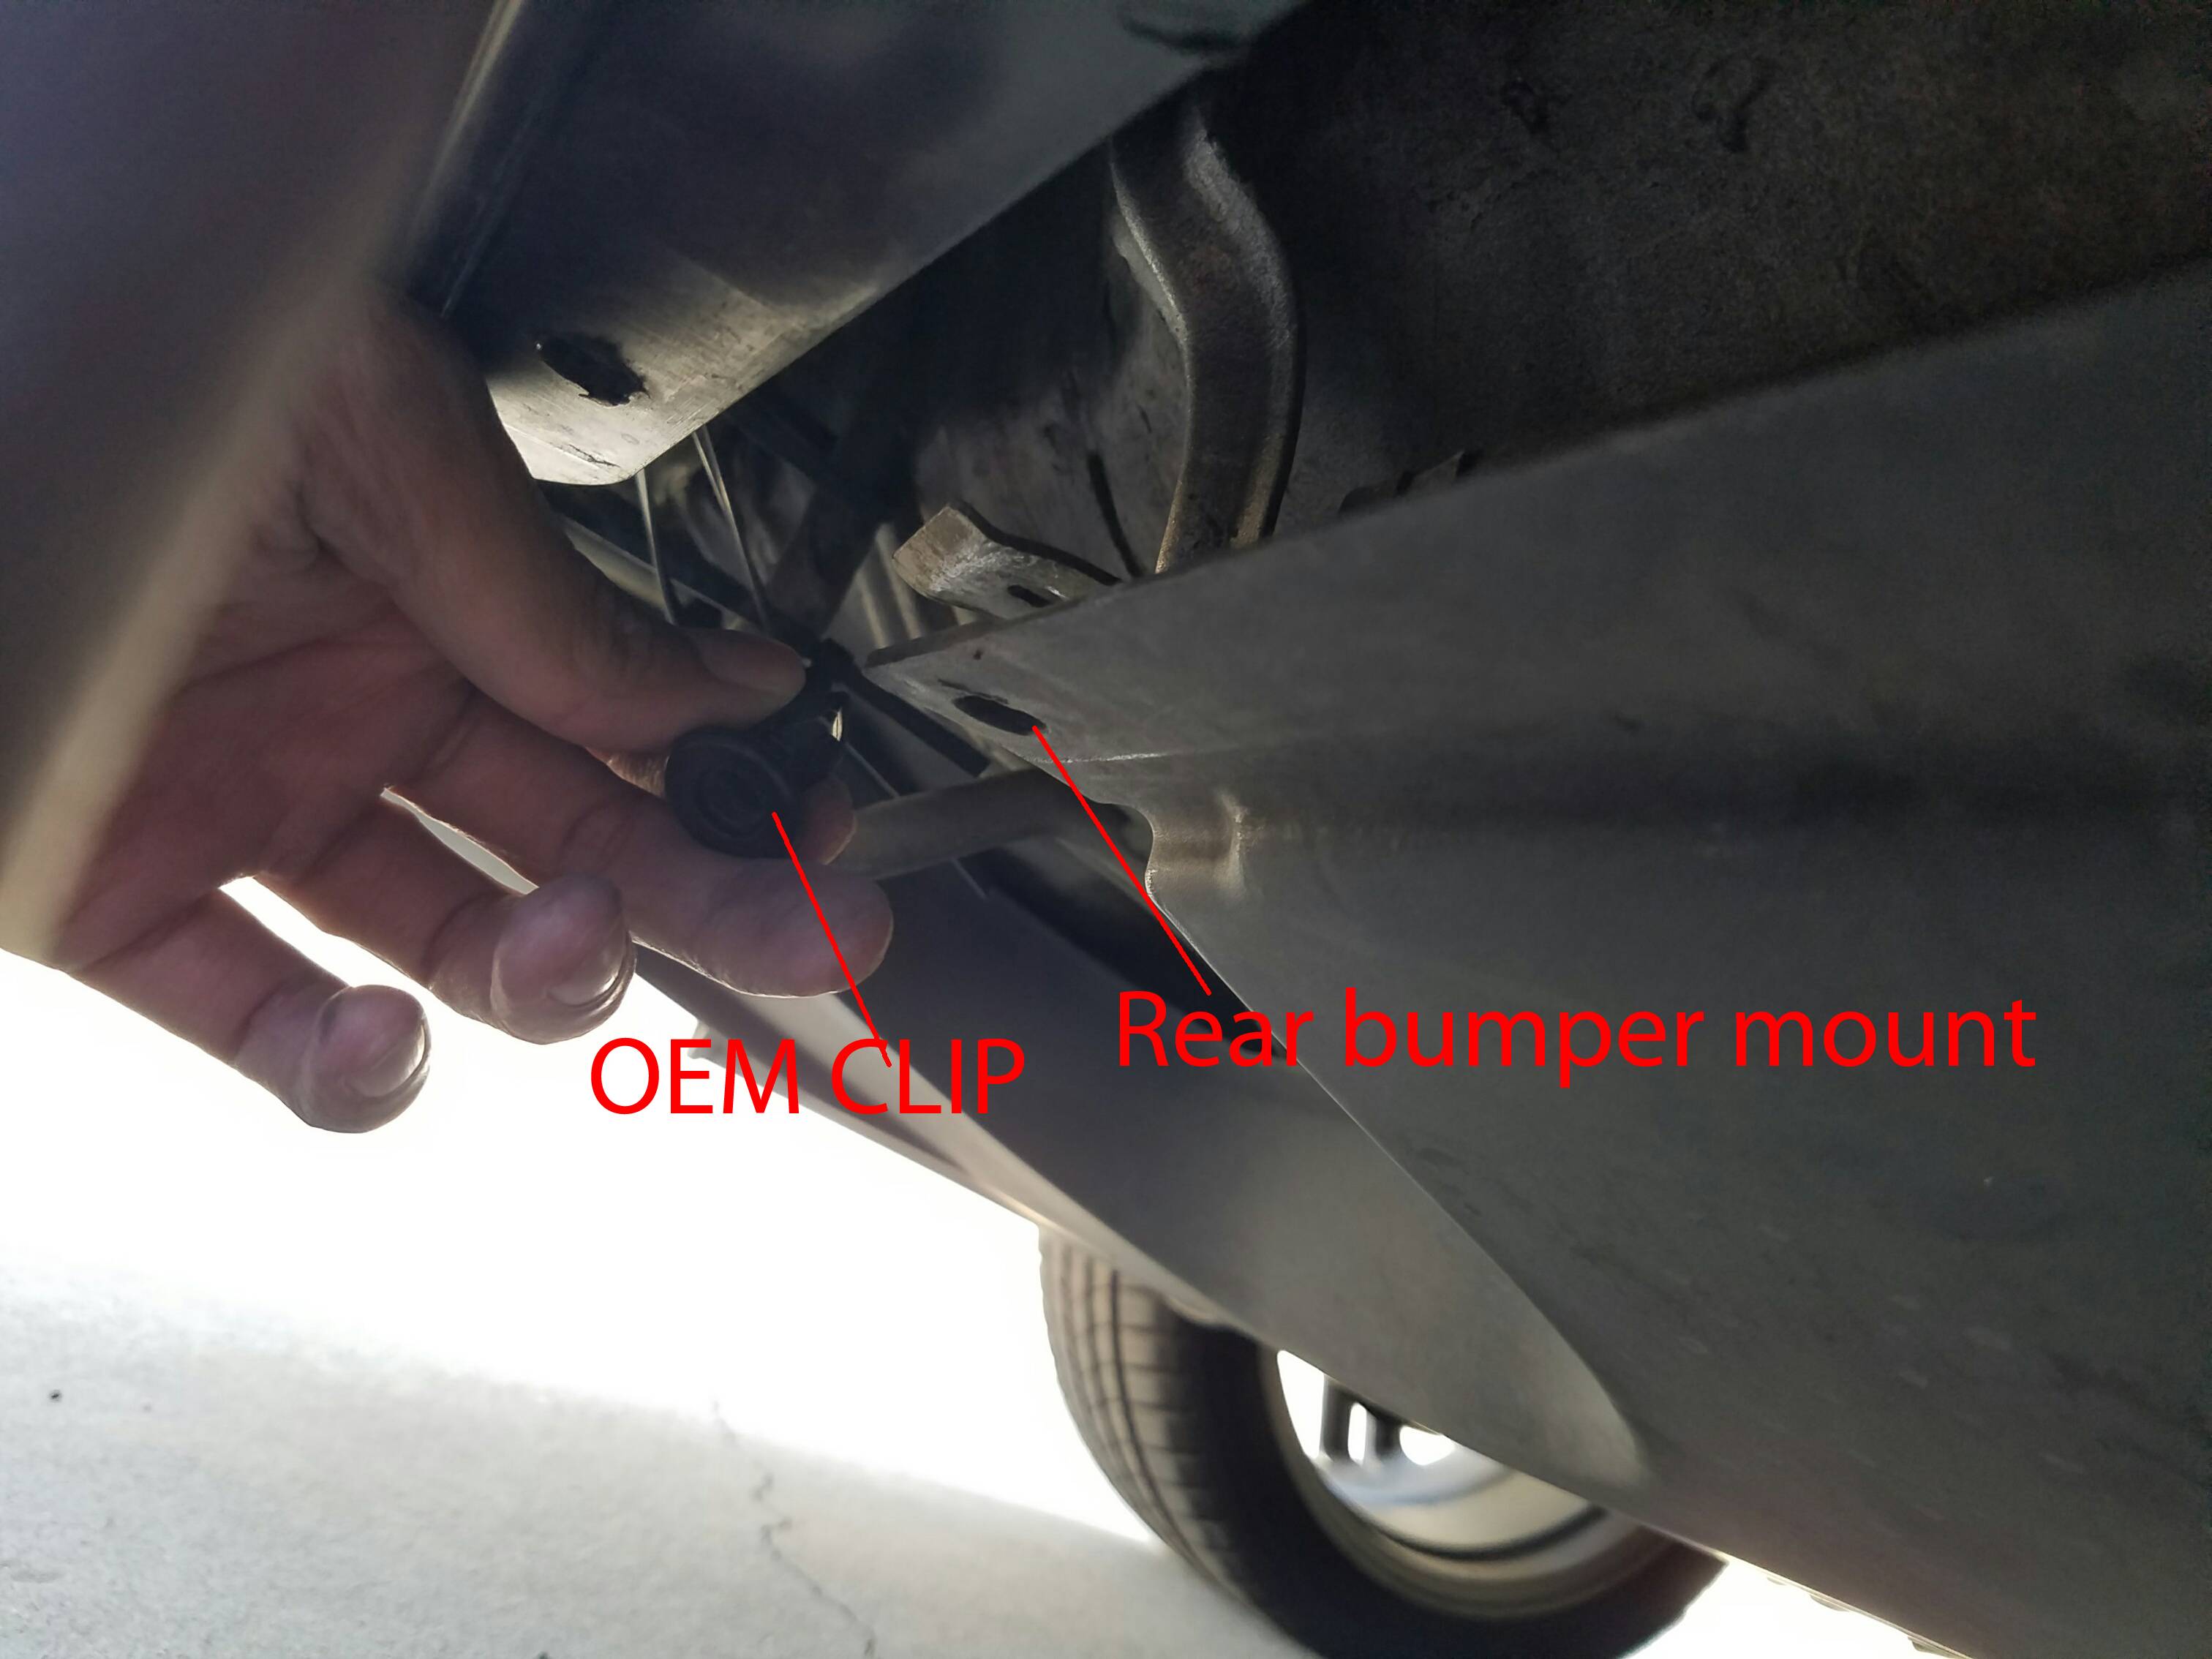
I was able to clip in my diffuser to OEM rear bumper mounting points with clips because I dont have this flap. You may need to use a bolt and washer. HIGHLY recommend taking off your bumper.
Materials Needed:
-Diffuser (For IS250 is350 isf Bolt on Unpainted Rear Bumper Diffuser Chin Lip Add on Kit | eBay) I believe it's just universal, I see it for camry and other cars--dimensions are th same
-Hex Screws + nuts (black)
-Paints tape
-Hack saw to trim
-Dremel/drill to drill holes
Step 1:
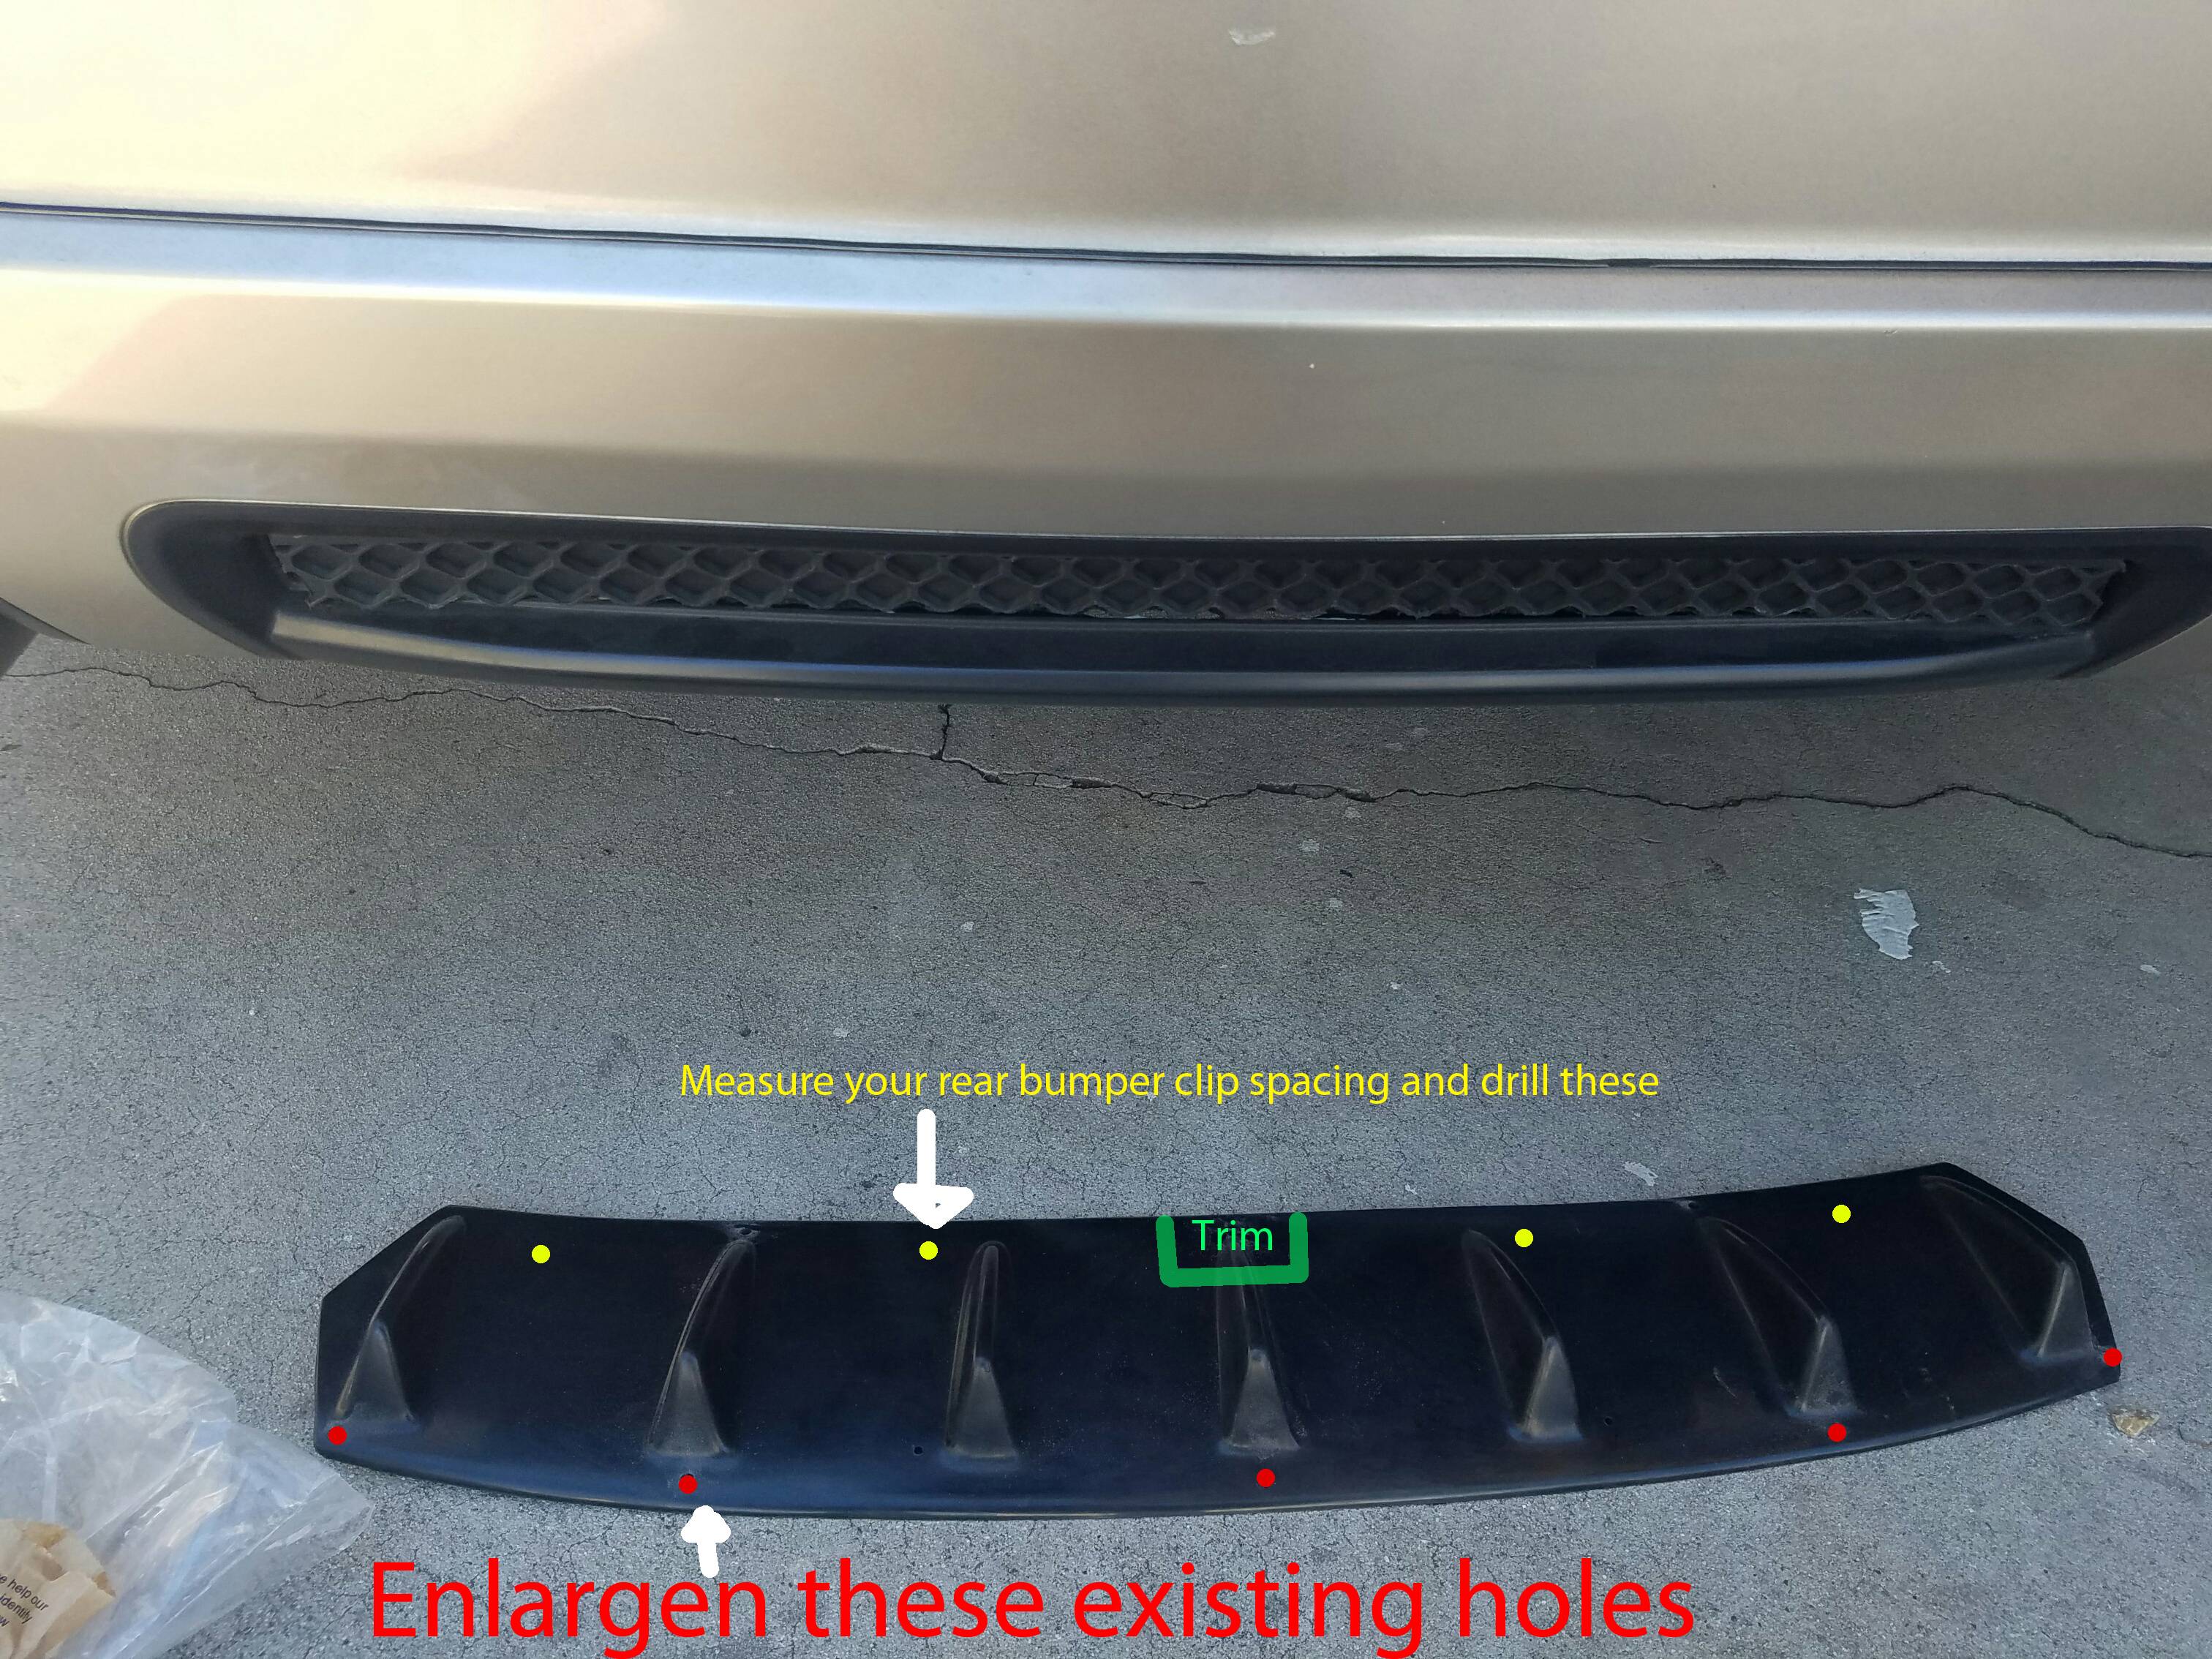
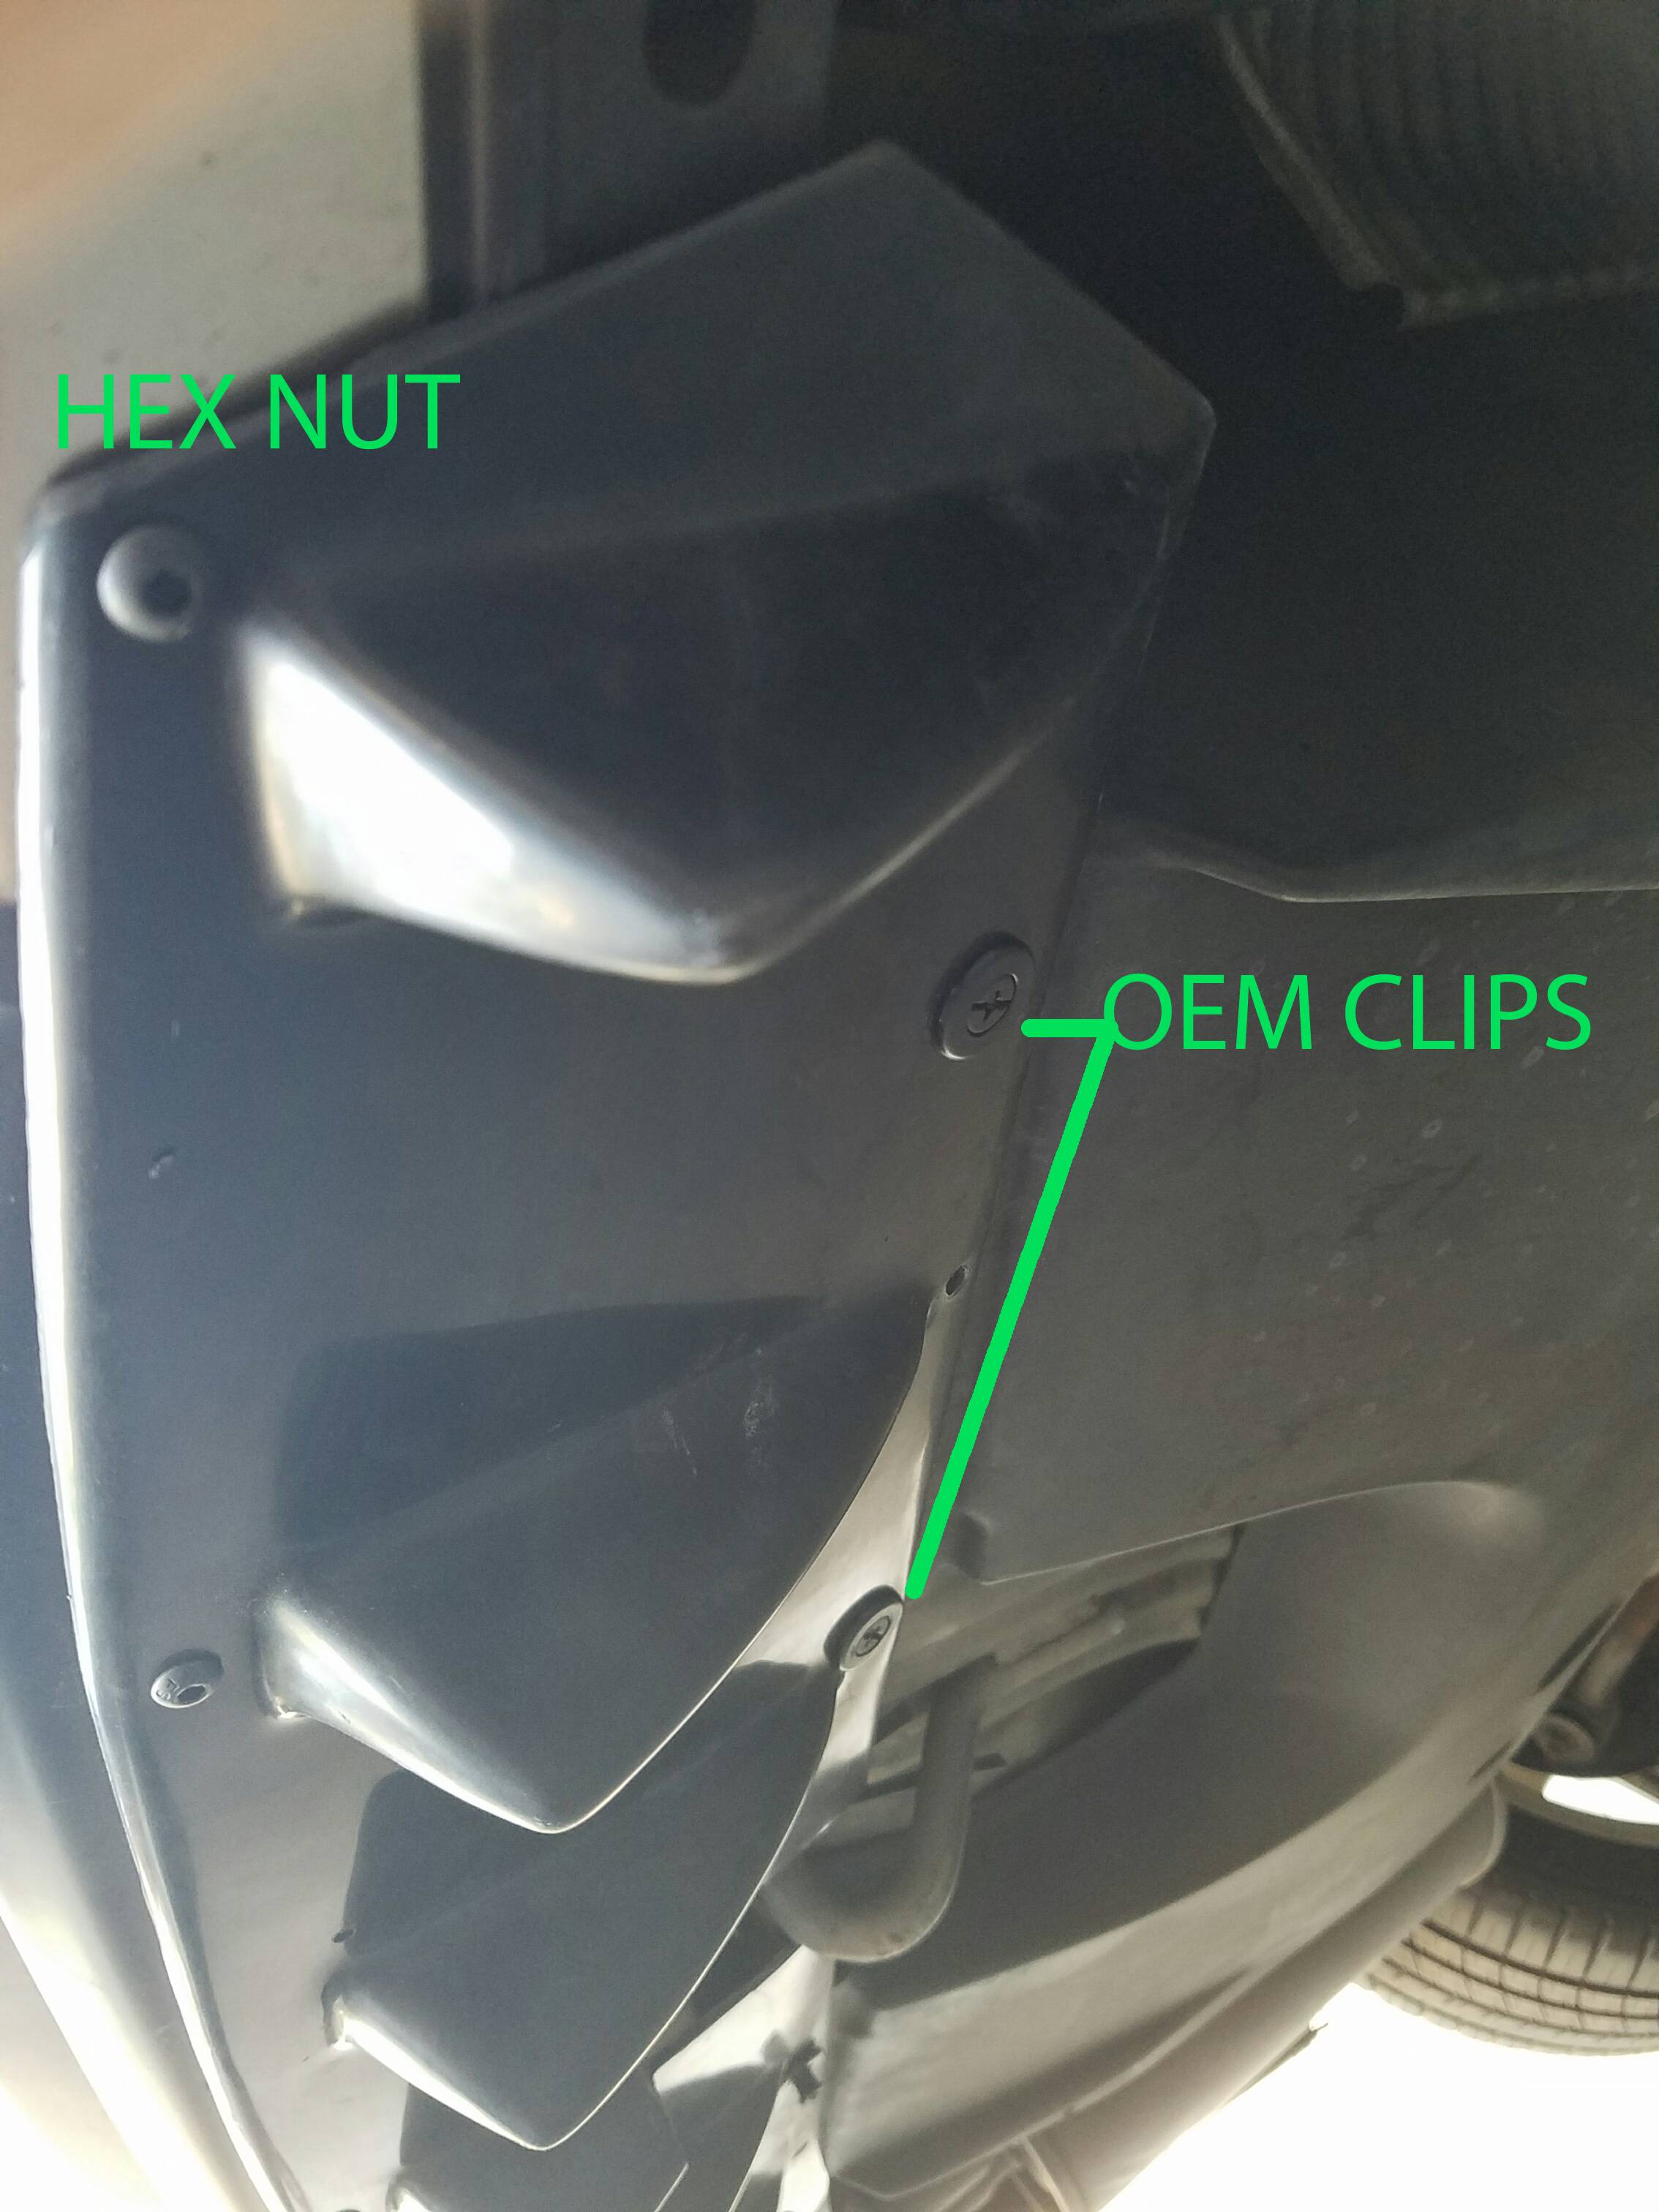
You need to drill out the existing holes to accommodate the larger hex screws. I didnt use the ones that came with it because they looked cheap and were shiny. Plus the black hex looks a lot cleaner and professional.
Here is a diagram of how I mounted mine. (4) OEM clips in the back, and 6 hex screws in front.
Step 2:
Trim the center fin, or 4th one to clear the tow hook.
Step 3:
Take off bumper--I'd recommend this unless you like shoving your hand behind your bumper to tighten nuts
Step 4:
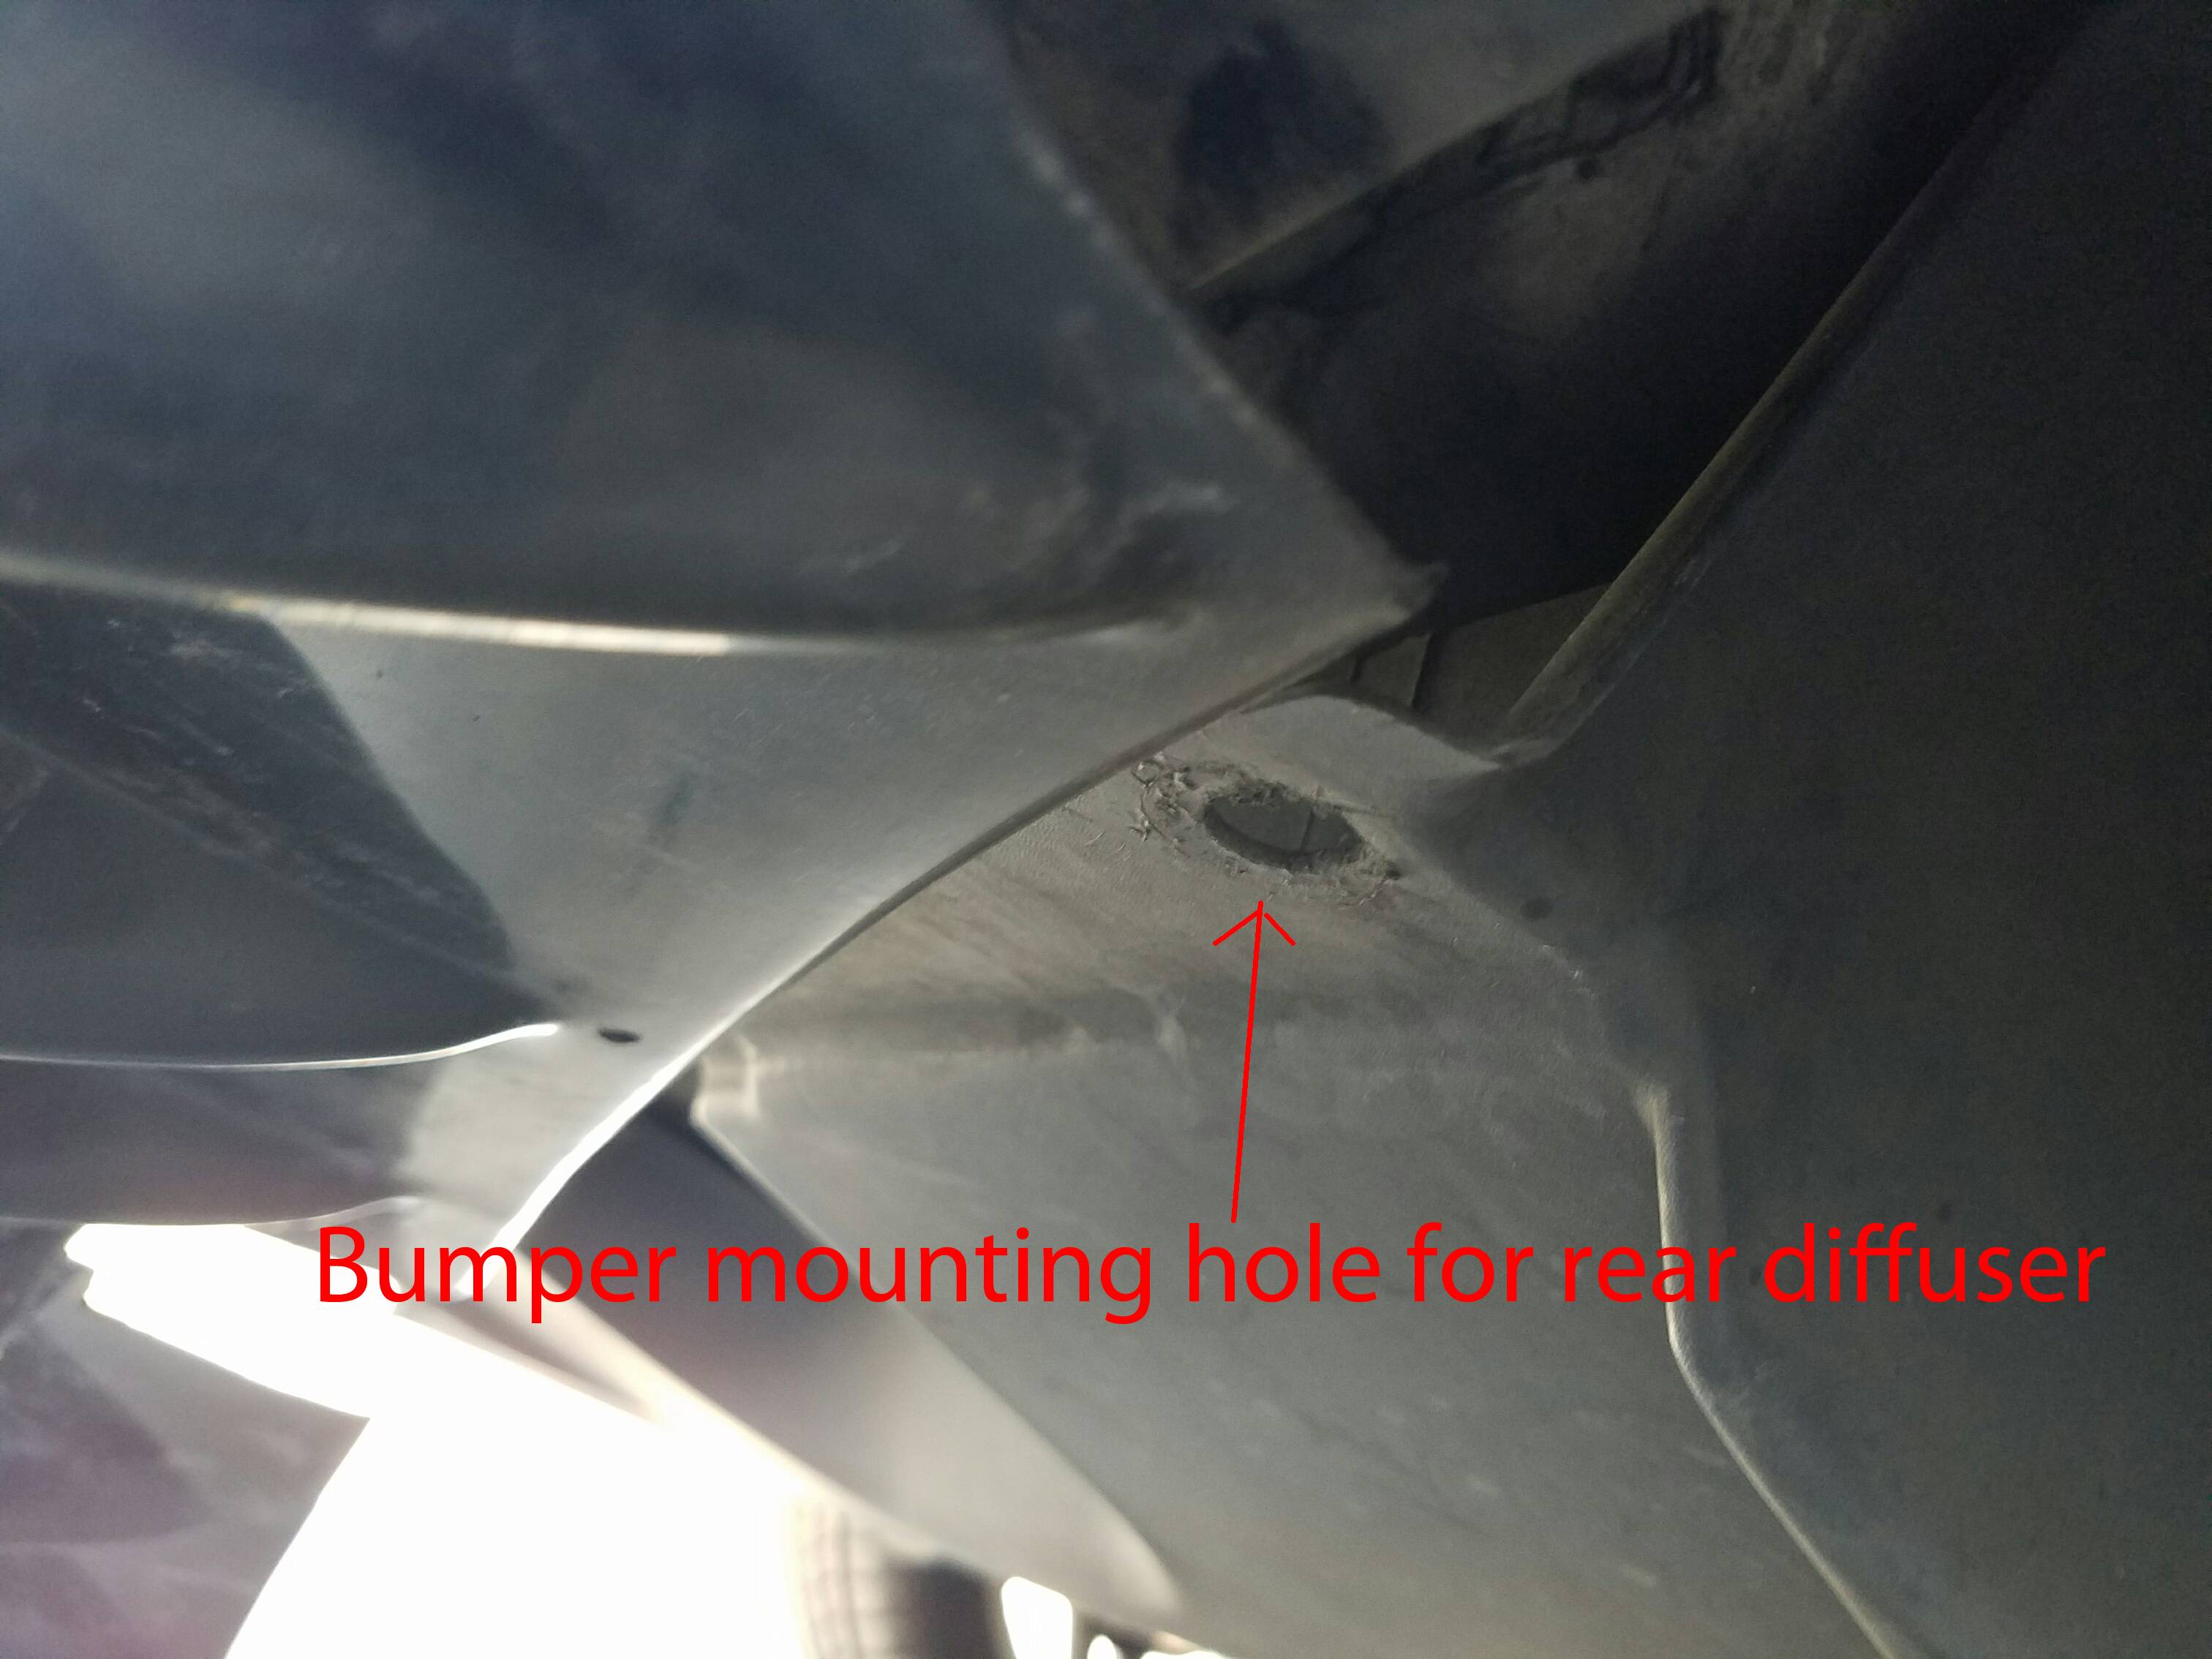
Here is where taking off your bumper would have come in handy. You need to put the diffuser up against the bottom of the bumper. It should fit flush with this gas tank cover/It's the plastic trim that the rear bumper mounts on to. We need to mark on the diffuser where these holes for the OEMS clips are to drill. So you can either try to mark it from the top or take your bumper off and do it easier.
OR You can just drill directly through the diffuser into the bumper and not use the clips--probably easier. I dont have the bumper flap because I cut it out.
Try to center the holes as much as possible. Use the middle fin as a guide.
Step 5:
After you have found how to mount the rear of the diffuser, clip the diffuser in

Step 6
With the rear diffuser clipped in, use painter's tape to get the lip flush against the bumper--it should look close to how you want it because we are going to drill into the bumper in these locations.

Step 7
Drill into the bumper holes for hex screws
Step 8
Tighten all hex bolts, will be very hard if you have your bumper off.
I highly recommend everyone take off their bumper and get 1/2" nut and bolts to mount to rear bumper mount location

Last edited by DesertMistTL; 06-18-2016 at 11:50 AM.

The following 10 users liked this post by DesertMistTL:
ATN (06-18-2016),
EvilVirus (07-15-2016),
ggesq (06-18-2016),
hannamand (07-01-2016),
LoveMyTL-S (06-19-2019),
and 5 others liked this post.


The following 4 users liked this post by DesertMistTL:

Trending Topics
 06-21-2016, 01:01 AM
#11
Senior Moderator
Dangggg looks mean! 
How many Hpees should I expect?
How many Hpees should I expect?

 06-21-2016, 07:29 PM
#13
Team Owner
iTrader: (2)
Join Date: Jan 2008
Location: Kansas City, MO (Overland Park, KS)
Posts: 36,545
Received 6,470 Likes
on
5,162 Posts
That looks outstanding.
06-22-2016, 09:37 AM
#14
Safety Car
iTrader: (5)
Found this diffuser on the Lexus form and decided to give it a shot.
DIY - How to install a S4play Diffuser - Club Lexus Forums
I based this DIY off another DIY on the lexus forum but we will have a few changes.
First, the distance between muffler cutouts on the ASPEC Lip is about 35"+. This diffuser is about 32.75", so it fits! It should also fit base models and base aspecs.
My bumper is completely cut to fit the ASPEC, so I dont have this bumper flap http://i17.photobucket.com/albums/b6...2/IMG_3582.jpg
I was able to clip in my diffuser to OEM rear bumper mounting points with clips because I dont have this flap. You may need to use a bolt and washer. HIGHLY recommend taking off your bumper.
Materials Needed:
-Diffuser (For IS250 is350 isf Bolt on Unpainted Rear Bumper Diffuser Chin Lip Add on Kit | eBay) I believe it's just universal, I see it for camry and other cars--dimensions are th same
-Hex Screws + nuts (black)
-Paints tape
-Hack saw to trim
-Dremel/drill to drill holes
Step 1:
You need to drill out the existing holes to accommodate the larger hex screws. I didnt use the ones that came with it because they looked cheap and were shiny. Plus the black hex looks a lot cleaner and professional.
Here is a diagram of how I mounted mine. (4) OEM clips in the back, and 6 hex screws in front.
Step 2:
Trim the center fin, or 4th one to clear the tow hook.
Step 3:
Take off bumper--I'd recommend this unless you like shoving your hand behind your bumper to tighten nuts
Step 4:
Here is where taking off your bumper would have come in handy. You need to put the diffuser up against the bottom of the bumper. It should fit flush with this gas tank cover/It's the plastic trim that the rear bumper mounts on to. We need to mark on the diffuser where these holes for the OEMS clips are to drill. So you can either try to mark it from the top or take your bumper off and do it easier.
OR You can just drill directly through the diffuser into the bumper and not use the clips--probably easier. I dont have the bumper flap because I cut it out.
Try to center the holes as much as possible. Use the middle fin as a guide.
Step 5:
After you have found how to mount the rear of the diffuser, clip the diffuser in
Step 6
With the rear diffuser clipped in, use painter's tape to get the lip flush against the bumper--it should look close to how you want it because we are going to drill into the bumper in these locations.
Step 7
Drill into the bumper holes for hex screws
Step 8
Tighten all hex bolts, will be very hard if you have your bumper off.
I highly recommend everyone take off their bumper and get 1/2" nut and bolts to mount to rear bumper mount location
long story short, is there anything that can't be done with the bumper on and in short summary, what are the hardest parts about installing this with the bumper on?
thanks again for the DIY! i think this adds a nice aggressive looking touch even though it's fake haha
 06-23-2016, 01:28 AM
#17
so i can't tell from your writing for sure, but sounds like you did this without removing the bumper? I'm thinking about doing this, but i'm trying to avoid taking off my bumper because i was a victim of a hit and run and i'm afraid to take my bumper off and not be able to get it back on (i was hit in the rear left corner where the bumper curves around to the side and i had to use silicone sealant to keep the side of the bumper from flaring out where it normal clips in).
long story short, is there anything that can't be done with the bumper on and in short summary, what are the hardest parts about installing this with the bumper on?
thanks again for the DIY! i think this adds a nice aggressive looking touch even though it's fake haha
long story short, is there anything that can't be done with the bumper on and in short summary, what are the hardest parts about installing this with the bumper on?
thanks again for the DIY! i think this adds a nice aggressive looking touch even though it's fake haha
I was able to do it easily because I dont have the bottom part of my bumper--i cut this off when I installed my aspec lip on my 05
bumper off would be good so you can measure the distance between the oem clips so you can mark where to drill on your diffuser.
Last edited by DesertMistTL; 06-23-2016 at 01:30 AM.
06-23-2016, 01:50 AM
#19
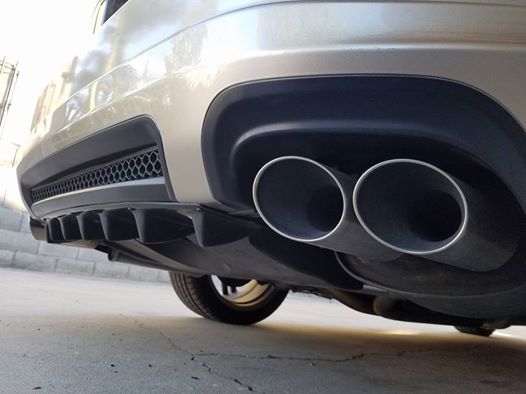
Surprisingly this is as far back the diffuser goes to be able to clip into the back and it fits flush against the lip coincidentally.


The following users liked this post:
EvilVirus (07-15-2016)

The following users liked this post:
Dion Rodella (03-03-2020)
07-13-2016, 07:42 PM
#29
Team Owner
iTrader: (2)
Join Date: Jan 2008
Location: Kansas City, MO (Overland Park, KS)
Posts: 36,545
Received 6,470 Likes
on
5,162 Posts
Looks great.
07-16-2016, 11:34 AM
#31
Cruisin'
Looks amazing I would want to do this to my car.
Where can you find a front diffuser for the TL's?
Where can you find a front diffuser for the TL's?
Last edited by Steven Bell; 07-21-2016 at 08:11 PM. Reason: Merged Posts


The following users liked this post:
llllBULLSEYE (07-22-2016)
 07-25-2016, 08:43 PM
#37
Team Owner
iTrader: (2)
Join Date: Jan 2008
Location: Kansas City, MO (Overland Park, KS)
Posts: 36,545
Received 6,470 Likes
on
5,162 Posts
Congrats!
 07-28-2016, 11:59 AM
#39
Race Director
iTrader: (1)
What the hell? Is that a lip spoiler on a lip spoiler? 
And those rear side lips....double
*You know they're affordable when....*
And those rear side lips....double
*You know they're affordable when....*