When you click on links to various merchants on this site and make a purchase, this can result in this site earning a commission. Affiliate programs and affiliations include, but are not limited to, the eBay Partner Network.
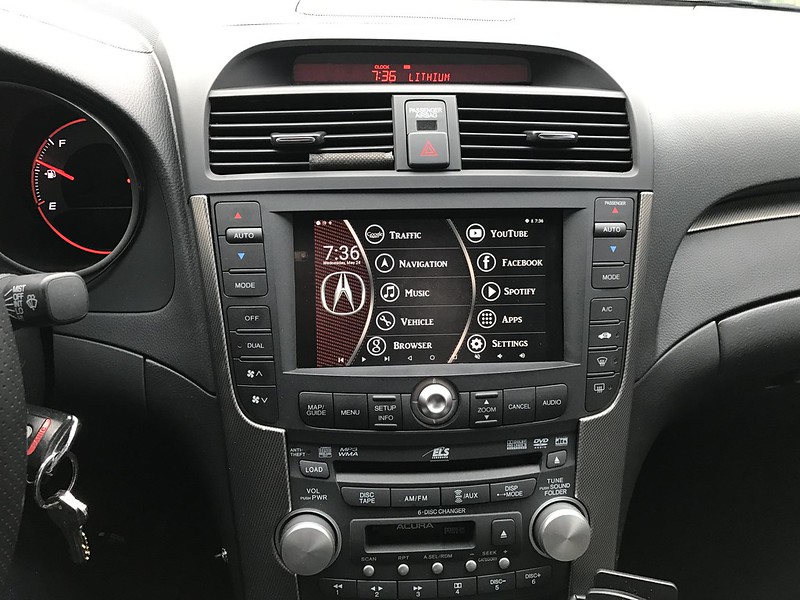
2013 Nexus 7 DIY Install in Type S with Reverse Camera
This is my DIY for a 2013 Nexus 7 tablet install into my navigation based TL (Type S) and having full functionality of an aftermarket reverse camera. I’m trying to be as detailed as possible so people can do their own install, but please ask any questions you have (but read the entire DIY first and try to work through it…that’s how you learn it!)
My navigation broke about 2 years ago and I didn’t want to pay $400 for 10 year old graphics and maps that needed to be updated every year, so finally I decided I wanted to take on this nexus 7 project. I spent LOTS of time researching and putting this project together. 3 months ago I knew NOTHING about Android and what rooting even was. I researched a ton and asked a ton of questions and eventually got to where I am. I am an engineer but not an electrical one, so don’t feel overwhelmed by the project…it’s all doable.
I refused to take on this project until I learned that I could still have a back up camera. I love having a back up camera and would not have done this install if I would lose my camera (oem type s has one). This camera install is slightly different than the others (zsameer, 2012 nexus 7) because I use a relay to load the reverse signal very quick, which in my mind is the way it should be done for the best functionality.
I have the wifi version of the tablet so I tether the tablet to my iphone. I use Bluetooth Auto Connect to automatically connect to my iphone and use bluetooth to pull data.
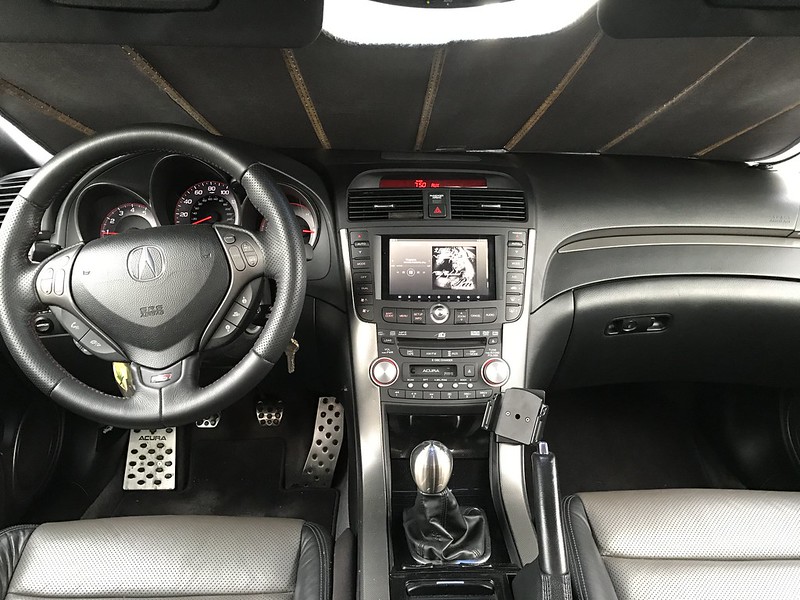
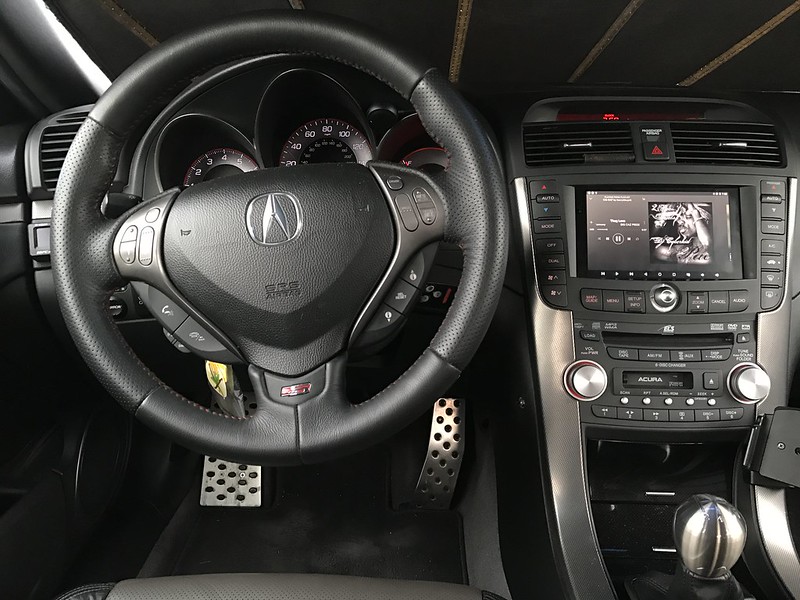
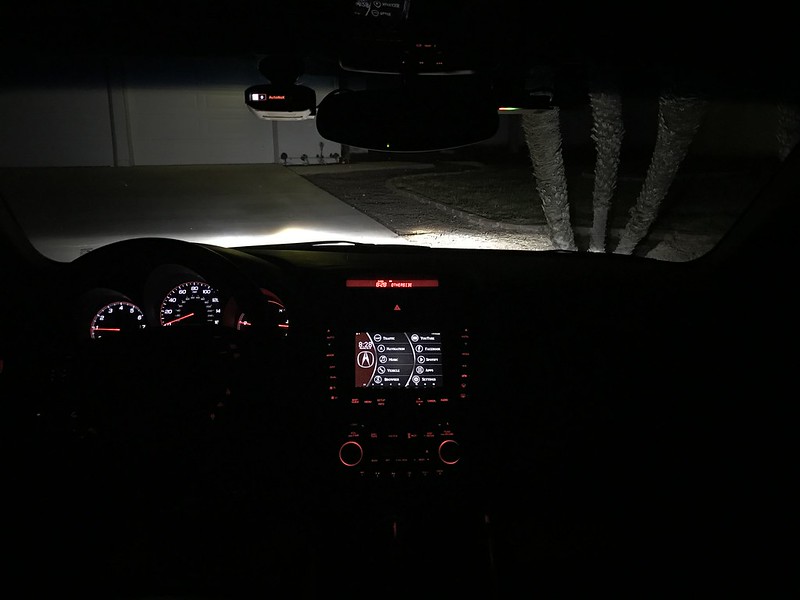
Final install:
Thank You: I’d like to thank the following members whom I either bothered via PM or took hints from their threads
- Timur: the biggest thank you to this person because without him there would be no kernel that allows this tablet to run so smooth for a 2013 nexus 7 in a car. Currently his kernel is free until January 21st so please take advantage of his deal! I paid $20 for it but it’s worth so much more!
Hardware: total cost was more than I thought but to me was worth it = $450 (I tested many, many parts to figure out what worked best and I’m sure amazon HATES me for all the returns I did haha)
- Used 2013 Nexus 7 wifi version (16gb), $75 (check craigslist)
- EasyCap (must buy this one it has the correct chipset! Otherwise you will have issues, takes about 20 days to arrive so plan ahead), $6
Files
- here's my google drive folder with some documents that may be helpful (no timur files)...powerdown/up videos, backgrounds (blank, final, and photoshop files for red type s theme and blue base theme), and navbar files: https://drive.google.com/drive/folde...Wc?usp=sharing
Add Animations (start up and shut down)
- those acura animations are all located in my google drive folder linked above. you just label whichever one you want "powerup" or "powerdown" and put them in the main nexus 7 folder (use amaze app to access folders/files).
- download the navbar zip file to the tablet or a usb drive connected to the tablet
- go into twrp through "recovery"
- load the zip file using twrp
- reboot into android
Autostart Music on Power
i recently switched to using spotify premium for my music needs. a family member added me to the account so i have full premium access. this allows me to download songs to the tablet storage and run spotify offline. the music is really good quality, all the album art is loaded, and i can literally listen to way more music than anything i had downloaded on a usb. also gives me the option to listen to songs online if i want. there is a max of 3333 downloaded songs on a device but i'm limited by my 16gb tablet storage.
in hindsight i wish again i would have got the LTE version that has a 32gb storage but can't do anything about that now. if you're going to do this install, get the LTE tablet with more storage!
the next issue i ran into was setting up my autoplay with spotify when i started my car. whenever i did autoplay for spotify, at the point where "play" was simulated the album/song "now playing" view would disappear and it would take me into "my library" which just shows lists of songs. not very good because then i would have to push "album display" to see the album/song now playing.
so i added some tasker actions to my music autostart profile:
- in tablet "settings", i turned "pointer location" on
- found the xy coordinates of the button to push to show the album/song now playing display
- turned off "pointer location"
- opened tasker and opened my music autoplay settings
- added "wait" for 1 second (this is needed otherwise tasker doesn't give spotify enough time to show the "my library" screen)
- added "run shell" and typed in "tap input 60 945" and enabled "root"
- closed tasker, gave tasker SU access, then turned off SU global notifications for tasker
everything works perfect!! car turns on, 10 sec later spotify launches, the song starts, spotify automatically switches to my library, then 1 second later it switches to the now playing view.
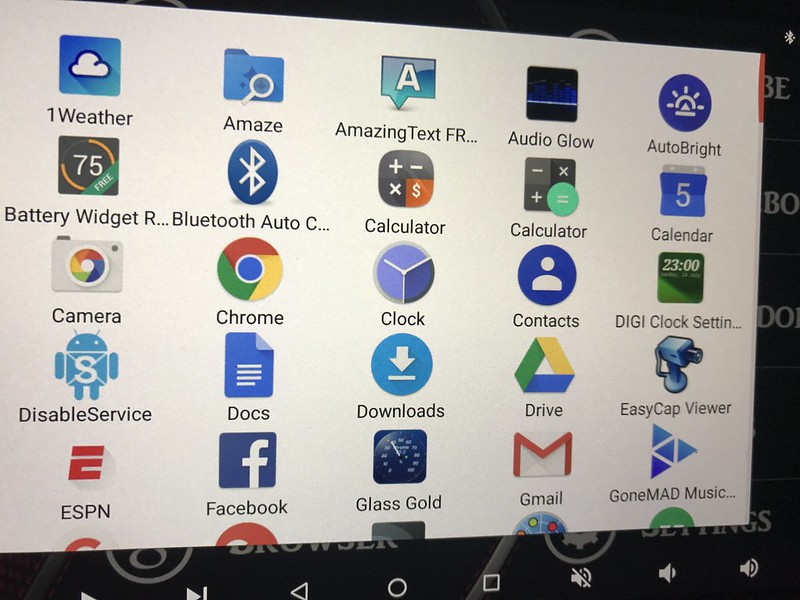
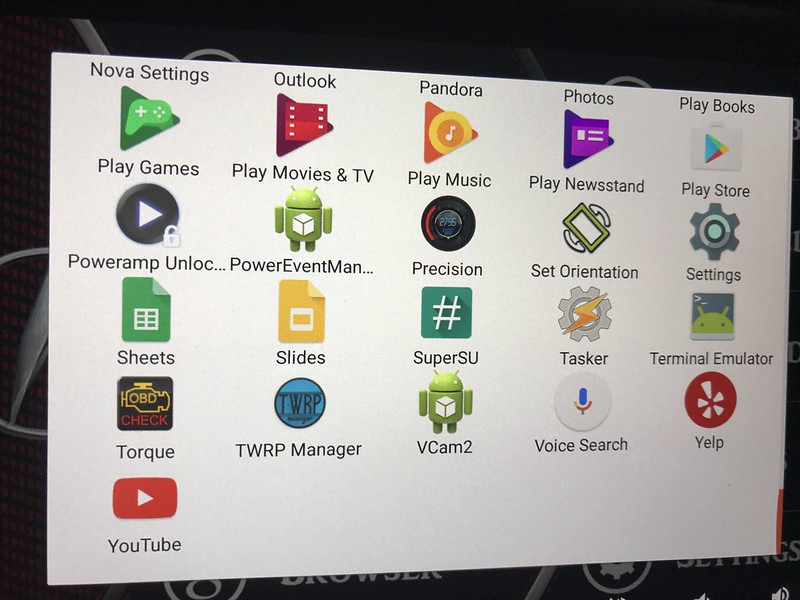
Apps
- Amaze: file manager (delete files, etc)
- AmazingText FREE: used to make invisible, click-able text on the screen
- Audio Glow: cool little app to give visualization for music
- AutoBright (paid): allows screen to dim based on suset/sunrise instead of using the tablet’s dimming function which changes a lot based on the light in your car/windshield
- Battery Widget Reborn: shows battery stats
- Bluetooth Auto Connect: used to connect the tablet automatically to my phone via tether (without this I would have to manually connect it). May not be necessary if you have an android phone (I have an iphone 7)
- DIGI Clock Settings: time on main screen
- Disable Service: disable android system updates
- EasyCap Viewer (paid): used for backup camera signal
- ESPN
- Facebook
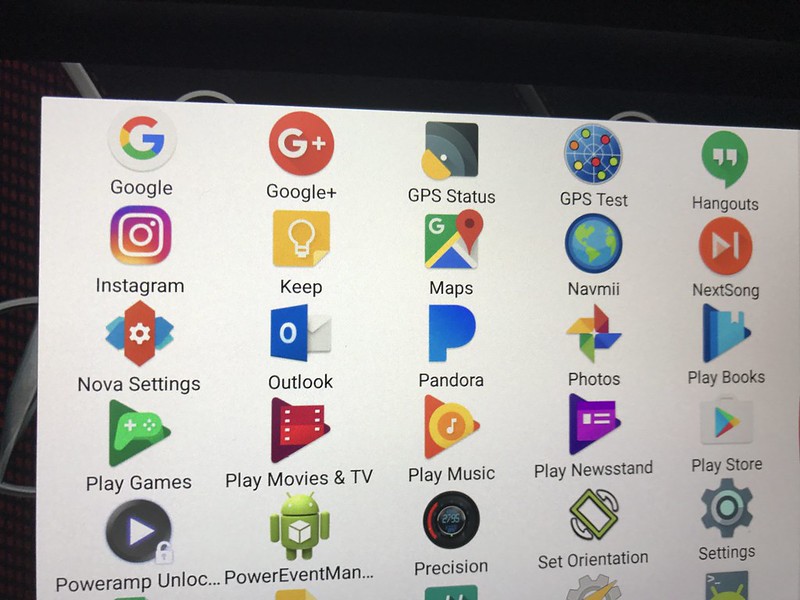
- Glass Gold (Torque Pro): template for torque pro
- GoneMAD Music Player: plays music
- GPS Status: can fix gps signal if you’re having issues
- GPS Test: shows gps signal strength and when you have a fix
- Instagram
- Maps (google): data and non-data based navigation app (I use this when I want traffic updates)
- Navmii: non data based navigation app
- NextSong (paid): on any screen briefly shows what song just started playing
- Nova Settings: launcher
- Outlook: email
- Pandora
- Precision (torque pro): template for torque pro
- Set Orientation: sets landscape orientation for portrait based apps (Instagram for example)
- Spotify: plays music and can be set up to run offline (download up to 3000 songs to tablet) or online. I use this as my main audio now since I got added to a family premium account
- Tasker (paid): set up tasks (I use this to start my music automatically on start up)
- Terminal Emulator: run commands
- Torque PRO (paid): vehicle data and fault codes
- TWRP Manager: background recovery manager, can backup entire system this way
- 2012: can reroute buttons to oem bezel buttons, can relocate micro usb power port from tablet to backside of tablet, timur’s kernel/rom is old and hard to find
- 2013: can’t reroute buttons nor relocate micros usb port but timur’s kernel is up-to-date and available. Much faster processing speed compared to 2012. To me it’s an obvious choice!!
Benefits
- Completely freshens up the entire interior and makes the car seem new again…yet looks OEM!
- Much cheaper for what you get compared to an off the shelf double din system
- Keeps all oem radio functionality and sources
- Can add backup camera
- Better sound if you use the DAC I linked (bass boost, very dynamic and adds depth to sound)
Downsides
- Lots of test fitting with the oem bezel to make sure it can all go back together
- Lots of parts to gather
- There will always be bugs, a tablet doesn’t work exactly like you want 100% of the time, you just have to work through it and keep trying
Set Up Timur's Kernel on Nexus 7 (instructions for 2013 only)
- all the directions will be provided once you sign up/buy the kernel but it took me a long time to get this figured out since I'm new to Android and hopefully this summary will make it easier for some people
Download correct version and files from Timur once you buy/register for his kernel (flo for wifi only model, deb for LTE model…this is important!)
Enable "USB debugging" feature on your Android device
- Go to “about tablet” and click the build number 5 times in a row: “now you are a developer”
- open Settings and then open "Developer options".
- Shift right click to open command window in directory above
- in command window type "adb shell date" and "adb devices" to ensure the tablet is connected once you “approve computer” on tablet
Unlock bootloader
- in command window type "adb reboot bootloader"
- Fastboot oem unlock (should say unlock on bootloader)
While in bootloader (don’t use OTG cable, use regular micro usb cable to computer):
- Unzip factory image for your device (flo for wifi, deb for LTE version)
- Copy files into adb command path folder from above (specifically flash-all.bat)
- In command window type “flash-all.bat” (this wipes tablet and installs fresh factory image)
- When everything is done and the tablet resets, hold power and vol down until the bootloader menu comes up
- Put twrp files in same adb command path folder and in command window type "fastboot flash recovery twrp-3.0.2-0-flo.img" (if you have the LTE model, use the img-file of the deb variant)
- May need to unplug and plug usb cord back in
- Use volume buttons to select recovery and push power button to select TWRP recovery
- With TWRP recovery running, the tablet should now appear as a USB drive on your PC. Copy over zip files: timur-services, timur-usbhost and SuperSU
- Install the three zip files (timur-services + timur-usbhost before SuperSU!), using the TWRP on-screen UI. USBhost zip file must be the same for your wifi or LTE device (flo or deb)
- Reboot into android start up
Let PEM load for a few minutes, then click PEM and grant super user access
- Turn off toast notifications for PEM and Vcam in SU app: open SuperSU app, select PowerEventMgr and change the Notifications setting from "Global defaults" to "Disabled". Hit the check mark to store the modified settings.
Go back into bootloader using PEM
- In command line type “fastboot oem off-mode-charge 0”
- Very important!! If the battery ever fully dies, this allows the tablet to turn on once it starts charging. If you don’t have this, then you have to physically push the power button to turn it back on after draining completely
Disable android updates
- Download disable service from the play store.
- Disable SystemUpdateService under Google Play services
Disable Android lock screen in Settings
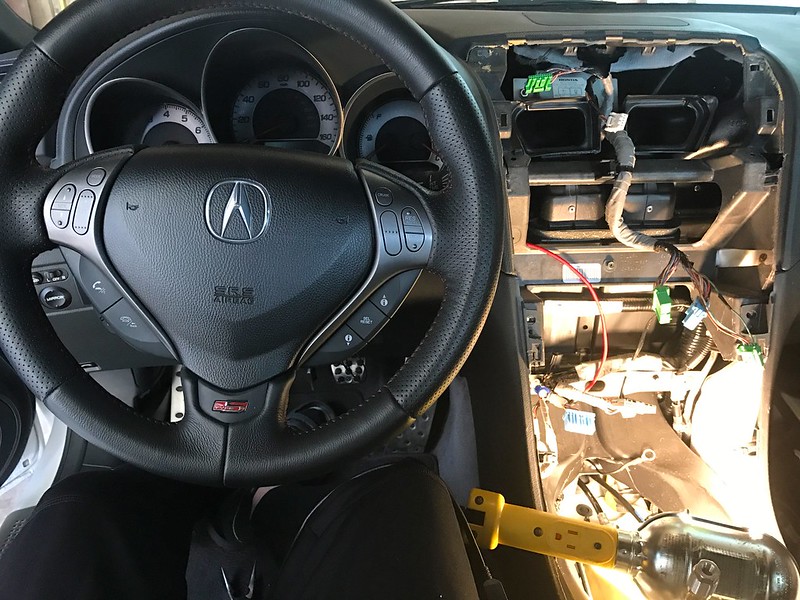
Fit Tablet into OEM Navigation Bezel
- lots of trial and error on this one...you just have to keep dremeling and test fitting until you get it right! this one will take the longest and most work but it's important to get it done outside the car so you don't have problems installing it into the car!
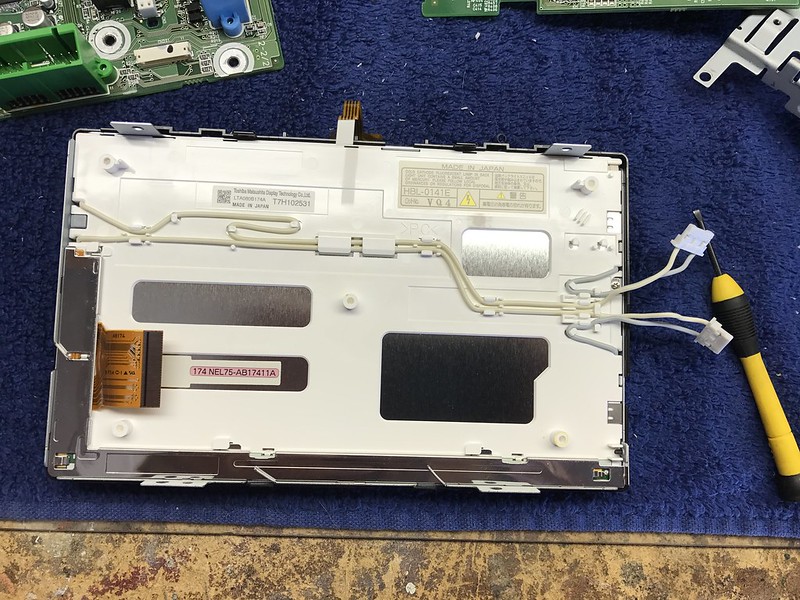
- you can either remove just the screen and leave all circuit boards there (this is what i did) or you can flip the screen around so it faces the inside of the dash
- TIP: if you remove the screen, make sure you keep all other electronics and circuit boards inside the car since the AC functions and other items are linked to all those boards (stupidly)
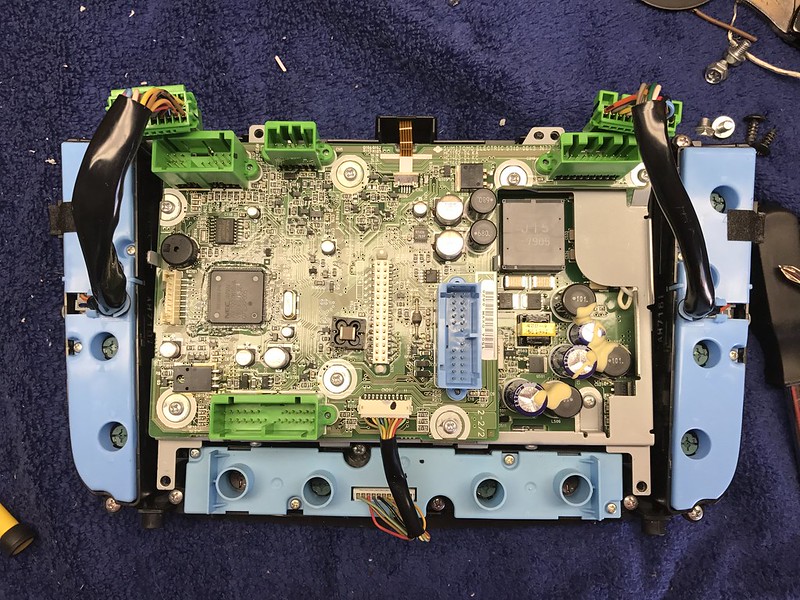
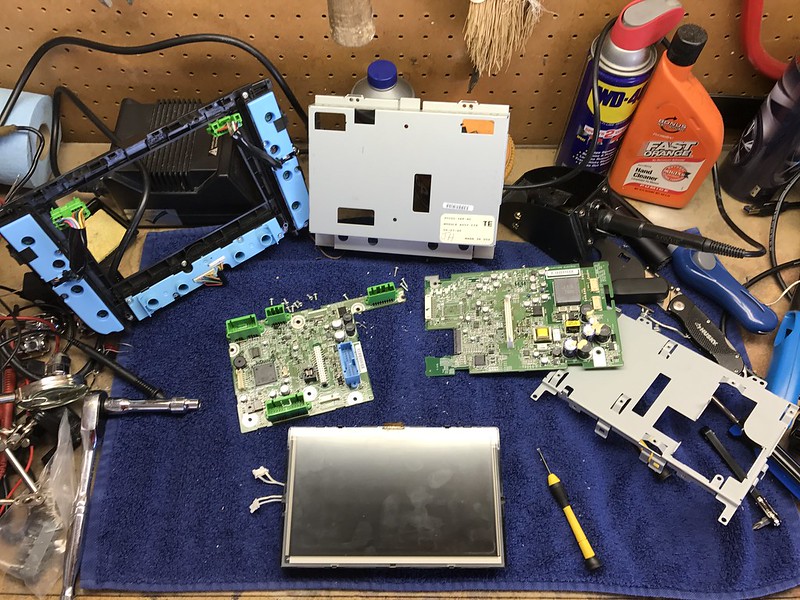
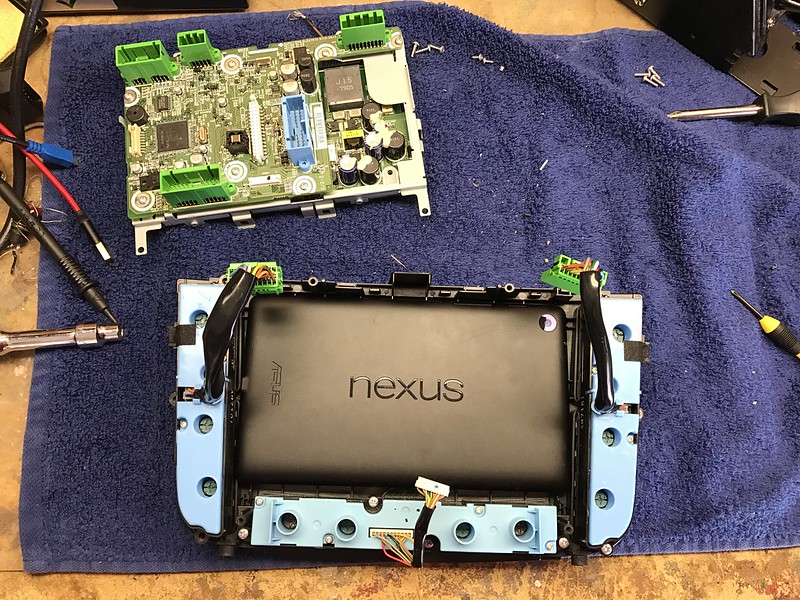
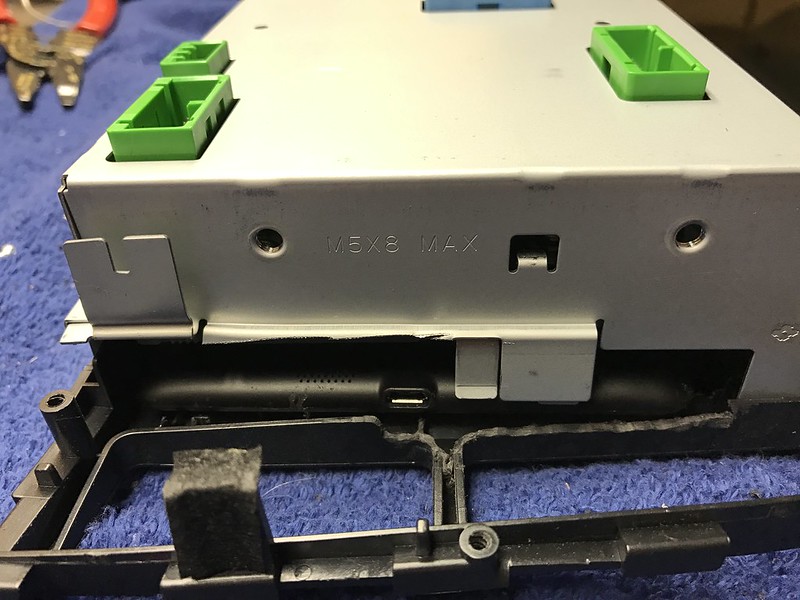
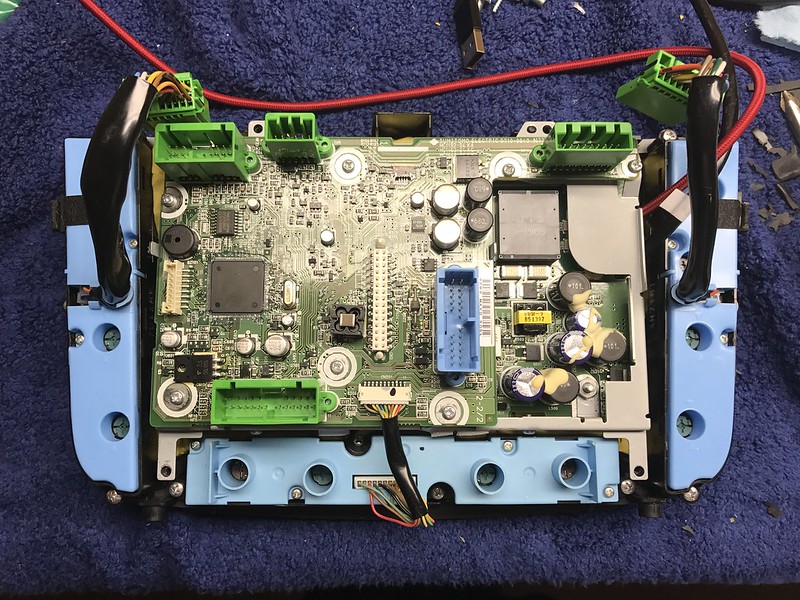
backside of the navigation unit when you remove the sheet metal cover
navigation unit taken apart
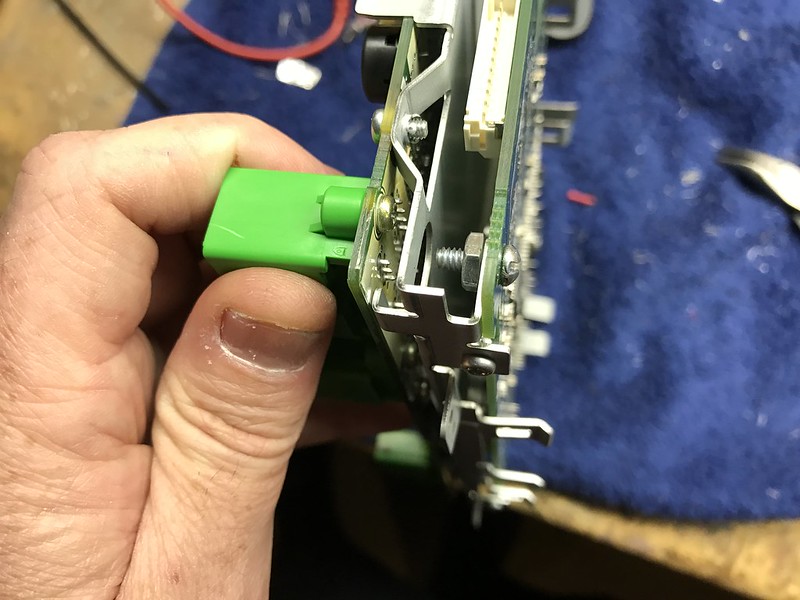
the connections you need to disconnect to remove the OEM screen
the tablet is almost a perfect fit!
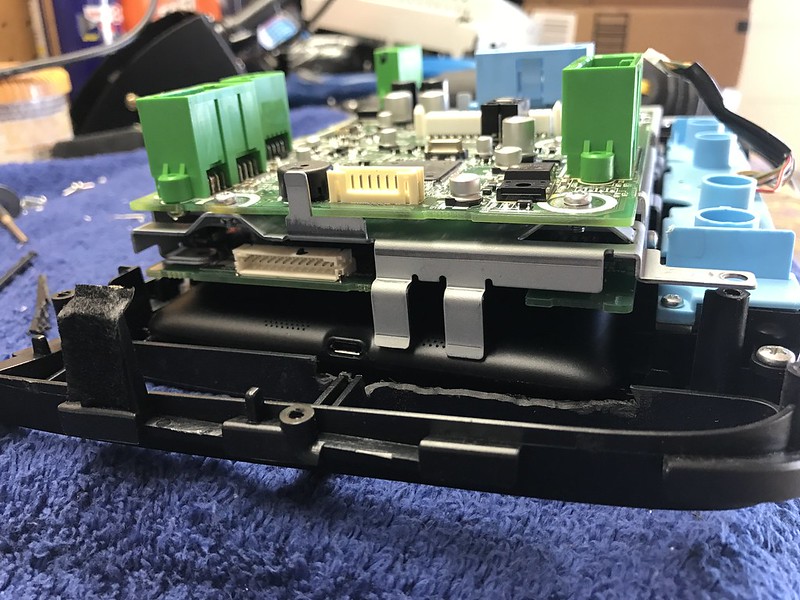
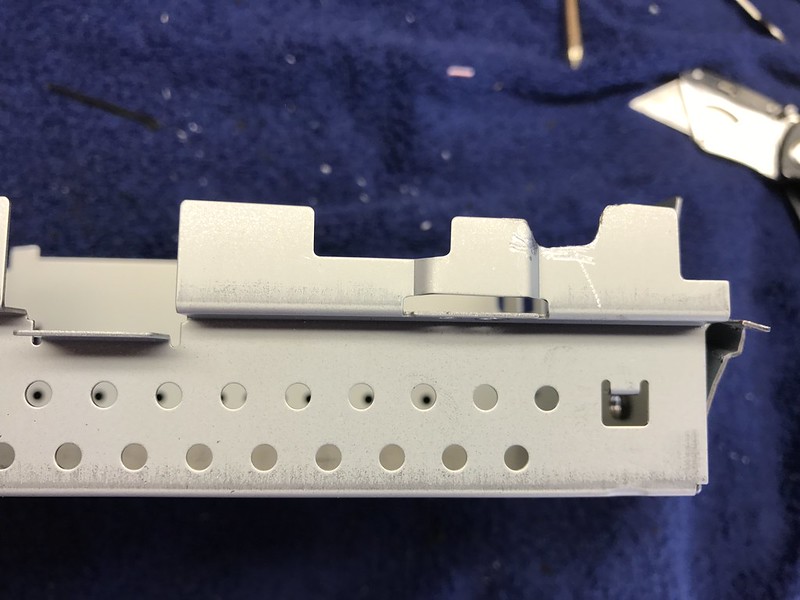
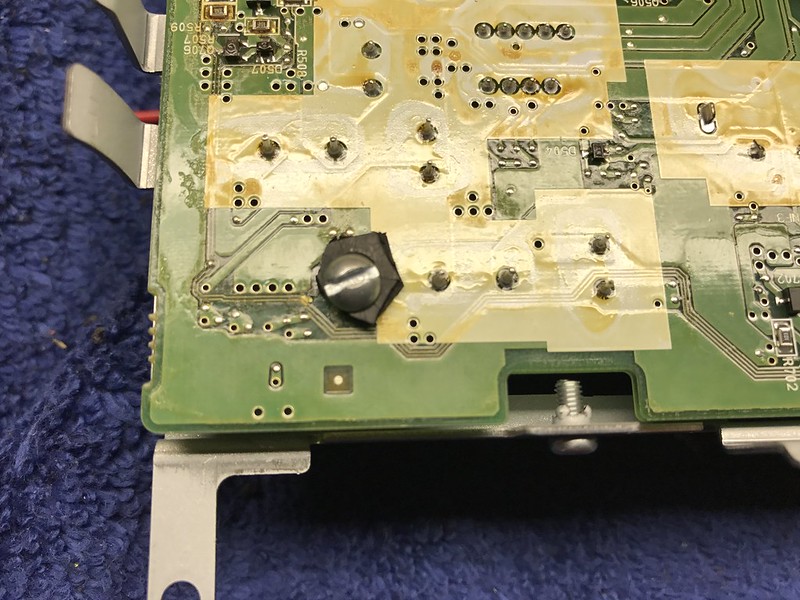
laying the circuit boards on top of the tablet shows you where there may be interference. i ended up cutting off these metal tabs to get the circuit boards to sit flat like they should on the raised columns (see second picture)
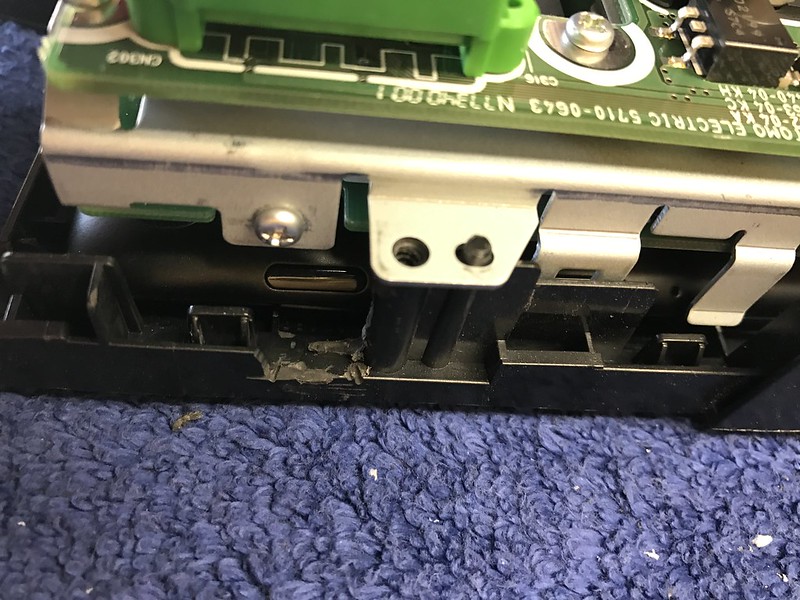
these are the locations you need to dremel to get the tablet to lay flat/flush
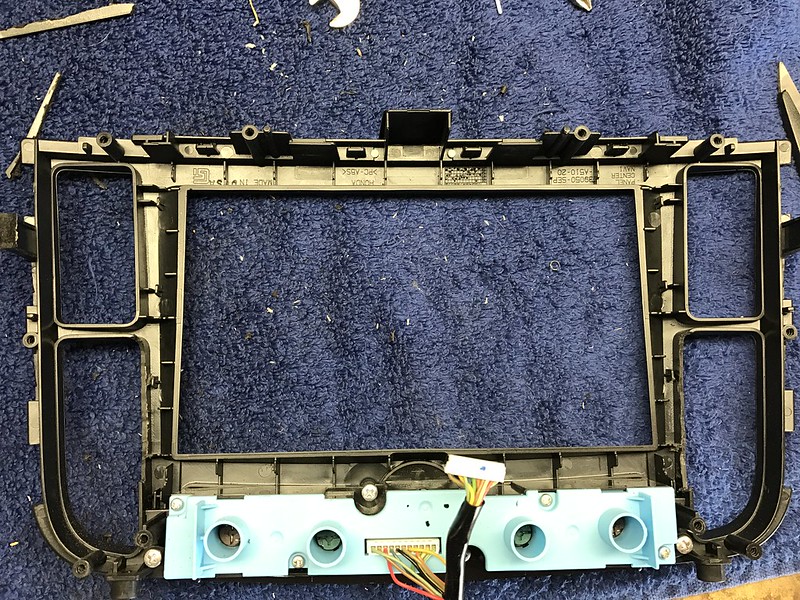
this is the sheet metal housing that goes on the backside. i basically cut most of the tabs around the perimeter to get a flush fit
in case you ever need to push the power button for a hard reset, i cut a hole where the power button will be so that i can just remove the vent trim piece in the car and access the power button (top right where all the scrapes are)
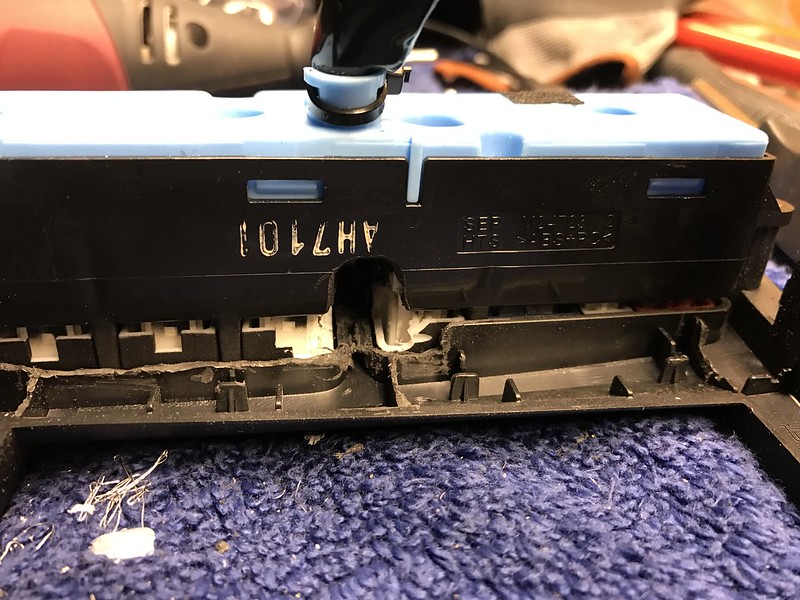
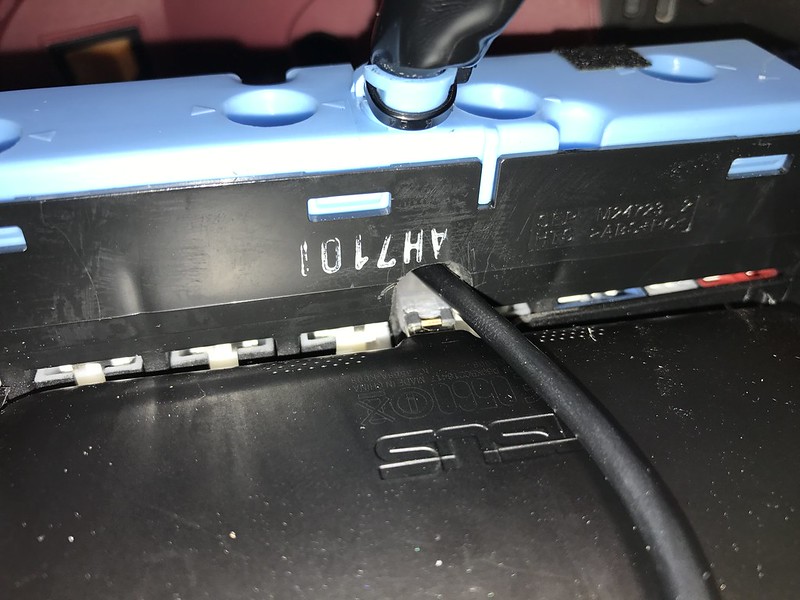
next you need to dremel out part of the bezel for the power cord to fit. because you can't relocate the micro usb port like the 2012 nexus 7, you have to trim the rubber around the cord and then cut into the AC buttons and OEM bezel to allow the power cord to "bend back upon itself"
add a piece of folded aluminum foil to the back side for a better ground (for charging) and to keep the cord from coming out
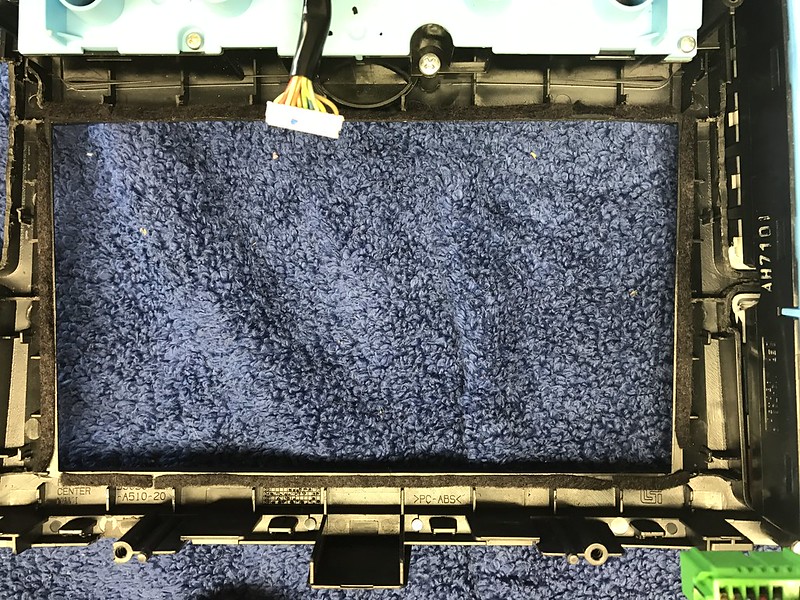
add very thin felt around the perimeter if you want
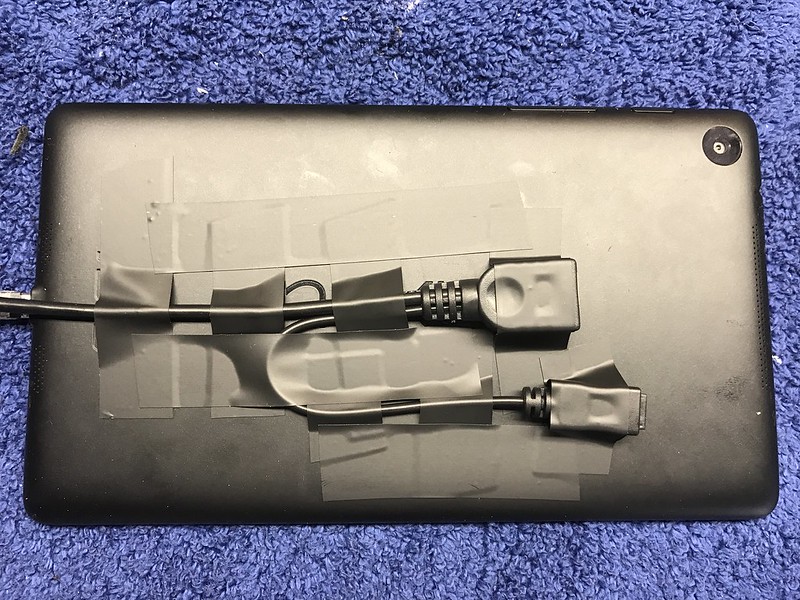
test fitting with the usb cord fit with the tablet in place
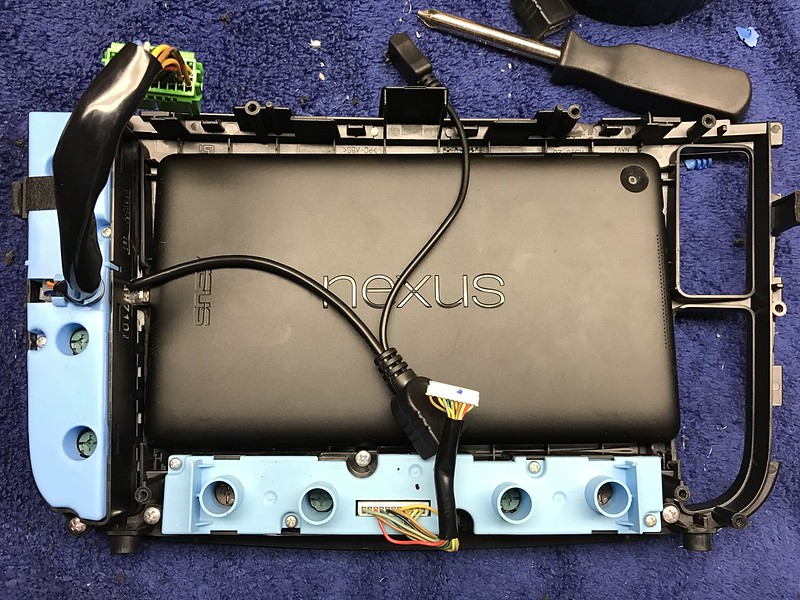
tape the cords flat to the tablet so the circuit boards can lay flat on top of them (i also had to snip off some of the long metal prongs on the circuit board)
test fit the tablet in place with the circuit boards on top
since we removed the OEM screen, that took away a few mounting spots for the circuit boards to be "secured." so what i did was find some very small screws and nuts and i clamped the circuit boards together and avoided any electrical traces (circuits). this allowed all the circuit boards to stay together like it would in the OEM setup. I added some rubber "washers" where it might get close to any circuits.
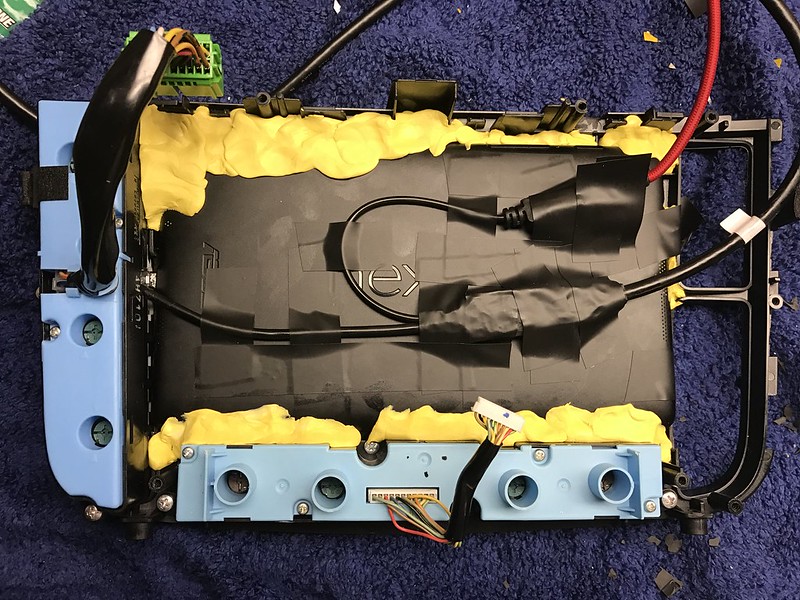
tape the tablet in place and then add the mold putty around the perimeter...you have about a minute before this stuff sets and gets hard! but if you mess up it's easy to remove and just make new putty. i had to do this a few times because I'm OCD and the tablet wasn't "level" when i flipped it around and turned it on
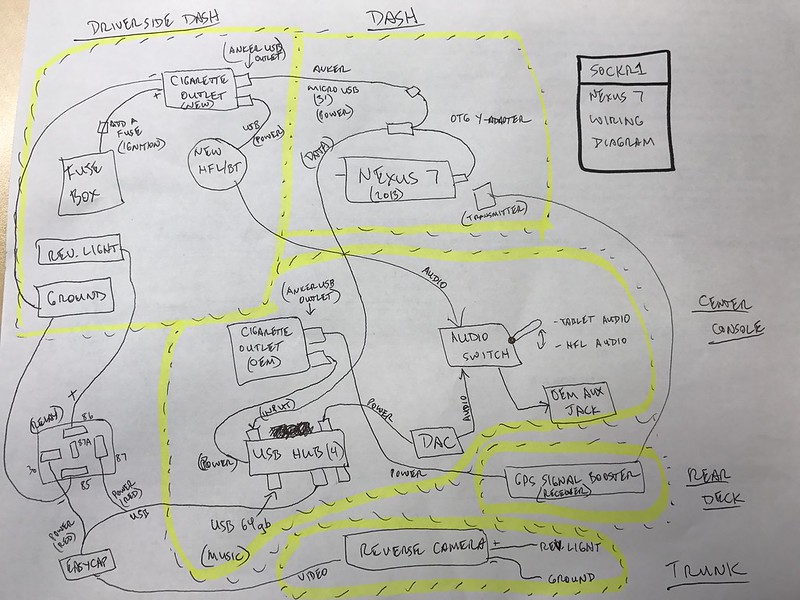
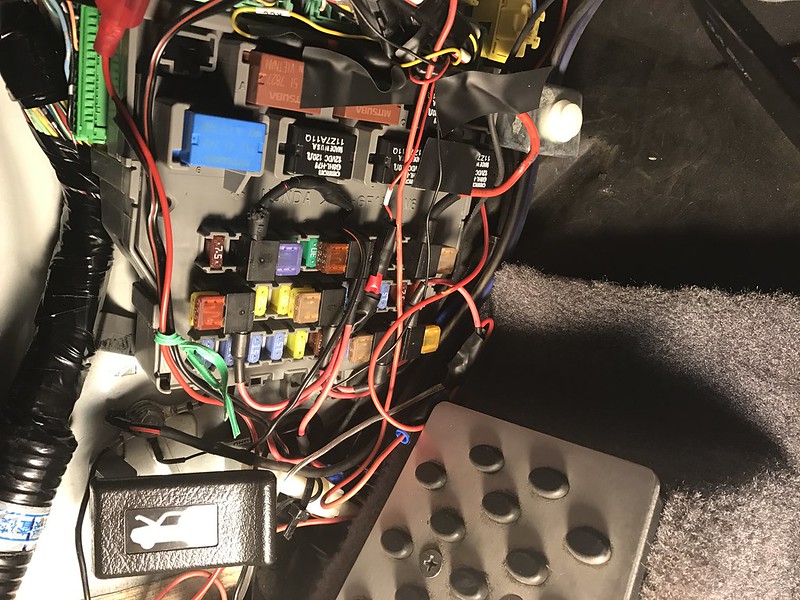
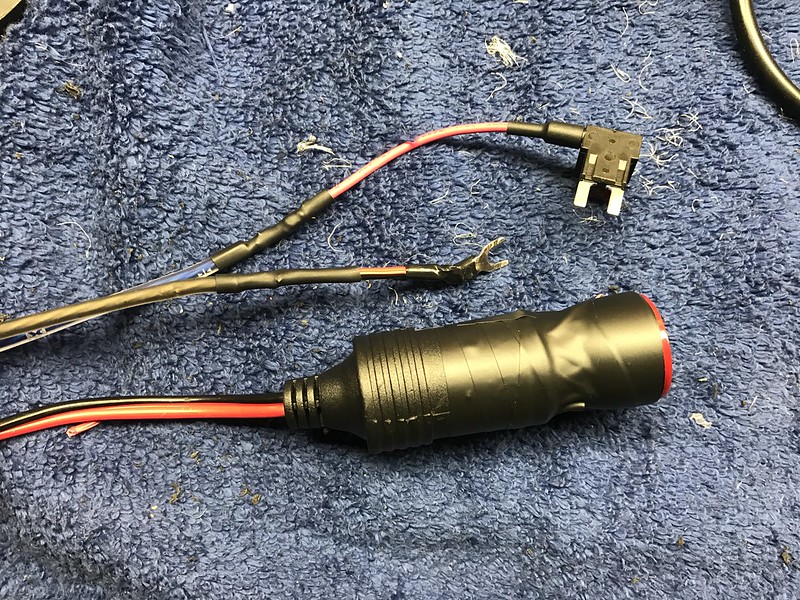
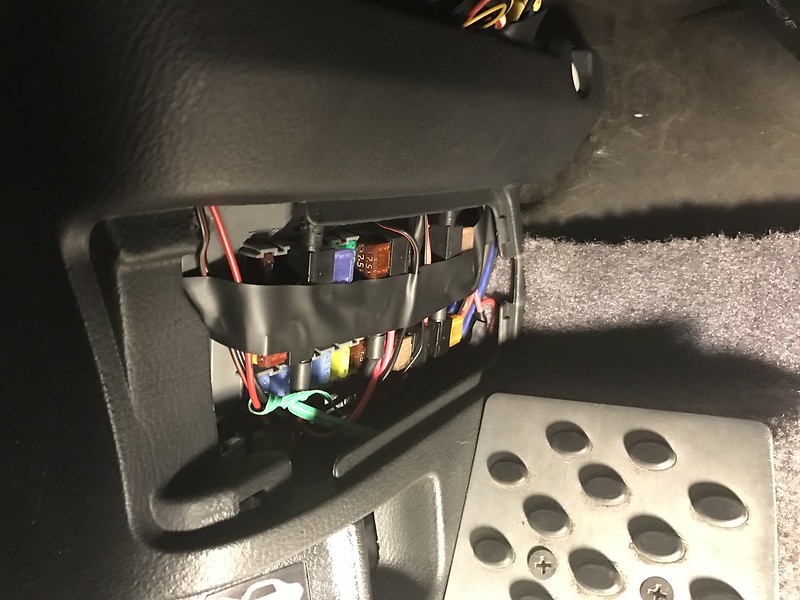
next i hooked up the power cord by putting it into the top slot of the anker cigarette adapter (higher amperage slot). i taped them together so they don't lose connection. then i took an ebay cigarette adapter and wired it to an add a fuse. i placed the add a fuse into a fuse slot that is powered by ignition (i don't remember which slot because i have like 8 add a fuses in the box and didn't write down which one i used)
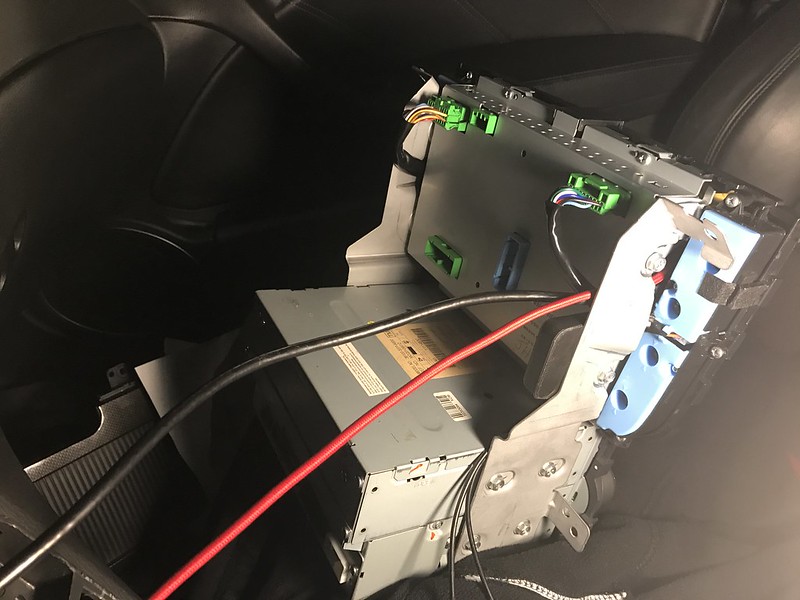
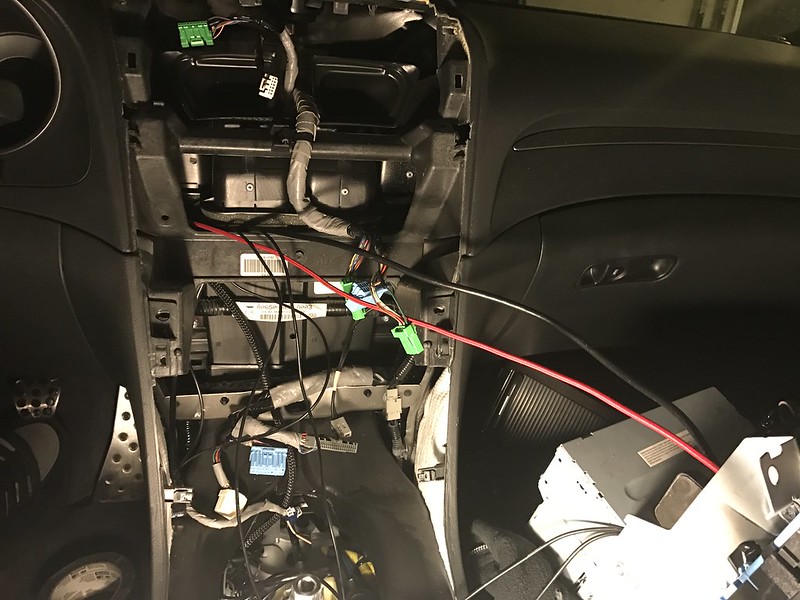
then i started installing it into the car and snaking the power cord from the dash to the underside of the driver's dash
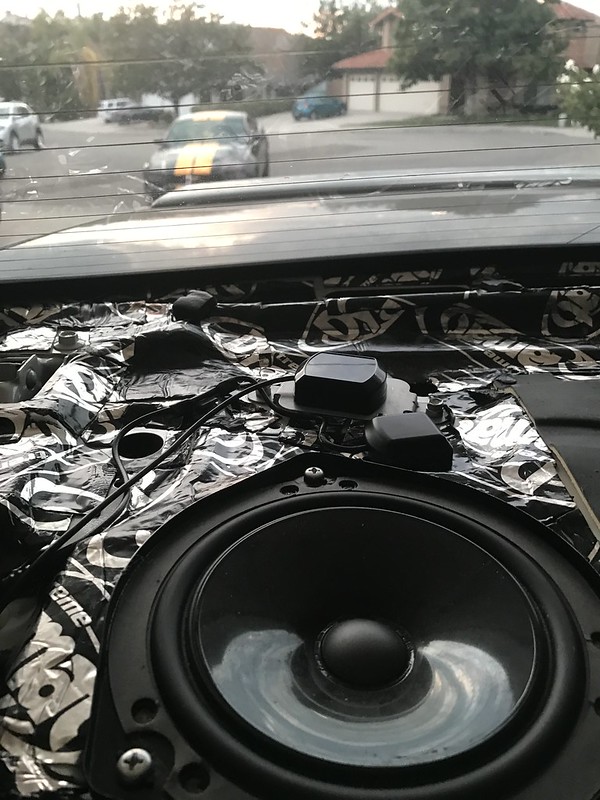
- I needed to add this because when I was mocking up the tablet in my car (passenger seat), I had zero GPS signal. I’ve heard others have this problem too and I wanted to make sure I always had a strong signal for GPS so I add this booster.
- I relocated the OEM GPS signal and put the new signal booster on the OEM metal plate
- I routed the other end of the GPS signal booster (transmitter) under the rear seats and carpet, under the center console, and then stuck it (magnet) on a metal bracket right next to where the tablet will go. make sure you play with the location of the transmitter next to the tablet to make sure your tablet is getting the boosted signal.
Add Reverse Camera
- I removed the OEM camera from the rear trim (tip: make sure you remove the license plate before removing the license plate trim…I didn’t know it connected to the trunk lid and I cracked my trim trying to remove it with the license plate on!)
- I mounted the new camera to the OEM trim where the old camera used to be
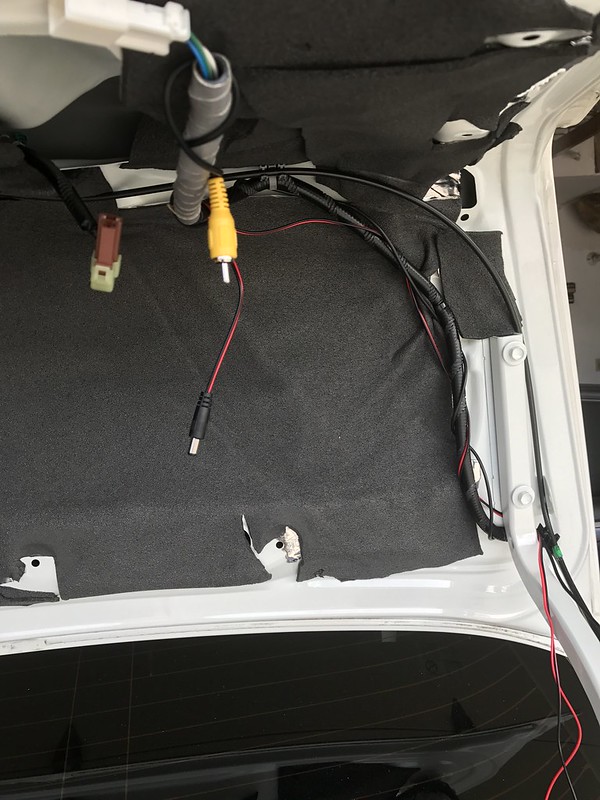
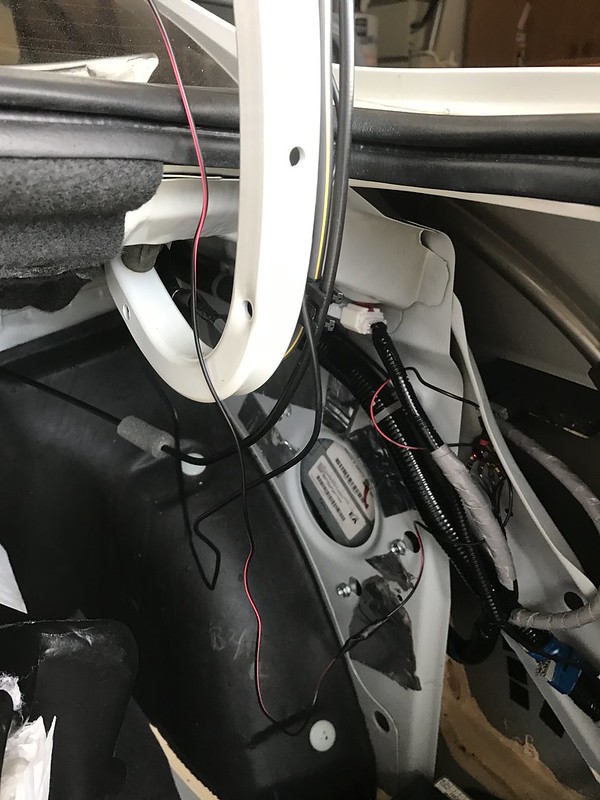
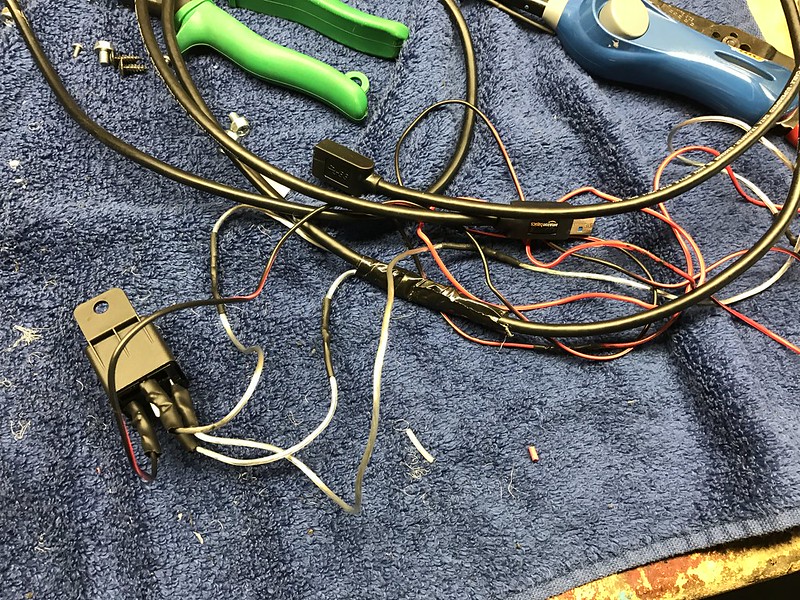
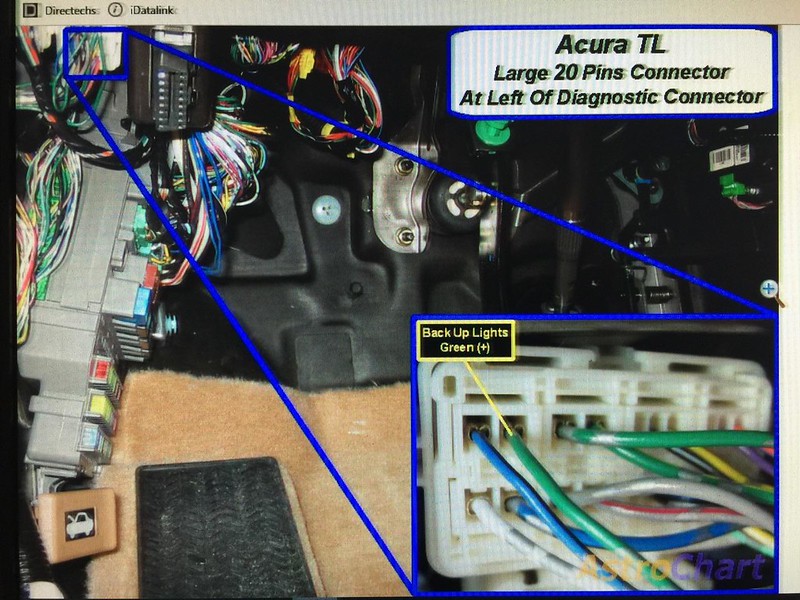
- I then tapped the camera power wire into the right reverse light wire (green with silver dots) and ran the ground wire to the ground located above the right wheel well behind the liner
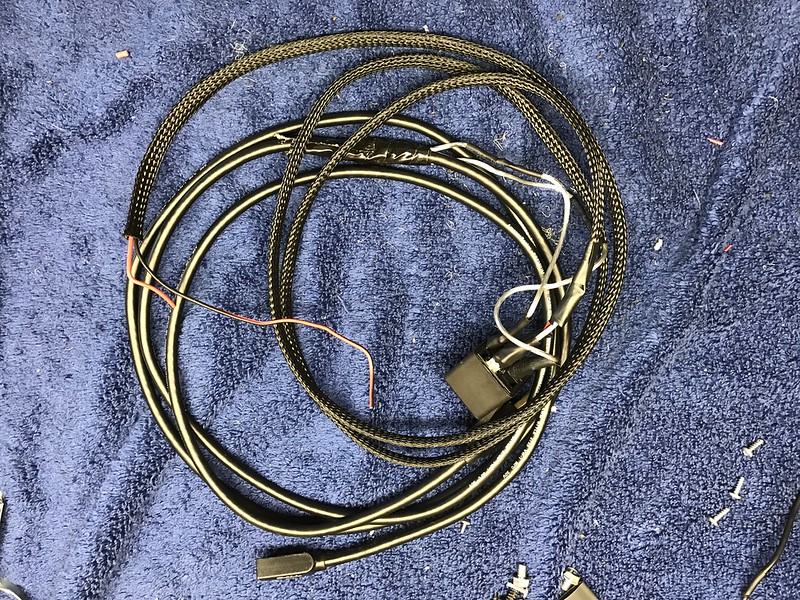
- I then ran the power, ground, and video signal wires down the trunk lid arm, behind the wheel well carpet liner inside trunk, under rear seat, and then came up through the center console from under the carpet
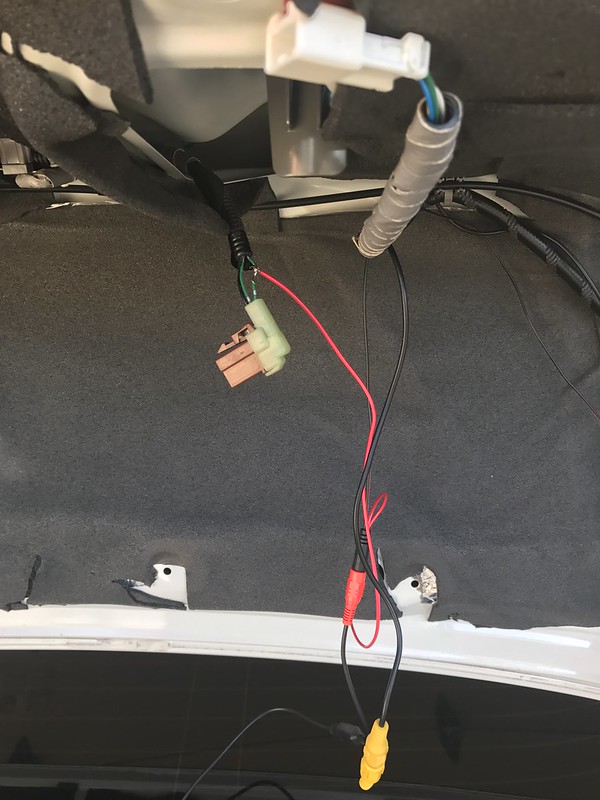
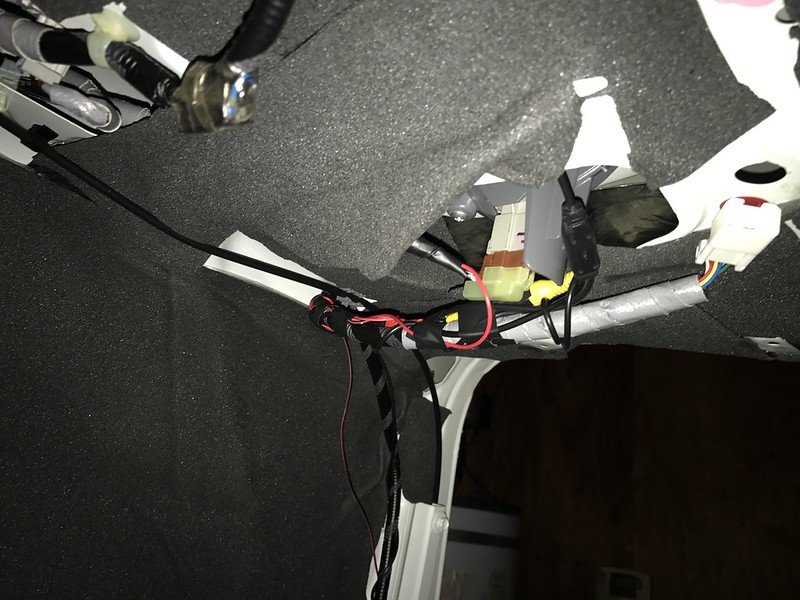
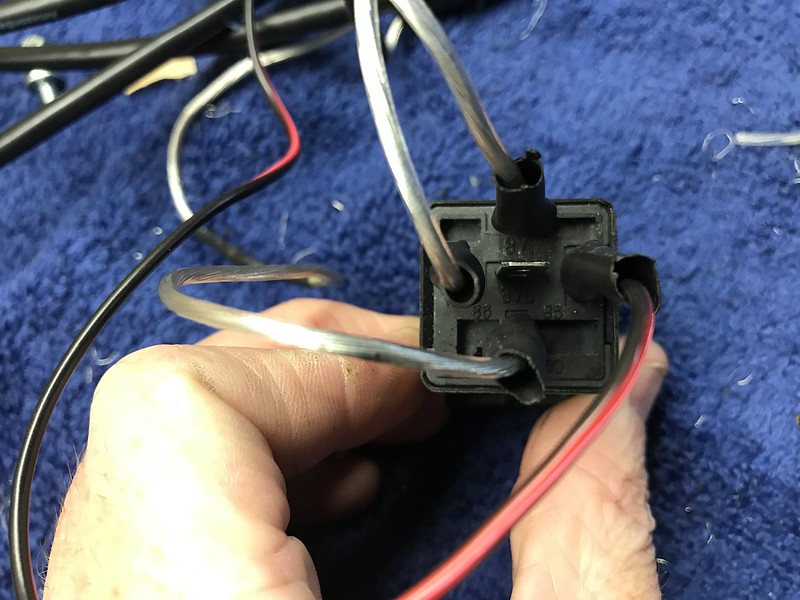
Next I created a relay to power on the EasyCap with the reverse lights. This isn't necessary but I think this is the cleanest way for a few reasons:
- the EasyCap runs very hot when it's powered all the time and the more it's powered the smaller the life will be. so my setup only allows the EasyCap to get power when the reverse lights are powered
- I tested a few setups and the video signal loaded/unloaded about 2x-3x faster when the EasyCap was getting/losing power compared to just the camera getting/losing power. so in other words, the video loads very fast and goes away very fast compared to if you didn't use the relay. up to you!
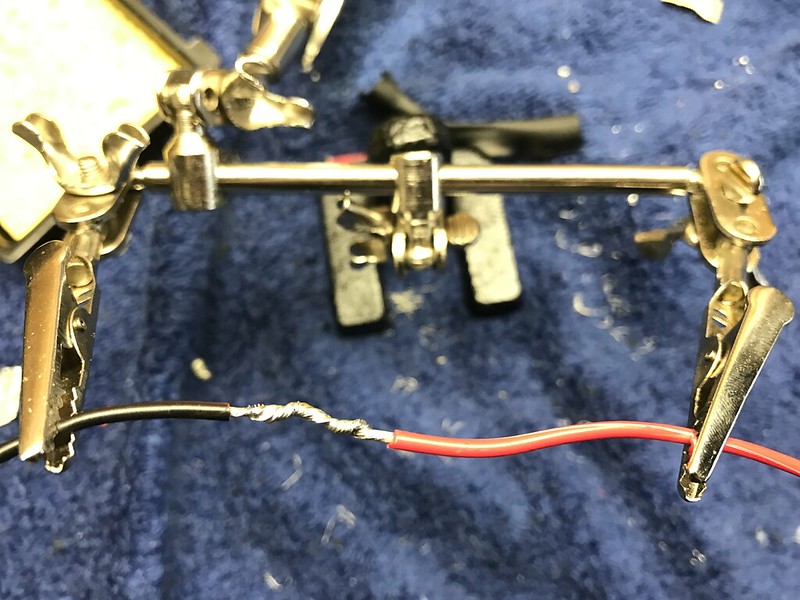
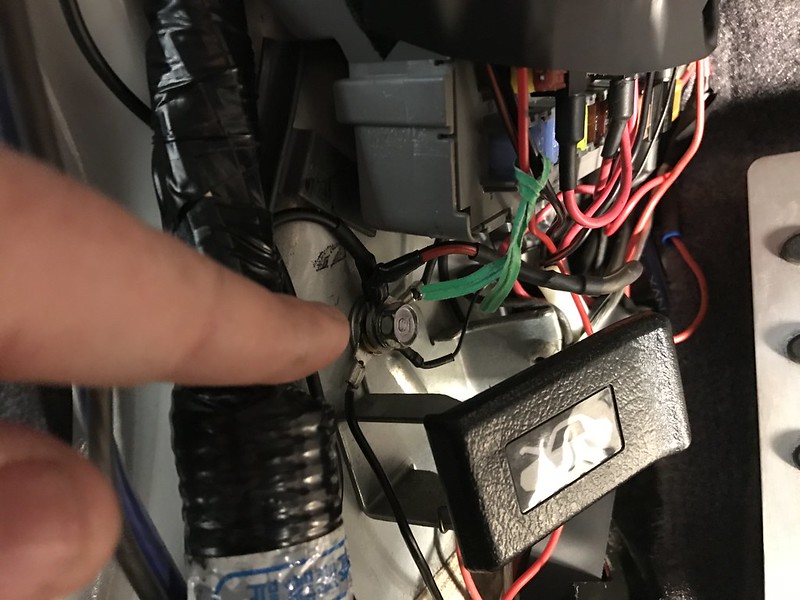
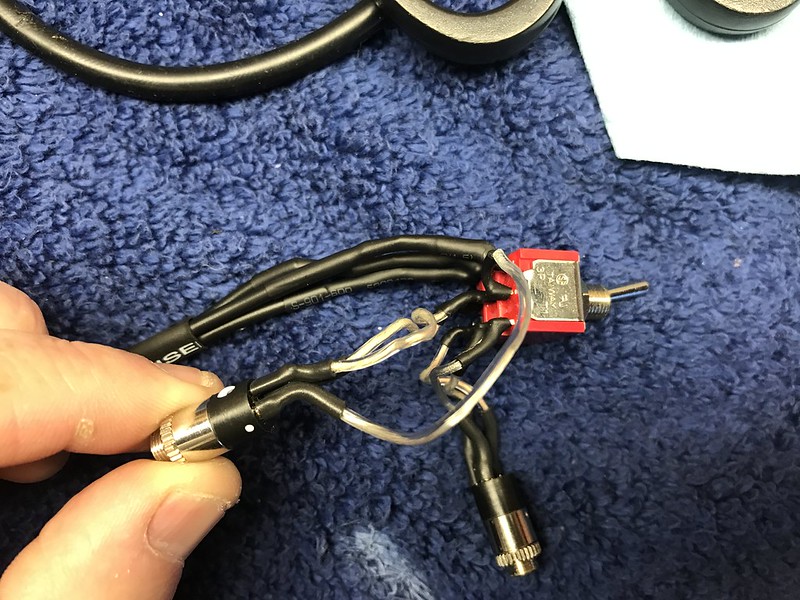
to set up the relay, i soldered four leads onto the relay.
- location 86 was the wire to power the relay and this connected to the reverse lights wire
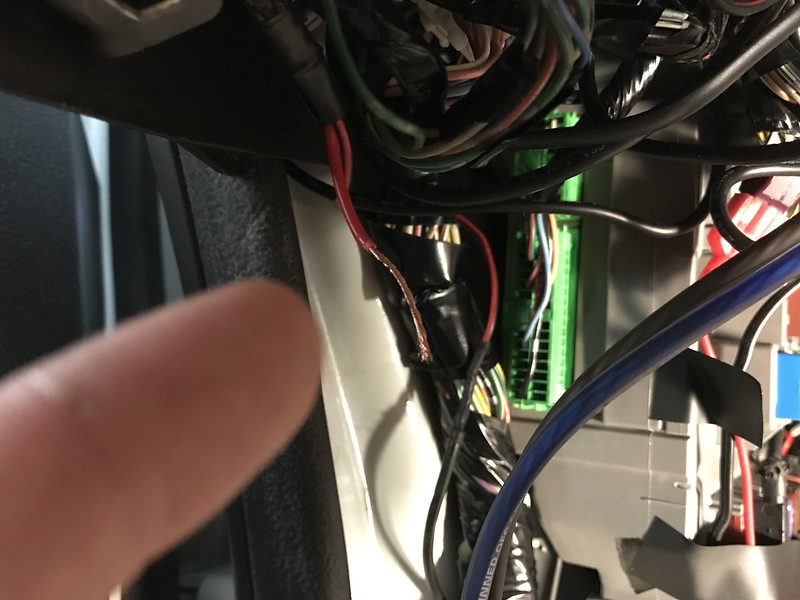
- location 85 was ground to the common ground near the hood latch release
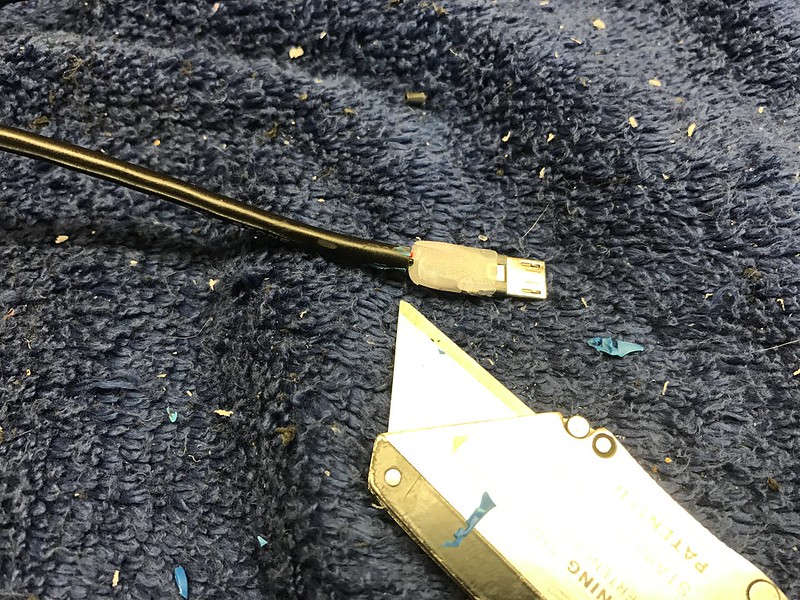
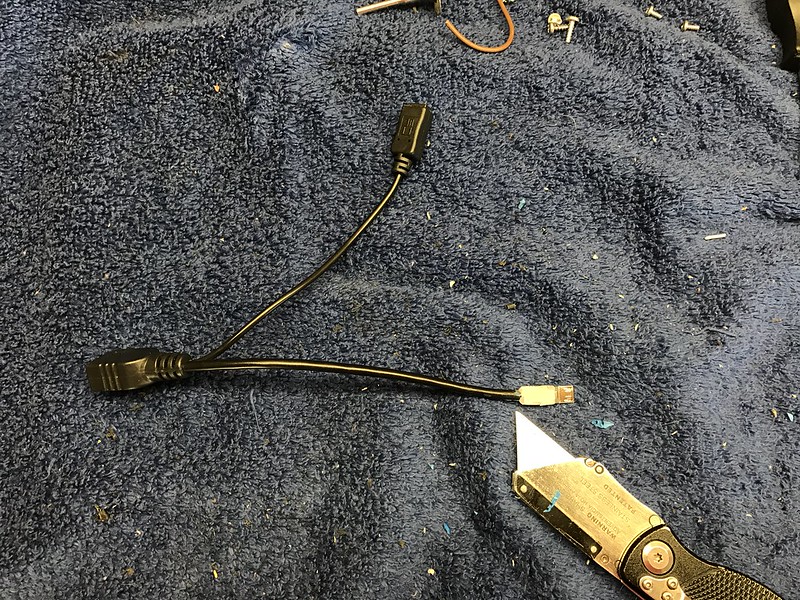
- location 87 and 30 is what will wire to the EasyCap usb cable to give it power. i cut into the usb cable that connects the EasyCap to the 4 port usb hub and then cut the red wire for power. i hooked up the lead from 87 to one end of the red wire and the lead from 30 to the other side of the red wire. this allows the usb to only have power when the reverse lights activate the relay and close the circuit
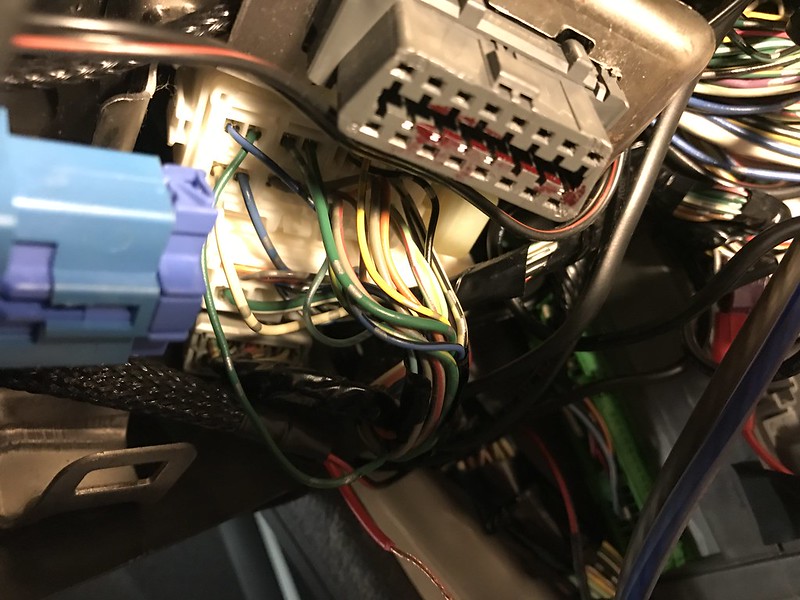
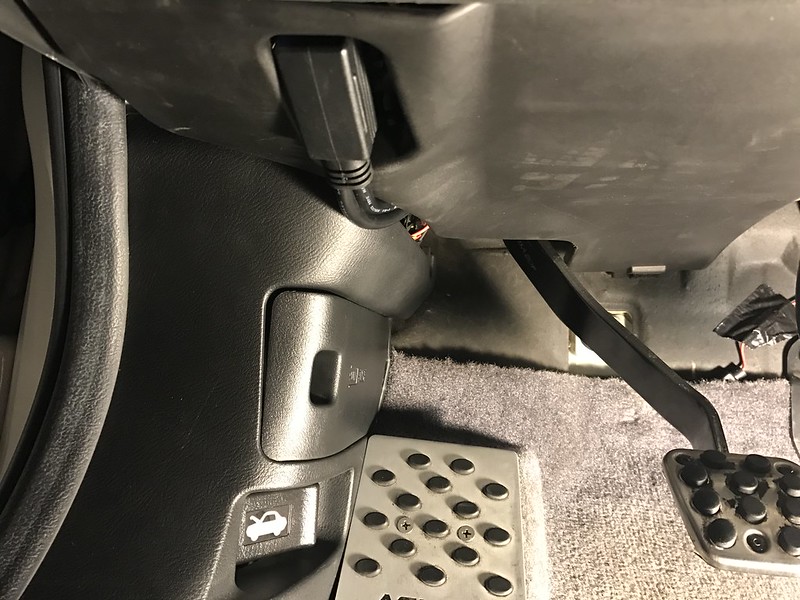
i had to find the reverse light wire near the fuse box and tap into the relay power there. then i just used the ground at the common ground near the hood latch release mechanism. there is no reverse wire behind the oem navigation unfortunately! this took me a while to figure out (thanks to the guys at krankitup.com for confirming this when i called them on a saturday morning all frustrated after tapping various center console wires that looked like the reverse wire)
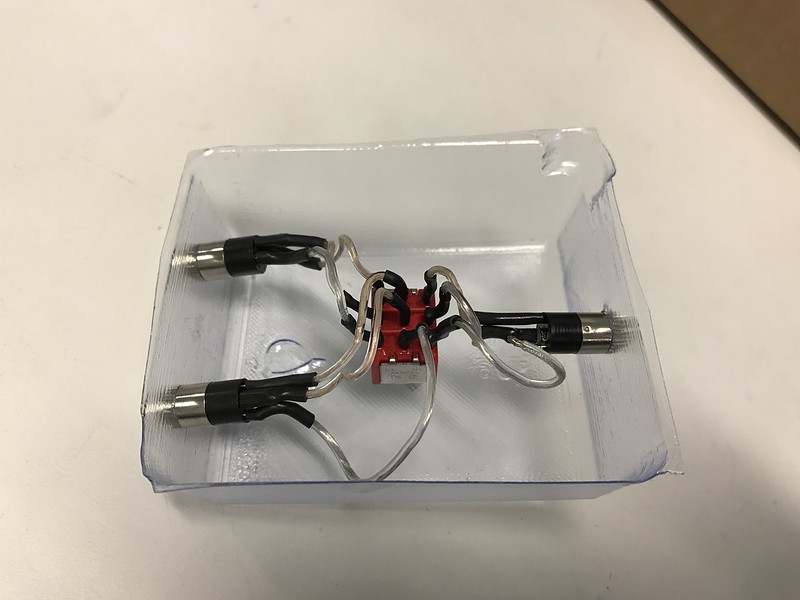
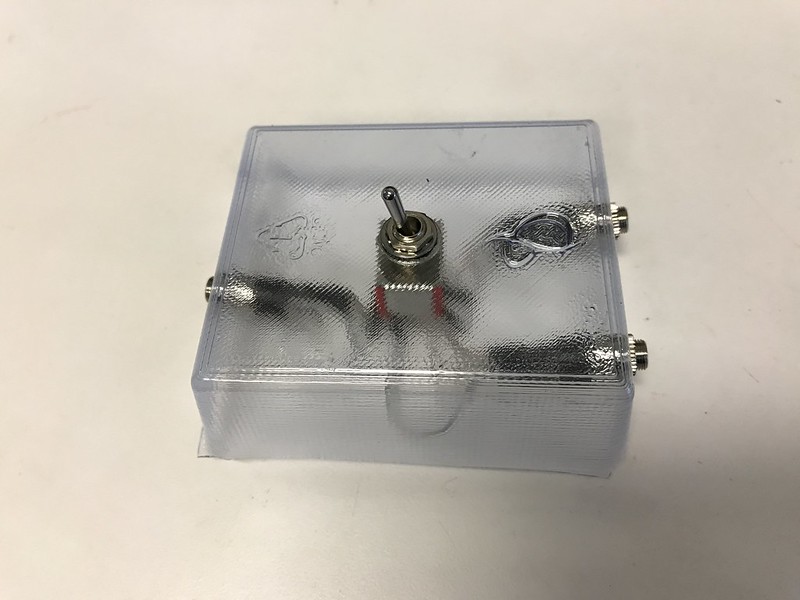
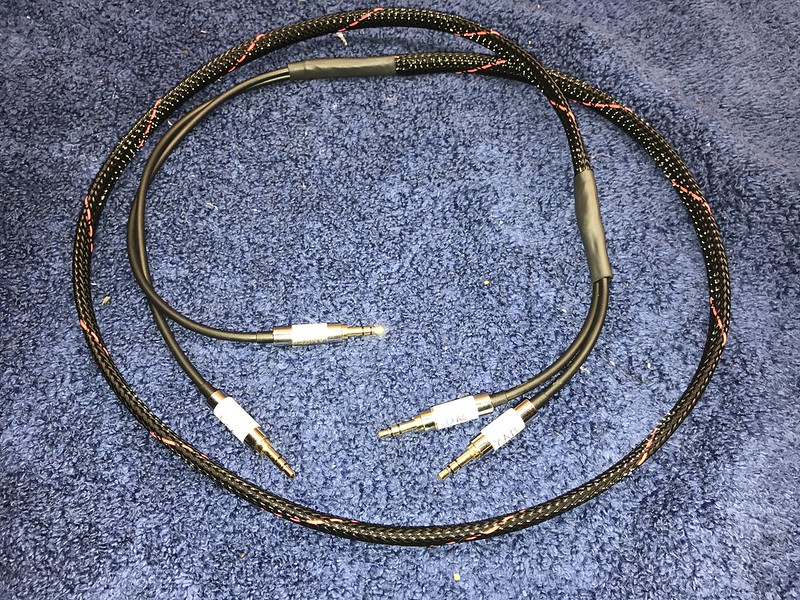
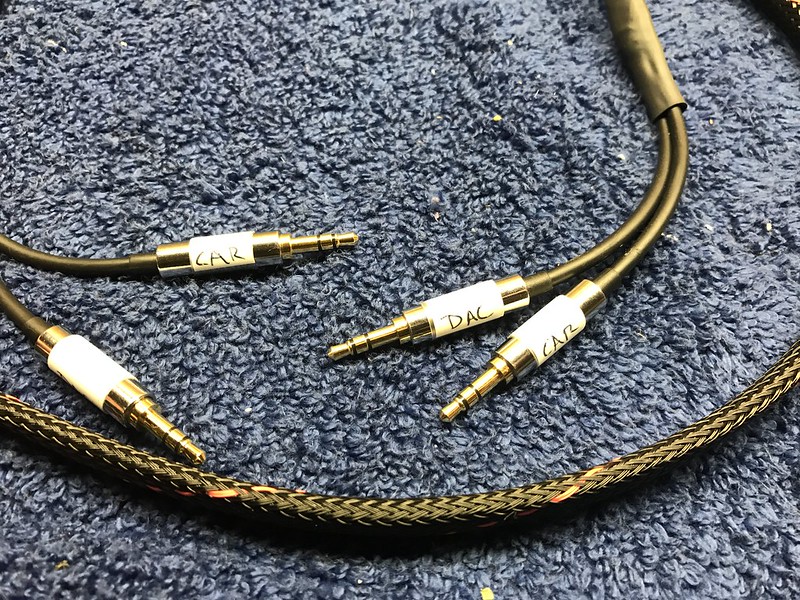
- the key to getting audio from the tablet to your car is an aux jack. you can either use the OEM one or you can add one via isimple. you can route the audio straight from the usb hub to the DAC and then to the aux jack. however, i wanted to add a hands free option because my HFL has died twice over the past few years and to me it's not worth over $200 for something i hardly use (i already did the baking solution via Godin Technologies). so i created an audio switch that allows me to manually switch whether the tablet or my new hands free phone audio plays through the car speakers
- my idea was to route 2 input aux cords into a "switch" with 1 output cord, and the toggle switch would say which audio came through. i was planning on putting it in the center console
first idea was to create a box switch but this proved to be too big since i wanted to drill a hole into the side of the center console and with the box being big it interfered with items inside the center console...so this idea was scratched but at least proved the concept that the switch worked
next i removed the box and just made long leads so that i can put it anywhere. i haven't physically drilled the whole yet but will do that soon, so no pics on final setup but i'm sure you can get the idea. basically i play music with the tablet and then when i get a phone call, i flip the toggle switch and push the button on the hands free device to answer. i placed the bluetooth received right above the dash dials behind my steering wheel and audio is pretty clear on the other end of the phone call
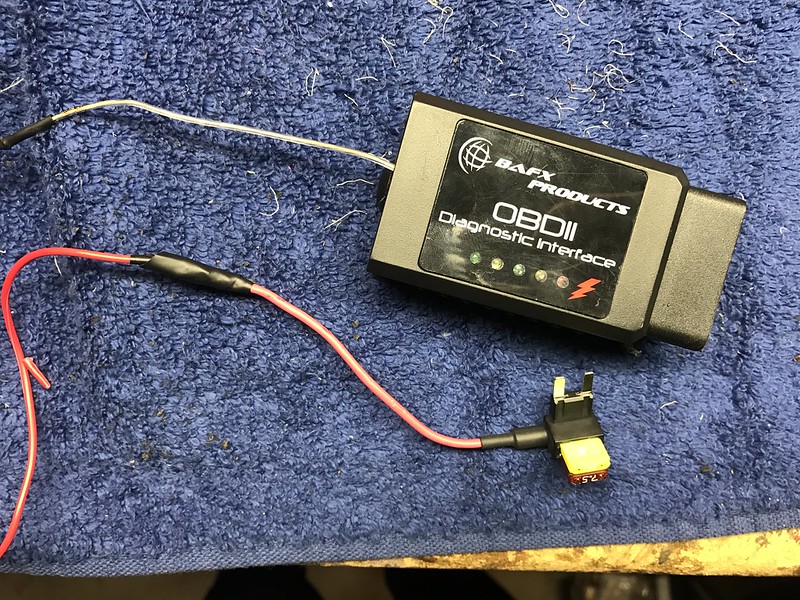
OBDII
- one of the cool features about using the tablet is you can see real time vehicle data and look up fault codes. i picked one of the popular OBDII devices but didn't like the fact that it would drain the battery some while the car wasn't on (small drain but still a drain). and i also didn't want to have to plug in the device when i wanted data so that i could see data on the fly and not have to plug it in. so i decided to open up the OBDII and cut into the power wire (wire in pin 16) and solder that to an add a fuse. i then put the add a fuse into an ignition slot in the fuse box
i then plugged the y-splitter into the OEM OBDII port, then ran the splitter up behind the underdash cover. that's where i plugged in the OBDII device and tucked it out of the way
Fake Steering Wheel Control
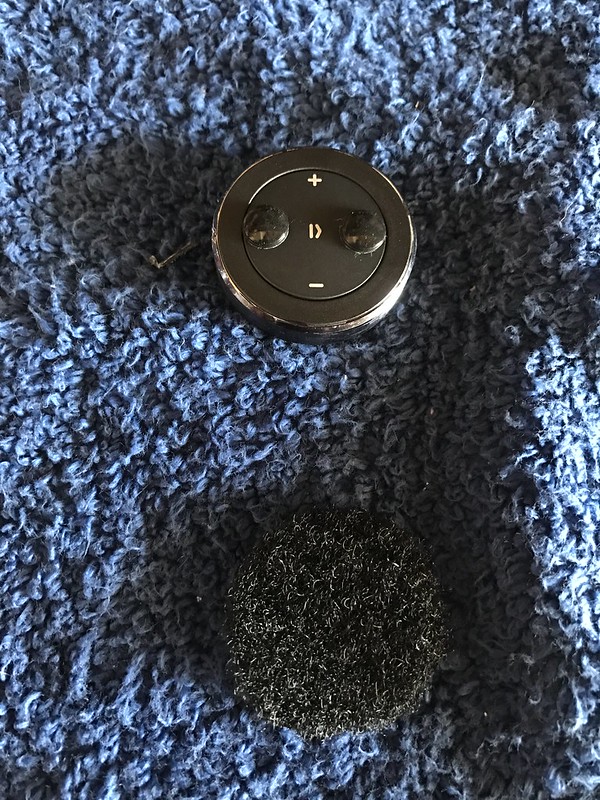
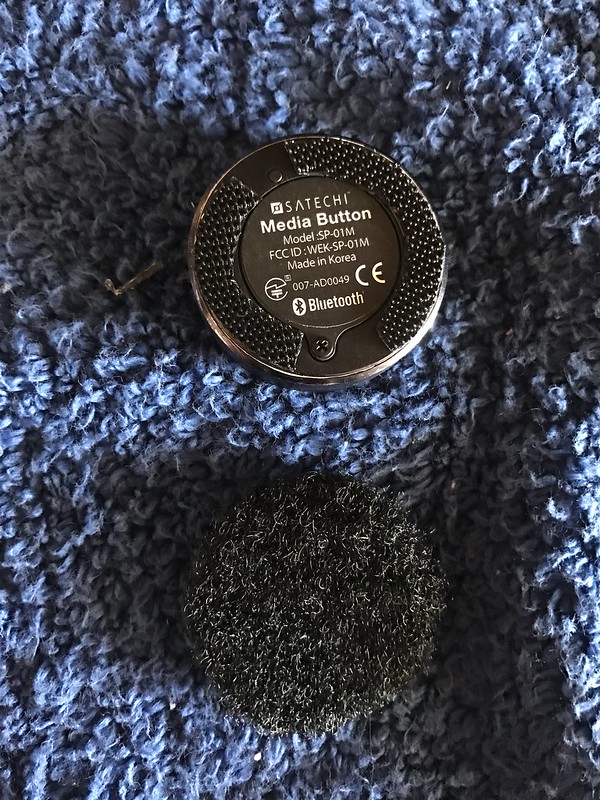
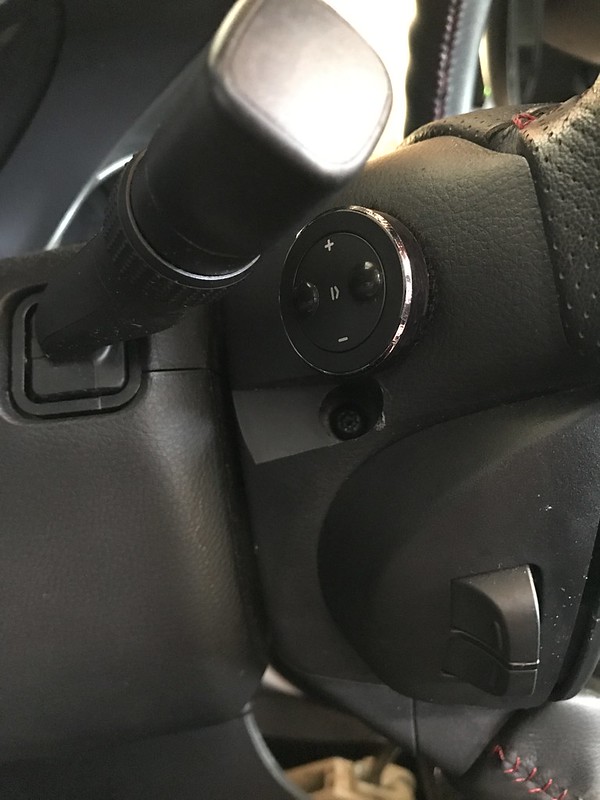
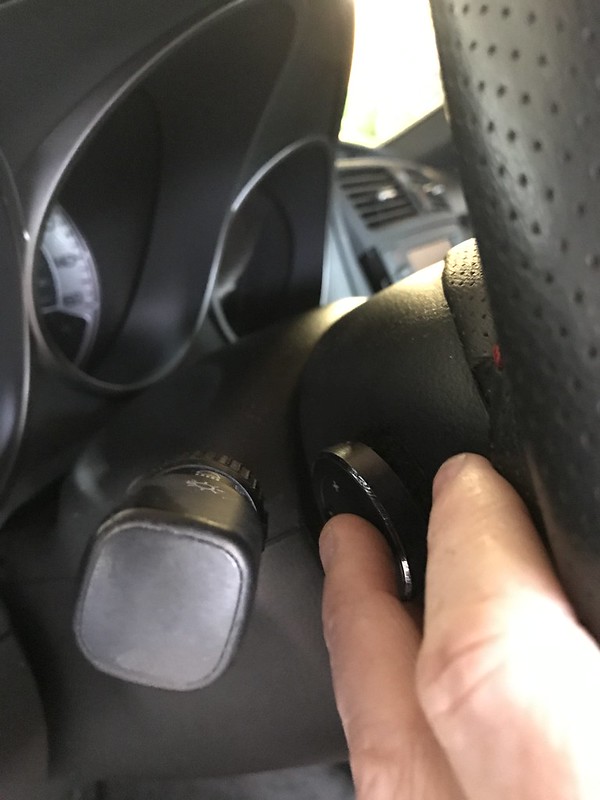
So there is an option to tie what's called a Joycon into your steering wheel controls to give you steering wheel controls for the tablet. however, i wanted to get this project done and didn't want to go through another "challenge" so i fake the steering wheel controls. i bought a bluetooth media button device and velcroed it to the back side of my steering wheel. this allows me to change songs on the tablet without letting go of the steering wheel and it works great! only downside is that sometimes it takes two "pushes" to get it to register because the first one wakes up the media button. i also added a "rubber foot" on both the forward and back buttons so that i can feel where they are without looking (otherwise it's just a flat surface). this makes it easy to know what to push!
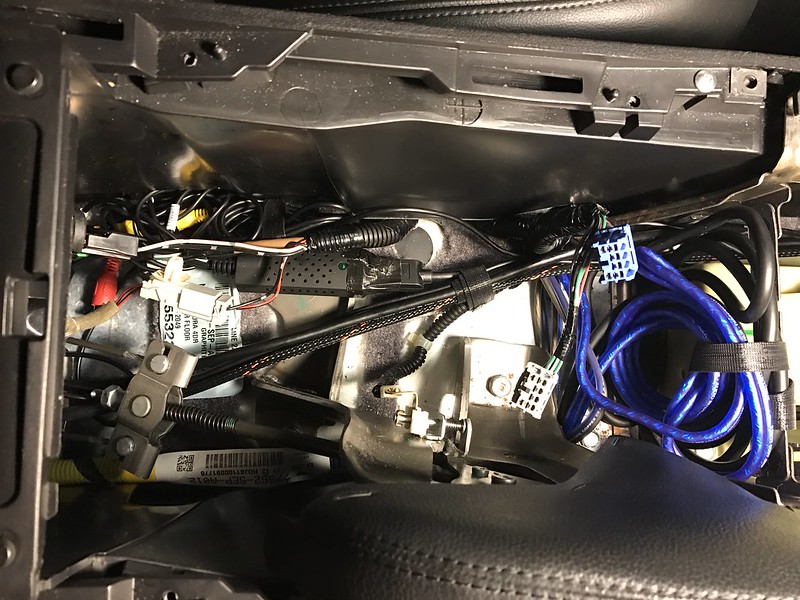
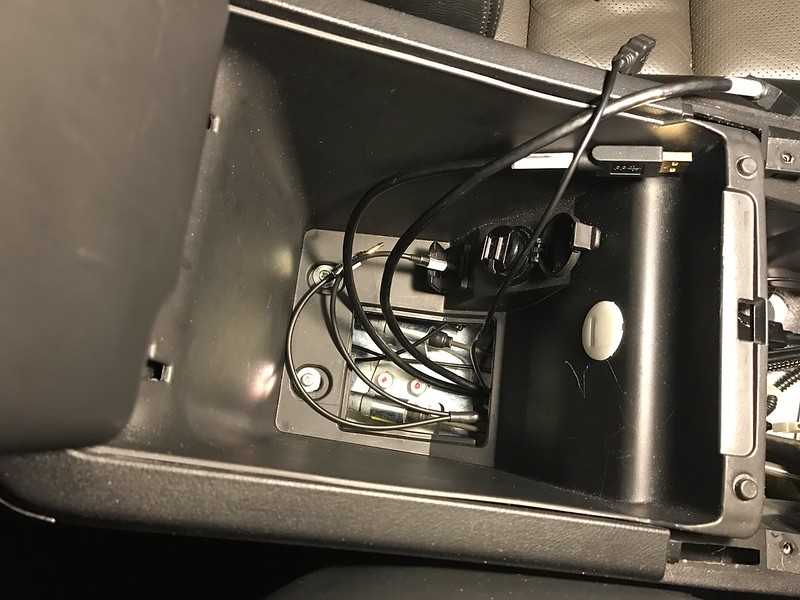
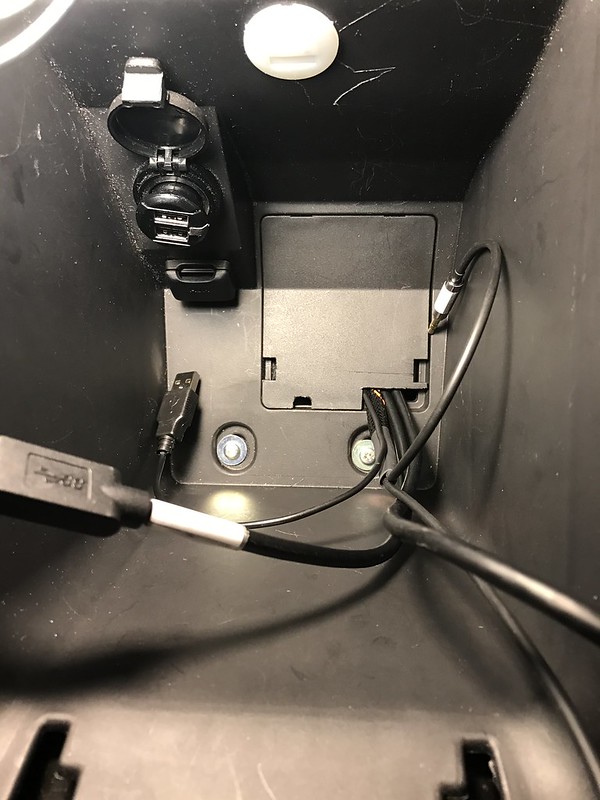
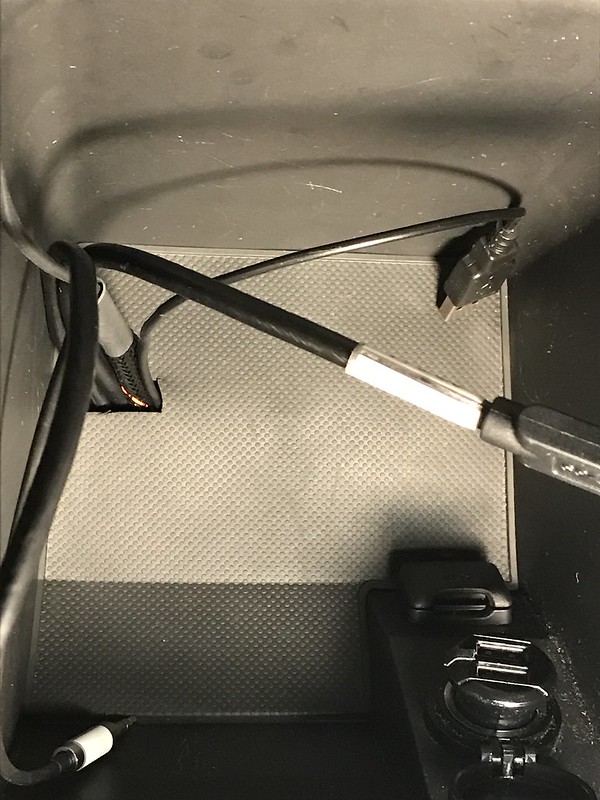
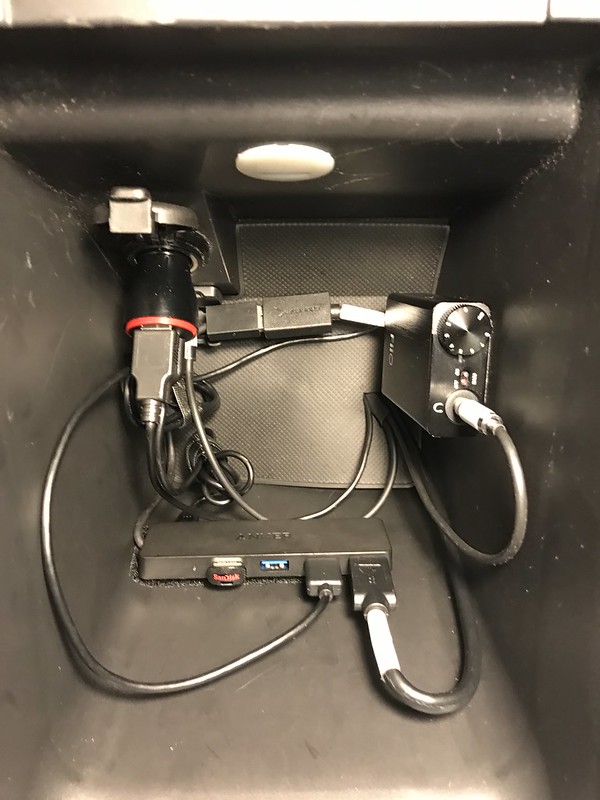
Final Routing
- for final routing i took everything underneath the shifter trim and zip tied it together to go under the cupholders. then i went up through the door of the center cubby and cut a large enough hole to get all the cables through. then i put everything back together and velcroed all the devices to the walls of the center cubby
and that is all haha. i know this thread has been super long but i was hoping to put as much detail as possible so others can enjoy this great mod!! everyone that sits in my car is blown away by it and it really freshens up the interior! i'll put up final pics once i get everything buttoned up, haven't had much time with the holidays
I noticed you're using the headphone jack on the FiiO. There is a purpose built "line out" jack on the other side of the unit. It's not that important, but it exists for this sort of application.
thank you, and thanks for documenting your install also. What's the benefit of using the line out vs the headphone jack? I'm not familiar enough to know the difference.
edit: just read up on it more. Apparently the bass boost only works for the headphone jack so I will probably keep it there. I also read that the turn dial only controls the front port and I like to have that amp control. But that is good info for other people too, I didn't even think of using the line out haha
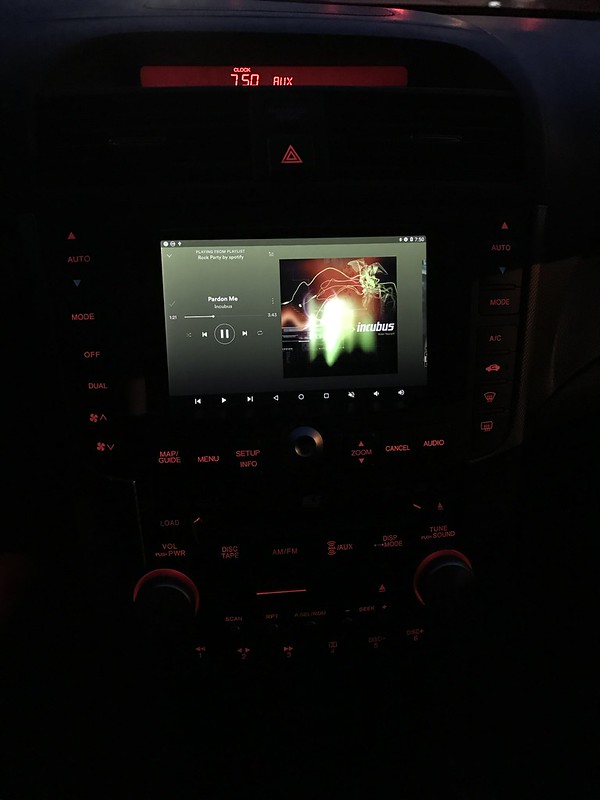
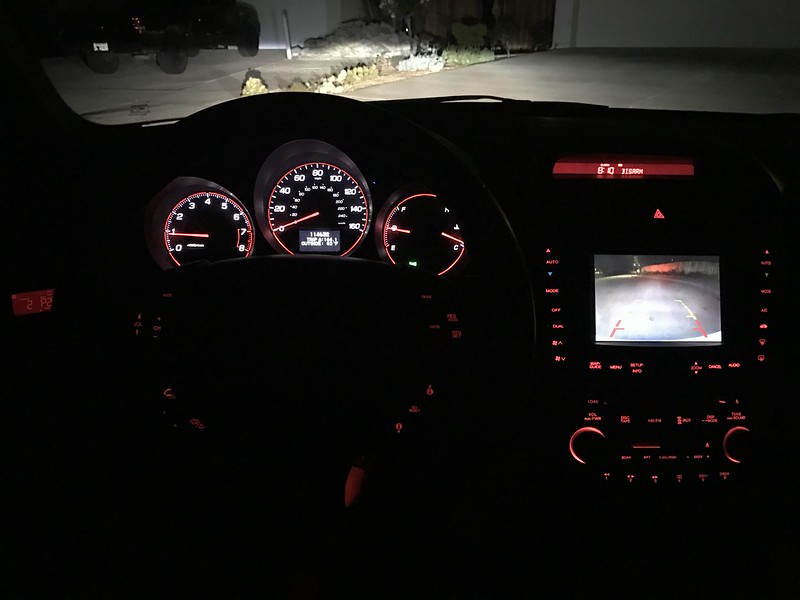
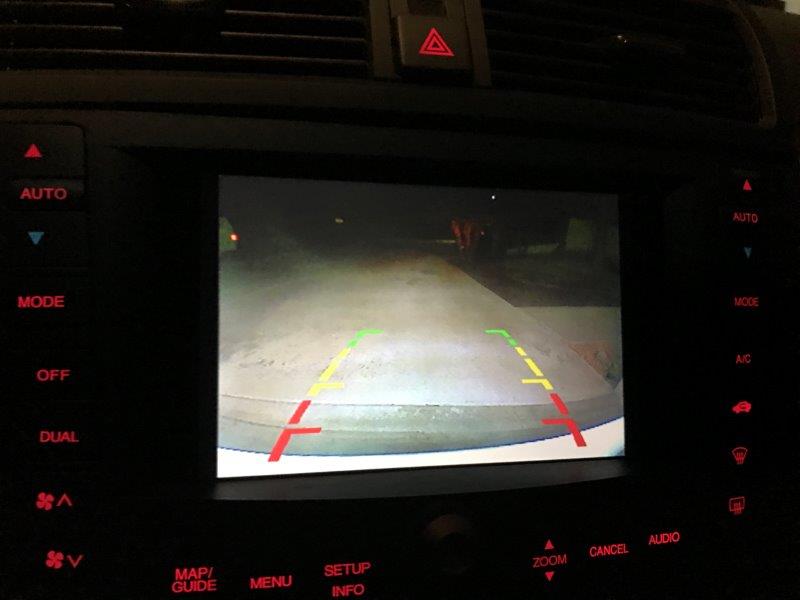
reverse camera working at night (good reverse lights really help!!)
overall setup looks oem
Originally Posted by thoiboi
FINALLY!!!!
haha i know i'm such a slacker...still owe the review on the Raceseng knob
Originally Posted by 03max6spd
Yeaaaaahhhh..... if i gathered parts and flew you out to new york, how much to do this LMAO
haha it looks daunting but put in the research and you can make it happen! i tried to layout as much as possible. i just helped another member with some of the details and he just finished his install this week.
Originally Posted by projectwidow
Awesome write up man!!
Dying to get my easycap! Finally got the camera wired in and cable routed so should be plug and play when it finally gets here.
let me know how it goes or if you have any questions! are you going to wire up the relay like i did or just run it straight up?
Originally Posted by Hugo2go
Awesome Write up!!!!
Thank you so much for the insight.
Originally Posted by Csakstar
Thank you again for posting this!
Originally Posted by zsameer
Awesome bro
thank you! took almost as long to write up as it did to do the physical install hahah. hope this helps give other people more confidence to take on the project
Originally Posted by princelybug
Awesome post. Good job!
thank you! did you ever get your dash cam installed? if not, maybe i can find some time soon and drive up from san diego (don't live in OC any more). i think it was a dash cam you needed help with...
for those that don't know, princelybug is one of the main reasons why I have the car I do. when i was looking for a car, i had a chance to buy a 6MT type s but it was a plane trip away. so i wanted to try a 6MT TL in a test drive but there were none at dealers and through a request on this forum he was kind enough to let a stranger (me) drive his car and see if i really wanted to fly to san jose to buy my car! i loved the test drive and made the flight to san jose to buy my car
Originally Posted by ADay2Long
Wooo looks very detailed, can't wait to read it and figure out what I need to get v4 in there!
you should definitely get v4 in there! mine has been working great
Dangit I picked up a 2012 Nexus 7 and according to Timur's site, it's not supported So looks like i may have to pick up a 2013 now . Definitely bookmarking this for future purposes.
Dangit I picked up a 2012 Nexus 7 and according to Timur's site, it's not supported So looks like i may have to pick up a 2013 now . Definitely bookmarking this for future purposes.
yea he stopped supporting it a while ago which only means it's hard to find the files for that kernel. i would for sure switch to the 2013, the tablet overall just works so much better and faster from what i've read. you can find one locally for a good price probably and you can even sell your 2012 and not pay much in the difference. you're pretty tech/car savvy i bet you could knock this out!
let me know how it goes or if you have any questions! are you going to wire up the relay like i did or just run it straight up?
Well.... lol
I actually wired a relay near the camera so it only turns on when I put it in reverse. I tested to make sure it works with a regular screen with video input.
I'm assuming the easycap is powered as soon as it's plugged in via USB? I was originally thinking it would only power on when it receives the signal.
I can't wait anymore before it gets here. I actually ordered another one (the one you posted in this thread) in case the one I ordered doesn't work or has the wrong chipset. I'll let you know if I have any questions.
as an update to the thread i'm now using n7 music player instead of gone mad music player (GMMP). i really like GMMP but for whatever reason it randomly freezes my tablet when playing music and then my entire tablet has to reboot. haven't had any issues with n7 so far, not as good of an interface but still pretty decent.
Originally Posted by projectwidow
Well.... lol
I actually wired a relay near the camera so it only turns on when I put it in reverse. I tested to make sure it works with a regular screen with video input.
I'm assuming the easycap is powered as soon as it's plugged in via USB? I was originally thinking it would only power on when it receives the signal.
I can't wait anymore before it gets here. I actually ordered another one (the one you posted in this thread) in case the one I ordered doesn't work or has the wrong chipset. I'll let you know if I have any questions.
Thanks!
if you wired the camera directly to the reverse lights you wouldn't need that first relay, it's simpler to tie it into the reverse lights rather than a power and ground for the relay. but if it's done it's done
yea the easycap gets power from usb so it's on all the time. mine was getting extremely hot and it's laying in a bunch of wires so i'm glad the relay turns it off. should make the life of it last longer too. hope yours works well and if not let me know if you have questions! you gotta be pretty excited to get it in haha
thank you! did you ever get your dash cam installed? if not, maybe i can find some time soon and drive up from san diego (don't live in OC any more). i think it was a dash cam you needed help with...
for those that don't know, princelybug is one of the main reasons why I have the car I do. when i was looking for a car, i had a chance to buy a 6MT type s but it was a plane trip away. so i wanted to try a 6MT TL in a test drive but there were none at dealers and through a request on this forum he was kind enough to let a stranger (me) drive his car and see if i really wanted to fly to san jose to buy my car! i loved the test drive and made the flight to san jose to buy my car
Thanks for the offer. I will let you know if I decide to go through with it!
Awesome work putting together this write-up! Excellent pictures and lots of useful tips. With this much detail, I'm sure we can expect to see 2018 Acura models with the Nexus7 tablets installed from the factory! Lol.
I haven't tried out n7 music player on my install (or any others for that matter) but if you're not satisfied with it you could try PowerAmp. It's a paid app ($4), but you can try it for free for a couple weeks before buying. It has a lot of customizatability (tons of custom skins available for download), lots of adjustable settings, including auto-pause/play on audio focus changes (like from Bluetooth, calls, notifications, navigation, etc).
^^ haha thank you! It's funny but when you see the tablet in the car it makes you wonder why they aren't standard already. The technology is already there
thanks for the heads up but poweramp was the first one I tried (even paid version). It did not work well with the kernel and I had a lot of issues with it. Basically i had to rescan for the USB drive every time.
Ive gone through about 6 different music apps (poweramp, n7, gone mad, rocket player, etc) but I found the best ones were gone mad followed by n7. I'm still having some bugs playing USB audio and I don't think it's the app so I purchased a new USB to see if that's the problem (32 instead of 64 and a different brand). I recently hooked up Spotify and am still loving the tablet!
dave, you killed it man. Jealous lol.. This type of thing is so far out of my realm haha. Id need major help with something like this but it looks so good
^^ haha thank you! It's funny but when you see the tablet in the car it makes you wonder why they aren't standard already. The technology is already there
They actually are starting to design some of the cars with tablets - I don't know about the new Acuras, but I used to work at a Honda dealership and the 2016 Civics have tablets as their audio system displays. I always thought it was funny if you go deep enough into the system settings you can turn on "airplane mode" and I used to joke that it was in case you took your car on the plane with you as a carry-on. Most of my friends there didn't think it was as funny as I did. The software is pretty buggy on those tablets too, they've had a lot of software updates and warranty exchanges for failed units already.
Originally Posted by sockr1
thanks for the heads up but poweramp was the first one I tried (even paid version). It did not work well with the kernel and I had a lot of issues with it. Basically i had to rescan for the USB drive every time.
Ive gone through about 6 different music apps (poweramp, n7, gone mad, rocket player, etc) but I found the best ones were gone mad followed by n7. I'm still having some bugs playing USB audio and I don't think it's the app so I purchased a new USB to see if that's the problem (32 instead of 64 and a different brand). I recently hooked up Spotify and am still loving the tablet!
I thought I had issues with PowerAmp at first, but it was actually a problem with the Android 6.0 software. I had connection problems with micro SD cards and with my 5th gen iPod, where Android would disconnect and reconnect the drive after a few minutes (which would cause PowerEventManager to unmount it, making PowerAmp forget the whole library and require a full re-scan after re-mounting the drive). Timur mentioned that Android 6.0 can have these issues and recommended using a usb drive instead, so I switched to a Sandisk 64gb USB 3.0 flash drive (specifically this one) and it solved all the problems.
Do you have the tablet shut down/reboot completely or just go into suspend/wake mode? Also - where did you find those cool Acura animations? All I've been able to find is an image of the Acura logo on a black background (which is cool too, just not as fancy).
Last edited by UA7X; 01-14-2017 at 01:29 PM.
Reason: forgot to ask a question
dave, you killed it man. Jealous lol.. This type of thing is so far out of my realm haha. Id need major help with something like this but it looks so good
thanks Jeff! it's really not that bad, just takes some time, effort, and patience haha. it's all do-able!
Originally Posted by UA7X
They actually are starting to design some of the cars with tablets - I don't know about the new Acuras, but I used to work at a Honda dealership and the 2016 Civics have tablets as their audio system displays. I always thought it was funny if you go deep enough into the system settings you can turn on "airplane mode" and I used to joke that it was in case you took your car on the plane with you as a carry-on. Most of my friends there didn't think it was as funny as I did. The software is pretty buggy on those tablets too, they've had a lot of software updates and warranty exchanges for failed units already.
I thought I had issues with PowerAmp at first, but it was actually a problem with the Android 6.0 software. I had connection problems with micro SD cards and with my 5th gen iPod, where Android would disconnect and reconnect the drive after a few minutes (which would cause PowerEventManager to unmount it, making PowerAmp forget the whole library and require a full re-scan after re-mounting the drive). Timur mentioned that Android 6.0 can have these issues and recommended using a usb drive instead, so I switched to a Sandisk 64gb USB 3.0 flash drive (specifically this one) and it solved all the problems.
Do you have the tablet shut down/reboot completely or just go into suspend/wake mode? Also - where did you find those cool Acura animations? All I've been able to find is an image of the Acura logo on a black background (which is cool too, just not as fancy).
haha doesn't surprise me that they have had update after update, you definitely have to work through some bugs to get them working. that's hilarious about airplane mode!
ah i see what you're saying about poweramp. maybe i'll give it another shot. i just got a new usb drive in (32gb instead of 64 and a different brand) so i'll see if i have the same issue. i was using a sandisk 64gb but not the one you linked, mine is one of those real small ones so maybe that's why. i'll see how this new usb stick does.
i have the tablet go into deep sleep mode, which is one of the main features of timur's kernel. it basically goes almost into shutdown, with less than 4% drain over 24 hours.
those acura animations are all located in my google drive folder that i linked in my original post. check out under "Links", i put my google drive link there and you can access all the acura animations as well as some other files i used during my install (no timur's files since he owns those). you just label whichever one you want "powerup" or "powerdown" and put them in the main nexus 7 folder (use amaze app to access folders/files).
What are pros of the fiio e7 for the tablet install?
i do not know anything about the fiio e7 (couldn't even find it available for sale), but did you mean the fiio e10k which is what i use?
e10k: stereo sound, much better than tablet's internal DAC (aka better and more dynamic sound), automatically power on and powers down automatically (some DACs require you to manually turn them off and on which really takes away from a "plug and play" oem type feel).
so more or less its just better audio quality as long as its defiantly worth it on a tight budget but i want my car to sound a little cleaner
it's completely worth it. the other day i unplugged it during some other testing and i was like oh man this sucks haha. then i plugged it back in and was happy again.
BUT it is expensive so i can see where someone would want to cut out that cost.
Great DIY, this will be helpful when I do my '06 in a few weeks. Being that I have the '06 with no built-in aux, I will need to use an iSimple/Blitzsafe adapter to plug the 10k into the head unit, correct? I will probably go Blitzsafe out of simplicity. Would there be any loss in sound quality or stereo output when using the line out from DAC to the Blitzsafe RCA in?
Great DIY, this will be helpful when I do my '06 in a few weeks. Being that I have the '06 with no built-in aux, I will need to use an iSimple/Blitzsafe adapter to plug the 10k into the head unit, correct? I will probably go Blitzsafe out of simplicity. Would there be any loss in sound quality or stereo output when using the line out from DAC to the Blitzsafe RCA in?
yea you can use those devices to create an aux jack. i don't think there will be a loss of quality, i know some people have used an isimple to provide an aux jack but i am not familiar with the blitzsafe, i'm sure it works just as well.
next i hooked up the power cord by putting it into the top slot of the anker cigarette adapter (higher amperage slot). i taped them together so they don't lose connection. then i took an ebay cigarette adapter and wired it to an add a fuse. i placed the add a fuse into a fuse slot that is powered by ignition (i don't remember which slot because i have like 8 add a fuses in the box and didn't write down which one i used)
The accessory adapter that you have powered by ignition, does it get power during engine cranking as well?
The accessory adapter that you have powered by ignition, does it get power during engine cranking as well?
Like most other electrical circuits in the car, the power shuts off while the starter motor cranking. However since the cranking only lasts up to 2 seconds, it usually doesn't matter.
Well done Dave and it was even more impressive seeing it in person the other day. You're doing what Acura should have done years ago bro!! Something tells me you like this kind of stuff
Okay, so I have now read your write-up and ADay2Long's write-up. I am feeling pretty confident that I can do it between your two write-ups. Appreciate ya both!
I think by installing an aftermarket headunit, I have actually made this install a lot easier for myself. I have gone through and looked at your wiring diagram and created my own based on what my goals from the set-up are.
I do have some questions on the feasibility of what I plan to do, but I am thinking everything should work.... I have put in bold any questions.
Okay, so in words, here is what my wiring is going to look like:
From Nexus 7 -> OTG Cable
OTG Cable
Data to Powered USB Hub
USB to Cig Outlet USB
Cig Outlet USB Ports:
USB from OTG cable
Power for USB Hub
Cig Outlet + and -
Neg: Splice from HU wiring harness adapter
Pos: Splice from HU wiring harness adapter (Switched ignition power) - Do I need to add an in-line fuse?
USB Hub:
Out:
EasyCap (plan to install back-up camera)
DAC (already have a FiiO E10k on hand for my computer set-up, planned to upgrade anyways)
Potentially a USB for audio files
In:
Power from Cig Outlet
Data cable from OTG cable
DAC:
Can be run into the back of my head unit, HOPEFULLY! I will test this weekend and see if the HU will recognize the DAC as an input. I can potentially go with USB, I have 2 inputs. I also have 2 Aux inputs on the unit, one in front, one in rear, which is pretty hype, considering an application like this one. Currently I connect my iPhone via USB to the HU because I believe the sound quality is better than Aux. Plan to be able to switch between tablet and iPhone as desired.
I believe that would be it for wiring, except for everything involved with the back-up camera. Do you see any holes in my layout? I can post a diagram if it makes things easier and you're willing to help, of course.
With this set-up, my goal is to be able to just plug my iPhone into the car for audio on a typical day for quick and easy audio. If I am traveling and need GPS, I guess the goal is to set my phone up to tether and have the phone be my hotspot. Can the iPhone be used as a hotspot? If it can't, I guess I am SOL on GPS (Waze) unless I somehow set-up 4G data on my tablet?
I believe the only truly difficult part is with the relocation of the HVAC controls to the factory clock location on the dash (Non-Nav model). It looks more tedious than anything though since I believe you just need to splice all the wires and extend them. Correct me if I am wrong.
The fabrication doesn't really scare me at all, I am working on finishing my sound system still. Honestly, I am not terribly happy with it right now, so I have some things to fix before I start this. Have to re-fiberglass the A-pillars because I don't like the angle my mids point in. Still need to tune more with the DSP, the list goes on...
Anyways, appreciate any help and thanks again for the great write-up! I think I am like 90% on my way, minus looking into installing the ROM onto the tablet.
If you are able to figure out a way to integrate it into the head-unit please let me know.
 01-06-2017, 01:33 PM


 So looks like i may have to pick up a 2013 now .
  Definitely bookmarking this for future purposes.


