D-001: D.I.Y. - A-Spec Suspension Install
 04-13-2010, 09:48 PM
#1
Instructor
Thread Starter
D-001: D.I.Y. - A-Spec Suspension Install
DISCLAIMER: The information you’re about to read is meant as guidelines only, safety is of the utmost importance and shouldn’t be taken lightly. Support the weight above you securely, use common sense, and exercise caution at all times. Copious amounts of alcohol can be consumed after the installation is complete, not during. No tools were harmed during the making of this D-I-Y. When possible, use anti-seize during re-assembly and use new hardware provided with A-Spec kit.
I’m going to assume you can take care of parking the car so that you’ve got plenty of room to work on the vehicle and know how to take the wheels off. If this seems difficult to you, please don’t continue reading and call your local dealership. No kidding, call the dealer.
BACK:
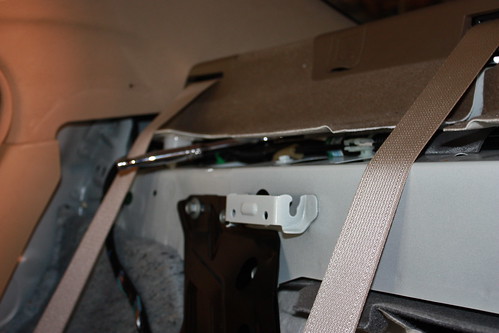
Start with the back first, get the hard part out of the way. I used the service manual to figure out how to take apart the rear seats but I’ll cover the basics. Base of the seat comes out first, feel around the front of the lower seat portion where it meets the carpet, there’s a tab, push down on the seat cushion directly above that area and pull out the tab. This needs to be done on either side. The seat base should lift up and pivot out revealing the (4) 10mm bolts that need to be removed in order to get the seat back free. There’s also a plug to disconnect by the drivers side passenger door, right by one of the 10mm bolts you’re removing be sure to unplug it. Seat belts have to come out as well, this is easy enough. Now you’re ready to remove the seat back revealing the top strut mounts, you can see them but to get a wrench in there, pop out the front row of white clips, I used a set of standard wire cutter pliers to get in there and assist me in popping these out, I didn’t break any so if I can do it, so can you.
Here’s a pic showing the progress so far:
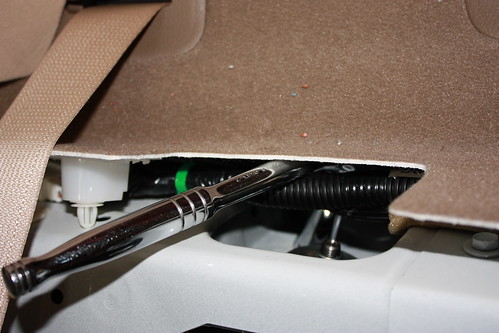
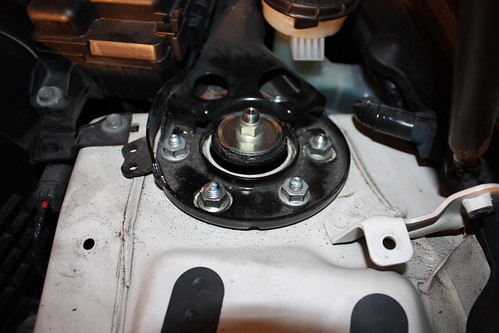
Now it’s onto the top strut mounts, remove the (4) 14mm nuts off using a 3/8” ratchet with a deep 14” socket, no need for extensions or swivel joints. Here’s a pic showing how I did it. Keep in mind, you’ll need to go over the harness, not below:
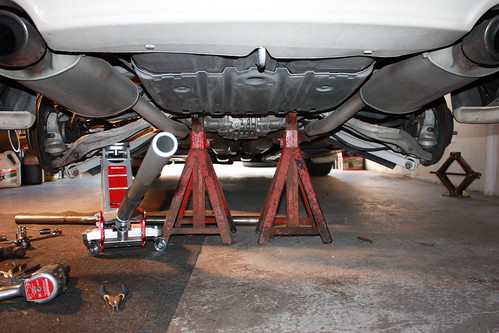
Now jack up the car, take the wheels off, use jackstands to keep it up in the air.
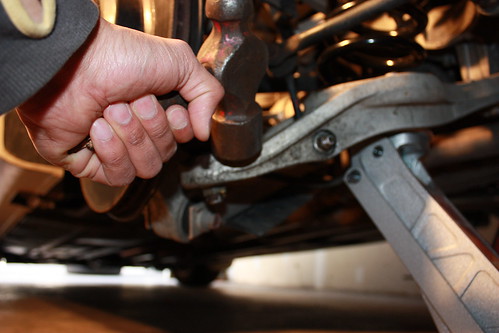
Pick a side and get at it, only difference is that on the drivers side, there's a 10mm nut to be removed to free up the auto leveler. Now, the cotter pin on lower ball joint comes out, then it’s a 22mm socket to get the castle nut off, you’ll need a mallet or hammer to influence the release of the lower control arm from the ball joint.
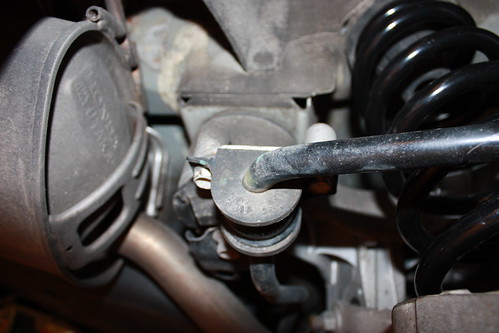
Now remove the (2) 14mm bolts holding the sway bar up to the chassis
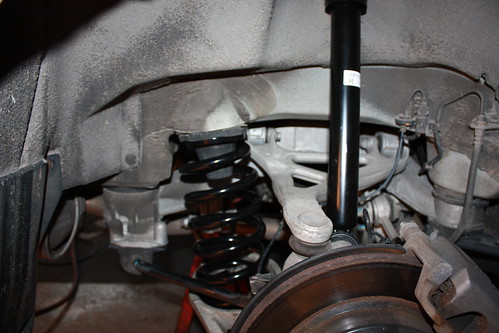
This is where an extra pair of hands (or feet) comes in handy, which I had, while one person manipulates the lower control arm towards the ground, work the spring out, you may have to spin it to get it out, I did. Grab that new spring and put it in just as you took this one out, do it while the memory of removing the old is still fresh even though the shorter A-Spec spring will fit easier, just makes sense to do it now. You’ll need a floor jack to help guide the lower control arm back up in to place. When I got it back into position, the side I was working on lifted away from the jackstand slightly, but it wouldn’t be for long so I left it, stayed away from being underneath the body and snugged up the castle nut for the lower control arm quickly so that the floor jack could be relieved of duty and the car rests safely back on the jackstand.
Now you’re ready to button up the sway bar mount that was previously removed, torque up the lower control arm castle nut (50-55ft.lbs.) so that you’ve got a clear path through the hole for the cotter pin. Use one of the new cotter pins from the kit.
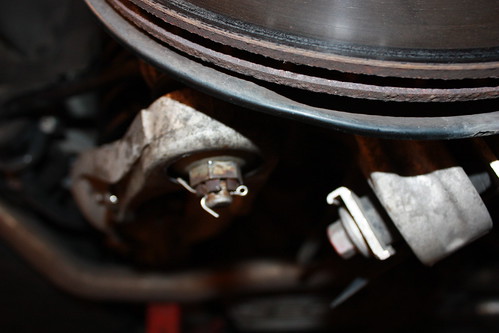
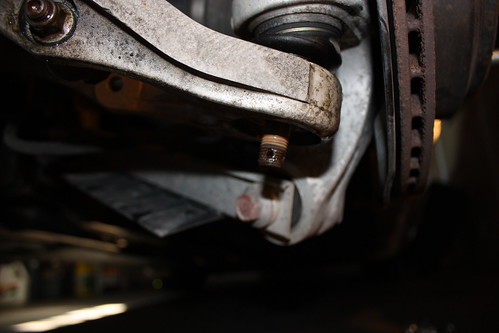
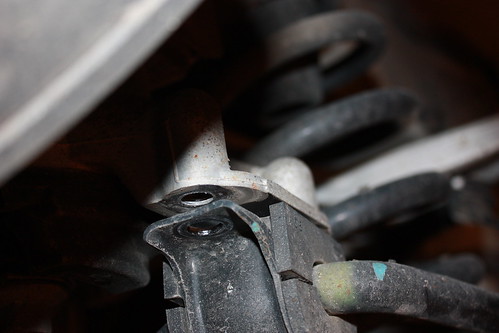
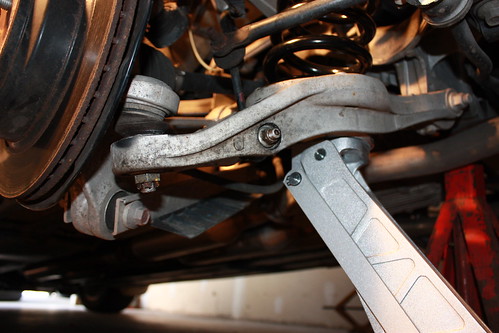
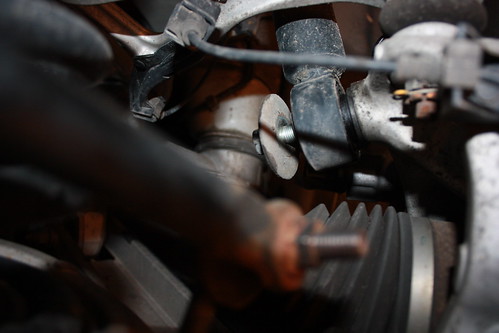
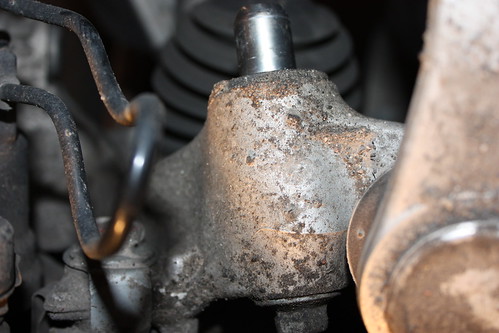
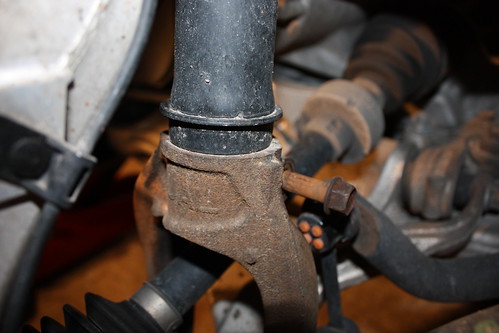
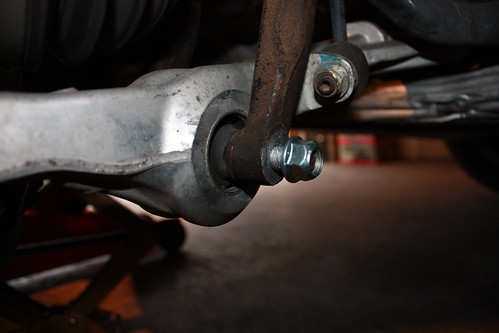
Now the shock, since the top is ready to rock, all that’s left is the lower bolt. This should be a 14mm if memory serves me right, it wasn’t very tight on mine so no need for an impact gun here, just give it a shot, should back right off. Remove the bolt completely; the shock lower is a donut mount that resides on a pin secured to the spindle. See the pics below for reference, one shows the bolt coming off, the other shows the spindle pin.
Now you’re ready to take out the rear shock. For an interesting comparison, compress the shock using your own strength, seems too easy doesn’t it? Now try it with the new A-Spec shock, not as easy. Putting the new shock back in is fairly straightforward but it helps to have someone inside to guide you through the holes and they can throw a nut on to keep it there while they run in for more beer. For the donut mount at the bottom, you may need the floor jack again if your spindle has moved. Go ahead and tighten it all back up. Do the other side in the back, throw the wheels on, torque and let’s move to the front.
FRONT:
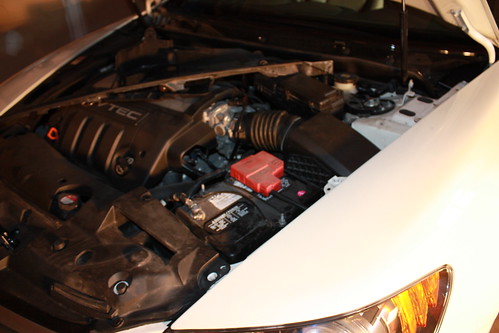
Start with taking off the panels under the hood to reveal the bolts at the top of the front shock.
I was unable to get the car high enough to get jackstands underneath so I used 2 floor jacks to work on each corner at a time. Start with removing the 17mm nut/bolt on the bottom of the shock fork that goes through the front lower control arm.

When that’s done, get the 14mm pinch bolt off of the top of this same fork.
Now comes the interesting part and here is where your own creativity will come in handy. I used a go-kart axle to force the front spindle away from the shock enough that I could get the fork out from under the shock. I will tell you, this wasn’t easy, it was part brute force, part finesse. No pictures to show the process, we were both busy getting it sorted. Good luck to you.
Once the fork is free from the bottom of the front shock, grab that 14mm socket and take off all 6 nuts at the top of the shock making sure that someone is there to grab the shock when the last nut comes off, I was able to get one hand onto the fork as the other hand took off the nut.
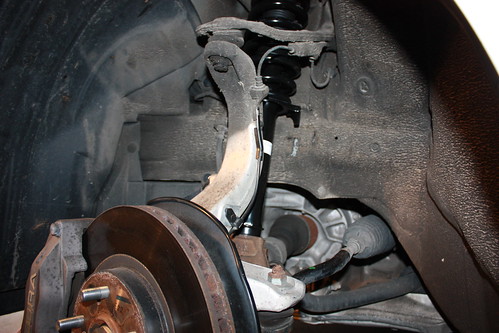
Reverse the procedure for the new shock, note the anti-seize used:
Throw the wheel on, torque it, repeat the same on the other side.
I’m going to assume you can take care of parking the car so that you’ve got plenty of room to work on the vehicle and know how to take the wheels off. If this seems difficult to you, please don’t continue reading and call your local dealership. No kidding, call the dealer.
BACK:
Start with the back first, get the hard part out of the way. I used the service manual to figure out how to take apart the rear seats but I’ll cover the basics. Base of the seat comes out first, feel around the front of the lower seat portion where it meets the carpet, there’s a tab, push down on the seat cushion directly above that area and pull out the tab. This needs to be done on either side. The seat base should lift up and pivot out revealing the (4) 10mm bolts that need to be removed in order to get the seat back free. There’s also a plug to disconnect by the drivers side passenger door, right by one of the 10mm bolts you’re removing be sure to unplug it. Seat belts have to come out as well, this is easy enough. Now you’re ready to remove the seat back revealing the top strut mounts, you can see them but to get a wrench in there, pop out the front row of white clips, I used a set of standard wire cutter pliers to get in there and assist me in popping these out, I didn’t break any so if I can do it, so can you.
Here’s a pic showing the progress so far:
Now it’s onto the top strut mounts, remove the (4) 14mm nuts off using a 3/8” ratchet with a deep 14” socket, no need for extensions or swivel joints. Here’s a pic showing how I did it. Keep in mind, you’ll need to go over the harness, not below:
Now jack up the car, take the wheels off, use jackstands to keep it up in the air.
Pick a side and get at it, only difference is that on the drivers side, there's a 10mm nut to be removed to free up the auto leveler. Now, the cotter pin on lower ball joint comes out, then it’s a 22mm socket to get the castle nut off, you’ll need a mallet or hammer to influence the release of the lower control arm from the ball joint.
Now remove the (2) 14mm bolts holding the sway bar up to the chassis
This is where an extra pair of hands (or feet) comes in handy, which I had, while one person manipulates the lower control arm towards the ground, work the spring out, you may have to spin it to get it out, I did. Grab that new spring and put it in just as you took this one out, do it while the memory of removing the old is still fresh even though the shorter A-Spec spring will fit easier, just makes sense to do it now. You’ll need a floor jack to help guide the lower control arm back up in to place. When I got it back into position, the side I was working on lifted away from the jackstand slightly, but it wouldn’t be for long so I left it, stayed away from being underneath the body and snugged up the castle nut for the lower control arm quickly so that the floor jack could be relieved of duty and the car rests safely back on the jackstand.
Now you’re ready to button up the sway bar mount that was previously removed, torque up the lower control arm castle nut (50-55ft.lbs.) so that you’ve got a clear path through the hole for the cotter pin. Use one of the new cotter pins from the kit.
Now the shock, since the top is ready to rock, all that’s left is the lower bolt. This should be a 14mm if memory serves me right, it wasn’t very tight on mine so no need for an impact gun here, just give it a shot, should back right off. Remove the bolt completely; the shock lower is a donut mount that resides on a pin secured to the spindle. See the pics below for reference, one shows the bolt coming off, the other shows the spindle pin.
Now you’re ready to take out the rear shock. For an interesting comparison, compress the shock using your own strength, seems too easy doesn’t it? Now try it with the new A-Spec shock, not as easy. Putting the new shock back in is fairly straightforward but it helps to have someone inside to guide you through the holes and they can throw a nut on to keep it there while they run in for more beer. For the donut mount at the bottom, you may need the floor jack again if your spindle has moved. Go ahead and tighten it all back up. Do the other side in the back, throw the wheels on, torque and let’s move to the front.
FRONT:
Start with taking off the panels under the hood to reveal the bolts at the top of the front shock.
I was unable to get the car high enough to get jackstands underneath so I used 2 floor jacks to work on each corner at a time. Start with removing the 17mm nut/bolt on the bottom of the shock fork that goes through the front lower control arm.
When that’s done, get the 14mm pinch bolt off of the top of this same fork.
Now comes the interesting part and here is where your own creativity will come in handy. I used a go-kart axle to force the front spindle away from the shock enough that I could get the fork out from under the shock. I will tell you, this wasn’t easy, it was part brute force, part finesse. No pictures to show the process, we were both busy getting it sorted. Good luck to you.
Once the fork is free from the bottom of the front shock, grab that 14mm socket and take off all 6 nuts at the top of the shock making sure that someone is there to grab the shock when the last nut comes off, I was able to get one hand onto the fork as the other hand took off the nut.
Reverse the procedure for the new shock, note the anti-seize used:
Throw the wheel on, torque it, repeat the same on the other side.

The following 5 users liked this post by vtr1000sp2:
ChocBoyWonder (05-24-2014),
Gimpies-Daddy (01-24-2023),
kcjohnnyboy (04-14-2019),
oo7spy (01-14-2015),
projektvertx (04-27-2015)
04-13-2010, 09:58 PM
#3
Instructor
Thread Starter
The $880 includes a 4-wheel alignment for A-Spec specific RL's. I got my alignment done today for $140 CAD. Buffalo dealer quoted me $89 plus tax but I won't have the time to get it done there.
04-14-2010, 07:01 AM
#4
Safety Car
 04-14-2010, 09:25 AM
#5
Safety Car
I forgot to say that this is an excellent DIY. Well done, and definitely Garage worthy. I expect neuronbob will place the thread near the top of the DIY index, since "A-Spec" is in the title!
https://acurazine.com/forums/showthread.php?t=772102
Great job!
https://acurazine.com/forums/showthread.php?t=772102
Great job!
04-14-2010, 02:49 PM
#7
Retired playa
I forgot to say that this is an excellent DIY. Well done, and definitely Garage worthy. I expect neuronbob will place the thread near the top of the DIY index, since "A-Spec" is in the title!
https://acurazine.com/forums/showthread.php?t=772102
Great job!
https://acurazine.com/forums/showthread.php?t=772102
Great job!

The following users liked this post:
Gimpies-Daddy (01-24-2023)
Trending Topics
 04-15-2010, 08:32 PM
#9
Senior Moderator
AWESOME. Garaged.
04-21-2010, 12:18 PM
#12
Safety Car
Correct, all 2G RL, 1G RL and 2G Legends have front strut tower bars. I think the 1G Legend did also, but I cannot remember. The RLegend has introduced a lot of standard stuff across the line. In fact, they are even bringing back the double front spring first implemented in the 1G Legend to the new Crosstour.
http://ww.hondanews.com/categories/1365/releases/5247
Progressive valve nitrogen gas-filled coil-over shock absorbers integrate an internal rebound spring. When cornering, the internal rebound spring allows the shock absorber to exert additional force on the inside wheel's coil spring to help counteract wheel lift in certain situations. This premium shock absorber design helps to improve both ride comfort and responsiveness. Ultimately, tire-to-road adhesion is enhanced.
 02-17-2011, 07:40 AM
#14
Instructor
Thread Starter
If this D.I.Y., helped you save some money, I ask that you consider giving some to a charity of your choosing (yes, even your own personal charity to support your modding habit, lol).
03-29-2011, 10:35 AM
#15
5th Gear

Join Date: Mar 2011
Age: 44
Posts: 5
Likes: 0
Received 0 Likes
on
0 Posts
 04-08-2011, 12:34 PM
#16
Hey guys, just a heads up, when doing the front springs. I used the stock jack and put it between the upper control arm and frame and jacked it up in order to get the front strut and spring out.. worked really well..
08-14-2013, 04:34 PM
#18

Awesome DIY. So if I jus wanted to replace the springs in the rear, I would go directly to the instructions from removing cotter pin and castle nut from lower ball joint, correct?
The following users liked this post:
nynruas (08-22-2013)
08-23-2013, 11:22 AM
#20
Cruisin'

hey everyone i lowered my 2006 acura rl and stupid thing has -2 camber in the rear, i ordered 3 separate ingalls and none of those motherefers fit....can anyone help with what you ordered for your vehicle?
05-21-2014, 02:14 AM
#23
1st Gear

Join Date: Jan 2013
Posts: 1
Likes: 0
Received 0 Likes
on
0 Posts
you forgot to mention one thing, ( I installed my coilovers today and went thru alot of trouble..) the sub frame link needs to be unbolted in order to for the spindle assembly to go down far enough so the fork comes out.
05-24-2014, 08:04 PM
#24
My Mugen suspension arrived and I decided to swap out for the H&R springs. I tackled this on on my own. The jack I used allowed me to get the front and rear on jackstands. Everything went well without a hitch. The only thing different I did was while separating the ball joint from the control arm. I used the jack to apply tension to the rotor. After I did that, I tapped twice with a rubber mallet and it popped off. Otherwise this was spot on.
Nice write up OP!
Nice write up OP!
 04-27-2015, 09:56 PM
#26
Moderator
iTrader: (2)
Join Date: Apr 2012
Location: Buffalo Grove, IL
Age: 34
Posts: 2,676
Received 612 Likes
on
490 Posts
Just swapped the struts on my RL over the weekend, definitely an awesome DIY. One thing I would add for the front: instead of messing around trying to finess the strut out of the fork, I decided to unbolt the upper ball joint from the spindle. Makes the strut removal MUCH, MUCH easier. Allows you to slide to fork further back and pull the strut out of the fork. No stress, no mess!!
The following users liked this post:
Gimpies-Daddy (01-24-2023)
 10-26-2016, 10:36 PM
#28
acura dealership is worse than Mercedes sometimes.
took them 3 hours to replace front seatbelts and 3 hours to replace 2 rear seatbelts...
took me an hour total to replace all seatbelts
took them 3 hours to replace front seatbelts and 3 hours to replace 2 rear seatbelts...
took me an hour total to replace all seatbelts
10-26-2016, 10:58 PM
#29
Senior Moderator

The following users liked this post:
projektvertx (10-26-2016)
01-02-2020, 05:08 PM
#30
Instructor
Hey guys! Don't want to shock everyone by reviving this thread, but I have a question.
I'm planning on changing the the rear shocks on my 2006 RL and wondering if I have to remove the rear spring coil when performing the job? I was reading the manual and I don't think I do, but just want to confirm with the community.
I replaced the fronts and it was a PITA due to unforeseen tool malfunctions. It rides great now but I still feel bumps from the rear making the ride less enjoyable.
Last edited by tr59210; 01-02-2020 at 05:10 PM.
01-03-2020, 07:27 AM
#32
Instructor


Thread
Thread Starter
Forum
Replies
Last Post
TheSauceBoss
3G TL (2004-2008)
2
06-16-2019 09:54 AM
projektvertx
2G RL Tires, Wheels & Suspension
41
05-24-2018 11:06 PM