DIY Air Conditioning Change '04
 06-12-2008, 07:48 PM
#1
Racer
Thread Starter
DIY Air Conditioning Change '04
Whats up people...I, like so many of you fell victim to the a/c issues in my '04. I was out of warranty and in addition to getting a major, rude attitude from my local Acura dealership, I was also quoted a price that I just wasn't going to pay for. I did my research and luckily have a good friend who helped me with the install.
I purchased all my parts online from out of state Acura dealerships because their prices were way way cheaper than anywhere local to me...
http://www.oemacuraparts.com
http://www.hondapartsunlimited.com/
Here's my DIY write up for anyone who wants to do this themselves. It's really not hard, though I would discourage anyone who is not very mechanically inclined from trying this on their own...But I really found it to be pretty easy. If I had to do it again, it would probably only take 2 hours at the most.
Parts:
- Compressor - 38810-RBB-A01
- Clutch Set - 38900-RBB-006
- Coil Set, Solenoid - 38924-RBA-006
- S-Belt - 38920-RBB-E02
- Filter, Sub-Assy - 80101-SEA-003
While you're down there & have the car apart, you might want to do what I did and change out the transmission fluid - I have a 6MT and it shifted much much smoother after the change (MT fluid from Acura & the washers for the fill/drain bolts are necessary 90403-RAR-M00 & 90404-RAR-M00)
Before you do this, let out all remaining R134 at the check valves so you don't have any unwanted pressure releases...keep in mind that this stuff smells and disconnect the battery just to be safe!
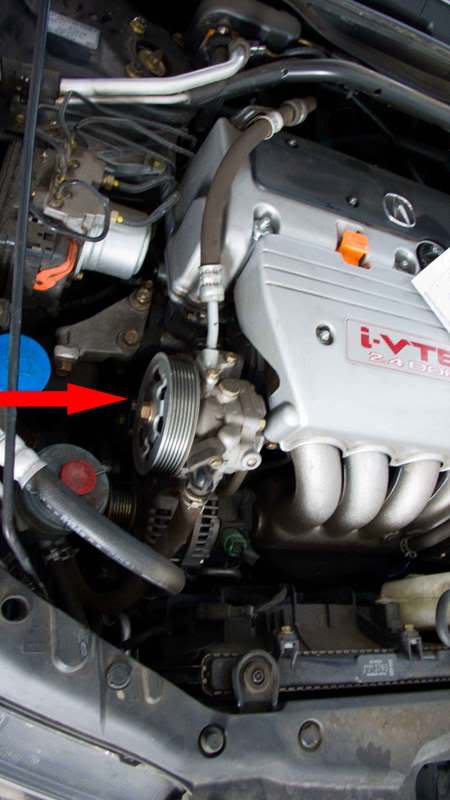
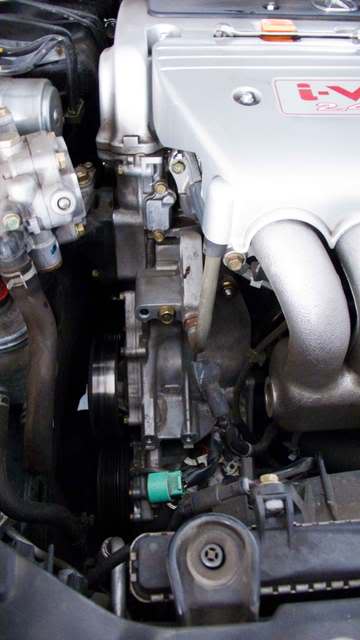
Here's the engine compartment after removing the s-belt (in hindsight, if you are going to install a new s-belt, you could cut it, but I'm not sure how hard it would break apart & you may get hit in the eye or something-at least I would with my luck!)
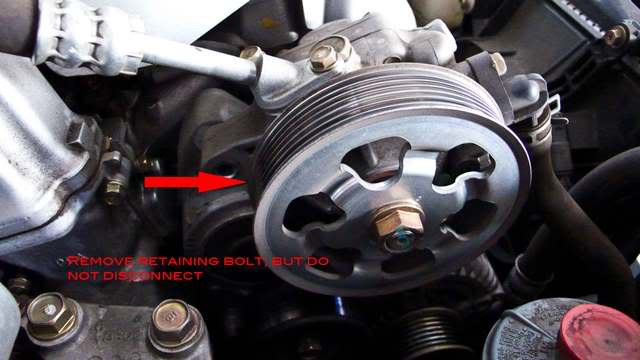
Next, remove but don't disconnect the hoses...it can be pushed to the side to keep it out of your way...
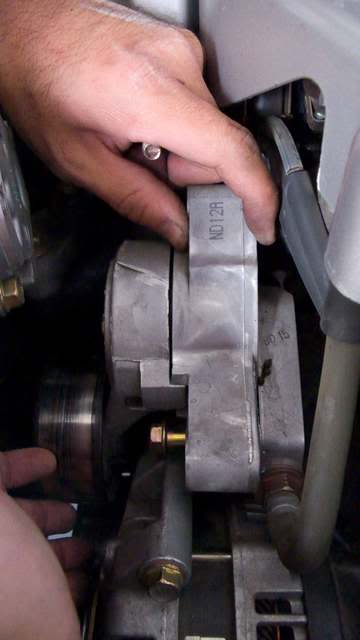
Remove the belt tensioner..I'm not quite sure if this is completely necessary, (can't remember if it makes it impossible to get the alternator off) but it does give you at least some extra elbow room to work...
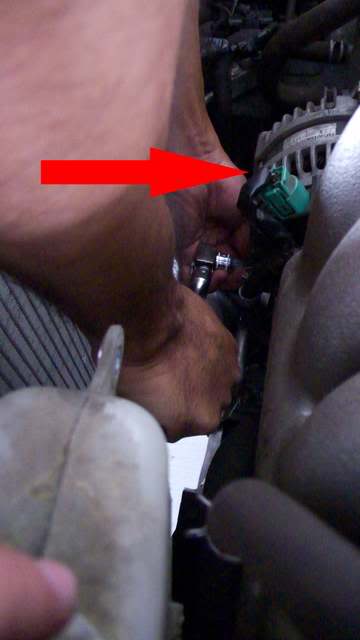
Remove the alternator - unplug the wiring harness, etc. first!!
This is what you should see after removing the main pulley assmbly, belt tensioner & alternator.
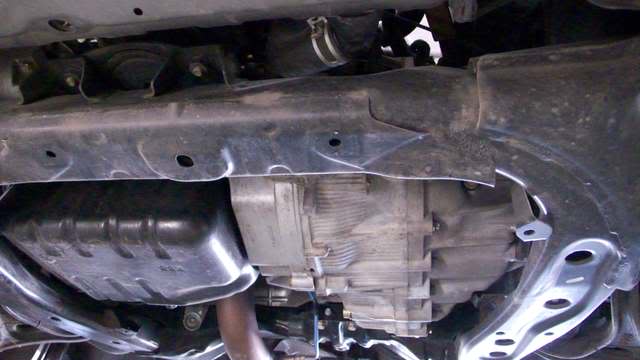
Remove the bottom plastic "aerodynamic" cover thingy - the one that covers the oil pan/transmission. It should look like this...
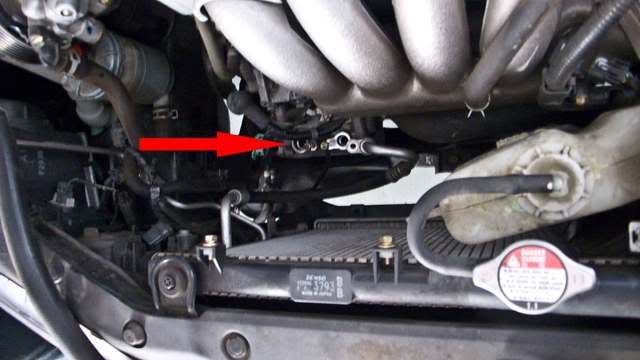
Looking straight down, this is what you should see...This pic was taken after I already removed the hoses...as you can/will see, the hoses are metal at the about the last 6 inches...I put a piece of painters tape at the end of the hoses since it is crucial to keep them free of any debris...after the hoses are removed, and the bottom "aerodynamic" cover thingy is removed you will be able to see the two bolt/screws that you will have to remove to get the compressor free...Don't get frustrated here as they are difficult to get at...sorry I don't have a pic of it, but you can figure it out...
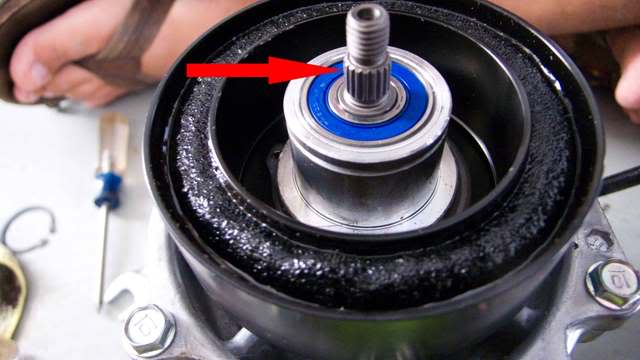
Here's the old compressor with the missing clutch...as you can see, the shaft that held on the remainder of the clutch assembly sheared off & disappeared into the Tustin streets...
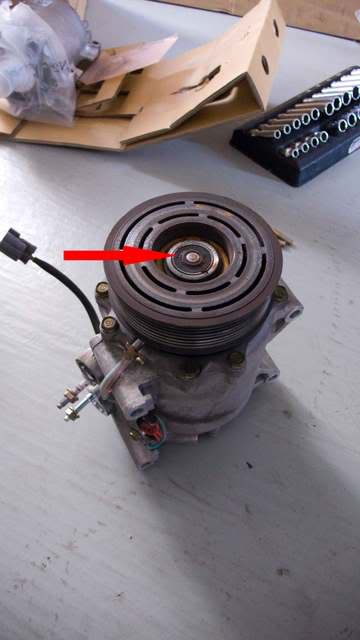
New compressor w/out the clutch assembly attached yet...but you can see the piece that broke off my original compressor.
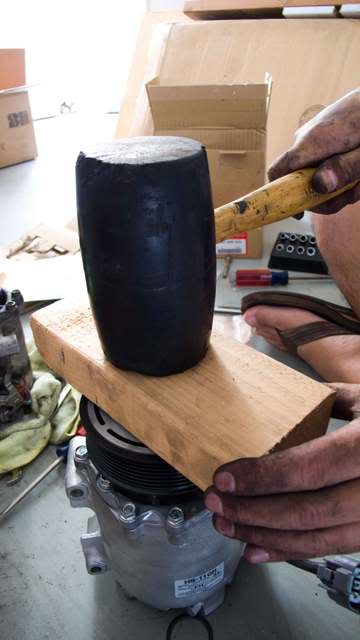
Since we didn't have any special tools to get put the base of the clutch on, a 2x4 & rubber mallet seemed to do the trick.
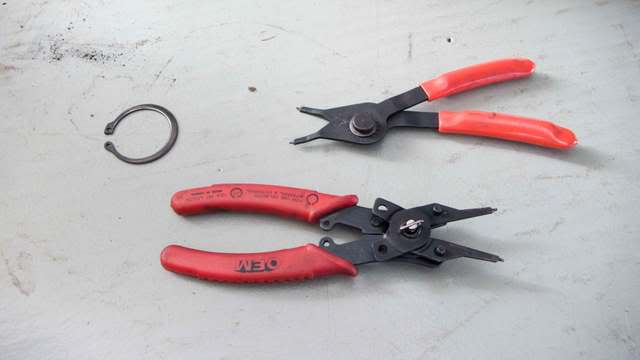
You will need a c-ring tool (or whatever it's called) to secure all the pieces together.
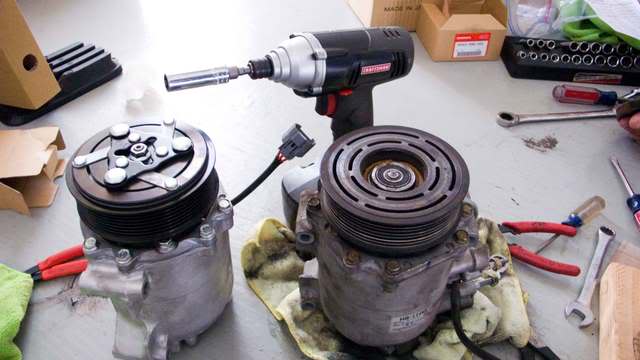
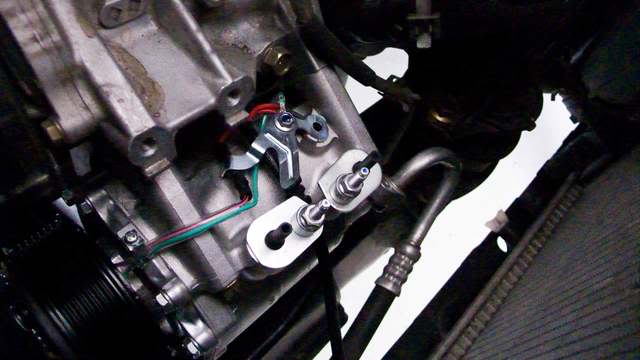
Here's the fully assembled compressor and clutch assembly next to the old one...an impact drill seemed to work well for the main bolt on the compressor. Make sure you reference the wiring set up on your old compressor and match them to the new parts.
Here's a diagram of the parts from the Acura service manual.
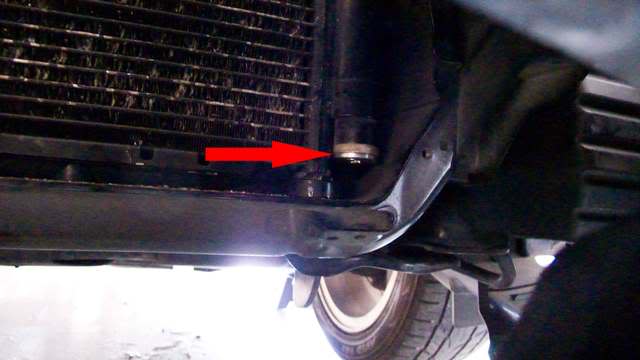
Prior to replacing the new compressor, you will want to loosen the condensor and remove and replace the condensor filter bag (it calls for a fairly large allen wrench attachment.

the silver piece is the plug that must be removed to replace the condensor filter bag - the tire in the background is the front drivers side for reference.
After the condensor is taken care of, re-tighten it and go ahead and reverse the order from which you took everything off...Finally, here's a pic of the compressor installed without the hoses attached. As you can see, in order to keep any debris out of the new compressor, there are thin metal plates...remove these and immediately attach the hoses so you don't let anything fall in the compressor...If ANYTHING gets into the system, it will most likely destroy your entire a/c system and you will be back to where you started.
After everything is put back together and tightened...you can do as I did and take the car to an A/C shop for a leak test and recharge...I'm in the OC so if you are in the area I took my car here:
Garden Grove Radiator,
Air Conditioning & Auto Repair
13089 Century Blvd. (Behind Costco)
Garden Grove, CA 92843
Tel: (714) 537-2658
Alt: (714) 539-5101
Hours:
Monday through Friday, 8:00am - 5pm
Saturday, 8:00am - 3:30pm
NOTE: Based on my research & talking to a service tech, the filter bag thing should not be reused and SHOULD be changed anytime the A/C system is opened up simply because moisture and other impurities will inevitably and unintentionally enter the system..and the bag is crucial in absorbing and filtering any pollutants...What I figure is for about $25-35 bucks, it's kind of worth it just to be safe....Also, I did not and have not yet had any issues but was told that I should have changed the rubber gaskets at the ends of the hoses that connect to the compressor...
Let me know if you have any questions/comments...this is my first DIY post so I'm not sure how helpful it was or wasn't....Good luck!
I purchased all my parts online from out of state Acura dealerships because their prices were way way cheaper than anywhere local to me...
http://www.oemacuraparts.com
http://www.hondapartsunlimited.com/
Here's my DIY write up for anyone who wants to do this themselves. It's really not hard, though I would discourage anyone who is not very mechanically inclined from trying this on their own...But I really found it to be pretty easy. If I had to do it again, it would probably only take 2 hours at the most.
Parts:
- Compressor - 38810-RBB-A01
- Clutch Set - 38900-RBB-006
- Coil Set, Solenoid - 38924-RBA-006
- S-Belt - 38920-RBB-E02
- Filter, Sub-Assy - 80101-SEA-003
While you're down there & have the car apart, you might want to do what I did and change out the transmission fluid - I have a 6MT and it shifted much much smoother after the change (MT fluid from Acura & the washers for the fill/drain bolts are necessary 90403-RAR-M00 & 90404-RAR-M00)
Before you do this, let out all remaining R134 at the check valves so you don't have any unwanted pressure releases...keep in mind that this stuff smells and disconnect the battery just to be safe!
Here's the engine compartment after removing the s-belt (in hindsight, if you are going to install a new s-belt, you could cut it, but I'm not sure how hard it would break apart & you may get hit in the eye or something-at least I would with my luck!)
Next, remove but don't disconnect the hoses...it can be pushed to the side to keep it out of your way...
Remove the belt tensioner..I'm not quite sure if this is completely necessary, (can't remember if it makes it impossible to get the alternator off) but it does give you at least some extra elbow room to work...
Remove the alternator - unplug the wiring harness, etc. first!!
This is what you should see after removing the main pulley assmbly, belt tensioner & alternator.
Remove the bottom plastic "aerodynamic" cover thingy - the one that covers the oil pan/transmission. It should look like this...
Looking straight down, this is what you should see...This pic was taken after I already removed the hoses...as you can/will see, the hoses are metal at the about the last 6 inches...I put a piece of painters tape at the end of the hoses since it is crucial to keep them free of any debris...after the hoses are removed, and the bottom "aerodynamic" cover thingy is removed you will be able to see the two bolt/screws that you will have to remove to get the compressor free...Don't get frustrated here as they are difficult to get at...sorry I don't have a pic of it, but you can figure it out...
Here's the old compressor with the missing clutch...as you can see, the shaft that held on the remainder of the clutch assembly sheared off & disappeared into the Tustin streets...
New compressor w/out the clutch assembly attached yet...but you can see the piece that broke off my original compressor.
Since we didn't have any special tools to get put the base of the clutch on, a 2x4 & rubber mallet seemed to do the trick.
You will need a c-ring tool (or whatever it's called) to secure all the pieces together.
Here's the fully assembled compressor and clutch assembly next to the old one...an impact drill seemed to work well for the main bolt on the compressor. Make sure you reference the wiring set up on your old compressor and match them to the new parts.
Here's a diagram of the parts from the Acura service manual.
Prior to replacing the new compressor, you will want to loosen the condensor and remove and replace the condensor filter bag (it calls for a fairly large allen wrench attachment.
the silver piece is the plug that must be removed to replace the condensor filter bag - the tire in the background is the front drivers side for reference.
After the condensor is taken care of, re-tighten it and go ahead and reverse the order from which you took everything off...Finally, here's a pic of the compressor installed without the hoses attached. As you can see, in order to keep any debris out of the new compressor, there are thin metal plates...remove these and immediately attach the hoses so you don't let anything fall in the compressor...If ANYTHING gets into the system, it will most likely destroy your entire a/c system and you will be back to where you started.
After everything is put back together and tightened...you can do as I did and take the car to an A/C shop for a leak test and recharge...I'm in the OC so if you are in the area I took my car here:
Garden Grove Radiator,
Air Conditioning & Auto Repair
13089 Century Blvd. (Behind Costco)
Garden Grove, CA 92843
Tel: (714) 537-2658
Alt: (714) 539-5101
Hours:
Monday through Friday, 8:00am - 5pm
Saturday, 8:00am - 3:30pm
NOTE: Based on my research & talking to a service tech, the filter bag thing should not be reused and SHOULD be changed anytime the A/C system is opened up simply because moisture and other impurities will inevitably and unintentionally enter the system..and the bag is crucial in absorbing and filtering any pollutants...What I figure is for about $25-35 bucks, it's kind of worth it just to be safe....Also, I did not and have not yet had any issues but was told that I should have changed the rubber gaskets at the ends of the hoses that connect to the compressor...
Let me know if you have any questions/comments...this is my first DIY post so I'm not sure how helpful it was or wasn't....Good luck!

The following users liked this post:
Glorygang600 (08-07-2017)
06-12-2008, 11:42 PM
#3
Racer
Join Date: Jan 2007
Location: Portland OR
Age: 40
Posts: 270
Likes: 0
Received 0 Likes
on
0 Posts
good work, DIY is the way to go to avoid paying for labor. Nice right up. I wonder if you could just pull the A/c unit out with out taking the alternator out by pulling the A/C unit from below. I'm not too sure how hard it would be to get to the upper bolts with the alt. there.
06-13-2008, 12:31 AM
#4
Racer
Thread Starter
Originally Posted by HI OFECR
Cost of Parts would be a good add
But nice job.
But nice job.
Parts:
- Compressor - 38810-RBB-A01 - $384.09
- Clutch Set - 38900-RBB-006 - $152.53
- Coil Set, Solenoid - 38924-RBA-006 - $60.32
- S-Belt - 38920-RBB-E02 - $57.74
- Filter, Sub-Assy - 80101-SEA-003 - $33.47
- System leak check and recharge - $45-60 (I forgot exactly how much) @ a/c repair shop
- TOTAL - $733.15
- Working on your own car...PRICELESS!!! -
06-13-2008, 12:33 AM
#5
Racer
Thread Starter
Originally Posted by shmork53
good work, DIY is the way to go to avoid paying for labor. Nice right up. I wonder if you could just pull the A/c unit out with out taking the alternator out by pulling the A/C unit from below. I'm not too sure how hard it would be to get to the upper bolts with the alt. there.
06-13-2008, 10:02 AM
#6
Originally Posted by knakane
Parts:
- Compressor - 38810-RBB-A01 - $384.09
- Clutch Set - 38900-RBB-006 - $152.53
- Coil Set, Solenoid - 38924-RBA-006 - $60.32
- S-Belt - 38920-RBB-E02 - $57.74
- Filter, Sub-Assy - 80101-SEA-003 - $33.47
- System leak check and recharge - $45-60 (I forgot exactly how much) @ a/c repair shop
- TOTAL - $733.15
 Good job knakane.
 (
 for our team last night).
06-13-2008, 10:47 AM
for our team last night).
06-13-2008, 10:47 AM
#7
Pro

Hope it works out for you, but keep in mind that usually when the compressor locks up it pumps a lot of debris through the system. Did you drain the oil out of the old compressor to see how dirty it was? Usually at the least you should replace the entire condensor and flex hoses and flush the remainder of the system out as well as you can. Often it's best to replace the evaporator and expansion valve too as any debris stuck in the exp. valve will effect system operation. Point is any debris left in the system that doesn't get picked up by the filter/desicant will shorten the life of the new compessor.
Also, did you shim the compressor clutch properly? If the clutch drags it will overheat in a hurry, and if the gap is too great the system may not engage in hot weather.
BTW....venting R134a into the air is a no-no, should have had your A/C shop evacuate the system for you first. Big fine if you happen to get caught, as it's still an ozone depleting gas.
Trending Topics
06-13-2008, 01:17 PM
#8
Racer
Thread Starter
Originally Posted by poltergeist
Hope it works out for you, but keep in mind that usually when the compressor locks up it pumps a lot of debris through the system. Did you drain the oil out of the old compressor to see how dirty it was? Usually at the least you should replace the entire condensor and flex hoses and flush the remainder of the system out as well as you can. Often it's best to replace the evaporator and expansion valve too as any debris stuck in the exp. valve will effect system operation. Point is any debris left in the system that doesn't get picked up by the filter/desicant will shorten the life of the new compessor.
Also, did you shim the compressor clutch properly? If the clutch drags it will overheat in a hurry, and if the gap is too great the system may not engage in hot weather.
BTW....venting R134a into the air is a no-no, should have had your A/C shop evacuate the system for you first. Big fine if you happen to get caught, as it's still an ozone depleting gas.
Also, did you shim the compressor clutch properly? If the clutch drags it will overheat in a hurry, and if the gap is too great the system may not engage in hot weather.
BTW....venting R134a into the air is a no-no, should have had your A/C shop evacuate the system for you first. Big fine if you happen to get caught, as it's still an ozone depleting gas.
06-16-2008, 07:50 PM
#9
STi'd
Join Date: Oct 2003
Location: Eight-Oh-Eight
Posts: 388
Likes: 0
Received 0 Likes
on
0 Posts
Originally Posted by poltergeist
Hope it works out for you, but keep in mind that usually when the compressor locks up it pumps a lot of debris through the system. Did you drain the oil out of the old compressor to see how dirty it was? Usually at the least you should replace the entire condensor and flex hoses and flush the remainder of the system out as well as you can. Often it's best to replace the evaporator and expansion valve too as any debris stuck in the exp. valve will effect system operation. Point is any debris left in the system that doesn't get picked up by the filter/desicant will shorten the life of the new compessor.
Also, did you shim the compressor clutch properly? If the clutch drags it will overheat in a hurry, and if the gap is too great the system may not engage in hot weather.
BTW....venting R134a into the air is a no-no, should have had your A/C shop evacuate the system for you first. Big fine if you happen to get caught, as it's still an ozone depleting gas.
Also, did you shim the compressor clutch properly? If the clutch drags it will overheat in a hurry, and if the gap is too great the system may not engage in hot weather.
BTW....venting R134a into the air is a no-no, should have had your A/C shop evacuate the system for you first. Big fine if you happen to get caught, as it's still an ozone depleting gas.
 08-22-2008, 03:30 PM
#11
Let me help you!
Yeah, the fine is at least $10,000 with some prison time. You should add that to the cost of your DIY if you plan on keeping the "vent freon into the atmosphere so it depletes the ozone" step. Otherwise, I'd suggest you replace that step with "Have the freon evacuated by a shop."
08-31-2009, 02:17 PM
#12
Intermediate

knakane,
Thanks for the great writeup on this. Driving home from work last week, I stated to hear a loud whirring noise coming from under the hood that starts up when the compressor is active. Manually turning the a/c to "off" eliminates the noise. Also, when the compressor is active, the whirring gets faster as I rev the engine (which makes sense since the flywheel is connected to compressor via the serpentine belt). Sounds like the bearing is giving out on the compressor and in an effort to learn up on this stuff (and save myself some money), I'm looking to do this myself.
Shopping around for parts, I'm looking at the following:
* Replacement compressor assembly (includes coil set & clutch set) from Autozone: $350
* Replacement serpentine belt from local dealership: $44.40 - 15% off coupon = $37.74
* Replacement filter (dryer/dessicant) from local dealership: $45.27 - 15% off coupon = $38.48
* R134a system evacuation & recharge from local mechanic: $125
That said, I'm wondering if anyone around here has had any luck (good or bad) with the non-OEM compressors. The OEM sets (compressor + clutch + coil) are pretty pricey and I'm looking to save some $$$ here. I also need the parts soon (it's pretty hot down here in this Texas heat!)
09-11-2009, 01:05 PM
#13
Intermediate
As luck would have it, there doesn't seem to be an available aftermarket compressor for the 2004 TSX.
The OEM compressor is a Keihin HS-110R. After snagging "replacements" from both the local Autozone and O'Reilly, we found the following differences:
* The OEM compressor has 3 terminals on the connector while the aftermarket replacement only has 2
* The OEM compressor has 3 wires coming from the terminal, where as the aftermarket replacement only has 1
* The pulley on the aftermarket replacement is actually slightly smaller in diameter - probably on the order of 1cm. This might throw off the auto-tensioner?
That said, I had to return the aftermarket "replacements" and am on the hunt for a "recycled" (read "used") OEM compressor from some parts distributors. I'll try to do a full write-up once I get everything figured out...
Again, this was for the 2004 TSX - tho you may have better luck with more recent model years.
09-14-2009, 01:48 PM
#14
still plays with cars

Have you tried NAPA or some of the other trades jobbers? There should be someone rebuilding them by now.
AutoZone and O'Reilly are aimed at the DIY folks and I'm not surprised their parts won't work.
AutoZone and O'Reilly are aimed at the DIY folks and I'm not surprised their parts won't work.
09-16-2009, 11:41 PM
#15
Intermediate
nbtx: Nope - didn't try Napa, but I went ahead and got a used compressor from LKQ since none of the local folks (not even local re-builders that I tried) had them in stock.
I've got a writeup now here:
Public Link (expires in 90 days?):
http://www.facebook.com/album.php?ai...5&l=487a44d94c
Permanent Link (log in to facebook first, album shared with Everyone):
http://www.facebook.com/album.php?ai...3&id=502851915
This was my first time and a bit tricky to do, but if you do some reading and understand some basic science, it can be straight forward with a little help. If I didn't have the issue with the parts, I could've probably finished this in one day, but overall, it took me about 2.5 weeks. (Definitely would've taken me more than just 2 hours!)
And the new compressor did take care of the noise! I guess the internal bearing on the old compressor might've been falling apart.
Finally, a big thanks to knakane for the original writeup
Last edited by djpinoy; 09-16-2009 at 11:42 PM. Reason: Credit where credit is due!
05-09-2011, 12:45 PM
#16
5th Gear

Join Date: Jun 2010
Posts: 5
Likes: 0
Received 0 Likes
on
0 Posts
My wife's AC just went out on Friday on her TSX. I researching and wanted to see if you had any new feedback on replacement. Anything that you would have done differently? Any additional parts? Here's the parts list that I have so far. Am I missing anything?
Compressor - 38810-RBB-A01
Clutch Set - 38900-RBB-006
Coil Set, Solenoid - 38924-RBA-006
Serpentine Belt - 38920-RBB-E02
Filter, Sub-Assy - 80101-SEA-003
Condenser - 80110-SEA-013
I found the compressor online at http://www.techchoiceparts.com for $198. I'm sure it's not OEM, but the OEM price I found was $420, so it may be worth it. And the condensor was $80 on that site instead of $315. Now I'm hesitant of the price difference.
So here are the prices that I found for what is needed:
Compressor - 38810-RBB-A01 - $198 (techchoice)
Clutch Set - 38900-RBB-006 - $168 (oemauraparts.com)
Coil Set, Solenoid - 38924-RBA-006 - $66 (oemacuraparts.com)
Serpentine Belt - 38920-RBB-E02 - $19 (amazon.com)
Filter, Sub-Assy - 80101-SEA-003 - $35 (oemacuraparts.com)
Condenser - 80110-SEA-013 - $80 (techchoice)
Comes out to $566 + tax/shipping. Am I missing anything? Do you think I should be wary of the low cost of the compressor/condensor?
I'll still need to add the AC maintenance (evac/charge) costs.
Thanks to knakane and djpinoy for the write ups.
 08-30-2014, 12:57 PM
#18

Thanks for the write up op, this really helped me change out the a/c on my tsx. I couldn't have done it without this thread, I had no idea where the damn drier went. Haha
btw for anyone wanting to know how much this cost, it cost me a total of $267 which included the new compressor, drier, compressor oil, orings, and freon.
btw for anyone wanting to know how much this cost, it cost me a total of $267 which included the new compressor, drier, compressor oil, orings, and freon.

Thread
Thread Starter
Forum
Replies
Last Post
tottenham12712
1G TSX Performance Parts & Modifications
24
11-20-2016 07:55 AM
closetprisoner
2G TL Problems & Fixes
57
11-01-2015 10:15 PM