When you click on links to various merchants on this site and make a purchase, this can result in this site earning a commission. Affiliate programs and affiliations include, but are not limited to, the eBay Partner Network.
INSTALL: Thottle body / Idle Control Valve - 3.0 Motor
I had to do some work to the car a couple weeks ago because my car was idling very funny. These are instructions for how to remove parts of the throttle body assembly. I figured since I went through all this just to change/clean my idle control valve, I�d document it for all you guys and gals. Mods, I�m sure you can decide what to do with this thread for future use.
Just some general info. You will need a socket wrench 3/8� drive should be fine with 8mm (I think), 10mm, 12mm sockets, Phillips and regular head screwdrivers, strong set of small pliers, hacksaw or chisel or dremel tool (all not required but for what I did I needed it), a razor blade, and plenty of light (for you newbs trying to use just a flashlight). I can think of anything else, but I may have forgotten something. Also most of the hose clamps are either screw clamps or need to be removed squeezing them with pliers to loosen, not remove completely.
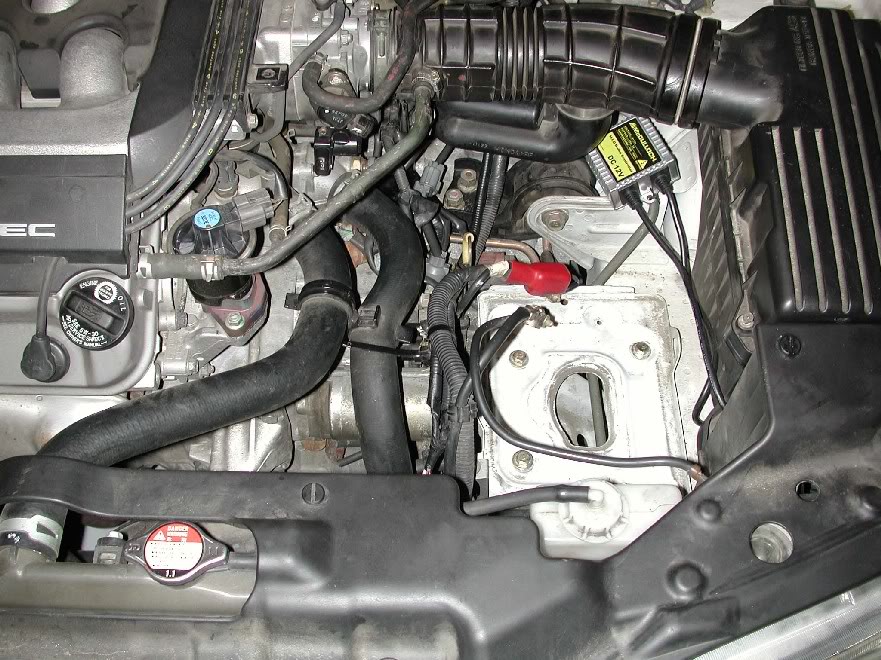
1) Remove the plastic cover on top of the throttle body and remove the battery and the black plastic battery holder. This will give you more room to work with and your going to have to disconnect the battery anyway to reset the computer so removing the battery helps out.
2) Next, remove the intake hose. You have to disconnect these clamp/hose assemblies first. There will be one more air hose connected to the other side of the intake hose which is a pain to remove so I just left it in and propped up the whole thing towards the back of the engine bay, out of the way.
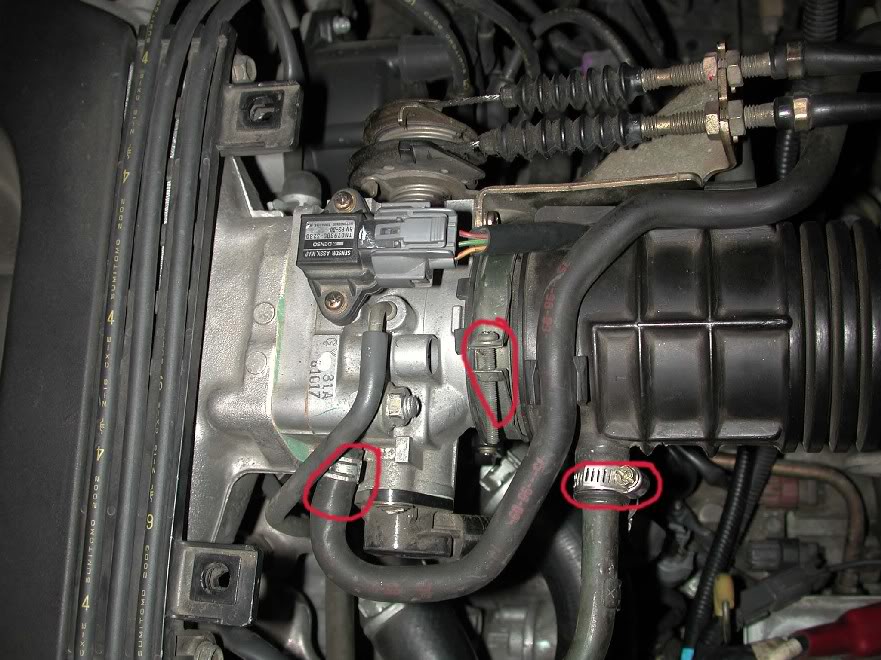
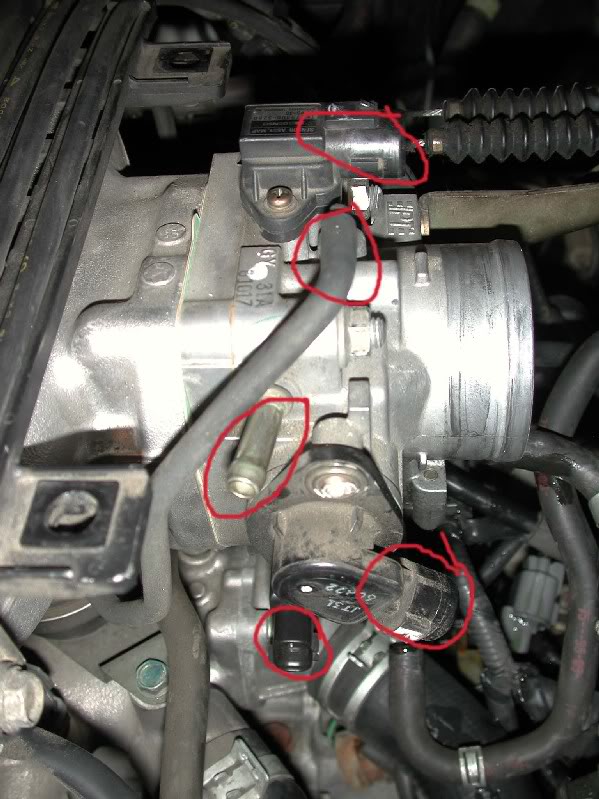
3) Next disconnect the following to remove the throttle body.
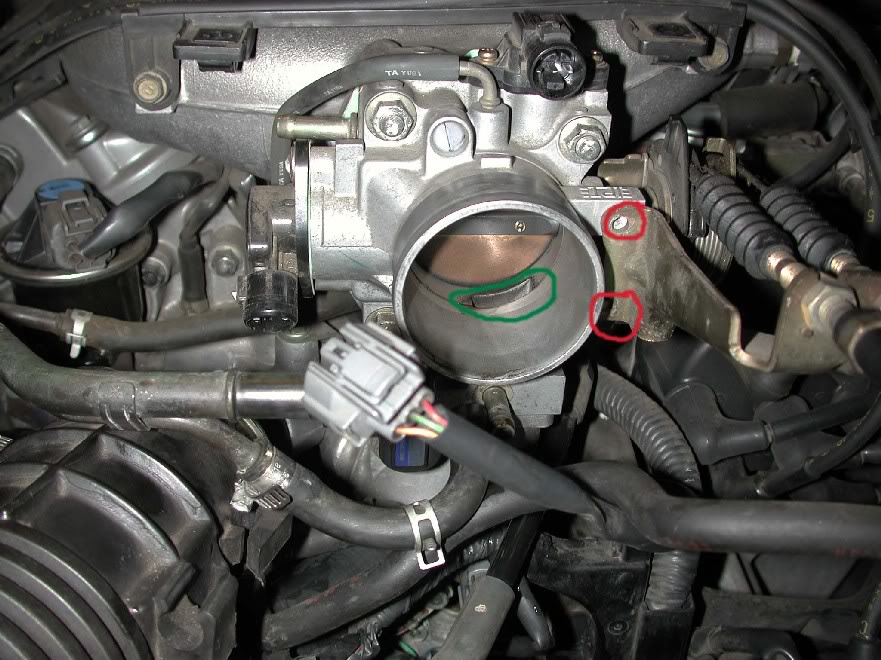
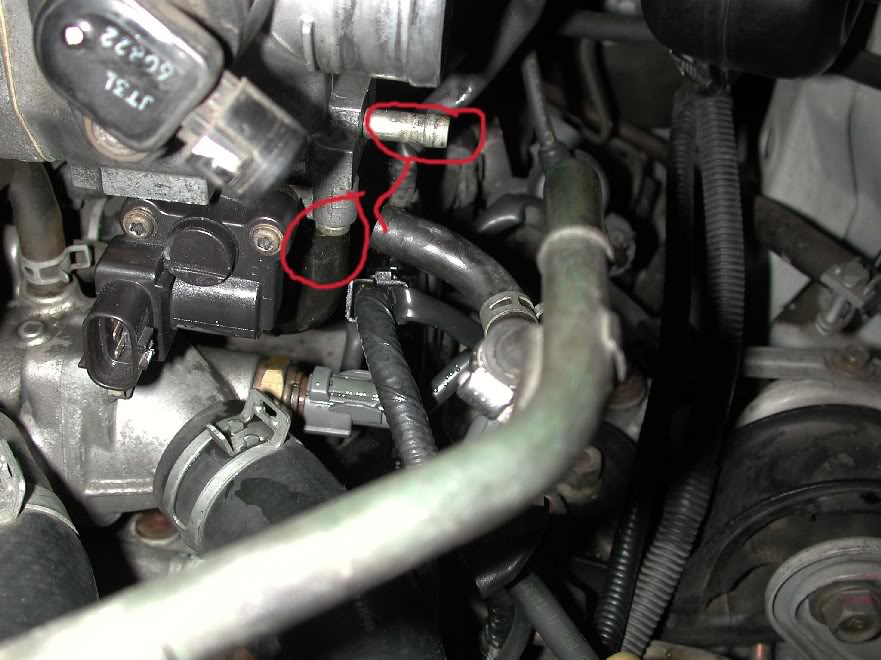
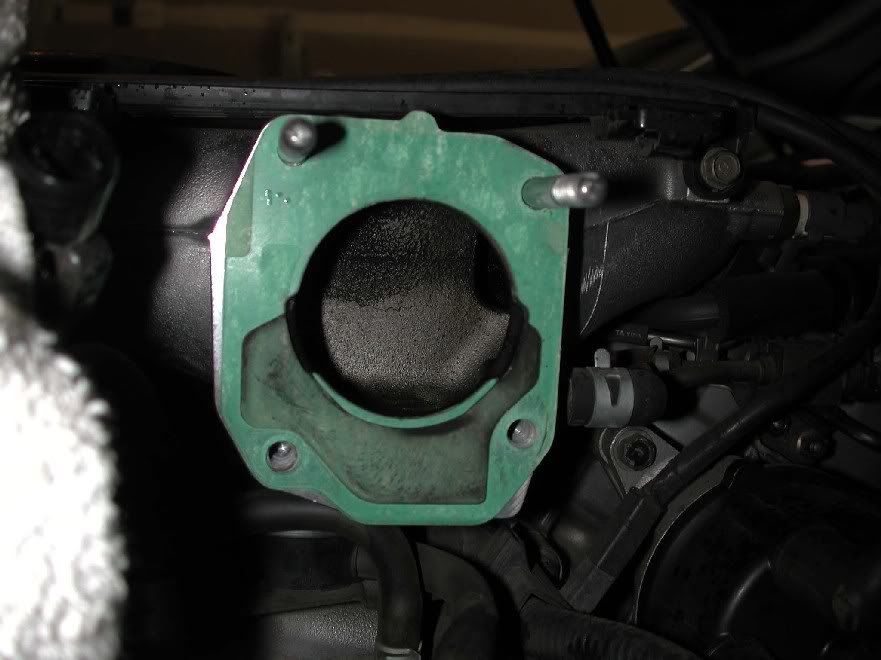
Once all of these connectors and hoses are disconnected, you have to remove the throttle cable assembly. There are two screws to remove circled in red. The opening in the throttle body circled in green is were the ICV gets the air from, just FYI for you.
Then disconnect the throttle cables. There are two cables connected to the rear/bottom of the circular spring assembly. All you have to do is compress the spring to give you slack and remove the anchored end of the cable out of the slot were the wire locks into the spring assembly. You can do it with your hand easily. If it seems to stiff, then the spring assembly is not compressed enough.
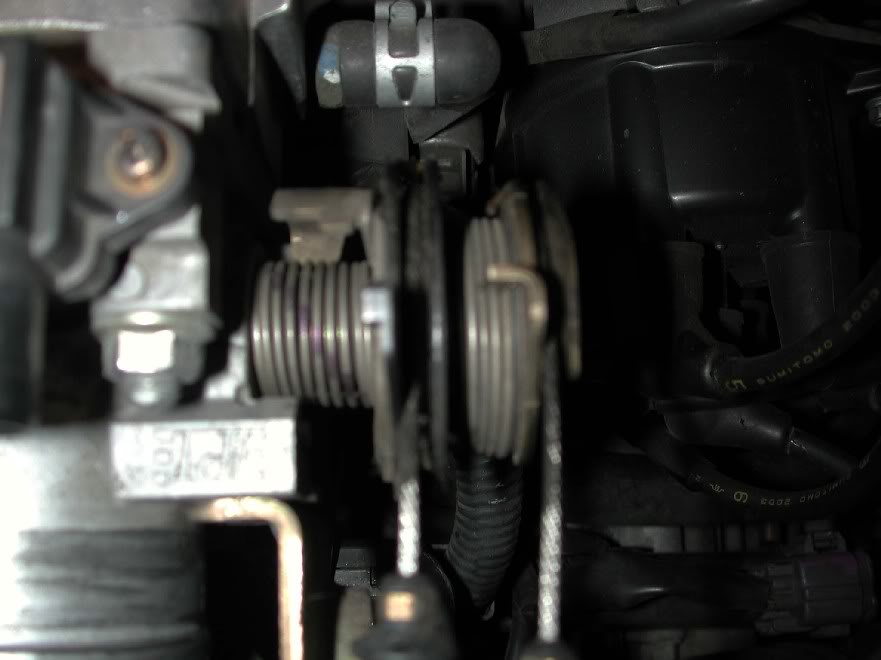
These are the final two hoses that are directly from the ICV at the bottom of the throttle body. They are coolant lines and will leak a small amount of fluid when they are removed. The top one is the input and the bottom is the return FYI. Just place a rag underneath to soaked up the coolant before it drops all over the place.
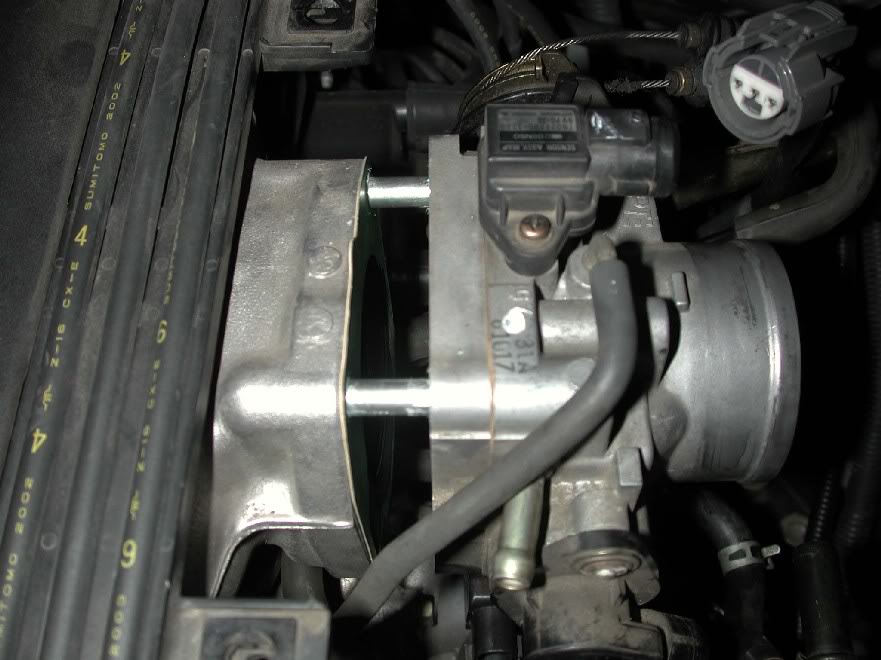
4) Now you can remove the throttle body. There are 4 bolts. The top two are stationary bolts and all you remove are the 12mm nuts and the bottom two you have to remove the entire bolt (go figure Honda engineers? ).
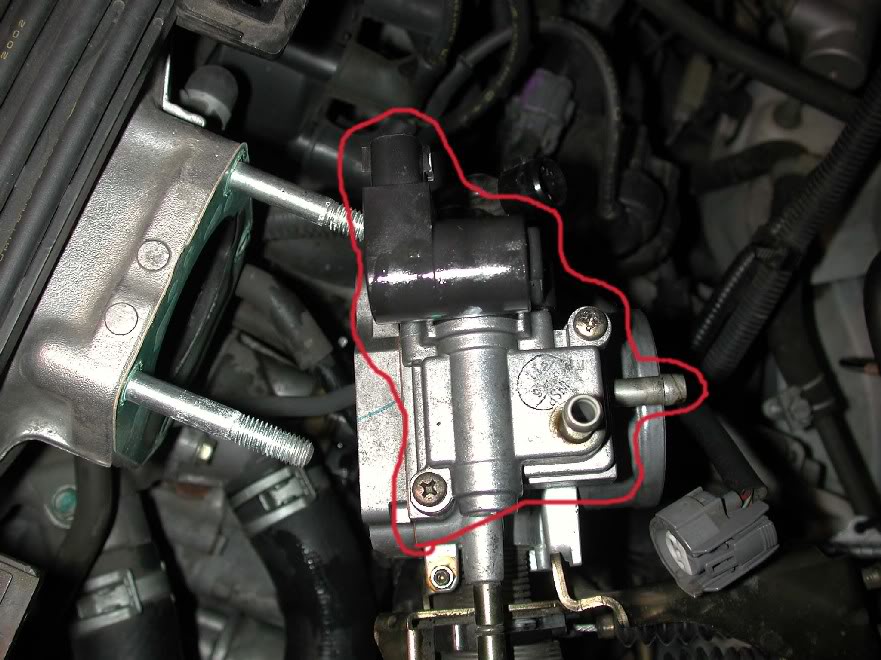
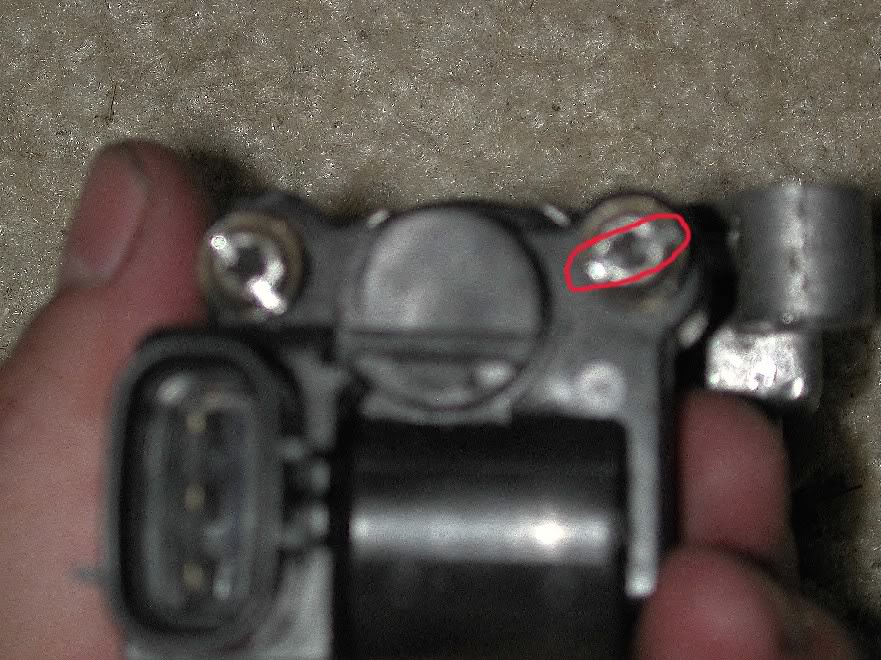
5) Flip the throttle body over and you�ll see the ICV and the two screws you need to remove. WARNING: SPRAY THESE SCREWS WITH PENETRATING LUBE. These can be surprising tough to remove and if you strip it, that�s were the headache begins.
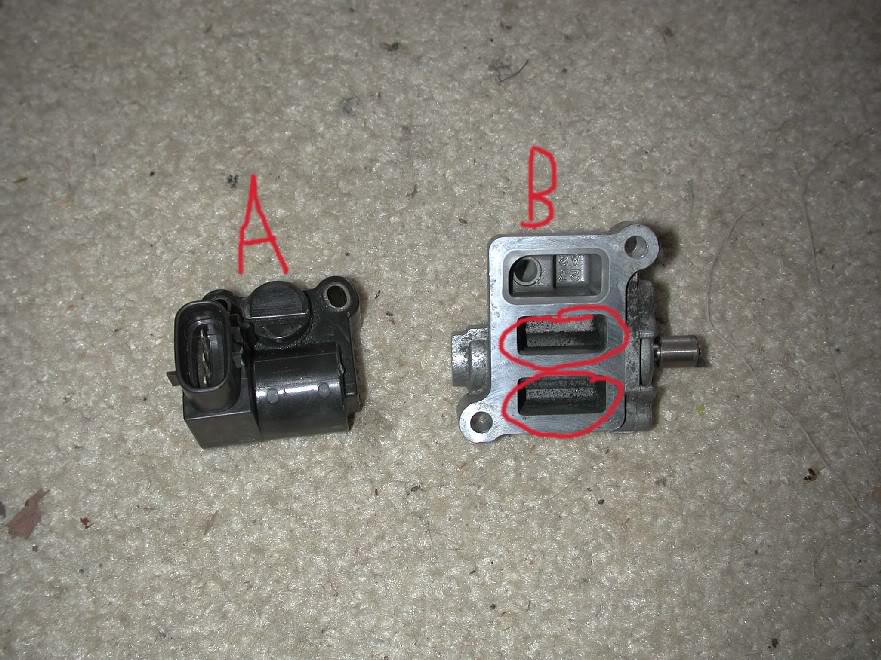
6) Now this is where you can go one of two ways. You can replace the whole ICV by simply using the 2 existing screws to attached the new ICV back to the throttle body, which is what I ended up doing anyway. OR try to clean out the two circled areas where the actual valve is located with some carb cleaner. I did this and put everything back together just come to the conclusion that I needed to replace the whole thing ($100 at the Honda dealer, but $70 for me )
Now the ICV is made up of two parts. What I like to call the electronic part (�A� in the pic) and the mechanical part (�B� in the pic). The mechanical part has a circular valve the spins, opening and closing the 2 red-circled areas. This is controlled by the electrical part, which uses a magnetic power source to spin the valve. Pulling the two pieces apart reveled to me that this piece is magnetic. Applying power, I figured that the electrical part was not working on mine, which is why I had to get a whole new ICV. Some people claim that cleaning out the mechanical part should do the trick. That is only if it is clogged or has a lot of carbon deposits.
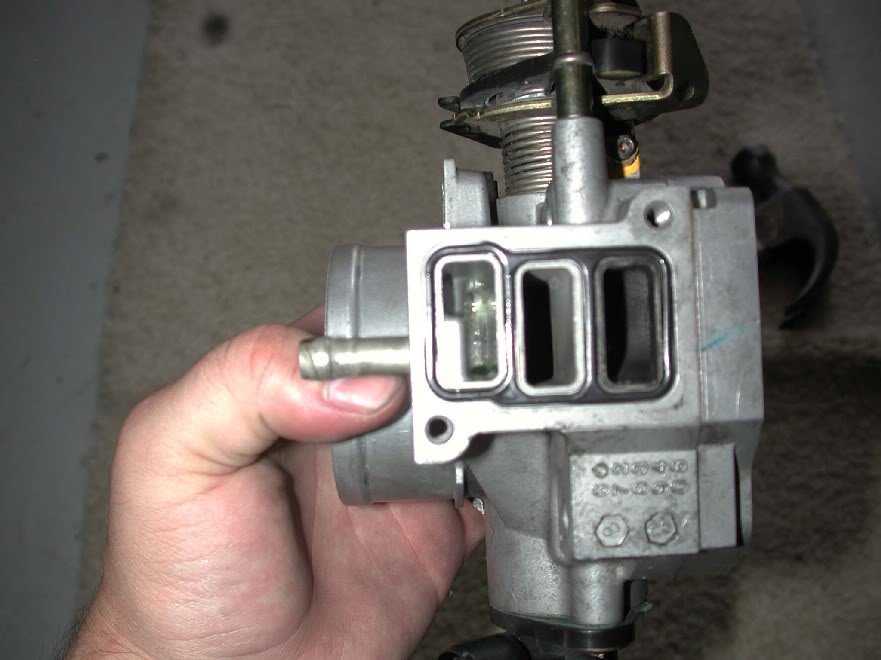
This is just so you all can see what the throttle body underside looks like with out the ICV attached.
The ICV has two special �Honda� 5-point screws that require a special tool to remove.
WARNING: YOU DO NOT NEED TO REMOVE THE TWO PIECES FOR ANY REPAIR AS YOU CANNOT BUY EACH PART SEPARATELY. I did it just to see what it looked like since I was going to have to get a new one anyway. I used a dremel tool to slice some slots where I could fit a regular head screwdriver to unscrew them (FU Honda )
This is the mechanical portion of the valve that is inserted into the electrical part.
This is the magnetic electrical part of the valve.
Oh and don�t forget to remove/replace the throttle body gasket (about $1.50) should it break apart when removing the throttle body. This is what you will need the razor blade for, to scrap off the remains of the gasket.
Well that�s all there is to it. When I did it the first time (when I just cleaned out the valve to see if that worked) it took about 1-2 hours since I was making sure I had everything removed and I new exactly how to replace everything I was removing and just generally taking my slow ass time. When I did it again to replace the ICV, it took about 30-40 minutes total.
Nice DIY... my car idles roughly too... 750rpms and then drops to 500rpms shrudders and brings the rpms up again... do I need to clean out or replace my ICV? 2.3
You saved me. I'm glad I did a search on this. My car was idling at 1000-1500 rpms. This whole time I was looking for a hose leak. Props to you man. Havent seen you around though....
You saved me. I'm glad I did a search on this. My car was idling at 1000-1500 rpms. This whole time I was looking for a hose leak. Props to you man. Havent seen you around though....
I hope everything goes smoothly. Let me know if you have any problems.
you are the fling man, i'm about to do this. Do you have the part # For the IACV by any chance?
Also what was your car doing. WHen i'm at a stop it goes from 250-0 rpms and bounces back in forth, w/ the A/C off it sits at about 250
Sorry for getting back to replying to this thread so late.
Anyway, the part number I got may be different for at Acura parts store, since I went to the Honda dealer to get it for the 98-01 accord engine. Let me know if you still need the part #.
The car at idle would rev on its own, going from around 1000 rpms to 2500 rpms, as if a ghost was pushing down on the gas and letting it go, over and over.
Nice DIY... my car idles roughly too... 750rpms and then drops to 500rpms shrudders and brings the rpms up again... do I need to clean out or replace my ICV? 2.3
Doesn't seem like the same problem. That may be cause for just a tune up.
The car at idle would rev on its own, going from around 1000 rpms to 2500 rpms, as if a ghost was pushing down on the gas and letting it go, over and over.
my car is doing this now too after i cleaned the IAC... so jsut replace with a new one and it will fix it?
great diy, thank you!
couldnt have fixed mine without this!
i didnt have to disconnect the throttle cables, im not sure why i was supposed to do that. but anyway, car's running fine now.
thanks again
Hey don't mean to bring up a very old thread, but I wanted to thank JoeSmoe, who probably isn't even active here anymore for the great and informative post. I was able to do this job in the morning with the help of the store manager at my local Kragen who helped remove the screws that were holding the IAC valve to the throttle body with an impact wrench. My car is sooooo smooth now. At idle and with the A/C off, my car has no vibration what so ever, it really does feel brand new again. Thats all, thanks Joe!
Oh one more thing, please make sure to install your IAC the right direction, I reversed it and ended up sucking coolant into the engine, causing a large plume of white smoke to come out of the back of my car and also annoying my neighbors at the same time
I had the same symptons of idle searching or low with the A/C on. Idle was fine with the A/C off. So I just ordered and got a new IAC and starting removing the Throttle Body and found the IAC is only held on by 2 Phillips screws but they are facing down, I used a Phillips head socket on a ratchet and with a little help from a mirror to locate the screw heads I was able to remove the IAC without removing the throttle body. I did use a toothbrush to partially clean the ports where the IAC connects to the Throttle Body.
Thanks this went smooth with these instructions, I removed the throttle body to remove the IAC Valve, so order a new spacer for it! Once all that was removed it was real easy to get to the Thermostat, so I replaced that at the same time. My 1997 3.0 CL has 243k and still runs good!
thanks joeshmoe
your thread took the anxiety i had away
replaced my air idle control valve in about an hour , taking my time.
also replaced the vehicle speed sensor ($17 of internet)
which was causing a transmission trouble code (4 short pulses of the d-4 light when i jumped the code reader connector thingy)
some local jdm mechanic told my my tranny was going out and it was just a 17 dollar sensor that took 10 minutes to replace.
I KNOW old thread but the screws to my IAC were on their sooo tight i don't think they have been changed since the car left the factory. Not even with liquid wrench and a drill could i remove it.. so i just sprayed carb clean through whatever openings i could see. I didn't have a constant error code it popped up once and despaired but still decided to clean that and the IM.
for future reference is there another way to remove the two screws that connect the IAC to TB?
I just had an issue getting my IACV off today. This is for anyone having trouble with screws or nuts that won't come off. From all I've read and actually applied, these are important notes about dealing with stuck things:
.Use some sort of rust penetrating solvent before attampting. I use PB Blaster. Trizol, Liquid Wrench, WD-40, use something to help break up the seizing rust. This can save you loads of trouble.
.Use the correct size screwdriver or bit. Epsecially when it comes to Phillips head screws, the right size or tip makes the difference between easily getting it out or stripping the inside of the screw. I halfway stripped my IACV screws, but using a larger bit saved me. These had been removed before, and I knew they needed way more force than before, but as long as the bit is a perfect fit, there's no need to fear.
.Don't just guess sizes with bolts and nuts. Know if you're dealing with Metric or Standard. Using a close-enough socket may very well strip a nut or bolt.
.If there's no other hope for the screw and it's stripped/stuck, you can use a hacksaw or dremel tool to cut a straight line across the top, like you're carving in the diameter. Then you can use a large flathead screwdriver to unscrew it. It's up to you to replace the screws with new ones.
.If you have a stripped nut, especially in a hard to get around place (like intake plenum/manifold bolts or nuts), you can hammer in a slightly smaller sized socket which will actually shave and carve out for you 6 new sides (use a 6-sided socket, not the multi-point ones). That socket should be stuck well enough to turn the nut or bolt out. I've done this using the closest but slightly smaller Standard socket for a Metric strippled nut. You will have to replace the nut or bolt after you get it out. Most are easily found at hardware stores or auto stores.
.If you have the space and clearance, use a file to shape 6 new sides to a stipped nut or bolt, then use whatever size socket will fit to turnn it out. This will also mean replacing the nut or bolt.
I hope this helps when you come across the inevitable problem-child screw, bolt, or nut.
Hey guys does anyone have any idea how to remove the throttle body? I think I removed all of the bolts but the part still feels seized to the manifold. I sprayed it with anti seize at the seam and gave it several tugs. See picture. I removed two lower bolts and the nuts on the studs.
Hey guys does anyone have any idea how to remove the throttle body? I think I removed all of the bolts but the part still feels seized to the manifold. I sprayed it with anti seize at the seam and gave it several tugs. See picture. I removed two lower bolts and the nuts on the studs.
Hello tmaschm, it's been months but have you gotten the throttle body out?
Excellent instructions !!!! Probably the best I have seen in a long time.
We have a 2001 TL that cranked but had a hard time starting. After it started it ran and started fine until the next day. Then the same cranking but hard start happened again.
Followed your instructions exactly. The IAC valve looked like your valve too. I took it apart and cleaned it as you did. Put it all back together, but it didn't help. I started with a P1676 code which led me to the IAC valve. Now I got a P0505 code… I’m thinking it might be the electronic portion of the IAC valve. Any thoughts?
I know this is super old but question on the last pic of first post. What hose is that and what is the connector? We bought the throttle body but it did not come with small metal connector.
I know this is super old but question on the last pic of first post. What hose is that and what is the connector? We bought the throttle body but it did not come with small metal connector.
 07-08-2004, 04:19 PM
 ).
).
 )
)
 )
)


 Great pics, I'll use this to install my outlaw engineering thermoblok tb spacer.


